
使用圖形處理器 (GPU) 執行機器學習 (ML) 模型 可大幅改善模型成效和使用者體驗 您的機器學習應用程式在 iOS 裝置上,您可以啟用 透過 GPU 加速執行模型 委派代表。委派代表擔任下列硬體的驅動程式 LiteRT 可讓您在 GPU 處理器上執行模型的程式碼。
本頁面說明如何在以下位置啟用 LiteRT 模型的 GPU 加速功能: iOS 應用程式。如要進一步瞭解 LiteRT 適用的 GPU 委派功能, 包括最佳做法和進階技術,請參閱 GPU 資源 委派代表。
將 GPU 與 解譯 er API 搭配使用
LiteRT 翻譯工具 API 提供了一組 以建構機器學習應用程式下列 操作說明,引導您為 iOS 應用程式新增 GPU 支援。本指南 假設您已有可成功執行機器學習模型的 iOS 應用程式 。
修改 Podfile 以納入 GPU 支援
從 LiteRT 2.3.0 版開始,系統會排除 GPU 委派
縮減二進位檔的大小如要納入這類目標對象,請指定
TensorFlowLiteSwift Pod 的子規格:
pod 'TensorFlowLiteSwift/Metal', '~> 0.0.1-nightly',
或
pod 'TensorFlowLiteSwift', '~> 0.0.1-nightly', :subspecs => ['Metal']
您也可以使用 TensorFlowLiteObjC 或 TensorFlowLiteC
Objective-C (適用於 2.4.0 版及更新版本),或 C API。
初始化及使用 GPU 委派
您可以透過 LiteRT 解譯器使用 GPU 委派功能 包含多種程式設計的 API 語言。建議使用 Swift 和 Objective-C,但您也可以使用 C++ 和 C:如果您使用的是舊版 LiteRT,則必須使用 C 而非 2.4以下程式碼範例概略說明如何使用委派功能
Swift
import TensorFlowLite

// Load model ...

// Initialize LiteRT interpreter with the GPU delegate.
let delegate = MetalDelegate()
if let interpreter = try Interpreter(modelPath: modelPath,
                                      delegates: [delegate]) {
  // Run inference ...
}
Objective-C
// Import module when using CocoaPods with module support
@import TFLTensorFlowLite;

// Or import following headers manually
#import "tensorflow/lite/objc/apis/TFLMetalDelegate.h"
#import "tensorflow/lite/objc/apis/TFLTensorFlowLite.h"

// Initialize GPU delegate
TFLMetalDelegate* metalDelegate = [[TFLMetalDelegate alloc] init];

// Initialize interpreter with model path and GPU delegate
TFLInterpreterOptions* options = [[TFLInterpreterOptions alloc] init];
NSError* error = nil;
TFLInterpreter* interpreter = [[TFLInterpreter alloc]
                                initWithModelPath:modelPath
                                          options:options
                                        delegates:@[ metalDelegate ]
                                            error:&error];
if (error != nil) { /* Error handling... */ }

if (![interpreter allocateTensorsWithError:&error]) { /* Error handling... */ }
if (error != nil) { /* Error handling... */ }

// Run inference ...
C++
// Set up interpreter.
auto model = FlatBufferModel::BuildFromFile(model_path);
if (!model) return false;
tflite::ops::builtin::BuiltinOpResolver op_resolver;
std::unique_ptr<Interpreter> interpreter;
InterpreterBuilder(*model, op_resolver)(&interpreter);

// Prepare GPU delegate.
auto* delegate = TFLGpuDelegateCreate(/*default options=*/nullptr);
if (interpreter->ModifyGraphWithDelegate(delegate) != kTfLiteOk) return false;

// Run inference.
WriteToInputTensor(interpreter->typed_input_tensor<float>(0));
if (interpreter->Invoke() != kTfLiteOk) return false;
ReadFromOutputTensor(interpreter->typed_output_tensor<float>(0));

// Clean up.
TFLGpuDelegateDelete(delegate);
C (2.4.0 之前)
#include "tensorflow/lite/c/c_api.h"
#include "tensorflow/lite/delegates/gpu/metal_delegate.h"

// Initialize model
TfLiteModel* model = TfLiteModelCreateFromFile(model_path);

// Initialize interpreter with GPU delegate
TfLiteInterpreterOptions* options = TfLiteInterpreterOptionsCreate();
TfLiteDelegate* delegate = TFLGPUDelegateCreate(nil);  // default config
TfLiteInterpreterOptionsAddDelegate(options, metal_delegate);
TfLiteInterpreter* interpreter = TfLiteInterpreterCreate(model, options);
TfLiteInterpreterOptionsDelete(options);

TfLiteInterpreterAllocateTensors(interpreter);

NSMutableData *input_data = [NSMutableData dataWithLength:input_size * sizeof(float)];
NSMutableData *output_data = [NSMutableData dataWithLength:output_size * sizeof(float)];
TfLiteTensor* input = TfLiteInterpreterGetInputTensor(interpreter, 0);
const TfLiteTensor* output = TfLiteInterpreterGetOutputTensor(interpreter, 0);

// Run inference
TfLiteTensorCopyFromBuffer(input, inputData.bytes, inputData.length);
TfLiteInterpreterInvoke(interpreter);
TfLiteTensorCopyToBuffer(output, outputData.mutableBytes, outputData.length);

// Clean up
TfLiteInterpreterDelete(interpreter);
TFLGpuDelegateDelete(metal_delegate);
TfLiteModelDelete(model);
GPU API 語言使用注意事項
- 2.4.0 以下版本的 LiteRT 只能用於將 C API 用於 Objective-C:
- 只有在使用 bazel 或建構 TensorFlow 時,才能使用 C++ API 輕而易舉C++ API 無法與 CocoaPods 搭配使用。
- 將 LiteRT 與 C++ 委派搭配使用時,取得 GPU
透過
TFLGpuDelegateCreate()函式委派,然後再傳遞至Interpreter::ModifyGraphWithDelegate(),不再撥打電話Interpreter::AllocateTensors()。
使用發布模式建構及測試
改用適當的 Metal API 加速器設定的發布子版本: 成效更佳並進行最終測試本節說明如何 啟用發布子版本並設定「金屬加速」功能的設定。
如要變更為發布子版本,請按照下列步驟操作:
- 選取 產品 >,編輯建構設定配置 >編輯配置... 然後選取「執行」。
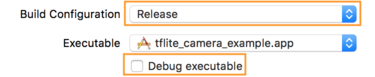
- 在「Info」分頁中,將「Build Configuration」變更為「Release」,然後
取消勾選「偵錯執行檔」。
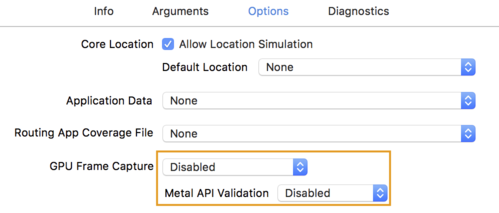
- 按一下「Options」分頁標籤,然後將「GPU Frame Capture」變更為「Disabled」。
和「Metal API Validation」設為「Disabled」。
- 請務必選取採用 64 位元架構的「僅限發布版本」。低於
專案導覽工具 >tflite_camera_example >專案 ><您的專案名稱> >
版本設定設定僅建構使用中的架構>發布:
可以。

進階 GPU 支援
本節說明 iOS 適用的 GPU 委派功能的進階用法,包括 委派選項、輸入和輸出緩衝區,以及量化模型的使用。
iOS 的委派選項
GPU 委派的建構函式接受 Swift 中的 struct 選項
API
Objective-C
API,
和 C
API 來建構應用程式。
將 nullptr (C API) 傳遞至
Initializer 會設定預設選項 (如需基本使用說明,請前往
範例)。
Swift
// THIS:
var options = MetalDelegate.Options()
options.isPrecisionLossAllowed = false
options.waitType = .passive
options.isQuantizationEnabled = true
let delegate = MetalDelegate(options: options)

// IS THE SAME AS THIS:
let delegate = MetalDelegate()
Objective-C
// THIS:
TFLMetalDelegateOptions* options = [[TFLMetalDelegateOptions alloc] init];
options.precisionLossAllowed = false;
options.waitType = TFLMetalDelegateThreadWaitTypePassive;
options.quantizationEnabled = true;

TFLMetalDelegate* delegate = [[TFLMetalDelegate alloc] initWithOptions:options];

// IS THE SAME AS THIS:
TFLMetalDelegate* delegate = [[TFLMetalDelegate alloc] init];
C
// THIS:
const TFLGpuDelegateOptions options = {
  .allow_precision_loss = false,
  .wait_type = TFLGpuDelegateWaitType::TFLGpuDelegateWaitTypePassive,
  .enable_quantization = true,
};

TfLiteDelegate* delegate = TFLGpuDelegateCreate(options);

// IS THE SAME AS THIS:
TfLiteDelegate* delegate = TFLGpuDelegateCreate(nullptr);
使用 C++ API 的輸入/輸出緩衝區
GPU 上的運算作業需要資料才能提供給 GPU。這個 這通常意味著您必須執行記憶體複本。建議您避免 導致資料超過 CPU/GPU 記憶體邊界 投入大量時間處理資料這種跨越通常無法避免,但在某些情況下 這兩種特殊情況可以省略
如果網路的輸入是已載入 GPU 記憶體的映像檔 (適用於 例如含有相機畫面的 GPU 紋理),這類紋理可保留在 GPU 記憶體中 不必進入 CPU 記憶體同樣地,如果網路輸出位於 圖片的可轉譯格式,例如圖片樣式 轉移 作業,即可直接在畫面上顯示結果。
為達到最佳效能,LRT 能讓使用者 直接讀取和寫入 TensorFlow 硬體緩衝區,並略過 避免產生記憶體的副本
假設圖片輸入內容位於 GPU 記憶體中,您必須先將輸入內容轉換為
MTLBuffer 物件 (金屬)。您可以將 TfLiteTensor 與
運用 TFLGpuDelegateBindMetalBufferToTensor() 為使用者提供預先準備的 MTLBuffer
函式。請注意,這個函式「必須」在
Interpreter::ModifyGraphWithDelegate()。此外,推論輸出內容
預設會從 GPU 記憶體複製到 CPU 記憶體您可以停用
撥打 Interpreter::SetAllowBufferHandleOutput(true)
和初始化。
C++
#include "tensorflow/lite/delegates/gpu/metal_delegate.h"
#include "tensorflow/lite/delegates/gpu/metal_delegate_internal.h"

// ...

// Prepare GPU delegate.
auto* delegate = TFLGpuDelegateCreate(nullptr);

if (interpreter->ModifyGraphWithDelegate(delegate) != kTfLiteOk) return false;

interpreter->SetAllowBufferHandleOutput(true);  // disable default gpu->cpu copy
if (!TFLGpuDelegateBindMetalBufferToTensor(
        delegate, interpreter->inputs()[0], user_provided_input_buffer)) {
  return false;
}
if (!TFLGpuDelegateBindMetalBufferToTensor(
        delegate, interpreter->outputs()[0], user_provided_output_buffer)) {
  return false;
}

// Run inference.
if (interpreter->Invoke() != kTfLiteOk) return false;
關閉預設行為後,複製 GPU 的推論輸出內容
需要明確呼叫
每個輸出張量的 Interpreter::EnsureTensorDataIsReadable()。這個
量化模型也適用,但您仍須使用
具有 float32 資料的 float32 大小緩衝區,因為這個緩衝區會繫結至
內部去量化緩衝區。
量化模型
iOS GPU 委派程式庫預設支援量化模型。你不需要 就必須先修改程式碼,才能搭配 GPU 委派使用量化模型。 下一節將說明如何停用量化支援功能,以用於測試、 實驗用途
停用量化模型支援功能
以下程式碼顯示如何停用量化模型的支援功能。
Swift
    var options = MetalDelegate.Options()
    options.isQuantizationEnabled = false
    let delegate = MetalDelegate(options: options)
Objective-C
    TFLMetalDelegateOptions* options = [[TFLMetalDelegateOptions alloc] init];
    options.quantizationEnabled = false;
C
    TFLGpuDelegateOptions options = TFLGpuDelegateOptionsDefault();
    options.enable_quantization = false;

    TfLiteDelegate* delegate = TFLGpuDelegateCreate(options);
如要進一步瞭解如何使用 GPU 加速功能執行量化模型,請參閱 GPU 委派總覽。