
각 계산기는 그래프의 노드입니다. 새로운 계산기를 만드는 방법, 계산기를 초기화하는 방법, 계산을 실행하는 방법, 입력 및 출력 스트림, 타임스탬프, 옵션을 설명합니다. 그래프의 각 노드는 Calculator로 구현됩니다. 대부분의 그래프 실행은 계산기 내에서 이루어집니다. 계산기는 0개 이상의 입력 스트림 또는 사이드 패킷을 수신할 수 있으며, 0개 이상의 출력 스트림 또는 사이드 패킷을 생성할 수 있습니다.
CalculatorBase
계산기는 CalculatorBase 클래스의 새 서브클래스를 정의하고 여러 메서드를 구현하며 Mediapipe에 새 서브클래스를 등록하여 만들어집니다. 새 계산기는 최소한 아래 네 가지 메서드를 구현해야 합니다.
GetContract()- 계산기 작성자는 GetContract()에서 계산기의 예상 입력 및 출력 유형을 지정할 수 있습니다. 그래프가 초기화되면 프레임워크는 정적 메서드를 호출하여 연결된 입력 및 출력의 패킷 유형이 이 사양의 정보와 일치하는지 확인합니다.
Open()- 그래프가 시작되면 프레임워크는
Open()를 호출합니다. 이 시점에서 입력 사이드 패킷은 계산기에서 사용할 수 있습니다.Open()는 노드 구성 연산 (그래프 참고)을 해석하고 계산기의 그래프 실행당 상태를 준비합니다. 이 함수는 계산기 출력에 패킷을 쓸 수도 있습니다.Open()중에 오류가 발생하면 그래프 실행이 종료될 수 있습니다.
- 그래프가 시작되면 프레임워크는
Process()- 입력이 있는 계산기의 경우 프레임워크는 하나 이상의 입력 스트림에 사용 가능한 패킷이 있을 때마다
Process()를 반복적으로 호출합니다. 프레임워크는 기본적으로 모든 입력의 타임스탬프가 동일하도록 보장합니다 (자세한 내용은 동기화 참고). 병렬 실행이 사용 설정되면 여러Process()호출을 동시에 호출할 수 있습니다.Process()중에 오류가 발생하면 프레임워크는Close()를 호출하고 그래프 실행이 종료됩니다.
- 입력이 있는 계산기의 경우 프레임워크는 하나 이상의 입력 스트림에 사용 가능한 패킷이 있을 때마다
Close()- 모든
Process()호출이 완료되거나 모든 입력 스트림이 종료된 후 프레임워크는Close()를 호출합니다. 이 함수는Open()가 호출되어 성공하고 그래프 실행이 오류로 인해 종료된 경우에도 항상 호출됩니다.Close()중에는 입력 스트림을 통해 입력을 사용할 수 없지만 입력 측 패킷에 계속 액세스할 수 있으므로 출력을 쓸 수 있습니다.Close()가 반환되면 계산기는 데드 노드로 간주됩니다. 계산기 객체는 그래프 실행이 완료되는 즉시 삭제됩니다.
- 모든
다음은 CalculatorBase.h의 코드 스니펫입니다.
class CalculatorBase {
 public:
  ...

  // The subclasses of CalculatorBase must implement GetContract.
  // ...
  static absl::Status GetContract(CalculatorContract* cc);

  // Open is called before any Process() calls, on a freshly constructed
  // calculator.  Subclasses may override this method to perform necessary
  // setup, and possibly output Packets and/or set output streams' headers.
  // ...
  virtual absl::Status Open(CalculatorContext* cc) {
    return absl::OkStatus();
  }

  // Processes the incoming inputs. May call the methods on cc to access
  // inputs and produce outputs.
  // ...
  virtual absl::Status Process(CalculatorContext* cc) = 0;

  // Is called if Open() was called and succeeded.  Is called either
  // immediately after processing is complete or after a graph run has ended
  // (if an error occurred in the graph).  ...
  virtual absl::Status Close(CalculatorContext* cc) {
    return absl::OkStatus();
  }

  ...
};
계산기의 일생
MediaPipe 그래프를 초기화하는 동안 프레임워크는 GetContract() 정적 메서드를 호출하여 어떤 종류의 패킷이 예상되는지 확인합니다.
프레임워크는 각 그래프 실행에 대해 전체 계산기를 구성하고 소멸시킵니다(예: 동영상당 한 번 또는 이미지당 한 번). 그래프 실행에서 고비용이나 큰 객체는 이후 실행에서 계산이 반복되지 않도록 입력 측 패킷으로 제공되어야 합니다.
초기화 후에는 그래프를 실행할 때마다 다음 순서가 발생합니다.
Open()Process()(반복)Close()
프레임워크는 Open()를 호출하여 계산기를 초기화합니다. Open()는 모든 옵션을 해석하고 계산기의 그래프 실행당 상태를 설정합니다. Open()는 입력 측 패킷을 가져오고 계산기 출력에 패킷을 쓸 수 있습니다. 적절한 경우 SetOffset()를 호출하여 입력 스트림의 잠재적 패킷 버퍼링을 줄여야 합니다.
Open() 또는 Process() 중에 오류가 발생하면 (이러한 오류 중 하나가 Ok가 아닌 상태를 반환하는 것으로 표시됨) 계산기의 메서드를 더 이상 호출하지 않고 그래프 실행이 종료되고 계산기가 삭제됩니다.
입력이 있는 계산기의 경우 프레임워크는 하나 이상의 입력에 사용 가능한 패킷이 있을 때마다 Process()를 호출합니다. 프레임워크는 모든 입력의 타임스탬프가 동일하고 Process()를 호출할 때마다 타임스탬프가 증가하며 모든 패킷이 전달되도록 보장합니다. 따라서 Process()이 호출될 때 일부 입력에는 패킷이 없을 수 있습니다. 패킷이 누락된 입력이 빈 패킷을 생성하는 것으로 보입니다 (타임스탬프 없음).
프레임워크는 모든 Process() 호출 후에 Close()를 호출합니다. 모든 입력이 소진되지만 Close()는 입력 측 패킷에 액세스할 수 있으며 출력을 작성할 수 있습니다. Close가 반환되면 계산기가 제거됩니다.
입력이 없는 계산기를 소스라고 합니다. 소스 계산기는 Ok 상태를 반환하는 한 Process()를 계속 호출합니다. 소스 계산기는 중지 상태(예: mediaPipe::tool::StatusStop())를 반환하여 소진되었음을 나타냅니다.
입력 및 출력 식별
계산기의 공개 인터페이스는 입력 스트림과 출력 스트림 집합으로 구성됩니다. CalculatorGraphConfiguration에서 일부 계산기의 출력은 이름이 지정된 스트림을 사용하여 다른 계산기의 입력에 연결됩니다. 스트림 이름은 일반적으로 소문자이지만 입력 및 출력 태그는 일반적으로 대문자입니다. 아래 예시에서 태그 이름이 VIDEO인 출력은 video_stream라는 스트림을 사용하여 태그 이름이 VIDEO_IN인 입력에 연결됩니다.
# Graph describing calculator SomeAudioVideoCalculator
node {
  calculator: "SomeAudioVideoCalculator"
  input_stream: "INPUT:combined_input"
  output_stream: "VIDEO:video_stream"
}
node {
  calculator: "SomeVideoCalculator"
  input_stream: "VIDEO_IN:video_stream"
  output_stream: "VIDEO_OUT:processed_video"
}
입력 및 출력 스트림은 색인 번호, 태그 이름 또는 태그 이름과 색인 번호의 조합으로 식별할 수 있습니다. 아래 예에서 입력 및 출력 식별자의 몇 가지 예를 확인할 수 있습니다. SomeAudioVideoCalculator는 태그로 동영상 출력을 식별하고 태그와 색인의 조합으로 오디오 출력을 식별합니다. VIDEO 태그가 있는 입력은 video_stream라는 스트림에 연결됩니다. 태그 AUDIO와 색인이 0 및 1인 출력은 audio_left 및 audio_right라는 스트림에 연결됩니다.
SomeAudioCalculator는 색인으로만 오디오 입력을 식별합니다 (태그 필요 없음).
# Graph describing calculator SomeAudioVideoCalculator
node {
  calculator: "SomeAudioVideoCalculator"
  input_stream: "combined_input"
  output_stream: "VIDEO:video_stream"
  output_stream: "AUDIO:0:audio_left"
  output_stream: "AUDIO:1:audio_right"
}

node {
  calculator: "SomeAudioCalculator"
  input_stream: "audio_left"
  input_stream: "audio_right"
  output_stream: "audio_energy"
}
계산기 구현에서는 입력과 출력도 태그 이름과 색인 번호로 식별됩니다. 아래 함수에서 입력과 출력이 식별됩니다.
- 색인 번호 기준: 결합된 입력 스트림은 단순히 색인
0로 식별됩니다. - 태그 이름별: 동영상 출력 스트림은 태그 이름 'VIDEO'로 식별됩니다.
- 태그 이름 및 색인 번호 기준: 출력 오디오 스트림은 태그 이름
AUDIO와 색인 번호0및1의 조합으로 식별됩니다.
// c++ Code snippet describing the SomeAudioVideoCalculator GetContract() method
class SomeAudioVideoCalculator : public CalculatorBase {
 public:
  static absl::Status GetContract(CalculatorContract* cc) {
    cc->Inputs().Index(0).SetAny();
    // SetAny() is used to specify that whatever the type of the
    // stream is, it's acceptable.  This does not mean that any
    // packet is acceptable.  Packets in the stream still have a
    // particular type.  SetAny() has the same effect as explicitly
    // setting the type to be the stream's type.
    cc->Outputs().Tag("VIDEO").Set<ImageFrame>();
    cc->Outputs().Get("AUDIO", 0).Set<Matrix>();
    cc->Outputs().Get("AUDIO", 1).Set<Matrix>();
    return absl::OkStatus();
  }
처리
비소스 노드에서 호출되는 Process()는 모두 잘 진행되었음을 나타내기 위해 absl::OkStatus()를 반환하거나 오류를 알리기 위해 다른 상태 코드를 반환해야 합니다.
비소스 계산기가 tool::StatusStop()를 반환하면 그래프가 조기에 취소되고 있음을 나타냅니다. 이 경우 모든 소스 계산기와 그래프 입력 스트림이 닫히고 나머지 패킷이 그래프를 통해 전파됩니다.
그래프의 소스 노드는 absl::OkStatus(를 반환하는 한 Process()를 계속 호출합니다. 생성할 데이터가 더 이상 없음을 나타내려면 tool::StatusStop()를 반환합니다. 다른 상태는 모두 오류가 발생했음을 나타냅니다.
Close()는 absl::OkStatus()를 반환하여 성공을 나타냅니다. 다른 상태는 모두 실패를 나타냅니다.
다음은 기본적인 Process() 함수입니다. Input() 메서드 (계산기에 단일 입력이 있는 경우에만 사용 가능)를 사용하여 입력 데이터를 요청합니다. 그런 다음 std::unique_ptr를 사용하여 출력 패킷에 필요한 메모리를 할당하고 계산을 수행합니다. 완료되면 출력 스트림에 포인터를 추가할 때 포인터를 해제합니다.
absl::Status MyCalculator::Process() {
  const Matrix& input = Input()->Get<Matrix>();
  std::unique_ptr<Matrix> output(new Matrix(input.rows(), input.cols()));
  // do your magic here....
  //    output->row(n) =  ...
  Output()->Add(output.release(), InputTimestamp());
  return absl::OkStatus();
}
계산기 옵션
계산기는 (1) 입력 스트림 패킷 (2) 입력 측 패킷 및 (3) 계산기 옵션을 통해 처리 매개변수를 허용합니다. 계산기 옵션은 지정된 경우 CalculatorGraphConfiguration.Node 메시지의 node_options 필드에 리터럴 값으로 표시됩니다.
  node {
    calculator: "TfLiteInferenceCalculator"
    input_stream: "TENSORS:main_model_input"
    output_stream: "TENSORS:main_model_output"
    node_options: {
      [type.googleapis.com/mediapipe.TfLiteInferenceCalculatorOptions] {
        model_path: "mediapipe/models/detection_model.tflite"
      }
    }
  }
node_options 필드는 proto3 문법을 허용합니다. 또는 proto2 구문을 사용하여 options 필드에 계산기 옵션을 지정할 수 있습니다.
  node {
    calculator: "TfLiteInferenceCalculator"
    input_stream: "TENSORS:main_model_input"
    output_stream: "TENSORS:main_model_output"
    node_options: {
      [type.googleapis.com/mediapipe.TfLiteInferenceCalculatorOptions] {
        model_path: "mediapipe/models/detection_model.tflite"
      }
    }
  }
일부 계산기는 계산기 옵션을 지원하지 않습니다. 옵션을 수락하기 위해 계산기는 일반적으로 옵션을 나타내는 새로운 protobuf 메시지 유형(예: PacketClonerCalculatorOptions)을 정의합니다. 그러면 계산기가 CalculatorBase::Open 메서드에서, 그리고 CalculatorBase::GetContract 함수나 CalculatorBase::Process 메서드에서도 protobuf 메시지를 읽습니다. 일반적으로 새 protobuf 메시지 유형은 '.proto' 파일과 mediapipe_proto_library() 빌드 규칙을 사용하여 protobuf 스키마로 정의됩니다.
  mediapipe_proto_library(
      name = "packet_cloner_calculator_proto",
      srcs = ["packet_cloner_calculator.proto"],
      visibility = ["//visibility:public"],
      deps = [
          "//mediapipe/framework:calculator_options_proto",
          "//mediapipe/framework:calculator_proto",
      ],
  )
예시 계산기
이 섹션에서는 비교적 간단한 작업을 실행하며 많은 계산기 그래프에 사용되는 PacketClonerCalculator의 구현에 관해 설명합니다.
PacketClonerCalculator는 요청 시 최근 입력 패킷의 사본을 생성합니다.
PacketClonerCalculator는 도착하는 데이터 패킷의 타임스탬프가 완벽하게 정렬되지 않은 경우에 유용합니다. 마이크, 조도 센서, 감각 데이터를 수집하는 비디오 카메라를 갖춘 방이 있다고 가정해 보겠습니다. 각 센서는 독립적으로 작동하며 간헐적으로 데이터를 수집합니다. 각 센서의 출력이 다음과 같다고 가정해 보겠습니다.
- 마이크 = 방 안의 소리 크기(데시벨 단위)(정수)
- 조도 센서 = 방의 밝기 (정수)
- 비디오 카메라 = 방의 RGB 이미지 프레임 (ImageFrame)
간단한 인식 파이프라인은 이러한 3가지 센서의 감각 데이터를 처리하도록 설계되었으며, 이렇게 하면 카메라의 이미지 프레임 데이터가 마지막으로 수집된 마이크 음량 데이터 및 광 센서 밝기 데이터와 동기화될 수 있습니다. MediaPipe를 사용하여 이를 수행하기 위한 인식 파이프라인에는 3개의 입력 스트림이 있습니다.
- room_mic_signal - 이 입력 스트림의 각 데이터 패킷은 타임스탬프가 있는 방의 오디오 볼륨을 나타내는 정수 데이터입니다.
- room_lightening_sensor - 이 입력 스트림의 각 데이터 패킷은 타임스탬프로 비추는 방의 밝기를 나타내는 정수 데이터입니다.
- room_video_tick_signal - 이 입력 스트림의 각 데이터 패킷은 타임스탬프가 있는 방의 카메라에서 수집된 동영상을 나타내는 동영상 데이터의 이미지 프레임입니다.
다음은 PacketClonerCalculator의 구현입니다. GetContract(), Open(), Process() 메서드와 최신 입력 패킷을 보유한 인스턴스 변수 current_를 확인할 수 있습니다.
// This takes packets from N+1 streams, A_1, A_2, ..., A_N, B.
// For every packet that appears in B, outputs the most recent packet from each
// of the A_i on a separate stream.

#include <vector>

#include "absl/strings/str_cat.h"
#include "mediapipe/framework/calculator_framework.h"

namespace mediapipe {

// For every packet received on the last stream, output the latest packet
// obtained on all other streams. Therefore, if the last stream outputs at a
// higher rate than the others, this effectively clones the packets from the
// other streams to match the last.
//
// Example config:
// node {
//   calculator: "PacketClonerCalculator"
//   input_stream: "first_base_signal"
//   input_stream: "second_base_signal"
//   input_stream: "tick_signal"
//   output_stream: "cloned_first_base_signal"
//   output_stream: "cloned_second_base_signal"
// }
//
class PacketClonerCalculator : public CalculatorBase {
 public:
  static absl::Status GetContract(CalculatorContract* cc) {
    const int tick_signal_index = cc->Inputs().NumEntries() - 1;
    // cc->Inputs().NumEntries() returns the number of input streams
    // for the PacketClonerCalculator
    for (int i = 0; i < tick_signal_index; ++i) {
      cc->Inputs().Index(i).SetAny();
      // cc->Inputs().Index(i) returns the input stream pointer by index
      cc->Outputs().Index(i).SetSameAs(&cc->Inputs().Index(i));
    }
    cc->Inputs().Index(tick_signal_index).SetAny();
    return absl::OkStatus();
  }

  absl::Status Open(CalculatorContext* cc) final {
    tick_signal_index_ = cc->Inputs().NumEntries() - 1;
    current_.resize(tick_signal_index_);
    // Pass along the header for each stream if present.
    for (int i = 0; i < tick_signal_index_; ++i) {
      if (!cc->Inputs().Index(i).Header().IsEmpty()) {
        cc->Outputs().Index(i).SetHeader(cc->Inputs().Index(i).Header());
        // Sets the output stream of index i header to be the same as
        // the header for the input stream of index i
      }
    }
    return absl::OkStatus();
  }

  absl::Status Process(CalculatorContext* cc) final {
    // Store input signals.
    for (int i = 0; i < tick_signal_index_; ++i) {
      if (!cc->Inputs().Index(i).Value().IsEmpty()) {
        current_[i] = cc->Inputs().Index(i).Value();
      }
    }

    // Output if the tick signal is non-empty.
    if (!cc->Inputs().Index(tick_signal_index_).Value().IsEmpty()) {
      for (int i = 0; i < tick_signal_index_; ++i) {
        if (!current_[i].IsEmpty()) {
          cc->Outputs().Index(i).AddPacket(
              current_[i].At(cc->InputTimestamp()));
          // Add a packet to output stream of index i a packet from inputstream i
          // with timestamp common to all present inputs
        } else {
          cc->Outputs().Index(i).SetNextTimestampBound(
              cc->InputTimestamp().NextAllowedInStream());
          // if current_[i], 1 packet buffer for input stream i is empty, we will set
          // next allowed timestamp for input stream i to be current timestamp + 1
        }
      }
    }
    return absl::OkStatus();
  }

 private:
  std::vector<Packet> current_;
  int tick_signal_index_;
};

REGISTER_CALCULATOR(PacketClonerCalculator);
}  // namespace mediapipe
일반적으로 계산기에는 .cc 파일만 있습니다. mediapipe는 등록을 사용하여 계산기를 알려주므로 .h가 필요하지 않습니다. 계산기 클래스를 정의한 후 매크로 호출(REGISTER_CALCULATOR(calculator_class_name))을 사용하여 등록합니다.
다음은 입력 스트림 3개, 노드 1개(PacketClonerCalculator), 출력 스트림 2개가 있는 간단한 MediaPipe 그래프입니다.
input_stream: "room_mic_signal"
input_stream: "room_lighting_sensor"
input_stream: "room_video_tick_signal"

node {
   calculator: "PacketClonerCalculator"
   input_stream: "room_mic_signal"
   input_stream: "room_lighting_sensor"
   input_stream: "room_video_tick_signal"
   output_stream: "cloned_room_mic_signal"
   output_stream: "cloned_lighting_sensor"
 }
아래 다이어그램은 PacketClonerCalculator가 일련의 입력 패킷 (상단)을 기반으로 출력 패킷 (하단)을 정의하는 방법을 보여줍니다.
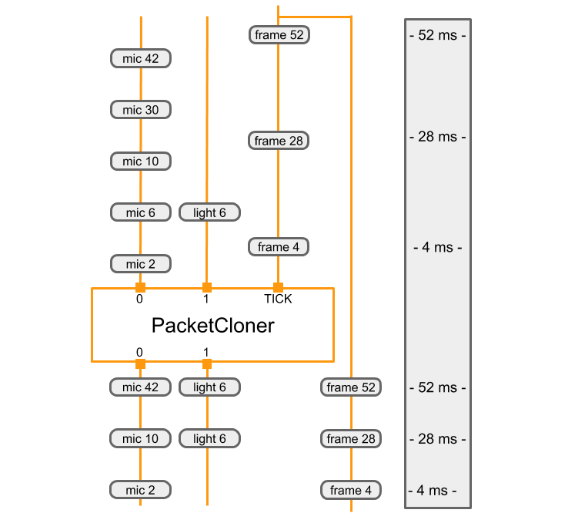 |
|---|
| TICK 입력 스트림에서 패킷을 수신할 때마다 PacketClonerCalculator는 각 입력 스트림에서 최신 패킷을 출력합니다. 출력 패킷 시퀀스 (하단)는 입력 패킷 시퀀스 (상단)와 타임스탬프에 따라 결정됩니다. 타임스탬프는 다이어그램 오른쪽에 표시됩니다. |