

โมเดล Gemini Robotics ER สามารถเขียนและเรียกใช้โค้ด Python เพื่อจัดการรูปภาพและใช้ตรรกะก่อนตอบคำถาม หน้านี้ครอบคลุมตัวอย่างการเรียกใช้โค้ด ได้แก่ การตรวจจับออบเจ็กต์ด้วยการซูมและครอบตัด การอ่านเครื่องมือ การวัดของเหลว การอ่านแผงวงจร และคำอธิบายประกอบรูปภาพ
หากต้องการปรับตัวอย่างเหล่านี้ให้เข้ากับกรณีการใช้งานของคุณเอง ให้แทนที่ข้อความพรอมต์และไฟล์รูปภาพที่อัปโหลดด้วยข้อความและไฟล์ของคุณเอง นอกจากนี้ คุณยังปรับสคีมา JSON ที่ขอในพรอมต์ให้ตรงกับโครงสร้างเอาต์พุตที่แอปพลิเคชันต้องการ หรือเพิ่ม system_instruction เพื่อบังคับใช้รูปแบบและความแม่นยำของเอาต์พุตได้ด้วย
ดูโค้ดที่เรียกใช้ได้ทั้งหมดที่ คู่มือการใช้งาน Robotics
ระดับการคิด
คุณสามารถควบคุมระดับการคิดของโมเดลเพื่อแลกความหน่วงแฝงกับความแม่นยำ งานเชิงพื้นที่ เช่น การตรวจจับออบเจ็กต์ จะทำงานได้ดีเมื่อมีระดับการคิดต่ำ งานที่ซับซ้อน เช่น การนับหรือการประมาณน้ำหนัก จะได้ประโยชน์จากระดับการคิดที่สูงขึ้น
ตัวอย่างต่อไปนี้จะตั้งค่าระดับการคิดเป็น high สำหรับงานการนับที่ซับซ้อน
Python
from google import genai

client = genai.Client()

uploaded_file = client.files.upload(file="scene.jpeg")

interaction = client.interactions.create(
    model="gemini-robotics-er-2-preview",
    input=[
        {
            "type": "image",
            "uri": uploaded_file.uri,
            "mime_type": uploaded_file.mime_type
        },
        {"type": "text", "text": "Identify and count all objects on the table."}
    ],
    generation_config={
        "thinking_level": "high"  # Use "minimal" or "low" for faster spatial tasks
    }
)

print(interaction.output_text)
ดูรายละเอียดได้ที่การคิด
การตรวจจับออบเจ็กต์ (ซูมและครอบตัด)
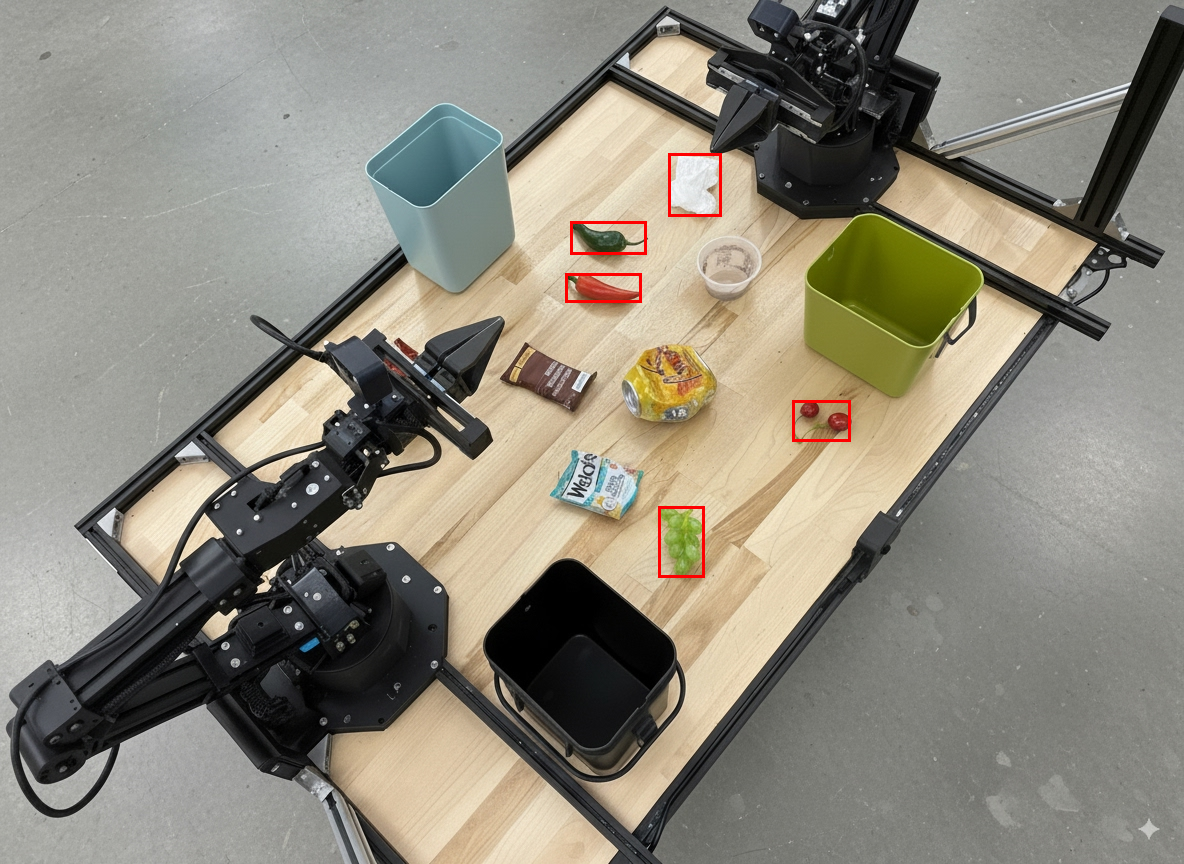
ตัวอย่างต่อไปนี้ใช้การเรียกใช้โค้ดเพื่อซูมและครอบตัดรูปภาพเพื่อให้เห็นชัดเจนขึ้นเมื่อตรวจจับออบเจ็กต์และแสดงกล่องขอบเขต
Python
from google import genai

client = genai.Client()

uploaded_file = client.files.upload(file="sorting.jpeg")

prompt = """
Return JSON in the format {label: val, y: val, x: val, y2: val, x2: val} for
the compostable objects in this scene. Please Zoom and crop the image for a
clearer view. Return an annotated image of the final result with the bounding
boxes drawn on it to the API caller as a part of your process.
"""

interaction = client.interactions.create(
    model="gemini-robotics-er-2-preview",
    input=[
        {
            "type": "image",
            "uri": uploaded_file.uri,
            "mime_type": uploaded_file.mime_type
        },
        {"type": "text", "text": prompt}
    ],
    tools=[{"type": "code_execution"}]
)

print(interaction.output_text)
เอาต์พุตโมเดลจะมีลักษณะคล้ายกับการตอบกลับ JSON ต่อไปนี้
[
  {"label": "compostable", "y": 256, "x": 482, "y2": 295, "x2": 546},
  {"label": "compostable", "y": 317, "x": 478, "y2": 350, "x2": 542},
  {"label": "compostable", "y": 586, "x": 556, "y2": 668, "x2": 595},
  {"label": "compostable", "y": 463, "x": 669, "y2": 511, "x2": 718},
  {"label": "compostable", "y": 178, "x": 565, "y2": 250, "x2": 609}
]
รูปภาพต่อไปนี้แสดงกล่องที่โมเดลแสดง
อ่านเกจแบบอนาล็อกและใช้ตรรกะ
ตัวอย่างต่อไปนี้แสดงวิธีใช้โมเดลเพื่ออ่านเกจแบบอนาล็อกและทำการคำนวณเวลา โดยใช้คำแนะนำระบบเพื่อบังคับใช้เอาต์พุต JSON
Python
from google import genai

client = genai.Client()

uploaded_file = client.files.upload(file="gauge.jpeg")

interaction = client.interactions.create(
    model="gemini-robotics-er-2-preview",
    system_instruction="Be precise. When JSON is requested, reply with ONLY that JSON (no preface, no code block).",
    input=[
        {
            "type": "image",
            "uri": uploaded_file.uri,
            "mime_type": uploaded_file.mime_type
        },
        {"type": "text", "text": """Read the current value from this gauge. Then, calculate how long
        it will take at the current rate for the value to reach maximum.
        Reply in JSON: {"current_value": val, "max_value": val,
        "time_to_max_minutes": val}"""}
    ],
    tools=[{"type": "code_execution"}]
)

print(interaction.output_text)
วัดของเหลวในภาชนะ
ตัวอย่างต่อไปนี้แสดงวิธีใช้การเรียกใช้โค้ดเพื่อวัดระดับของเหลวในภาชนะ
Python
from google import genai

client = genai.Client()

uploaded_file = client.files.upload(file="fluid.jpeg")

interaction = client.interactions.create(
    model="gemini-robotics-er-2-preview",
    system_instruction="Be precise. When JSON is requested, reply with ONLY that JSON (no preface, no code block).",
    input=[
        {
            "type": "image",
            "uri": uploaded_file.uri,
            "mime_type": uploaded_file.mime_type
        },
        {"type": "text", "text": """Measure the amount of fluid in the container. Reply in JSON:
        {"fluid_level_ml": val, "container_capacity_ml": val,
        "percentage_full": val}"""}
    ],
    tools=[{"type": "code_execution"}]
)

print(interaction.output_text)
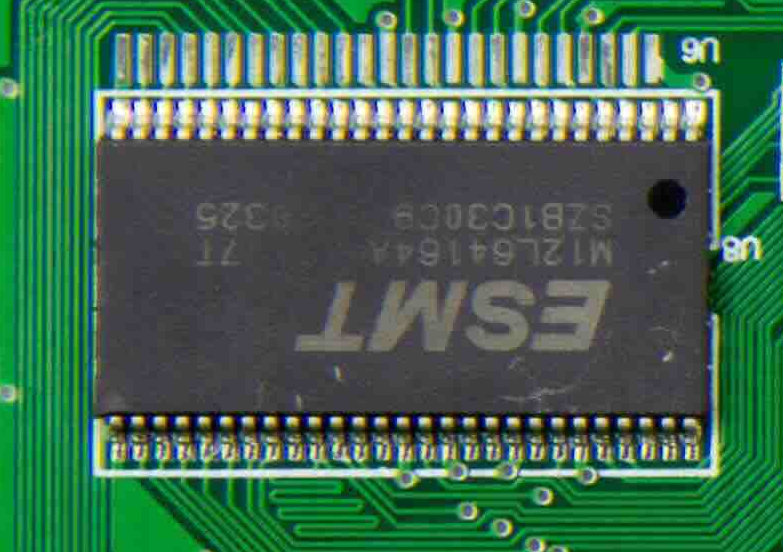
อ่านเครื่องหมายบนแผงวงจร
ตัวอย่างต่อไปนี้แสดงวิธีใช้การเรียกใช้โค้ดเพื่ออ่านเครื่องหมายบนแผงวงจร
Python
from google import genai

client = genai.Client()

uploaded_file = client.files.upload(file="circuit_board.jpeg")

interaction = client.interactions.create(
    model="gemini-robotics-er-2-preview",
    system_instruction="Be precise. When JSON is requested, reply with ONLY that JSON (no preface, no code block).",
    input=[
        {
            "type": "image",
            "uri": uploaded_file.uri,
            "mime_type": uploaded_file.mime_type
        },
        {"type": "text", "text": """Read all visible component labels and markings on this circuit
        board. Reply in JSON: {"components": [{"label": val,
        "location": [y, x]}]}"""}
    ],
    tools=[{"type": "code_execution"}]
)

print(interaction.output_text)
คำอธิบายประกอบรูปภาพ
ตัวอย่างต่อไปนี้แสดงวิธีใช้การเรียกใช้โค้ดเพื่อใส่คำอธิบายประกอบในรูปภาพ (เช่น การวาดลูกศรสำหรับวิธีการกำจัด) และแสดงรูปภาพที่แก้ไขแล้ว
Python
from google import genai

client = genai.Client()

# Load your image
uploaded_file = client.files.upload(file="sorting.jpeg")

prompt = """
Look at this image and return it as an annotated version using arrows of
different colors to represent which items should go in which bins for
disposal. You must return the final image to the API caller.
"""

interaction = client.interactions.create(
    model="gemini-robotics-er-2-preview",
    input=[
        {
            "type": "image",
            "uri": uploaded_file.uri,
            "mime_type": uploaded_file.mime_type
        },
        {"type": "text", "text": prompt}
    ],
    tools=[{"type": "code_execution"}]
)

print(interaction.output_text)
ต่อไปนี้คือตัวอย่างอินพุตรูปภาพ
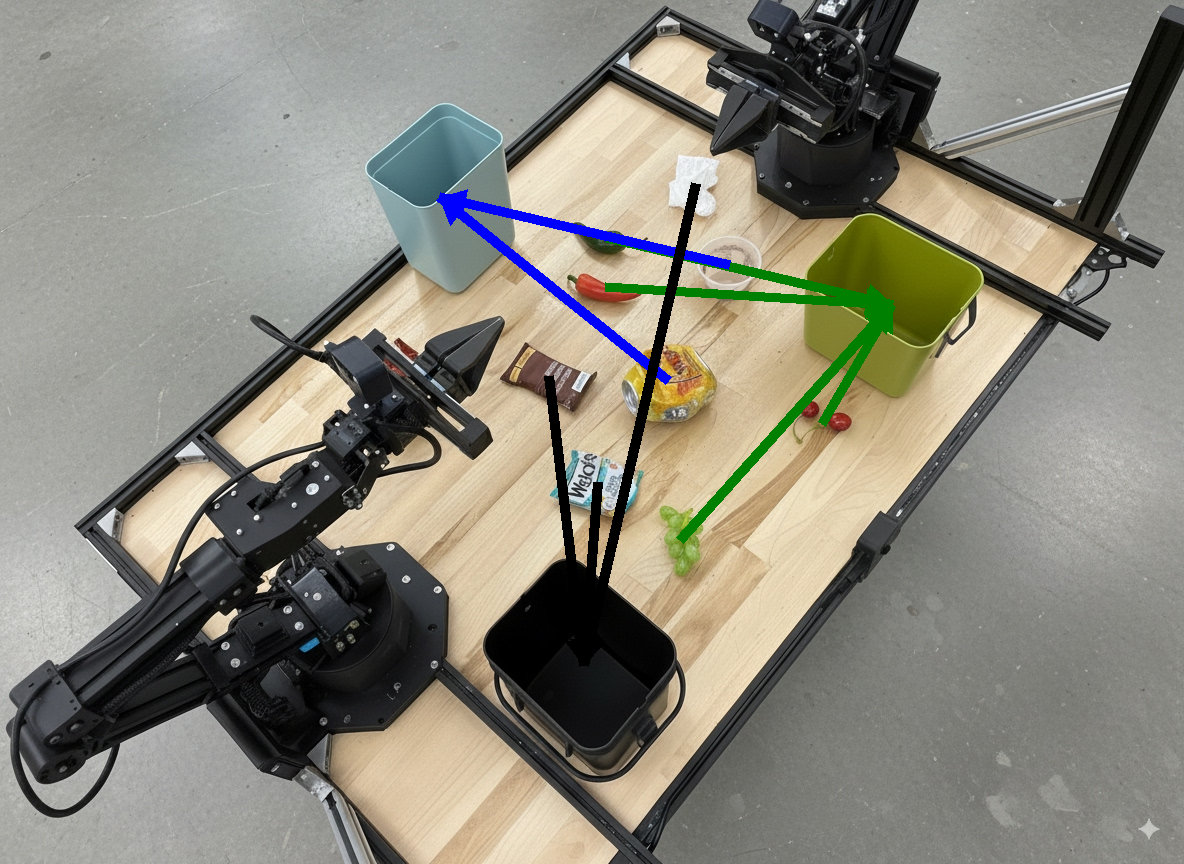
เอาต์พุตโมเดลจะมีลักษณะคล้ายกับเอาต์พุตต่อไปนี้
  The annotated image shows the suggested disposal locations for the items on the table:
  - **Green bin (Compost/Organic)**: Green chili, red chili, grapes, and cherries.
  - **Blue bin (Recycling)**: Yellow crushed can and plastic container.
  - **Black bin (Trash)**: Chocolate bar wrapper, Welch's packet, and white tissue.
ขั้นตอนถัดไป
- การจัดระเบียบงาน - งานระยะยาวที่มี API ของหุ่นยนต์ที่กำหนดเอง
- Robotics พร้อมการสตรีม - การสตรีมแบบสองทางแบบเรียลไทม์ (Gemini Robotics ER 2 เท่านั้น)
- ความเข้าใจวิดีโอ - การค้นหาช่วงเวลาและการจัดประเภทความคืบหน้า (Gemini Robotics ER 2 เท่านั้น)