

Gemini Robotics ER मॉडल, टास्क की योजना बना सकते हैं. साथ ही, जगह के बारे में अनुमान लगा सकते हैं. इससे यह तय किया जा सकता है कि किसी लक्ष्य को पूरा करने के लिए, कौनसी कार्रवाइयां करनी हैं और किन ऑब्जेक्ट को मूव करना है. इस पेज पर, कस्टम रोबोट एपीआई की मदद से, किसी आइटम को उठाकर किसी जगह पर रखने की कार्रवाई का उदाहरण दिया गया है. इससे, किसी आइटम को कटोरे में रखने के टास्क को ऑर्केस्ट्रेट किया जा सकता है. इस उदाहरण में, Gemini ER 2 के स्टैंडर्ड मॉडल का इस्तेमाल किया गया है. स्ट्रीमिंग उदाहरण के लिए, Gemini ER 2 की स्ट्रीमिंग से जुड़ी गाइड देखें.
रन किया जा सकने वाला पूरा कोड देखने के लिए, रोबोटिक्स कुकबुक देखें.
कस्टम रोबोट एपीआई का इस्तेमाल करना
इस उदाहरण में, कस्टम रोबोट एपीआई की मदद से टास्क ऑर्केस्ट्रेशन दिखाया गया है. इसमें, किसी आइटम को उठाकर किसी जगह पर रखने की कार्रवाई के लिए डिज़ाइन किया गया मॉक एपीआई दिखाया गया है. इस टास्क में, नीले रंग के ब्लॉक को उठाकर, नारंगी रंग के कटोरे में रखना है:
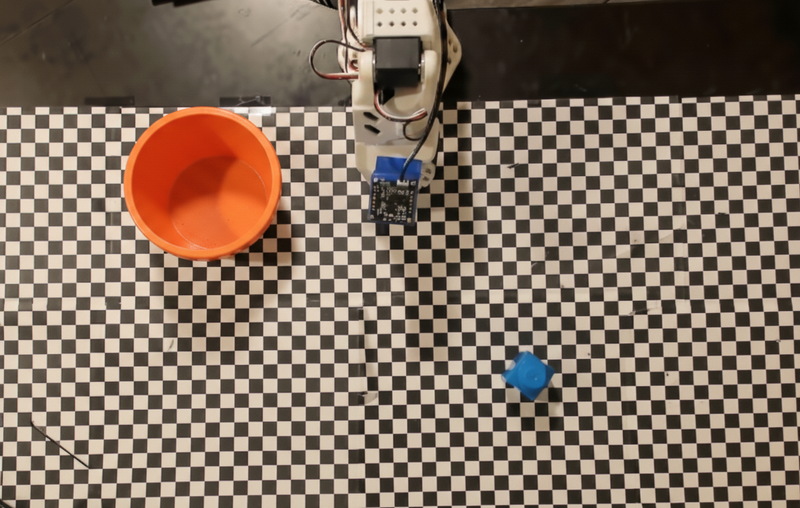
इस उदाहरण में, मॉक रोबोट एपीआई का इस्तेमाल किया गया है:
Python
def move(x, y, high):
  print(f"Mock Robot: Moving to coordinates: {x}, {y}, {'high above table' if high else 'down at table level'}")

def setGripperState(opened):
  print(f"Mock Robot: {'Opening gripper' if opened else 'Closing gripper'}")

robot_origin_y = 300
robot_origin_x = 500

move_function = {
    "type": "function",
    "name": "move",
    "description": "Moves the arm to the given coordinates.",
    "parameters": {
        "type": "object",
        "properties": {
            "x": {"type": "integer", "description": "X coordinate relative to the origin"},
            "y": {"type": "integer", "description": "Y coordinate relative to the origin"},
            "high": {"type": "boolean", "description": "Set to True to lift the robot arm above the scene for avoiding obstacles. Set to False to place the gripper on the surface."}
        },
        "required": ["x", "y", "high"]
    }
}

set_gripper_state_function = {
    "type": "function",
    "name": "setGripperState",
    "description": "Opens or closes the robot's gripper.",
    "parameters": {
        "type": "object",
        "properties": {
            "opened": {"type": "boolean", "description": "True opens the gripper, False closes the gripper."}
        },
        "required": ["opened"]
    }
}
इस उदाहरण में, टूल की परिभाषाओं के साथ प्रॉम्प्ट और इमेज को मॉडल को भेजा जाता है. इसके बाद, एजेंटिक लूप चलता है: मॉडल के हर जवाब के बाद, अनुरोध किए गए फ़ंक्शन कॉल (move, setGripperState) को लागू किया जाता है. इसके बाद, previous_interaction_id का इस्तेमाल करके, नतीजों को वापस मॉडल को भेजा जाता है. यह प्रोसेस तब तक चलती है, जब तक मॉडल फ़ंक्शन कॉल करना बंद नहीं कर देता या चरण की सीमा पूरी नहीं हो जाती.
Python
prompt = (
    "You are a robotic arm with six degrees-of-freedom. "
    f"The origin point for calculating the moves is at normalized point y={robot_origin_y}, x={robot_origin_x}. "
    "Use this as the new (0,0) for calculating moves, allowing x and y to be negative.\n\n"
    "Find the blue block and the orange bowl. Calculate their coordinates relative to the origin.\n"
    "Perform a pick and place operation where you pick up the blue block and place it into the orange bowl. "
    "Call the appropriate sequence of functions to complete this operation."
)

# 1. Initial Interaction
interaction = client.interactions.create(
    model=MODEL_ID,
    input=[{"type": "user_input", "content": [
        {"type": "image", "data": img_b64, "mime_type": "image/png"},
        {"type": "text", "text": prompt}
    ]}],
    tools=[move_function, set_gripper_state_function],
    generation_config={"thinking_level": "low"}
)

print("\n--- Executing Orchestrated Plan ---")

max_steps = 15 # Safety limit to prevent infinite loops
step_count = 0

# 2. The Agentic Loop
while step_count < max_steps:
    step_count += 1

    # Check if the model wants to call any functions
    tool_calls = [step for step in interaction.steps if step.type == "function_call"]

    if not tool_calls:
        # If no tools were called, the model is finished with the sequence
        print("Sequence complete.")
        if interaction.output_text:
            print(f"Model Summary: {interaction.output_text}")
        break

    function_results = []

    for step in tool_calls:
        function_name = step.name
        arguments = step.arguments

        # Execute the mock function
        if function_name == "move":
            move(**arguments)
        elif function_name == "setGripperState":
            setGripperState(**arguments)
        else:
            print(f"Unknown function: {function_name}")

        # 3. Create a result object to tell the model the function succeeded
        function_results.append({
            "type": "function_result",
            "name": step.name,
            "call_id": step.id,
            "result": [{"type": "text", "text": '{"status": "success"}'}]
        })

    # 4. Send the results back to the model, passing previous_interaction_id
    # so it remembers the conversation history and generates the NEXT step
    interaction = client.interactions.create(
        model=MODEL_ID,
        previous_interaction_id=interaction.id,
        tools=[move_function, set_gripper_state_function],
        input=function_results
    )
यहां, प्रॉम्प्ट और मॉक रोबोट एपीआई के आधार पर, मॉडल का संभावित आउटपुट दिखाया गया है. आउटपुट में, रोबोट के फ़ंक्शन कॉल का आउटपुट शामिल होता है. मॉडल ने इन फ़ंक्शन कॉल को एक साथ क्रम से लगाया है.
--- Executing Orchestrated Plan ---
Mock Robot: Opening gripper
Mock Robot: Moving to coordinates: 160, 440, high above table
Mock Robot: Moving to coordinates: 160, 440, down at table level
Mock Robot: Closing gripper
Mock Robot: Moving to coordinates: 160, 440, high above table
Mock Robot: Moving to coordinates: -250, 60, high above table
Mock Robot: Moving to coordinates: -250, 60, down at table level
Mock Robot: Opening gripper
Mock Robot: Moving to coordinates: -250, 60, high above table
Sequence complete.
Model Summary: I have completed the task of picking up the blue block and placing it into the orange bowl.
आगे क्या करना है
- स्ट्रीमिंग के साथ रोबोटिक्स — फ़ंक्शन कॉलिंग के साथ रीयल-टाइम स्ट्रीमिंग (सिर्फ़ Gemini Robotics ER 2).
- वीडियो को समझना — वीडियो से टास्क की प्रोग्रेस ट्रैक करना (सिर्फ़ ER 2).
- स्पेशल रीज़निंग — पॉइंटिंग, ट्रैकिंग, और बाउंडिंग बॉक्स के उदाहरण.