
画像セグメンターは、画像の各ピクセルが特定のクラスに関連付けられているかどうかを予測します。これは、長方形の領域内のオブジェクトを検出するオブジェクト検出や、画像全体を分類する画像分類とは対照的です。画像セグメンターの詳細については、画像セグメンテーションの概要の例をご覧ください。
Task Library ImageSegmenter API を使用して、カスタム画像セグメンターまたは事前トレーニング済みのセグメンターをモバイルアプリにデプロイします。
ImageSegmenter API の主な機能
回転、サイズ変更、色空間変換などの入力画像処理。
ラベルマップの言語 / 地域。
カテゴリマスクと信頼度マスクの 2 つの出力タイプ。
表示用の色付きラベル。
サポートされている画像セグメンタ モデル
次のモデルは、ImageSegmenter API との互換性が保証されています。
モデルの互換性要件を満たすカスタムモデル。
Java で推論を実行する
Android アプリで ImageSegmenter を使用する方法の例については、画像セグメンテーション リファレンス アプリをご覧ください。
ステップ 1: Gradle の依存関係とその他の設定をインポートする
.tflite モデルファイルを、モデルが実行される Android モジュールの assets ディレクトリにコピーします。ファイルを圧縮しないように指定し、TensorFlow Lite ライブラリをモジュールの build.gradle ファイルに追加します。
android {
    // Other settings

    // Specify tflite file should not be compressed for the app apk
    aaptOptions {
        noCompress "tflite"
    }
}

dependencies {
    // Other dependencies

    // Import the Task Vision Library dependency
    implementation 'org.tensorflow:tensorflow-lite-task-vision'
    // Import the GPU delegate plugin Library for GPU inference
    implementation 'org.tensorflow:tensorflow-lite-gpu-delegate-plugin'
}
ステップ 2: モデルを使用する
// Initialization
ImageSegmenterOptions options =
    ImageSegmenterOptions.builder()
        .setBaseOptions(BaseOptions.builder().useGpu().build())
        .setOutputType(OutputType.CONFIDENCE_MASK)
        .build();
ImageSegmenter imageSegmenter =
    ImageSegmenter.createFromFileAndOptions(context, modelFile, options);

// Run inference
List<Segmentation> results = imageSegmenter.segment(image);
ImageSegmenter を構成するその他のオプションについては、ソースコードと javadoc をご覧ください。
iOS で推論を実行する
ステップ 1: 依存関係をインストールする
タスク ライブラリは、CocoaPods を使用したインストールをサポートしています。システムに CocoaPods がインストールされていることを確認します。手順については、CocoaPods インストール ガイドをご覧ください。
Xcode プロジェクトに Pod を追加する方法について詳しくは、CocoaPods ガイドをご覧ください。
Podfile に TensorFlowLiteTaskVision Pod を追加します。
target 'MyAppWithTaskAPI' do
  use_frameworks!
  pod 'TensorFlowLiteTaskVision'
end
推論に使用する .tflite モデルがアプリバンドルに含まれていることを確認します。
ステップ 2: モデルを使用する
Swift
// Imports
import TensorFlowLiteTaskVision
// Initialization
guard let modelPath = Bundle.main.path(forResource: "deeplabv3",
ofType: "tflite") else { return }
let options = ImageSegmenterOptions(modelPath: modelPath)
// Configure any additional options:
// options.outputType = OutputType.confidenceMasks
let segmenter = try ImageSegmenter.segmenter(options: options)
// Convert the input image to MLImage.
// There are other sources for MLImage. For more details, please see:
// https://developers.google.com/ml-kit/reference/ios/mlimage/api/reference/Classes/GMLImage
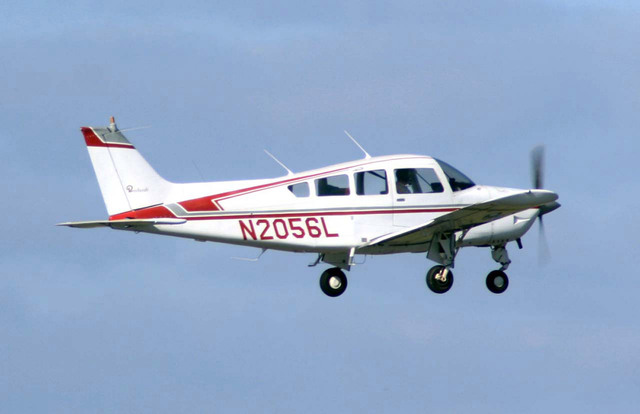
guard let image = UIImage (named: "plane.jpg"), let mlImage = MLImage(image: image) else { return }
// Run inference
let segmentationResult = try segmenter.segment(mlImage: mlImage)
Objective-C
// Imports
#import <TensorFlowLiteTaskVision/TensorFlowLiteTaskVision.h>

// Initialization
NSString *modelPath = [[NSBundle mainBundle] pathForResource:@"deeplabv3" ofType:@"tflite"];

TFLImageSegmenterOptions *options =
    [[TFLImageSegmenterOptions alloc] initWithModelPath:modelPath];

// Configure any additional options:
// options.outputType = TFLOutputTypeConfidenceMasks;

TFLImageSegmenter *segmenter = [TFLImageSegmenter imageSegmenterWithOptions:options
                                                                      error:nil];

// Convert the input image to MLImage.
UIImage *image = [UIImage imageNamed:@"plane.jpg"];

// There are other sources for GMLImage. For more details, please see:
// https://developers.google.com/ml-kit/reference/ios/mlimage/api/reference/Classes/GMLImage
GMLImage *gmlImage = [[GMLImage alloc] initWithImage:image];

// Run inference
TFLSegmentationResult *segmentationResult =
    [segmenter segmentWithGMLImage:gmlImage error:nil];
TFLImageSegmenter を構成するその他のオプションについては、ソースコードをご覧ください。
Python で推論を実行する
ステップ 1: pip パッケージをインストールする
pip install tflite-support
ステップ 2: モデルを使用する
# Imports
from tflite_support.task import vision
from tflite_support.task import core
from tflite_support.task import processor

# Initialization
base_options = core.BaseOptions(file_name=model_path)
segmentation_options = processor.SegmentationOptions(
    output_type=processor.SegmentationOptions.output_type.CATEGORY_MASK)
options = vision.ImageSegmenterOptions(base_options=base_options, segmentation_options=segmentation_options)
segmenter = vision.ImageSegmenter.create_from_options(options)

# Alternatively, you can create an image segmenter in the following manner:
# segmenter = vision.ImageSegmenter.create_from_file(model_path)

# Run inference
image_file = vision.TensorImage.create_from_file(image_path)
segmentation_result = segmenter.segment(image_file)
ImageSegmenter を構成するその他のオプションについては、ソースコードをご覧ください。
C++ で推論を実行する
// Initialization
ImageSegmenterOptions options;
options.mutable_base_options()->mutable_model_file()->set_file_name(model_path);
std::unique_ptr<ImageSegmenter> image_segmenter = ImageSegmenter::CreateFromOptions(options).value();

// Create input frame_buffer from your inputs, `image_data` and `image_dimension`.
// See more information here: tensorflow_lite_support/cc/task/vision/utils/frame_buffer_common_utils.h
std::unique_ptr<FrameBuffer> frame_buffer = CreateFromRgbRawBuffer(
      image_data, image_dimension);

// Run inference
const SegmentationResult result = image_segmenter->Segment(*frame_buffer).value();
ImageSegmenter を構成するその他のオプションについては、ソースコードをご覧ください。
検索結果の例
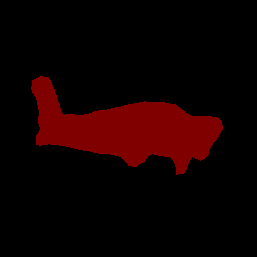
TensorFlow Hub で利用可能な汎用セグメンテーション モデルである deeplab_v3 のセグメンテーション結果の例を次に示します。
Color Legend:
 (r: 000, g: 000, b: 000):
  index       : 0
  class name  : background
 (r: 128, g: 000, b: 000):
  index       : 1
  class name  : aeroplane

# (omitting multiple lines for conciseness) ...

 (r: 128, g: 192, b: 000):
  index       : 19
  class name  : train
 (r: 000, g: 064, b: 128):
  index       : 20
  class name  : tv
Tip: use a color picker on the output PNG file to inspect the output mask with
this legend.
セグメンテーション カテゴリ マスクは次のようになります。
独自のモデルとテストデータを使用して、シンプルな ImageSegmenter 用 CLI デモツールを試してください。
モデルの互換性要件
ImageSegmenter API は、必須の TFLite モデル メタデータを含む TFLite モデルを想定しています。TensorFlow Lite メタデータ ライター API を使用して画像セグメンターのメタデータを作成する例をご覧ください。
入力画像テンソル(kTfLiteUInt8/kTfLiteFloat32)
- サイズ
[batch x height x width x channels]の画像入力。 - バッチ推論はサポートされていません(
batchは 1 である必要があります)。 - RGB 入力のみがサポートされます(
channelsは 3 である必要があります)。 - 型が kTfLiteFloat32 の場合、入力正規化のメタデータに NormalizationOptions を付加する必要があります。
- サイズ
出力マスク テンソル: (kTfLiteUInt8/kTfLiteFloat32)
- サイズ
[batch x mask_height x mask_width x num_classes]のテンソル。ここで、batchは 1 である必要があり、mask_widthとmask_heightはモデルによって生成されるセグメンテーション マスクのディメンションであり、num_classesはモデルでサポートされているクラスの数です。 - 省略可(推奨)のラベルマップは、タイプが TENSOR_AXIS_LABELS の AssociatedFile として添付できます。各行に 1 つのラベルが含まれます。最初に見つかった AssociatedFile(存在する場合)は、結果の
labelフィールド(C++ ではclass_name)に入力するために使用されます。display_nameフィールドは、作成時に使用されたImageSegmenterOptionsのdisplay_names_localeフィールドとロケールが一致する AssociatedFile(存在する場合)から入力されます(デフォルトでは「en」、つまり英語)。いずれも利用できない場合は、結果のindexフィールドのみが入力されます。
- サイズ