
מפלחים של תמונות מנבאים אם כל פיקסל בתמונה משויך לסיווג מסוים. זיהוי אובייקטים, לעומת זאת, מזהה אובייקטים באזורים מלבניים, וסיווג תמונות מסווג את התמונה הכוללת. מידע נוסף על כלי לפילוח תמונות זמין בסקירה הכללית על פילוח תמונות.
אפשר להשתמש ב-Task Library ImageSegmenter API כדי לפרוס את כלי הפילוח של התמונות המותאמות אישית או אלה שעברו אימון מראש באפליקציות לנייד.
תכונות עיקריות של ImageSegmenter API
עיבוד תמונת הקלט, כולל סיבוב, שינוי גודל והמרה של מרחב הצבעים.
תווית של מיקום במפה
שני סוגי פלט: מסכת קטגוריה ומסכות מהימנות.
תווית צבעונית למטרות תצוגה.
מודלים נתמכים של מפלח תמונות
המודלים הבאים תואמים בוודאות ל-API של ImageSegmenter.
מודלים של חלוקת תמונות למקטעים שעברו אימון מראש ב-TensorFlow Hub.
מודלים בהתאמה אישית שעומדים בדרישות התאימות למודלים.
הסקת מסקנות ב-Java
באפליקציית ההפניה Image Segmentation אפשר לראות דוגמה לשימוש ב-ImageSegmenter באפליקציית Android.
שלב 1: מייבאים את התלות ב-Gradle והגדרות אחרות
מעתיקים את קובץ המודל .tflite לספריית הנכסים של מודול Android שבו יופעל המודל. מציינים שהקובץ לא צריך להיות דחוס, ומוסיפים את ספריית TensorFlow Lite לקובץ build.gradle של המודול:
android {
    // Other settings

    // Specify tflite file should not be compressed for the app apk
    aaptOptions {
        noCompress "tflite"
    }
}

dependencies {
    // Other dependencies

    // Import the Task Vision Library dependency
    implementation 'org.tensorflow:tensorflow-lite-task-vision'
    // Import the GPU delegate plugin Library for GPU inference
    implementation 'org.tensorflow:tensorflow-lite-gpu-delegate-plugin'
}
שלב 2: שימוש במודל
// Initialization
ImageSegmenterOptions options =
    ImageSegmenterOptions.builder()
        .setBaseOptions(BaseOptions.builder().useGpu().build())
        .setOutputType(OutputType.CONFIDENCE_MASK)
        .build();
ImageSegmenter imageSegmenter =
    ImageSegmenter.createFromFileAndOptions(context, modelFile, options);

// Run inference
List<Segmentation> results = imageSegmenter.segment(image);
אפשר לעיין בקוד המקור וב-javadoc כדי לראות עוד אפשרויות להגדרת ImageSegmenter.
הפעלת הסקה ב-iOS
שלב 1: התקנת יחסי התלות
ספריית המשימות תומכת בהתקנה באמצעות CocoaPods. מוודאים ש-CocoaPods מותקן במערכת. הוראות מפורטות זמינות במדריך להתקנת CocoaPods.
פרטים על הוספת pods לפרויקט Xcode מופיעים במדריך ל-CocoaPods.
מוסיפים את ה-Pod TensorFlowLiteTaskVision ל-Podfile.
target 'MyAppWithTaskAPI' do
  use_frameworks!
  pod 'TensorFlowLiteTaskVision'
end
חשוב לוודא שמודל .tflite שבו תשתמשו להסקת מסקנות נמצא בחבילת האפליקציה.
שלב 2: שימוש במודל
Swift
// Imports
import TensorFlowLiteTaskVision
// Initialization
guard let modelPath = Bundle.main.path(forResource: "deeplabv3",
ofType: "tflite") else { return }
let options = ImageSegmenterOptions(modelPath: modelPath)
// Configure any additional options:
// options.outputType = OutputType.confidenceMasks
let segmenter = try ImageSegmenter.segmenter(options: options)
// Convert the input image to MLImage.
// There are other sources for MLImage. For more details, please see:
// https://developers.google.com/ml-kit/reference/ios/mlimage/api/reference/Classes/GMLImage
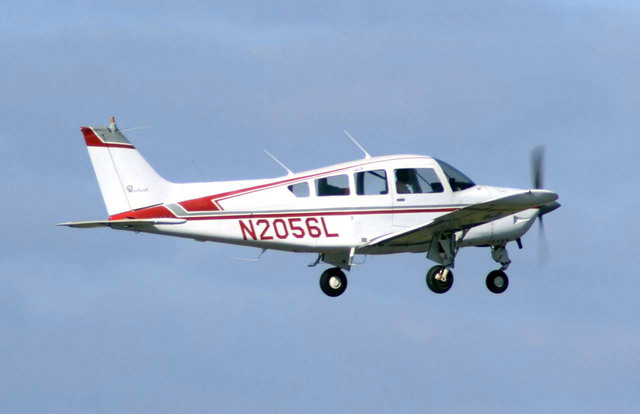
guard let image = UIImage (named: "plane.jpg"), let mlImage = MLImage(image: image) else { return }
// Run inference
let segmentationResult = try segmenter.segment(mlImage: mlImage)
Objective-C
// Imports
#import <TensorFlowLiteTaskVision/TensorFlowLiteTaskVision.h>

// Initialization
NSString *modelPath = [[NSBundle mainBundle] pathForResource:@"deeplabv3" ofType:@"tflite"];

TFLImageSegmenterOptions *options =
    [[TFLImageSegmenterOptions alloc] initWithModelPath:modelPath];

// Configure any additional options:
// options.outputType = TFLOutputTypeConfidenceMasks;

TFLImageSegmenter *segmenter = [TFLImageSegmenter imageSegmenterWithOptions:options
                                                                      error:nil];

// Convert the input image to MLImage.
UIImage *image = [UIImage imageNamed:@"plane.jpg"];

// There are other sources for GMLImage. For more details, please see:
// https://developers.google.com/ml-kit/reference/ios/mlimage/api/reference/Classes/GMLImage
GMLImage *gmlImage = [[GMLImage alloc] initWithImage:image];

// Run inference
TFLSegmentationResult *segmentationResult =
    [segmenter segmentWithGMLImage:gmlImage error:nil];
אפשר לעיין בקוד המקור כדי לראות עוד אפשרויות להגדרת TFLImageSegmenter.
הרצת הסקה ב-Python
שלב 1: התקנת חבילת pip
pip install tflite-support
שלב 2: שימוש במודל
# Imports
from tflite_support.task import vision
from tflite_support.task import core
from tflite_support.task import processor

# Initialization
base_options = core.BaseOptions(file_name=model_path)
segmentation_options = processor.SegmentationOptions(
    output_type=processor.SegmentationOptions.output_type.CATEGORY_MASK)
options = vision.ImageSegmenterOptions(base_options=base_options, segmentation_options=segmentation_options)
segmenter = vision.ImageSegmenter.create_from_options(options)

# Alternatively, you can create an image segmenter in the following manner:
# segmenter = vision.ImageSegmenter.create_from_file(model_path)

# Run inference
image_file = vision.TensorImage.create_from_file(image_path)
segmentation_result = segmenter.segment(image_file)
אפשר לעיין בקוד המקור כדי לראות עוד אפשרויות להגדרת ImageSegmenter.
הרצת הסקה ב-C++
// Initialization
ImageSegmenterOptions options;
options.mutable_base_options()->mutable_model_file()->set_file_name(model_path);
std::unique_ptr<ImageSegmenter> image_segmenter = ImageSegmenter::CreateFromOptions(options).value();

// Create input frame_buffer from your inputs, `image_data` and `image_dimension`.
// See more information here: tensorflow_lite_support/cc/task/vision/utils/frame_buffer_common_utils.h
std::unique_ptr<FrameBuffer> frame_buffer = CreateFromRgbRawBuffer(
      image_data, image_dimension);

// Run inference
const SegmentationResult result = image_segmenter->Segment(*frame_buffer).value();
אפשר לעיין בקוד המקור כדי לראות עוד אפשרויות להגדרת ImageSegmenter.
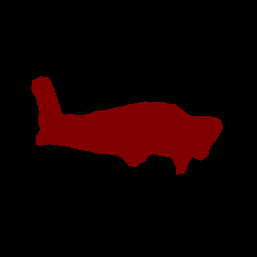
תוצאות לדוגמה
לפניכם דוגמה לתוצאות הפילוח של deeplab_v3, מודל פילוח כללי שזמין ב-TensorFlow Hub.
Color Legend:
 (r: 000, g: 000, b: 000):
  index       : 0
  class name  : background
 (r: 128, g: 000, b: 000):
  index       : 1
  class name  : aeroplane

# (omitting multiple lines for conciseness) ...

 (r: 128, g: 192, b: 000):
  index       : 19
  class name  : train
 (r: 000, g: 064, b: 128):
  index       : 20
  class name  : tv
Tip: use a color picker on the output PNG file to inspect the output mask with
this legend.
מסכת קטגוריית הפילוח צריכה להיראות כך:
אתם יכולים לנסות את כלי ההדגמה הפשוט של CLI ל-ImageSegmenter עם המודל ונתוני הבדיקה שלכם.
דרישות התאימות של המודל
ממשק ה-API ImageSegmenter מצפה לקבל מודל TFLite עם מטא-נתונים של מודל TFLite חובה. אפשר לראות דוגמאות ליצירת מטא-נתונים עבור מפלחים של תמונות באמצעות TensorFlow Lite Metadata Writer API.
פרמטרים של טנסור של תמונת קלט (kTfLiteUInt8/kTfLiteFloat32)
- קלט תמונה בגודל
[batch x height x width x channels]. - אין תמיכה בהסקת מסקנות באצווה (הערך של
batchצריך להיות 1). - יש תמיכה רק בקלט RGB (הערך של
channelsחייב להיות 3). - אם הסוג הוא kTfLiteFloat32, צריך לצרף NormalizationOptions למטא-נתונים כדי לבצע נורמליזציה של הקלט.
- קלט תמונה בגודל
טנזור של מסכות פלט: (kTfLiteUInt8/kTfLiteFloat32)
- טנזור בגודל
[batch x mask_height x mask_width x num_classes], כאשרbatchחייב להיות 1, mask_widthו-mask_heightהם הממדים של מסכות הפילוח שנוצרו על ידי המודל, ו-num_classesהוא מספר הסיווגים שהמודל תומך בהם. - אפשר לצרף מפות תוויות אופציונליות (אבל מומלצות) כ-AssociatedFile-s עם סוג TENSOR_AXIS_LABELS, שמכילות תוויות אחת לכל שורה. ה-AssociatedFile הראשון (אם יש כזה) משמש למילוי השדה
label(שנקראclass_nameב-C++) בתוצאות. השדהdisplay_nameמלא בערך מהקובץ המשויך (אם יש כזה) שהלוקאל שלו תואם לשדהdisplay_names_localeשלImageSegmenterOptionsשבו נעשה שימוש בזמן היצירה (ברירת המחדל היא en, כלומר אנגלית). אם אף אחד מהם לא זמין, רק השדהindexשל התוצאות יאוכלס.
- טנזור בגודל