
סיווג תמונות הוא שימוש נפוץ בלמידת מכונה כדי לזהות מה התמונה מייצגת. לדוגמה, יכול להיות שנרצה לדעת איזה סוג של בעל חיים מופיע בתמונה מסוימת. המשימה של חיזוי מה מייצגת תמונה נקראת סיווג תמונות. מסווג תמונות מאומן לזהות סוגים שונים של תמונות. לדוגמה, יכול להיות שמודל אומן לזיהוי תמונות שמייצגות שלושה סוגים שונים של בעלי חיים: ארנבים, אוגרים וכלבים. מידע נוסף על מסווגי תמונות זמין בדוגמה לסיווג תמונות.
אפשר להשתמש ב-Task Library ImageClassifier API כדי לפרוס מסווגי תמונות בהתאמה אישית או מסווגים שאומנו מראש באפליקציות לנייד.
תכונות עיקריות של ImageClassifier API
עיבוד תמונת הקלט, כולל סיבוב, שינוי גודל והמרה של מרחב הצבעים.
אזור העניין בתמונת הקלט.
תווית של מיקום במפה
סף הניקוד לסינון התוצאות.
תוצאות הסיווג המובילות (k).
רשימת ההיתרים ורשימת הישויות החסומות של התווית.
מודלים נתמכים של מסווג תמונות
המודלים הבאים תואמים בוודאות ל-API של ImageClassifier.
מודלים שנוצרו על ידי TensorFlow Lite Model Maker לסיווג תמונות.
מודלים שנוצרו על ידי AutoML Vision Edge Image Classification.
מודלים בהתאמה אישית שעומדים בדרישות התאימות למודלים.
הסקת מסקנות ב-Java
באפליקציית ההפניה Image Classification אפשר לראות דוגמה לשימוש ב-ImageClassifier באפליקציית Android.
שלב 1: מייבאים את התלות ב-Gradle והגדרות אחרות
מעתיקים את קובץ המודל .tflite לספריית הנכסים של מודול Android שבו יופעל המודל. מציינים שהקובץ לא צריך להיות דחוס, ומוסיפים את ספריית TensorFlow Lite לקובץ build.gradle של המודול:
android {
    // Other settings

    // Specify tflite file should not be compressed for the app apk
    aaptOptions {
        noCompress "tflite"
    }
}

dependencies {
    // Other dependencies

    // Import the Task Vision Library dependency
    implementation 'org.tensorflow:tensorflow-lite-task-vision'
    // Import the GPU delegate plugin Library for GPU inference
    implementation 'org.tensorflow:tensorflow-lite-gpu-delegate-plugin'
}
שלב 2: שימוש במודל
// Initialization
ImageClassifierOptions options =
    ImageClassifierOptions.builder()
        .setBaseOptions(BaseOptions.builder().useGpu().build())
        .setMaxResults(1)
        .build();
ImageClassifier imageClassifier =
    ImageClassifier.createFromFileAndOptions(
        context, modelFile, options);

// Run inference
List<Classifications> results = imageClassifier.classify(image);
אפשר לעיין בקוד המקור וב-javadoc כדי לראות עוד אפשרויות להגדרת ImageClassifier.
הפעלת הסקה ב-iOS
שלב 1: התקנת יחסי התלות
ספריית המשימות תומכת בהתקנה באמצעות CocoaPods. מוודאים ש-CocoaPods מותקן במערכת. הוראות מפורטות זמינות במדריך להתקנת CocoaPods.
פרטים על הוספת pods לפרויקט Xcode מופיעים במדריך ל-CocoaPods.
מוסיפים את ה-Pod TensorFlowLiteTaskVision ל-Podfile.
target 'MyAppWithTaskAPI' do
  use_frameworks!
  pod 'TensorFlowLiteTaskVision'
end
חשוב לוודא שמודל .tflite שבו תשתמשו להסקת מסקנות נמצא בחבילת האפליקציה.
שלב 2: שימוש במודל
Swift
// Imports
import TensorFlowLiteTaskVision

// Initialization
guard let modelPath = Bundle.main.path(forResource: "birds_V1",
                                            ofType: "tflite") else { return }

let options = ImageClassifierOptions(modelPath: modelPath)

// Configure any additional options:
// options.classificationOptions.maxResults = 3

let classifier = try ImageClassifier.classifier(options: options)

// Convert the input image to MLImage.
// There are other sources for MLImage. For more details, please see:
// https://developers.google.com/ml-kit/reference/ios/mlimage/api/reference/Classes/GMLImage
guard let image = UIImage (named: "sparrow.jpg"), let mlImage = MLImage(image: image) else { return }

// Run inference
let classificationResults = try classifier.classify(mlImage: mlImage)
Objective-C
// Imports
#import <TensorFlowLiteTaskVision/TensorFlowLiteTaskVision.h>

// Initialization
NSString *modelPath = [[NSBundle mainBundle] pathForResource:@"birds_V1" ofType:@"tflite"];

TFLImageClassifierOptions *options =
    [[TFLImageClassifierOptions alloc] initWithModelPath:modelPath];

// Configure any additional options:
// options.classificationOptions.maxResults = 3;

TFLImageClassifier *classifier = [TFLImageClassifier imageClassifierWithOptions:options
                                                                          error:nil];

// Convert the input image to MLImage.
UIImage *image = [UIImage imageNamed:@"sparrow.jpg"];

// There are other sources for GMLImage. For more details, please see:
// https://developers.google.com/ml-kit/reference/ios/mlimage/api/reference/Classes/GMLImage
GMLImage *gmlImage = [[GMLImage alloc] initWithImage:image];

// Run inference
TFLClassificationResult *classificationResult =
    [classifier classifyWithGMLImage:gmlImage error:nil];
אפשר לעיין בקוד המקור כדי לראות עוד אפשרויות להגדרת TFLImageClassifier.
הרצת הסקה ב-Python
שלב 1: התקנת חבילת pip
pip install tflite-support
שלב 2: שימוש במודל
# Imports
from tflite_support.task import vision
from tflite_support.task import core
from tflite_support.task import processor

# Initialization
base_options = core.BaseOptions(file_name=model_path)
classification_options = processor.ClassificationOptions(max_results=2)
options = vision.ImageClassifierOptions(base_options=base_options, classification_options=classification_options)
classifier = vision.ImageClassifier.create_from_options(options)

# Alternatively, you can create an image classifier in the following manner:
# classifier = vision.ImageClassifier.create_from_file(model_path)

# Run inference
image = vision.TensorImage.create_from_file(image_path)
classification_result = classifier.classify(image)
אפשר לעיין בקוד המקור כדי לראות עוד אפשרויות להגדרת ImageClassifier.
הרצת הסקה ב-C++
// Initialization
ImageClassifierOptions options;
options.mutable_base_options()->mutable_model_file()->set_file_name(model_path);
std::unique_ptr<ImageClassifier> image_classifier = ImageClassifier::CreateFromOptions(options).value();

// Create input frame_buffer from your inputs, `image_data` and `image_dimension`.
// See more information here: tensorflow_lite_support/cc/task/vision/utils/frame_buffer_common_utils.h

std::unique_ptr<FrameBuffer> frame_buffer = CreateFromRgbRawBuffer(
      image_data, image_dimension);

// Run inference
const ClassificationResult result = image_classifier->Classify(*frame_buffer).value();
אפשר לעיין בקוד המקור כדי לראות עוד אפשרויות להגדרת ImageClassifier.
תוצאות לדוגמה
לפניכם דוגמה לתוצאות הסיווג של מסווג ציפורים.
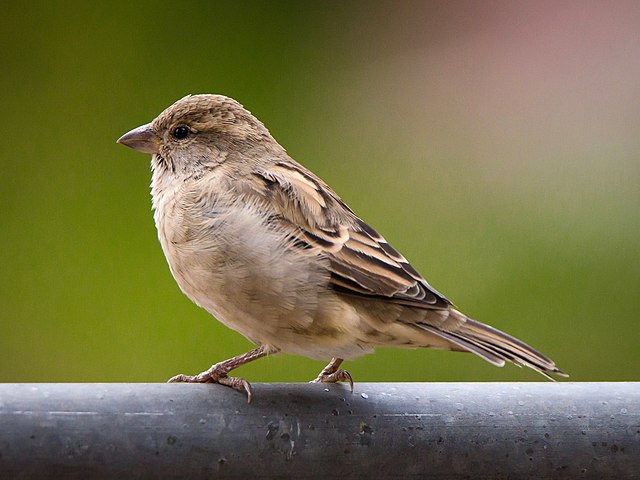
Results:
  Rank #0:
   index       : 671
   score       : 0.91406
   class name  : /m/01bwb9
   display name: Passer domesticus
  Rank #1:
   index       : 670
   score       : 0.00391
   class name  : /m/01bwbt
   display name: Passer montanus
  Rank #2:
   index       : 495
   score       : 0.00391
   class name  : /m/0bwm6m
   display name: Passer italiae
אפשר לנסות את כלי ההדגמה הפשוט של CLI ל-ImageClassifier עם המודל ונתוני הבדיקה שלכם.
דרישות התאימות של המודל
ממשק ה-API ImageClassifier מצפה לקבל מודל TFLite עם מטא-נתונים של מודל TFLite חובה. אפשר לראות דוגמאות ליצירת מטא-נתונים עבור מסווגי תמונות באמצעות TensorFlow Lite Metadata Writer API.
מודלים תואמים לסיווג תמונות צריכים לעמוד בדרישות הבאות:
פרמטרים של טנסור של תמונת קלט (kTfLiteUInt8/kTfLiteFloat32)
- קלט תמונה בגודל
[batch x height x width x channels]. - אין תמיכה בהסקת מסקנות באצווה (הערך של
batchצריך להיות 1). - יש תמיכה רק בקלט RGB (הערך של
channelsחייב להיות 3). - אם הסוג הוא kTfLiteFloat32, צריך לצרף NormalizationOptions למטא-נתונים כדי לבצע נורמליזציה של הקלט.
- קלט תמונה בגודל
טנזור של ציון הפלט (kTfLiteUInt8/kTfLiteFloat32)
- עם
Nכיתות ו-2 או 4 מאפיינים, כלומר[1 x N]או[1 x 1 x 1 x N] - מיפוי תווית אופציונלי (אבל מומלץ) כ-AssociatedFile-s עם סוג TENSOR_AXIS_LABELS, שמכיל תווית אחת בכל שורה. דוגמה לקובץ תוויות
ה-AssociatedFile הראשון (אם יש כזה) משמש למילוי השדה
label(שנקראclass_nameב-C++) בתוצאות. השדהdisplay_nameמתמלא מתוך AssociatedFile (אם יש כזה) שהלוקאל שלו תואם לשדהdisplay_names_localeשלImageClassifierOptionsשנעשה בו שימוש בזמן היצירה (ברירת המחדל היא en, כלומר אנגלית). אם אף אחד מהם לא זמין, רק השדהindexשל התוצאות יאוכלס.
- עם