
Các công cụ phân đoạn hình ảnh dự đoán xem mỗi pixel của một hình ảnh có được liên kết với một lớp nhất định hay không. Điều này trái ngược với tính năng phát hiện đối tượng (phát hiện các đối tượng trong các vùng hình chữ nhật) và phân loại hình ảnh (phân loại hình ảnh tổng thể). Hãy xem ví dụ tổng quan về phân đoạn hình ảnh để biết thêm thông tin về các công cụ phân đoạn hình ảnh.
Sử dụng API Thư viện tác vụ ImageSegmenter để triển khai các công cụ phân đoạn hình ảnh tuỳ chỉnh hoặc được huấn luyện trước vào các ứng dụng di động của bạn.
Các tính năng chính của ImageSegmenter API
Xử lý hình ảnh đầu vào, bao gồm xoay, đổi kích thước và chuyển đổi không gian màu.
Gắn nhãn ngôn ngữ trên bản đồ.
Hai loại đầu ra: mặt nạ danh mục và mặt nạ độ tin cậy.
Nhãn màu cho mục đích hiển thị.
Các mô hình phân đoạn hình ảnh được hỗ trợ
Các mô hình sau đây chắc chắn sẽ tương thích với API ImageSegmenter.
Các mô hình phân đoạn hình ảnh được huấn luyện trước trên TensorFlow Hub.
Các mô hình tuỳ chỉnh đáp ứng yêu cầu về khả năng tương thích của mô hình.
Chạy suy luận trong Java
Hãy xem Ứng dụng tham chiếu Phân đoạn hình ảnh để biết ví dụ về cách sử dụng ImageSegmenter trong một ứng dụng Android.
Bước 1: Nhập phần phụ thuộc Gradle và các chế độ cài đặt khác
Sao chép tệp mô hình .tflite vào thư mục tài sản của mô-đun Android nơi mô hình sẽ chạy. Chỉ định rằng tệp không được nén và thêm thư viện TensorFlow Lite vào tệp build.gradle của mô-đun:
android {
    // Other settings

    // Specify tflite file should not be compressed for the app apk
    aaptOptions {
        noCompress "tflite"
    }
}

dependencies {
    // Other dependencies

    // Import the Task Vision Library dependency
    implementation 'org.tensorflow:tensorflow-lite-task-vision'
    // Import the GPU delegate plugin Library for GPU inference
    implementation 'org.tensorflow:tensorflow-lite-gpu-delegate-plugin'
}
Bước 2: Sử dụng mô hình
// Initialization
ImageSegmenterOptions options =
    ImageSegmenterOptions.builder()
        .setBaseOptions(BaseOptions.builder().useGpu().build())
        .setOutputType(OutputType.CONFIDENCE_MASK)
        .build();
ImageSegmenter imageSegmenter =
    ImageSegmenter.createFromFileAndOptions(context, modelFile, options);

// Run inference
List<Segmentation> results = imageSegmenter.segment(image);
Hãy xem mã nguồn và javadoc để biết thêm các lựa chọn định cấu hình ImageSegmenter.
Chạy suy luận trong iOS
Bước 1: Cài đặt các phần phụ thuộc
Thư viện tác vụ hỗ trợ việc cài đặt bằng CocoaPods. Đảm bảo bạn đã cài đặt CocoaPods trên hệ thống. Vui lòng xem hướng dẫn cài đặt CocoaPods để biết hướng dẫn.
Vui lòng xem hướng dẫn về CocoaPods để biết thông tin chi tiết về cách thêm pod vào dự án Xcode.
Thêm nhóm TensorFlowLiteTaskVision vào Podfile.
target 'MyAppWithTaskAPI' do
  use_frameworks!
  pod 'TensorFlowLiteTaskVision'
end
Đảm bảo rằng mô hình .tflite mà bạn sẽ dùng để suy luận có trong gói ứng dụng của bạn.
Bước 2: Sử dụng mô hình
Swift
// Imports
import TensorFlowLiteTaskVision
// Initialization
guard let modelPath = Bundle.main.path(forResource: "deeplabv3",
ofType: "tflite") else { return }
let options = ImageSegmenterOptions(modelPath: modelPath)
// Configure any additional options:
// options.outputType = OutputType.confidenceMasks
let segmenter = try ImageSegmenter.segmenter(options: options)
// Convert the input image to MLImage.
// There are other sources for MLImage. For more details, please see:
// https://developers.google.com/ml-kit/reference/ios/mlimage/api/reference/Classes/GMLImage
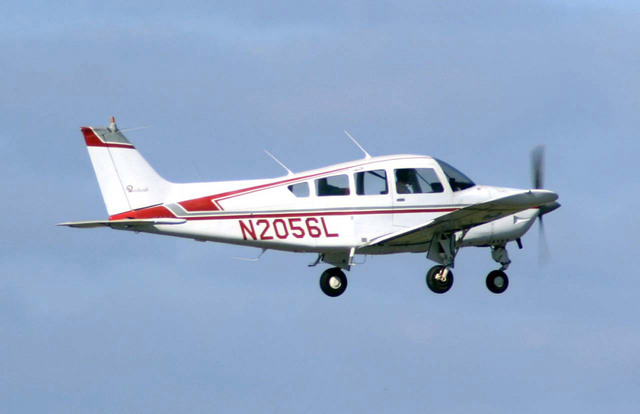
guard let image = UIImage (named: "plane.jpg"), let mlImage = MLImage(image: image) else { return }
// Run inference
let segmentationResult = try segmenter.segment(mlImage: mlImage)
Objective-C
// Imports
#import <TensorFlowLiteTaskVision/TensorFlowLiteTaskVision.h>

// Initialization
NSString *modelPath = [[NSBundle mainBundle] pathForResource:@"deeplabv3" ofType:@"tflite"];

TFLImageSegmenterOptions *options =
    [[TFLImageSegmenterOptions alloc] initWithModelPath:modelPath];

// Configure any additional options:
// options.outputType = TFLOutputTypeConfidenceMasks;

TFLImageSegmenter *segmenter = [TFLImageSegmenter imageSegmenterWithOptions:options
                                                                      error:nil];

// Convert the input image to MLImage.
UIImage *image = [UIImage imageNamed:@"plane.jpg"];

// There are other sources for GMLImage. For more details, please see:
// https://developers.google.com/ml-kit/reference/ios/mlimage/api/reference/Classes/GMLImage
GMLImage *gmlImage = [[GMLImage alloc] initWithImage:image];

// Run inference
TFLSegmentationResult *segmentationResult =
    [segmenter segmentWithGMLImage:gmlImage error:nil];
Hãy xem mã nguồn để biết thêm các lựa chọn định cấu hình TFLImageSegmenter.
Chạy suy luận trong Python
Bước 1: Cài đặt gói pip
pip install tflite-support
Bước 2: Sử dụng mô hình
# Imports
from tflite_support.task import vision
from tflite_support.task import core
from tflite_support.task import processor

# Initialization
base_options = core.BaseOptions(file_name=model_path)
segmentation_options = processor.SegmentationOptions(
    output_type=processor.SegmentationOptions.output_type.CATEGORY_MASK)
options = vision.ImageSegmenterOptions(base_options=base_options, segmentation_options=segmentation_options)
segmenter = vision.ImageSegmenter.create_from_options(options)

# Alternatively, you can create an image segmenter in the following manner:
# segmenter = vision.ImageSegmenter.create_from_file(model_path)

# Run inference
image_file = vision.TensorImage.create_from_file(image_path)
segmentation_result = segmenter.segment(image_file)
Hãy xem mã nguồn để biết thêm các lựa chọn định cấu hình ImageSegmenter.
Chạy suy luận bằng C++
// Initialization
ImageSegmenterOptions options;
options.mutable_base_options()->mutable_model_file()->set_file_name(model_path);
std::unique_ptr<ImageSegmenter> image_segmenter = ImageSegmenter::CreateFromOptions(options).value();

// Create input frame_buffer from your inputs, `image_data` and `image_dimension`.
// See more information here: tensorflow_lite_support/cc/task/vision/utils/frame_buffer_common_utils.h
std::unique_ptr<FrameBuffer> frame_buffer = CreateFromRgbRawBuffer(
      image_data, image_dimension);

// Run inference
const SegmentationResult result = image_segmenter->Segment(*frame_buffer).value();
Hãy xem mã nguồn để biết thêm các lựa chọn định cấu hình ImageSegmenter.
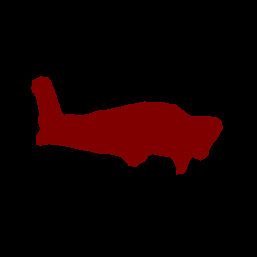
Kết quả mẫu
Dưới đây là ví dụ về kết quả phân đoạn của deeplab_v3, một mô hình phân đoạn chung có trên TensorFlow Hub.
Color Legend:
 (r: 000, g: 000, b: 000):
  index       : 0
  class name  : background
 (r: 128, g: 000, b: 000):
  index       : 1
  class name  : aeroplane

# (omitting multiple lines for conciseness) ...

 (r: 128, g: 192, b: 000):
  index       : 19
  class name  : train
 (r: 000, g: 064, b: 128):
  index       : 20
  class name  : tv
Tip: use a color picker on the output PNG file to inspect the output mask with
this legend.
Mặt nạ danh mục phân đoạn sẽ có dạng như sau:
Dùng thử công cụ minh hoạ CLI đơn giản cho ImageSegmenter bằng mô hình và dữ liệu kiểm thử của riêng bạn.
Yêu cầu về khả năng tương thích của mô hình
API ImageSegmenter yêu cầu một mô hình TFLite có Siêu dữ liệu mô hình TFLite bắt buộc. Xem ví dụ về cách tạo siêu dữ liệu cho các bộ phân đoạn hình ảnh bằng API Trình ghi siêu dữ liệu TensorFlow Lite.
Tensor hình ảnh đầu vào (kTfLiteUInt8/kTfLiteFloat32)
- đầu vào hình ảnh có kích thước
[batch x height x width x channels]. - không hỗ trợ suy luận theo lô (
batchphải là 1). - chỉ hỗ trợ đầu vào RGB (
channelsphải là 3). - nếu loại là kTfLiteFloat32, bạn phải đính kèm NormalizationOptions vào siêu dữ liệu để chuẩn hoá dữ liệu đầu vào.
- đầu vào hình ảnh có kích thước
Tensor mặt nạ đầu ra: (kTfLiteUInt8/kTfLiteFloat32)
- tensor có kích thước
[batch x mask_height x mask_width x num_classes], trong đóbatchphải là 1,mask_widthvàmask_heightlà kích thước của mặt nạ phân đoạn do mô hình tạo ra, cònnum_classeslà số lượng lớp mà mô hình hỗ trợ. - bạn có thể đính kèm (nhưng nên đính kèm) (các) bản đồ nhãn không bắt buộc dưới dạng AssociatedFile-s có loại TENSOR_AXIS_LABELS, chứa một nhãn trên mỗi dòng. AssociatedFile đầu tiên như vậy (nếu có) được dùng để điền vào trường
label(được đặt tên làclass_nametrong C++) của kết quả. Trườngdisplay_nameđược điền từ AssociatedFile (nếu có) có ngôn ngữ khớp với trườngdisplay_names_localecủaImageSegmenterOptionsđược dùng tại thời điểm tạo ("en" theo mặc định, tức là tiếng Anh). Nếu không có trường nào trong số này, thì chỉ trườngindexcủa kết quả sẽ được điền.
- tensor có kích thước