
オブジェクト検出器は、既知のオブジェクト セットのどれが存在する可能性があるかを特定し、指定された画像または動画ストリーム内の位置に関する情報を提供します。オブジェクト検出器は、複数のクラスのオブジェクトの存在と位置を検出するようにトレーニングされます。たとえば、さまざまな果物を含む画像と、それらが表す果物のクラス(リンゴ、バナナ、イチゴなど)を指定するラベル、各オブジェクトが画像内のどこに表示されるかを指定するデータを使用してモデルをトレーニングできます。オブジェクト検出器の詳細については、オブジェクト検出の例をご覧ください。
Task Library ObjectDetector API を使用して、カスタム オブジェクト検出器または事前トレーニング済みのオブジェクト検出器をモバイルアプリにデプロイします。
ObjectDetector API の主な機能
回転、サイズ変更、色空間変換などの入力画像処理。
ラベルマップの言語 / 地域。
結果をフィルタするスコアのしきい値。
上位 k 個の検出結果。
ラベルの許可リストと拒否リスト。
サポートされているオブジェクト検出モデル
次のモデルは、ObjectDetector API との互換性が保証されています。
AutoML Vision Edge Object Detection で作成されたモデル。
オブジェクト検出用の TensorFlow Lite Model Maker で作成されたモデル。
モデルの互換性要件を満たすカスタムモデル。
Java で推論を実行する
Android アプリで ObjectDetector を使用する方法の例については、オブジェクト検出リファレンス アプリをご覧ください。
ステップ 1: Gradle の依存関係とその他の設定をインポートする
.tflite モデルファイルを、モデルが実行される Android モジュールの assets ディレクトリにコピーします。ファイルを圧縮しないように指定し、TensorFlow Lite ライブラリをモジュールの build.gradle ファイルに追加します。
android {
    // Other settings

    // Specify tflite file should not be compressed for the app apk
    aaptOptions {
        noCompress "tflite"
    }
}

dependencies {
    // Other dependencies

    // Import the Task Vision Library dependency
    implementation 'org.tensorflow:tensorflow-lite-task-vision'
    // Import the GPU delegate plugin Library for GPU inference
    implementation 'org.tensorflow:tensorflow-lite-gpu-delegate-plugin'
}
ステップ 2: モデルを使用する
// Initialization
ObjectDetectorOptions options =
    ObjectDetectorOptions.builder()
        .setBaseOptions(BaseOptions.builder().useGpu().build())
        .setMaxResults(1)
        .build();
ObjectDetector objectDetector =
    ObjectDetector.createFromFileAndOptions(
        context, modelFile, options);

// Run inference
List<Detection> results = objectDetector.detect(image);
ObjectDetector を構成するその他のオプションについては、ソースコードと javadoc をご覧ください。
iOS で推論を実行する
ステップ 1: 依存関係をインストールする
タスク ライブラリは、CocoaPods を使用したインストールをサポートしています。システムに CocoaPods がインストールされていることを確認します。手順については、CocoaPods インストール ガイドをご覧ください。
Xcode プロジェクトに Pod を追加する方法について詳しくは、CocoaPods ガイドをご覧ください。
Podfile に TensorFlowLiteTaskVision Pod を追加します。
target 'MyAppWithTaskAPI' do
  use_frameworks!
  pod 'TensorFlowLiteTaskVision'
end
推論に使用する .tflite モデルがアプリバンドルに含まれていることを確認します。
ステップ 2: モデルを使用する
Swift
// Imports
import TensorFlowLiteTaskVision

// Initialization
guard let modelPath = Bundle.main.path(forResource: "ssd_mobilenet_v1",
                                            ofType: "tflite") else { return }

let options = ObjectDetectorOptions(modelPath: modelPath)

// Configure any additional options:
// options.classificationOptions.maxResults = 3

let detector = try ObjectDetector.detector(options: options)

// Convert the input image to MLImage.
// There are other sources for MLImage. For more details, please see:
// https://developers.google.com/ml-kit/reference/ios/mlimage/api/reference/Classes/GMLImage
guard let image = UIImage (named: "cats_and_dogs.jpg"), let mlImage = MLImage(image: image) else { return }

// Run inference
let detectionResult = try detector.detect(mlImage: mlImage)
Objective-C
// Imports
#import <TensorFlowLiteTaskVision/TensorFlowLiteTaskVision.h>

// Initialization
NSString *modelPath = [[NSBundle mainBundle] pathForResource:@"ssd_mobilenet_v1" ofType:@"tflite"];

TFLObjectDetectorOptions *options = [[TFLObjectDetectorOptions alloc] initWithModelPath:modelPath];

// Configure any additional options:
// options.classificationOptions.maxResults = 3;

TFLObjectDetector *detector = [TFLObjectDetector objectDetectorWithOptions:options
                                                                     error:nil];

// Convert the input image to MLImage.
UIImage *image = [UIImage imageNamed:@"dogs.jpg"];

// There are other sources for GMLImage. For more details, please see:
// https://developers.google.com/ml-kit/reference/ios/mlimage/api/reference/Classes/GMLImage
GMLImage *gmlImage = [[GMLImage alloc] initWithImage:image];

// Run inference
TFLDetectionResult *detectionResult = [detector detectWithGMLImage:gmlImage error:nil];
TFLObjectDetector を構成するその他のオプションについては、ソースコードをご覧ください。
Python で推論を実行する
ステップ 1: pip パッケージをインストールする
pip install tflite-support
ステップ 2: モデルを使用する
# Imports
from tflite_support.task import vision
from tflite_support.task import core
from tflite_support.task import processor

# Initialization
base_options = core.BaseOptions(file_name=model_path)
detection_options = processor.DetectionOptions(max_results=2)
options = vision.ObjectDetectorOptions(base_options=base_options, detection_options=detection_options)
detector = vision.ObjectDetector.create_from_options(options)

# Alternatively, you can create an object detector in the following manner:
# detector = vision.ObjectDetector.create_from_file(model_path)

# Run inference
image = vision.TensorImage.create_from_file(image_path)
detection_result = detector.detect(image)
ObjectDetector を構成するその他のオプションについては、ソースコードをご覧ください。
C++ で推論を実行する
// Initialization
ObjectDetectorOptions options;
options.mutable_base_options()->mutable_model_file()->set_file_name(model_path);
std::unique_ptr<ObjectDetector> object_detector = ObjectDetector::CreateFromOptions(options).value();

// Create input frame_buffer from your inputs, `image_data` and `image_dimension`.
// See more information here: tensorflow_lite_support/cc/task/vision/utils/frame_buffer_common_utils.h
std::unique_ptr<FrameBuffer> frame_buffer = CreateFromRgbRawBuffer(
      image_data, image_dimension);

// Run inference
const DetectionResult result = object_detector->Detect(*frame_buffer).value();
ObjectDetector を構成するその他のオプションについては、ソースコードをご覧ください。
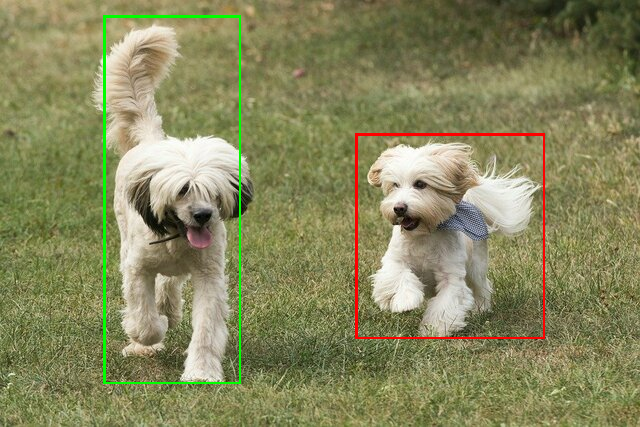
検索結果の例
TensorFlow Hub の ssd mobilenet v1 の検出結果の例を次に示します。
Results:
 Detection #0 (red):
  Box: (x: 355, y: 133, w: 190, h: 206)
  Top-1 class:
   index       : 17
   score       : 0.73828
   class name  : dog
 Detection #1 (green):
  Box: (x: 103, y: 15, w: 138, h: 369)
  Top-1 class:
   index       : 17
   score       : 0.73047
   class name  : dog
入力画像に境界ボックスをレンダリングします。
独自のモデルとテストデータを使用して、シンプルな ObjectDetector の CLI デモツールを試してください。
モデルの互換性要件
ObjectDetector API は、必須の TFLite モデル メタデータを含む TFLite モデルを想定しています。TensorFlow Lite メタデータ ライター API を使用してオブジェクト検出器のメタデータを作成する例をご覧ください。
互換性のあるオブジェクト検出モデルは、次の要件を満たしている必要があります。
入力画像テンソル: (kTfLiteUInt8/kTfLiteFloat32)
- サイズ
[batch x height x width x channels]の画像入力。 - バッチ推論はサポートされていません(
batchは 1 である必要があります)。 - RGB 入力のみがサポートされます(
channelsは 3 である必要があります)。 - 型が kTfLiteFloat32 の場合、入力正規化のメタデータに NormalizationOptions を付加する必要があります。
- サイズ
出力テンソルは
DetectionPostProcessオペレーションの 4 つの出力である必要があります。- 位置テンソル(kTfLiteFloat32)
- サイズ
[1 x num_results x 4]のテンソル。内側の配列は、[上、左、右、下] の形式で境界ボックスを表します。 - BoundingBoxProperties はメタデータに関連付けられている必要があり、
type=BOUNDARIESと `coordinate_type=RATIO` を指定する必要があります。 クラス テンソル(kTfLiteFloat32)
サイズ
[1 x num_results]のテンソル。各値はクラスの整数インデックスを表します。省略可(推奨)のラベルマップは、タイプが TENSOR_VALUE_LABELS の AssociatedFile として添付できます。各行に 1 つのラベルが含まれます。ラベルファイルの例をご覧ください。そのような AssociatedFile がある場合は、最初に見つかったものが結果の
class_nameフィールドに入力されます。display_nameフィールドは、作成時に使用されたObjectDetectorOptionsのdisplay_names_localeフィールドとロケールが一致する AssociatedFile(存在する場合)から入力されます(デフォルトでは「en」、つまり英語)。いずれも利用できない場合は、結果のindexフィールドのみが入力されます。スコア テンソル(kTfLiteFloat32)
サイズ
[1 x num_results]のテンソル。各値は検出されたオブジェクトのスコアを表します。検出テンソルの数(kTfLiteFloat32)
サイズ
[1]のテンソルとしての整数 num_results。