
LiteRT 透過 CompiledModel API 支援 Intel OpenVino,適用於 AOT 和裝置端編譯。
Python API
設定開發環境
Linux (x86_64):
- Ubuntu 22.04 或 24.04 LTS
- Python 3.10 以上版本 - 從 python.org 或發行版本 (
sudo apt install python3 python3-venv) 安裝 - Intel NPU 驅動程式 v1.32.1 - 請參閱 Linux NPU 設定
Windows (x86_64):
- Windows 10 或 11
- Python 3.10 以上版本 - 從 python.org 安裝
- Intel NPU 驅動程式 32.0.100.4724+ - 請參閱「Windows NPU 設定」
如要從來源建構,也必須使用 Bazelisk 或密封式 Docker 建構,Bazel 版本則須為 7.4.1 以上。
支援的 SoC
| 平台 | NPU | 產品代號 | 作業系統 |
|---|---|---|---|
| Intel Core Ultra Series 2 | NPU4000 | Lunar Lake (LNL) | Linux、Windows |
| Intel Core Ultra Series 3 | NPU5010 | Panther Lake (PTL) | Linux、Windows |
快速入門
1. 安裝 NPU 驅動程式
請參閱 Linux NPU 設定或 Windows NPU 設定。如果只需要 AOT,請略過這個步驟。
只有在系統執行 NPU 硬體上的模型時,才需要 NPU 驅動程式。純 AOT 建構系統可以略過這項步驟。
注意:
ai-edge-litert-sdk-intel-nightly會依據 PEP 440 版本 (例如openvino==2026.2.0.dev20260506) 固定相符的 OpenVINO 每夜版 Wheel,因此 pip 需要--extra-index-url https://storage.openvinotoolkit.org/simple/wheels/nightly才能找到該 Wheel。在 Linux 上,如果發行版本自動偵測功能選取了錯誤的封存檔,請在pip install前設定LITERT_OV_OS_ID=ubuntu22或ubuntu24。
2. 建立 Python 虛擬環境
建議將每晚的 openvino 輪子與任何系統範圍的 OpenVINO 安裝作業隔離。
python -m venv litert_env
# Linux / macOS
source litert_env/bin/activate
# Windows (PowerShell)
.\litert_env\Scripts\Activate.ps1
python -m pip install --upgrade pip
3. 安裝 pip 套件
pip install --pre \
--extra-index-url https://storage.openvinotoolkit.org/simple/wheels/nightly \
ai-edge-litert-nightly ai-edge-litert-sdk-intel-nightly
--extra-index-url 可讓 pip 從 OpenVINO 的索引解析固定的 openvino 夜間版 Wheel,以及 PyPI 上的套件。
4. 驗證安裝
python -c "
from ai_edge_litert.aot.vendors.intel_openvino import intel_openvino_backend
import ai_edge_litert_sdk_intel, openvino, os
print('Backend:', intel_openvino_backend.IntelOpenVinoBackend.id())
print('Dispatch:', intel_openvino_backend.get_dispatch_dir())
print('OpenVINO:', openvino.__version__)
print('SDK libs:', sorted(os.listdir(ai_edge_litert_sdk_intel.path_to_sdk_libs())))
print('Available devices:', openvino.Core().available_devices)
"
輸出內容檢查事項:
SDK libs清單libopenvino_intel_npu_compiler.so(Linux) 或openvino_intel_npu_compiler.dll(Windows) - AOT 必須使用。Available devices包含NPU,可確認 NPU 驅動程式已安裝,且 OpenVINO 可以與裝置通訊。如果系統僅支援 AOT (未安裝驅動程式),或系統沒有 Intel NPU 硬體,就不會顯示「NPU」。
5. AOT 編譯 (選用)
- 針對特定 Intel NPU 目標 (PTL 或 LNL) 預先編譯
.tflite,因此執行階段會略過編譯器外掛程式步驟。 - 不需要實體 NPU 或 NPU 驅動程式,只需要
ai-edge-litert-nightly和ai-edge-litert-sdk-intel-nightly。 - 支援跨平台編譯:在任何 Linux 或 Windows 主機上編譯,然後將產生的
.tflite傳送至任一 OS 的目標,並在該處運作執行。
輸出檔案名稱為 <model>_IntelOpenVINO_<SoC>_apply_plugin.tflite。
from ai_edge_litert.aot import aot_compile
from ai_edge_litert.aot.vendors.intel_openvino import target as intel_target

# Compile for a single Intel NPU target (PTL or LNL).
aot_compile.aot_compile(
    "model.tflite",
    output_dir="out",
    target=intel_target.Target(soc_model=intel_target.SocModel.PTL),
)

# Or omit target= to compile for every registered backend/target.
aot_compile.aot_compile("model.tflite", output_dir="out", keep_going=True)
6. 執行 NPU 推論
LiteRT 在 Intel NPU 上支援兩種推論路徑:
- JIT - 載入原始
.tflite;編譯器外掛程式會在CompiledModel.from_file()時間分割並編譯 NPU 支援的作業。增加一些首次執行延遲 (因型號而異)。 - AOT 編譯 - 載入步驟 4 產生的
<model>_IntelOpenVINO_<SoC>_apply_plugin.tflite。在載入時間略過分割和編譯步驟。
這個程式碼片段適用於這兩種情況:
from ai_edge_litert.compiled_model import CompiledModel
from ai_edge_litert.hardware_accelerator import HardwareAccelerator

model = CompiledModel.from_file(
    "model.tflite",  # raw tflite (JIT) or ..._apply_plugin.tflite (AOT)
    hardware_accel=HardwareAccelerator.NPU | HardwareAccelerator.CPU,
)

sig_key = list(model.get_signature_list().keys())[0]
sig_idx = model.get_signature_index(sig_key)
input_buffers = model.create_input_buffers(sig_idx)
output_buffers = model.create_output_buffers(sig_idx)
model.run_by_index(sig_idx, input_buffers, output_buffers)
print("Fully accelerated:", model.is_fully_accelerated())
確認 JIT 確實已執行
如果 JIT 成功,記錄檔會包含 (Linux 的副檔名為 .so,Windows 的副檔名為 .dll):
INFO: [compiler_plugin.cc:236] Loaded plugin at: .../LiteRtCompilerPlugin_IntelOpenvino.{so,dll}
INFO: [compiler_plugin.cc:690] Partitioned subgraph<0>, selected N ops, from a total of N ops
INFO: [compiled_model.cc:1006] JIT compilation changed model, reserializing...
如果沒有這些行,但仍回報 Fully accelerated: True,則表示模型是在 XNNPACK CPU 回退上執行,而非在 NPU 上執行,請參閱 JIT 疑難排解資料列。
7. 基準
# Dispatch library and the NPU compiler are auto-discovered from the wheel.
litert-benchmark --model=model.tflite --use_npu --num_runs=50
常見標記:
| 檢舉 | 預設 | 說明 |
|---|---|---|
--model PATH
|
— | .tflite 模型的路徑 (必要)。 |
--signature KEY |
第一週 | 要執行的簽章金鑰。 |
--use_cpu / --no_cpu
|
on | 切換 CPU 加速器 / CPU 回退。 |
--use_gpu |
關閉 | 啟用 GPU 加速器。 |
--use_npu |
關閉 | 啟用 Intel NPU 加速器。 |
--require_full_delegation
|
關閉 | 如果模型未完全卸載至所選加速器,就會失敗。 |
--num_runs N
|
50 | 計時推論疊代次數。 |
--warmup_runs N
|
5 | 在測量前進行不計時的暖身疊代。 |
--num_threads N |
1 | CPU 執行緒數量。 |
--result_json PATH
|
— | 撰寫 JSON 摘要 (延遲統計資料、處理量、加速器清單)。 |
--verbose |
關閉 | 額外執行階段記錄。 |
進階 / 覆寫旗標 - 僅在指向自訂建構版本時需要:--dispatch_library_path、--compiler_plugin_path、--runtime_path。
混合供應商的 Wheel:將 JIT 釘選至 Intel OV
注意:如果呼叫
Environment.create()時未指定路徑,系統會自動依字母順序探索ai_edge_litert/vendors/下的供應商,並註冊找到的第一個供應商。在混合供應商安裝中,這可能不是 Intel OV,請明確傳遞 Intel OV 目錄,強制選擇正確的目錄。
- pip 輪會為每個已註冊的供應商 (
intel_openvino/、google_tensor/、mediatek/、qualcomm/、samsung/) 運送編譯器外掛程式。 - 如要強制使用 Intel OV 路徑 (建議在安裝多個供應商 SDK 時使用),請手動傳遞 Intel OV 目錄:
from ai_edge_litert.environment import Environment
from ai_edge_litert.compiled_model import CompiledModel
from ai_edge_litert.hardware_accelerator import HardwareAccelerator
from ai_edge_litert.aot.vendors.intel_openvino import intel_openvino_backend as ov

env = Environment.create(
    compiler_plugin_path=ov.get_compiler_plugin_dir(),   # JIT compiler
    dispatch_library_path=ov.get_dispatch_dir(),          # runtime
)
model = CompiledModel.from_file(
    "model.tflite",
    hardware_accel=HardwareAccelerator.NPU | HardwareAccelerator.CPU,
    environment=env,
)
執行階段會載入指定目錄中找到的每個共用程式庫,因此指向 vendors/intel_openvino/compiler/ 只會載入 Intel 外掛程式;同層級目錄中的 Google Tensor / MediaTek / Qualcomm / Samsung 外掛程式則不會受到影響。
如果是 CLI,對應的旗標如下:
DISPATCH_DIR=$(python3 -c 'from ai_edge_litert.aot.vendors.intel_openvino import intel_openvino_backend as ov; print(ov.get_dispatch_dir())')
COMPILER_DIR=$(python3 -c 'from ai_edge_litert.aot.vendors.intel_openvino import intel_openvino_backend as ov; print(ov.get_compiler_plugin_dir())')

litert-benchmark --model=model.tflite --use_npu \
    --compiler_plugin_path=$COMPILER_DIR \
    --dispatch_library_path=$DISPATCH_DIR
驗證 NPU 執行作業
如要確認模型是否確實在 NPU 上執行,請檢查這兩種信號:
- 記錄包含
Loading shared library:
.../LiteRtDispatch_IntelOpenvino.{so,dll}
,表示已載入 Intel 派遣程式庫 (Linux 上為.so,Windows 上為.dll)。 model.is_fully_accelerated()傳回True- 每個運算都已卸載至所選加速器。
is_fully_accelerated() 本身不足:如果從未載入調度程式庫,作業會完全卸載至 XNNPACK/CPU,而非 NPU。
Linux NPU 設定
注意:如果只需要 AOT,則可略過本節,因為不需要實體 NPU。
資訊:使用 NPU 驅動程式 v1.32.1 (搭配 OpenVINO 2026.1)。舊版驅動程式會失敗並顯示
Level0 pfnCreate2
result: ZE_RESULT_ERROR_UNSUPPORTED_FEATURE
。
# 1. NPU driver (Ubuntu 24.04 use -ubuntu2204 tarball for 22.04).
sudo dpkg --purge --force-remove-reinstreq \
  intel-driver-compiler-npu intel-fw-npu intel-level-zero-npu intel-level-zero-npu-dbgsym || true
wget https://github.com/intel/linux-npu-driver/releases/download/v1.32.1/linux-npu-driver-v1.32.1.20260422-24767473183-ubuntu2404.tar.gz
tar -xf linux-npu-driver-v1.32.1.*.tar.gz
sudo apt update && sudo apt install -y libtbb12
sudo dpkg -i intel-fw-npu_*.deb intel-level-zero-npu_*.deb intel-driver-compiler-npu_*.deb

# 2. Level Zero loader v1.27.0.
wget https://snapshot.ppa.launchpadcontent.net/kobuk-team/intel-graphics/ubuntu/20260324T100000Z/pool/main/l/level-zero-loader/libze1_1.27.0-1~24.04~ppa2_amd64.deb
sudo dpkg -i libze1_*.deb

# 3. Permissions + verify.
sudo gpasswd -a ${USER} render && newgrp render
ls /dev/accel/accel0   # must exist after reboot
Windows NPU 設定
注意:如果只需要 AOT,則可略過本節,因為不需要實體 NPU。
- 從 Intel 下載中心安裝 Intel NPU 驅動程式 (32.0.100.4724+)。
- 確認裝置管理工具是否在「神經元處理器」下方列出 NPU 裝置 (視驅動程式而定,顯示為
Intel(R) AI Boost或Intel(R) NPU)。 - 從「快速入門」執行安裝 + 驗證程式碼片段,並將
pip替換為python -m pip。
資訊:
import ai_edge_litert會使用os.add_dll_directory()自動註冊 DLL 目錄,因此 Python 指令碼不需要PATH設定。對於非 Python 消費者,請執行setupvars.bat或在PATH前加上<openvino>/libs。
從來源建構
使用 Proxy 嗎?請在執行建構指令碼前匯出
http_proxy/https_proxy/no_proxy,這些指令碼會將這些變數轉送至 Docker 和容器。
Linux (Docker、密封):
cd LiteRT/docker_build && ./build_wheel_with_docker.sh
Windows (PowerShell,Bazel 位於 PATH 中):
.\ci\build_pip_package_with_bazel_windows.ps1
輸出內容會顯示在 dist/ 中:
ai_edge_litert-*.whl,即執行階段輪。ai_edge_litert_sdk_{intel,qualcomm,mediatek,samsung}-*.tar.gz- 供應商 sdists。- Intel sdist 約為 5 KB;NPU 編譯器
.so/.dll會在pip install時間擷取,因此相同的 sdist 適用於 Linux 和 Windows。
單元測試
bazel test \
  //litert/python/aot/vendors/intel_openvino:intel_openvino_backend_test \
  //litert/c/options:litert_intel_openvino_options_test \
  //litert/cc/options:litert_intel_openvino_options_test \
  //litert/tools/flags/vendors:intel_openvino_flags_test
疑難排解
| 問題 | 修正 |
|---|---|
AOT 失敗:Device with "NPU" name is not registered |
未擷取 NPU 編譯器。請查看 ai_edge_litert_sdk_intel.path_to_sdk_libs() 清單 libopenvino_intel_npu_compiler.so / .dll。如果為空,請重新安裝並授予網路存取權,或設定 LITERT_OV_OS_ID=ubuntu22/ubuntu24。 |
JIT 在 CPU 上執行,而非 NPU (沒有 Partitioned subgraph 記錄、沒有 Loaded plugin 記錄,但仍會列印 Fully accelerated: True) |
找不到編譯器外掛程式。確認 ov.get_compiler_plugin_dir() 會傳回 ai_edge_litert/vendors/intel_openvino/compiler/ 下的路徑。如果安裝了多個供應商 SDK,請明確將 compiler_plugin_path=ov.get_compiler_plugin_dir() 傳遞至 Environment.create() (或將 --compiler_plugin_path=... 傳遞至 litert-benchmark)。 |
JIT 失敗:Cannot load library .../openvino/libs/libopenvino_intel_npu_compiler.so (Linux) / openvino_intel_npu_compiler.dll (Windows) |
SDK sdist 會在第一次 import ai_edge_litert_sdk_intel 時,將 NPU 編譯器複製到 openvino/libs/。如果系統略過複製程序 (唯讀 FS、缺少 openvino),請在安裝 openvino 後重新安裝 ai-edge-litert-sdk-intel,然後import ai_edge_litert。 |
Level0 pfnCreate2 result: ZE_RESULT_ERROR_UNSUPPORTED_FEATURE |
將 NPU 驅動程式升級至 v1.32.1 (Linux)。 |
找不到「/dev/accel/accel0」 |
sudo dmesg | grep -i vpu 偵錯驅動程式;安裝後重新啟動。 |
| NPU 權限遭拒 | sudo gpasswd -a ${USER} render && newgrp render。 |
| Windows:裝置管理工具中未顯示 NPU | 從 Intel 下載中心安裝 NPU 驅動程式 32.0.100.4724 以上版本。 |
Windows:Failed to initialize Dispatch API / 缺少 DLL |
請務必先執行 import ai_edge_litert (自動註冊 DLL 目錄);對於非 Python 呼叫端,請執行 setupvars.bat 或將 <openvino>/libs 前置於 PATH。 |
Windows 版本:LNK2001 fixed_address_empty_string、C2491 dllimport、Python 3.12+ fails |
Protobuf ABI / Python 版本限制 - 請參閱 ci/build_pip_package_with_bazel_windows.ps1;Windows 建構作業需要 Python 3.11。 |
限制
透過 OpenVINO 傳送路徑,僅支援 NPU 裝置。如要進行 CPU 推論,請單獨使用 HardwareAccelerator.CPU (XNNPACK)。
C++ API
事前準備和建構設定
建構先決條件:
- Visual Studio 2022 以上版本 (必須安裝 C++ 開發工具)。
- git:從 https://git-scm.com/install/ 安裝 git。請確認系統的 PATH 環境變數中包含
C:\Program Files\Git\bin and C:\Program Files\Git\cmd,以便 LiteRT/LiteRT-LM 建構程序找到 bash.exe 和 git.exe。 - bazelisk:安裝 bazelisk,並將其位置納入系統的
PATH環境變數:https://bazel.build/install/bazelisk。 - Cmake:從 https://cmake.org/download/ 安裝 Cmake 4.3.0 以上版本,並確認 Cmake 已納入系統的 PATH。
- Python:請確認已安裝 Python 3.11 以上版本,且 python.exe 位於 PATH 中。
- Windows 設定:在 Windows 設定中啟用開發人員模式。
為 Intel NPU 建構 LiteRT 工具和外掛程式
如要在 Intel NPU 上使用 LiteRT 執行模型,必須使用 LiteRT Intel OpenVINO 編譯器外掛程式編譯模型;此外,任何要在 Intel NPU 上執行的編譯模型,都必須委派給 LiteRT Intel OpenVINO 調度外掛程式。
LiteRT 叫用這些外掛程式的機制如下圖所示:
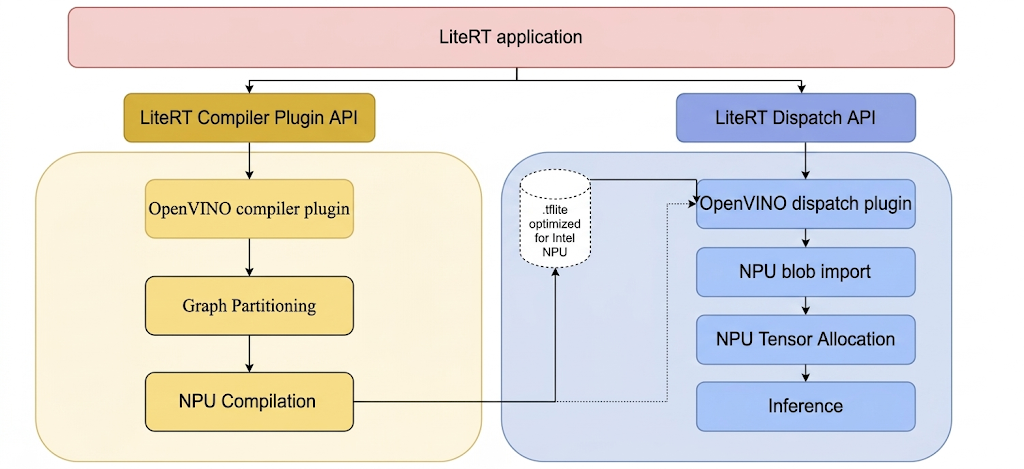
建構 LiteRT 工具和 Intel 外掛程式的步驟。
從 LiteRT 建構任何可執行檔或程式庫之前,請先建立本機目錄,例如 C:\bzl。建構輸出二進位檔會從這個目錄收集。建構 Intel OpenVINO 派遣外掛程式
# At the top-level directory of LiteRT repository
bazelisk --output_base=C:\bzl build //litert/vendors/intel_openvino/dispatch:LiteRtDispatch --config=windows
或者,您也可以從 LiteRT-LM 存放區建構調度外掛程式,方法是在目標中新增 @litert 前置字元。LiteRT 存放區中的所有目標都類似於此。
# At the top-level directory of LiteRT-LM repository
bazelisk --output_base=C:\bzl build @litert//litert/vendors/intel_openvino/dispatch:LiteRtDispatch --config=windows
建構 Intel OpenVINO 編譯器外掛程式
bazelisk --output_base=C:\bzl build //litert/vendors/intel_openvino/compiler:LiteRtCompilerPlugin --config=windows
建構 LiteRT 預先編譯 (AOT) 編譯器公用程式。部分 LiteRT 工具需要先明確編譯模型,才能在 Intel NPU 上執行。LiteRT AOT 編譯器公用程式的建構指令:
bazelisk --output_base=C:\bzl build
//litert/tools:apply_plugin_main --config=windows
建構 LiteRT 模型執行器 LiteRT 模型執行器可用於在 Intel NPU 上執行模型,無論是未預先編譯的模型或 AOT 編譯模型皆可。建構模型執行器的指令:
bazelisk --output_base=C:\bzl build //litert/tools:run_model --config=windows
建構 LiteRT 基準模型公用程式 LiteRT 模型基準工具可用於評估 Intel NPU 上模型推論的效能。如需建構基準測試工具的說明,請參閱:
bazelisk --output_base=C:\bzl build //litert/tools:benchmark_model --config=windows --define=protobuf_allow_msvc=true
建構 LiteRT 數字檢查公用程式
bazelisk --output_base=C:\bzl build //litert/tools:npu_numerics_check --config=windows
進階用法:使用自訂的 Intel OpenVINO SDK 建構
編譯編譯器和調度外掛程式時,LiteRT 建構系統會自動擷取預先建構的 Intel OpenVINO SDK。
如果專案需要特定或自訂版本的 Intel OpenVINO SDK,請先完成下列額外設定步驟,再開始建構外掛程式:
- 從 https://www.intel.com/content/www/us/en/download/753640/intel-distribution-of-openvino-toolkit.html 下載適用於 Windows 的最新 OpenVINO 版本二進位檔,然後解壓縮至本機磁碟,例如
C:\Intel\intel_openvino。 - 請確認這個路徑下只有一個名為「openvino」的子目錄,其中包含「runtime」和「include」等子目錄。
- 在控制台 (命令提示字元或 PowerShell) 中,前往複製的 LiteRT 存放區根目錄,然後設定 OPENVINO_NATIVE_DIR 變數 (請確認沒有尾端
\`), for example:set OPENVINO_NATIVE_DIR=C:\Intel\intel_openvino`
自訂模型的 AOT 編譯
本節將準備環境,並對 LiteRT 的自訂 TFLite、PyTorch 或 JAX 模型執行 AOT 編譯。
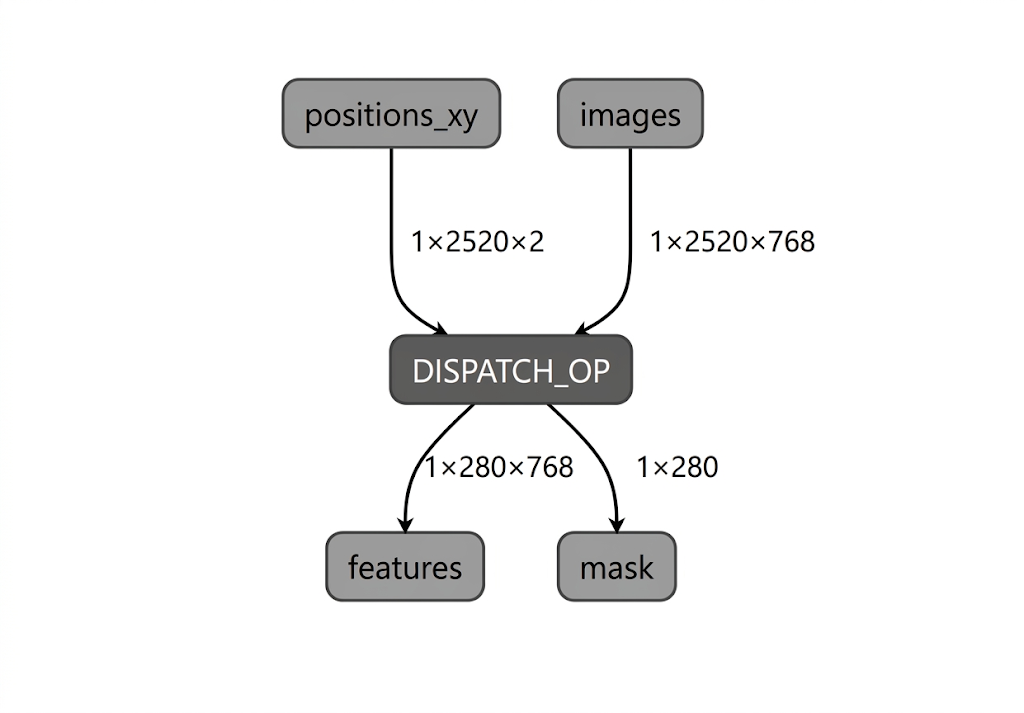
在 Intel NPU 的模型編譯過程中,LiteRT 會根據 LiteRT Intel OpenVINO 編譯器外掛程式支援的運算子,驗證模型圖。對於與編譯器外掛程式相容的運算子或子圖,LiteRT 會將每個這類子圖編譯為 DISPATCH_OP,隨後取代圖形中的原始子圖。Intel OpenVINO 編譯器支援的運算子集不包含的運算子,在圖表中會維持不變。因此,AOT 編譯可能會產生完全委派或部分委派的模型。以下是完全委派的 AOT 編譯模型範例:
LiteRT apply_plugin_main 公用程式 (apply_plugin_main.exe) 是 AOT 編譯公用程式,可用於此用途。在 Intel 平台上使用公用程式的範例:
.\apply_plugin_main.exe -cmd apply --model="C:\models\model.tflite" -o C:\models\model_aot.tflite --soc_model=PTL --soc_manufacturer "IntelOpenVINO" --libs C:\litertlibs
請注意,Intel OpenVINO SDK 的二進位發行版本內含預設的基礎 NPU 編譯器,適用於 Intel Core Ultra Series 2 和後續的 SoC。如果編譯模型時使用的 NPU 不在支援清單中,則必須明確指定編譯器類型 (但 Intel Core Ultra 2 以上版本仍為選用)。
set IE_NPU_COMPILER_TYPE=PLUGIN
應用程式中的 JIT 與 AOT 編譯
如要在自己的 LiteRT 應用程式中編譯模型,有兩種方法:我們已介紹過的 AOT 編譯,以及即時 (JIT) 編譯。
使用 AOT 編譯時,模式會在部署前離線編譯,並儲存以供日後使用。如果編譯作業耗用的資源過多,無法在裝置端執行,通常會使用這種方式。您不必在部署模型的裝置上執行這項操作。程式碼中的 AOT 編譯範例:
void AotCompileForOpenVINO() {
  auto run = std::make_unique<ApplyPluginRun>();

  // Full pipeline: partition → compile → embed bytecode in .tflite
  run->cmd = ApplyPluginRun::Cmd::APPLY;

  // Path to directory containing LiteRtComplilerPlugin.dll
  run->lib_search_paths.push_back("/path/to/plugin/dir/");

  // Input model
  run->model.emplace("model.tflite");

  // Intel OpenVINO target
  run->soc_manufacturer.emplace("IntelOpenVINO");
  run->soc_models.push_back("PTL");  // or "LNL"

  // Output stream for the AOT-compiled model
  std::stringstream compiled_output;
  run->outs.push_back(compiled_output);

  // Run AOT compilation
  auto status = ApplyPlugin(std::move(run));
  // compiled_output now contains .tflite with embedded OpenVINO bytecode
}
使用 AOT 編譯模型進行推論的方式:
void RunAotCompiledModel() {
  auto env = litert::Environment::Create({}).value();

  // Load AOT-compiled model, still must specify NPU accelerator
  auto compiled_model = litert::CompiledModel::Create(
      env, "model_aot.tflite", litert::HwAccelerators::kNpu).value();

  auto input_buffers = compiled_model.CreateInputBuffers().value();
  auto output_buffers = compiled_model.CreateOutputBuffers().value();

  input_buffers[0].Write<float>({/* data */});
  compiled_model.Run(input_buffers, output_buffers);
}
替代方法是在裝置上執行階段 JIT 編譯模型。 更具彈性:只需要一個與後端無關的模型檔案。
// Create environment
auto env = litert::Environment::Create({}).value();

// JIT compile for NPU
auto compiled_model = litert::CompiledModel::Create(
    env, "model.tflite", litert::HwAccelerators::kNpu).value();

// Create I/O buffers
auto input_buffers = compiled_model.CreateInputBuffers().value();
auto output_buffers = compiled_model.CreateOutputBuffers().value();

// Fill inputs
input_buffers[0].Write<float>({/* input data */});

// Run inference
compiled_model.Run(input_buffers, output_buffers);
使用 benchmark_model 進行基準測試
LiteRT benchmark_model 公用程式 (benchmark_model.exe) 專為在 NPU 上評估 AOT 編譯模型而設計,可用於比較 LiteRT 中 CPU 後端 (XNNPack) 的效能。以下是在 Intel NPU 上對 AOT 編譯模型進行基準化測試的範例指令:
.\benchmark_model.exe --graph=C:\models\model_aot.tflite --use_npu=true --compiler_plugin_library_path=C:\litertlib --dispatch_library_path=C:\litertlib --compiler_cache_path=C:\models
使用 npu_numerics_check 檢查準確度
npu_numerics_check 公用程式用於根據基準 (通常是 CPU 後端、XNNPack),驗證 NPU 編譯模型的數值準確度。這個步驟至關重要,可確保委派給 NPU 的作業不會造成無法接受的數值偏差,進而影響模型品質。
執行數值檢查 這項公用程式需要 AOT 編譯模型,並會比較模型輸出內容與原始非委派模型在 CPU 上執行的結果。
.\npu_numerics_check.exe --npu_model=C:\models\model_aot.tflite --cpu_model=C:\models\model.tflite --dispatch_library_path=C:\litertlib
後續步驟
- 請先參閱統一 NPU 指南:使用 LiteRT 進行 NPU 加速
- 請按照該頁面的轉換和部署步驟操作,並視需要選擇 Qualcomm。
- 如要瞭解如何使用 LiteRT-LM 在 NPU 上執行 LLM,請參閱這篇文章。