
圖片區隔器會預測圖片中的每個像素是否皆與特定類別有關聯。這與物件偵測不同,物件偵測會偵測矩形區域中的物件,而圖片分類則會分類整張圖片。如要進一步瞭解圖像分割器,請參閱圖像分割總覽範例。
使用 Task Library ImageSegmenter API,將自訂或預先訓練的圖像分割器部署至行動應用程式。
ImageSegmenter API 的主要功能
處理輸入圖片,包括旋轉、調整大小和轉換色彩空間。
標記地圖語言區域。
兩種輸出類型:類別遮罩和信賴度遮罩。
顯示用途的彩色標籤。
支援的圖像分割模型
下列機型保證與 ImageSegmenter
API 相容。
符合模型相容性規定的自訂模型。
在 Java 中執行推論作業
如要瞭解如何在 Android 應用程式中使用 ImageSegmenter,請參閱圖像分割參考應用程式。
步驟 1:匯入 Gradle 依附元件和其他設定
將 .tflite 模型檔案複製到要執行模型的 Android 模組資產目錄。指定檔案不應壓縮,並將 TensorFlow Lite 程式庫新增至模組的 build.gradle 檔案:
android {
    // Other settings

    // Specify tflite file should not be compressed for the app apk
    aaptOptions {
        noCompress "tflite"
    }
}

dependencies {
    // Other dependencies

    // Import the Task Vision Library dependency
    implementation 'org.tensorflow:tensorflow-lite-task-vision'
    // Import the GPU delegate plugin Library for GPU inference
    implementation 'org.tensorflow:tensorflow-lite-gpu-delegate-plugin'
}
步驟 2:使用模型
// Initialization
ImageSegmenterOptions options =
    ImageSegmenterOptions.builder()
        .setBaseOptions(BaseOptions.builder().useGpu().build())
        .setOutputType(OutputType.CONFIDENCE_MASK)
        .build();
ImageSegmenter imageSegmenter =
    ImageSegmenter.createFromFileAndOptions(context, modelFile, options);

// Run inference
List<Segmentation> results = imageSegmenter.segment(image);
如要瞭解設定 ImageSegmenter 的其他選項,請參閱原始碼和 Javadoc。
在 iOS 中執行推論
步驟 1:安裝依附元件
工作程式庫支援使用 CocoaPods 安裝。請確認系統已安裝 CocoaPods。如需操作說明,請參閱 CocoaPods 安裝指南。
如要瞭解如何將 Pod 新增至 Xcode 專案,請參閱 CocoaPods 指南。
在 Podfile 中新增 TensorFlowLiteTaskVision pod。
target 'MyAppWithTaskAPI' do
  use_frameworks!
  pod 'TensorFlowLiteTaskVision'
end
確認您將用於推論的 .tflite 模型位於應用程式套件中。
步驟 2:使用模型
Swift
// Imports
import TensorFlowLiteTaskVision
// Initialization
guard let modelPath = Bundle.main.path(forResource: "deeplabv3",
ofType: "tflite") else { return }
let options = ImageSegmenterOptions(modelPath: modelPath)
// Configure any additional options:
// options.outputType = OutputType.confidenceMasks
let segmenter = try ImageSegmenter.segmenter(options: options)
// Convert the input image to MLImage.
// There are other sources for MLImage. For more details, please see:
// https://developers.google.com/ml-kit/reference/ios/mlimage/api/reference/Classes/GMLImage
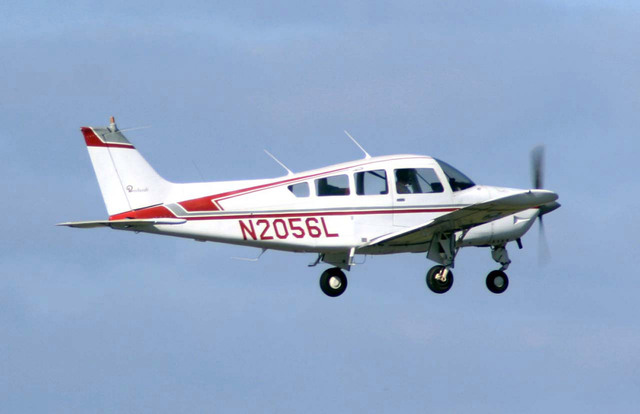
guard let image = UIImage (named: "plane.jpg"), let mlImage = MLImage(image: image) else { return }
// Run inference
let segmentationResult = try segmenter.segment(mlImage: mlImage)
Objective-C
// Imports
#import <TensorFlowLiteTaskVision/TensorFlowLiteTaskVision.h>

// Initialization
NSString *modelPath = [[NSBundle mainBundle] pathForResource:@"deeplabv3" ofType:@"tflite"];

TFLImageSegmenterOptions *options =
    [[TFLImageSegmenterOptions alloc] initWithModelPath:modelPath];

// Configure any additional options:
// options.outputType = TFLOutputTypeConfidenceMasks;

TFLImageSegmenter *segmenter = [TFLImageSegmenter imageSegmenterWithOptions:options
                                                                      error:nil];

// Convert the input image to MLImage.
UIImage *image = [UIImage imageNamed:@"plane.jpg"];

// There are other sources for GMLImage. For more details, please see:
// https://developers.google.com/ml-kit/reference/ios/mlimage/api/reference/Classes/GMLImage
GMLImage *gmlImage = [[GMLImage alloc] initWithImage:image];

// Run inference
TFLSegmentationResult *segmentationResult =
    [segmenter segmentWithGMLImage:gmlImage error:nil];
如要設定 TFLImageSegmenter 的其他選項,請參閱原始碼。
在 Python 中執行推論
步驟 1:安裝 pip 套件
pip install tflite-support
步驟 2:使用模型
# Imports
from tflite_support.task import vision
from tflite_support.task import core
from tflite_support.task import processor

# Initialization
base_options = core.BaseOptions(file_name=model_path)
segmentation_options = processor.SegmentationOptions(
    output_type=processor.SegmentationOptions.output_type.CATEGORY_MASK)
options = vision.ImageSegmenterOptions(base_options=base_options, segmentation_options=segmentation_options)
segmenter = vision.ImageSegmenter.create_from_options(options)

# Alternatively, you can create an image segmenter in the following manner:
# segmenter = vision.ImageSegmenter.create_from_file(model_path)

# Run inference
image_file = vision.TensorImage.create_from_file(image_path)
segmentation_result = segmenter.segment(image_file)
如要設定 ImageSegmenter 的其他選項,請參閱原始碼。
以 C++ 執行推論
// Initialization
ImageSegmenterOptions options;
options.mutable_base_options()->mutable_model_file()->set_file_name(model_path);
std::unique_ptr<ImageSegmenter> image_segmenter = ImageSegmenter::CreateFromOptions(options).value();

// Create input frame_buffer from your inputs, `image_data` and `image_dimension`.
// See more information here: tensorflow_lite_support/cc/task/vision/utils/frame_buffer_common_utils.h
std::unique_ptr<FrameBuffer> frame_buffer = CreateFromRgbRawBuffer(
      image_data, image_dimension);

// Run inference
const SegmentationResult result = image_segmenter->Segment(*frame_buffer).value();
如要設定 ImageSegmenter 的其他選項,請參閱原始碼。
搜尋結果範例
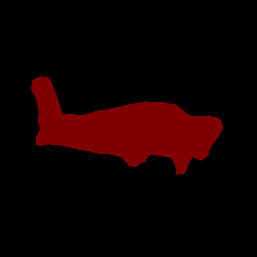
以下是 deeplab_v3 的區隔結果範例,這是 TensorFlow Hub 上提供的通用區隔模型。
Color Legend:
 (r: 000, g: 000, b: 000):
  index       : 0
  class name  : background
 (r: 128, g: 000, b: 000):
  index       : 1
  class name  : aeroplane

# (omitting multiple lines for conciseness) ...

 (r: 128, g: 192, b: 000):
  index       : 19
  class name  : train
 (r: 000, g: 064, b: 128):
  index       : 20
  class name  : tv
Tip: use a color picker on the output PNG file to inspect the output mask with
this legend.
分割類別遮罩應如下所示:
使用自己的模型和測試資料,試用 ImageSegmenter 的簡單 CLI 示範工具。
模型相容性規定
ImageSegmenter API 預期會收到包含必要 TFLite 模型中繼資料的 TFLite 模型。請參閱這篇文章,瞭解如何使用 TensorFlow Lite Metadata Writer API,為圖片區隔器建立中繼資料。
輸入圖像張量 (kTfLiteUInt8/kTfLiteFloat32)
- 大小為
[batch x height x width x channels]的圖片輸入內容。 - 不支援批次推論 (
batch必須為 1)。 - 僅支援 RGB 輸入 (
channels必須為 3)。 - 如果類型為 kTfLiteFloat32,則必須將 NormalizationOptions 附加至中繼資料,以進行輸入正規化。
- 大小為
輸出遮罩張量:(kTfLiteUInt8/kTfLiteFloat32)
- 大小為
[batch x mask_height x mask_width x num_classes]的張量,其中batch必須為 1,mask_width和mask_height是模型產生的區隔遮罩維度,而num_classes則是模型支援的類別數量。 - (建議) 標籤對應可附加為 AssociatedFile,類型為 TENSOR_AXIS_LABELS,每行包含一個標籤。系統會使用第一個這類 AssociatedFile (如有) 填入結果的
label欄位 (在 C++ 中命名為class_name)。系統會從 AssociatedFile 填入display_name欄位 (如有),該檔案的語言代碼須與建立時ImageSegmenterOptions的display_names_locale欄位相符 (預設為「en」,即英文)。如果沒有任何可用的項目,系統只會填入結果的index欄位。
- 大小為