
|
|
|
 GitHub에서 소스 보기 GitHub에서 소스 보기
|
개요
이 노트북에서는 Gemini API로 생성된 임베딩을 사용하여 주제에 따라 다양한 유형의 뉴스그룹 게시물을 분류할 수 있는 모델을 학습시키는 방법을 알아봅니다.
이 튜토리얼에서는 뉴스그룹 게시물이 어떤 클래스에 속하는지 예측하도록 분류기를 학습시킵니다.
기본 요건
이 빠른 시작은 Google Colab에서 실행할 수 있습니다.
자체 개발 환경에서 이 빠른 시작을 완료하려면 환경이 다음 요구사항을 충족하는지 확인하세요.
- Python 3.9 이상
- 노트북을 실행할
jupyter설치
설정
먼저 Gemini API Python 라이브러리를 다운로드하고 설치합니다.
pip install -U -q google.generativeai
import re
import tqdm
import keras
import numpy as np
import pandas as pd

import google.generativeai as genai
import google.ai.generativelanguage as glm

# Used to securely store your API key
from google.colab import userdata

import seaborn as sns
import matplotlib.pyplot as plt

from keras import layers
from matplotlib.ticker import MaxNLocator
from sklearn.datasets import fetch_20newsgroups
import sklearn.metrics as skmetrics
API 키 가져오기
Gemini API를 사용하려면 먼저 API 키를 가져와야 합니다. 아직 키가 없으면 Google AI Studio에서 클릭 한 번으로 키를 만듭니다.
Colab에서 왼쪽 패널의 'boot' 아래에 있는 보안 비밀 관리자에 키를 추가합니다. 이름을 API_KEY로 지정합니다.
API 키가 있으면 SDK에 전달합니다. 여기에는 두 가지 방법이 있습니다.
GOOGLE_API_KEY환경 변수에 키를 배치합니다 (SDK가 자동으로 거기에서 가져옴).genai.configure(api_key=...)에 키 전달
# Or use `os.getenv('API_KEY')` to fetch an environment variable.
API_KEY=userdata.get('API_KEY')

genai.configure(api_key=API_KEY)
for m in genai.list_models():
  if 'embedContent' in m.supported_generation_methods:
    print(m.name)
models/embedding-001
models/embedding-001
데이터 세트
20 Newsgroups 텍스트 데이터 세트에는 학습 및 테스트 세트로 나누어진 20가지 주제에 대한 18,000개의 뉴스그룹 게시물이 포함되어 있습니다. 학습 데이터 세트와 테스트 데이터 세트는 특정 날짜 이전과 이후에 게시된 메시지를 기준으로 분할됩니다. 이 튜토리얼에서는 학습 및 테스트 데이터 세트의 하위 집합을 사용합니다. 데이터를 Pandas DataFrame으로 전처리하고 구성합니다.
newsgroups_train = fetch_20newsgroups(subset='train')
newsgroups_test = fetch_20newsgroups(subset='test')

# View list of class names for dataset
newsgroups_train.target_names
['alt.atheism',
 'comp.graphics',
 'comp.os.ms-windows.misc',
 'comp.sys.ibm.pc.hardware',
 'comp.sys.mac.hardware',
 'comp.windows.x',
 'misc.forsale',
 'rec.autos',
 'rec.motorcycles',
 'rec.sport.baseball',
 'rec.sport.hockey',
 'sci.crypt',
 'sci.electronics',
 'sci.med',
 'sci.space',
 'soc.religion.christian',
 'talk.politics.guns',
 'talk.politics.mideast',
 'talk.politics.misc',
 'talk.religion.misc']
다음은 학습 세트의 데이터 포인트가 어떤 모습인지 보여주는 예입니다.
idx = newsgroups_train.data[0].index('Lines')
print(newsgroups_train.data[0][idx:])
Lines: 15

 I was wondering if anyone out there could enlighten me on this car I saw
the other day. It was a 2-door sports car, looked to be from the late 60s/
early 70s. It was called a Bricklin. The doors were really small. In addition,
the front bumper was separate from the rest of the body. This is
all I know. If anyone can tellme a model name, engine specs, years
of production, where this car is made, history, or whatever info you
have on this funky looking car, please e-mail.

Thanks,

- IL
   ---- brought to you by your neighborhood Lerxst ----
이제 이 튜토리얼의 데이터 전처리를 시작합니다. 민감한 정보(예: 이름, 이메일) 또는 텍스트의 중복된 부분(예: "From: ", "\nSubject: ")을 삭제하세요. 정보를 Pandas DataFrame으로 구성하여 가독성을 높입니다.
def preprocess_newsgroup_data(newsgroup_dataset):
  # Apply functions to remove names, emails, and extraneous words from data points in newsgroups.data
  newsgroup_dataset.data = [re.sub(r'[\w\.-]+@[\w\.-]+', '', d) for d in newsgroup_dataset.data] # Remove email
  newsgroup_dataset.data = [re.sub(r"\([^()]*\)", "", d) for d in newsgroup_dataset.data] # Remove names
  newsgroup_dataset.data = [d.replace("From: ", "") for d in newsgroup_dataset.data] # Remove "From: "
  newsgroup_dataset.data = [d.replace("\nSubject: ", "") for d in newsgroup_dataset.data] # Remove "\nSubject: "

  # Cut off each text entry after 5,000 characters
  newsgroup_dataset.data = [d[0:5000] if len(d) > 5000 else d for d in newsgroup_dataset.data]

  # Put data points into dataframe
  df_processed = pd.DataFrame(newsgroup_dataset.data, columns=['Text'])
  df_processed['Label'] = newsgroup_dataset.target
  # Match label to target name index
  df_processed['Class Name'] = ''
  for idx, row in df_processed.iterrows():
    df_processed.at[idx, 'Class Name'] = newsgroup_dataset.target_names[row['Label']]

  return df_processed
# Apply preprocessing function to training and test datasets
df_train = preprocess_newsgroup_data(newsgroups_train)
df_test = preprocess_newsgroup_data(newsgroups_test)

df_train.head()
다음으로 학습 데이터 세트에서 100개의 데이터 포인트를 선택하고 이 튜토리얼에서 실행할 카테고리 몇 개를 삭제하여 일부 데이터를 샘플링합니다. 비교할 과학 카테고리를 선택합니다.
def sample_data(df, num_samples, classes_to_keep):
  df = df.groupby('Label', as_index = False).apply(lambda x: x.sample(num_samples)).reset_index(drop=True)

  df = df[df['Class Name'].str.contains(classes_to_keep)]

  # Reset the encoding of the labels after sampling and dropping certain categories
  df['Class Name'] = df['Class Name'].astype('category')
  df['Encoded Label'] = df['Class Name'].cat.codes

  return df
TRAIN_NUM_SAMPLES = 100
TEST_NUM_SAMPLES = 25
CLASSES_TO_KEEP = 'sci' # Class name should contain 'sci' in it to keep science categories
df_train = sample_data(df_train, TRAIN_NUM_SAMPLES, CLASSES_TO_KEEP)
df_test = sample_data(df_test, TEST_NUM_SAMPLES, CLASSES_TO_KEEP)
df_train.value_counts('Class Name')
Class Name
sci.crypt          100
sci.electronics    100
sci.med            100
sci.space          100
dtype: int64
df_test.value_counts('Class Name')
Class Name
sci.crypt          25
sci.electronics    25
sci.med            25
sci.space          25
dtype: int64
임베딩 만들기
이 섹션에서는 Gemini API의 임베딩을 사용하여 텍스트 조각의 임베딩을 생성하는 방법을 알아봅니다. 임베딩에 대한 자세한 내용은 임베딩 가이드를 참고하세요.
Embeddings embedding-001의 API 변경사항
새 임베딩 모델에는 새로운 작업 유형 매개변수와 선택적 제목이 있습니다 (task_type=RETRIEVAL_DOCUMENT에서만 유효).
이러한 새 매개변수는 최신 임베딩 모델에만 적용됩니다. 작업 유형은 다음과 같습니다.
| 작업 유형 | 설명 |
|---|---|
| RETRIEVAL_QUERY | 지정된 텍스트가 검색/가져오기 설정의 쿼리임을 지정합니다. |
| RETRIEVAL_DOCUMENT | 지정된 텍스트가 검색/가져오기 설정의 문서임을 지정합니다. |
| SEMANTIC_SIMILARITY | 지정된 텍스트를 시맨틱 텍스트 유사성(STS)에 사용하도록 지정합니다. |
| 분류 | 임베딩이 분류에 사용되도록 지정합니다. |
| 클러스터링 | 클러스터링에 임베딩을 사용하도록 지정합니다. |
from tqdm.auto import tqdm
tqdm.pandas()

from google.api_core import retry

def make_embed_text_fn(model):

  @retry.Retry(timeout=300.0)
  def embed_fn(text: str) -> list[float]:
    # Set the task_type to CLASSIFICATION.
    embedding = genai.embed_content(model=model,
                                    content=text,
                                    task_type="classification")
    return embedding['embedding']

  return embed_fn

def create_embeddings(model, df):
  df['Embeddings'] = df['Text'].progress_apply(make_embed_text_fn(model))
  return df
model = 'models/embedding-001'
df_train = create_embeddings(model, df_train)
df_test = create_embeddings(model, df_test)
0%|          | 0/400 [00:00<?, ?it/s]
0%|          | 0/100 [00:00<?, ?it/s]
df_train.head()
간단한 분류 모델 빌드
여기서는 히든 레이어 하나와 클래스 확률 출력 하나가 있는 간단한 모델을 정의합니다. 예측은 텍스트가 특정 뉴스 클래스일 확률에 대응합니다. 모델을 빌드할 때 Keras는 자동으로 데이터 포인트를 셔플합니다.
def build_classification_model(input_size: int, num_classes: int) -> keras.Model:
  inputs = x = keras.Input(input_size)
  x = layers.Dense(input_size, activation='relu')(x)
  x = layers.Dense(num_classes, activation='sigmoid')(x)
  return keras.Model(inputs=[inputs], outputs=x)
# Derive the embedding size from the first training element.
embedding_size = len(df_train['Embeddings'].iloc[0])

# Give your model a different name, as you have already used the variable name 'model'
classifier = build_classification_model(embedding_size, len(df_train['Class Name'].unique()))
classifier.summary()

classifier.compile(loss = keras.losses.SparseCategoricalCrossentropy(from_logits=True),
                   optimizer = keras.optimizers.Adam(learning_rate=0.001),
                   metrics=['accuracy'])
Model: "model"
_________________________________________________________________
 Layer (type)                Output Shape              Param #
=================================================================
 input_1 (InputLayer)        [(None, 768)]             0

 dense (Dense)               (None, 768)               590592

 dense_1 (Dense)             (None, 4)                 3076

=================================================================
Total params: 593668 (2.26 MB)
Trainable params: 593668 (2.26 MB)
Non-trainable params: 0 (0.00 Byte)
_________________________________________________________________
embedding_size
768
뉴스 그룹을 분류하도록 모델을 학습시킵니다.
마지막으로 간단한 모델을 학습시킬 수 있습니다. 과적합을 방지하기 위해 적은 수의 에포크를 사용합니다. 임베딩을 한 번만 계산하면 되므로 첫 번째 에포크는 나머지 에포크보다 훨씬 오래 걸립니다.
NUM_EPOCHS = 20
BATCH_SIZE = 32

# Split the x and y components of the train and validation subsets.
y_train = df_train['Encoded Label']
x_train = np.stack(df_train['Embeddings'])
y_val = df_test['Encoded Label']
x_val = np.stack(df_test['Embeddings'])

# Train the model for the desired number of epochs.
callback = keras.callbacks.EarlyStopping(monitor='accuracy', patience=3)

history = classifier.fit(x=x_train,
                         y=y_train,
                         validation_data=(x_val, y_val),
                         callbacks=[callback],
                         batch_size=BATCH_SIZE,
                         epochs=NUM_EPOCHS,)
Epoch 1/20
/usr/local/lib/python3.10/dist-packages/keras/src/backend.py:5729: UserWarning: "`sparse_categorical_crossentropy` received `from_logits=True`, but the `output` argument was produced by a Softmax activation and thus does not represent logits. Was this intended?
  output, from_logits = _get_logits(
13/13 [==============================] - 1s 30ms/step - loss: 1.2141 - accuracy: 0.6675 - val_loss: 0.9801 - val_accuracy: 0.8800
Epoch 2/20
13/13 [==============================] - 0s 12ms/step - loss: 0.7580 - accuracy: 0.9400 - val_loss: 0.6061 - val_accuracy: 0.9300
Epoch 3/20
13/13 [==============================] - 0s 13ms/step - loss: 0.4249 - accuracy: 0.9525 - val_loss: 0.3902 - val_accuracy: 0.9200
Epoch 4/20
13/13 [==============================] - 0s 13ms/step - loss: 0.2561 - accuracy: 0.9625 - val_loss: 0.2597 - val_accuracy: 0.9400
Epoch 5/20
13/13 [==============================] - 0s 13ms/step - loss: 0.1693 - accuracy: 0.9700 - val_loss: 0.2145 - val_accuracy: 0.9300
Epoch 6/20
13/13 [==============================] - 0s 13ms/step - loss: 0.1240 - accuracy: 0.9850 - val_loss: 0.1801 - val_accuracy: 0.9600
Epoch 7/20
13/13 [==============================] - 0s 21ms/step - loss: 0.0931 - accuracy: 0.9875 - val_loss: 0.1623 - val_accuracy: 0.9400
Epoch 8/20
13/13 [==============================] - 0s 16ms/step - loss: 0.0736 - accuracy: 0.9925 - val_loss: 0.1418 - val_accuracy: 0.9600
Epoch 9/20
13/13 [==============================] - 0s 20ms/step - loss: 0.0613 - accuracy: 0.9925 - val_loss: 0.1315 - val_accuracy: 0.9700
Epoch 10/20
13/13 [==============================] - 0s 20ms/step - loss: 0.0479 - accuracy: 0.9975 - val_loss: 0.1235 - val_accuracy: 0.9600
Epoch 11/20
13/13 [==============================] - 0s 19ms/step - loss: 0.0399 - accuracy: 0.9975 - val_loss: 0.1219 - val_accuracy: 0.9700
Epoch 12/20
13/13 [==============================] - 0s 21ms/step - loss: 0.0326 - accuracy: 0.9975 - val_loss: 0.1158 - val_accuracy: 0.9700
Epoch 13/20
13/13 [==============================] - 0s 19ms/step - loss: 0.0263 - accuracy: 1.0000 - val_loss: 0.1127 - val_accuracy: 0.9700
Epoch 14/20
13/13 [==============================] - 0s 17ms/step - loss: 0.0229 - accuracy: 1.0000 - val_loss: 0.1123 - val_accuracy: 0.9700
Epoch 15/20
13/13 [==============================] - 0s 20ms/step - loss: 0.0195 - accuracy: 1.0000 - val_loss: 0.1063 - val_accuracy: 0.9700
Epoch 16/20
13/13 [==============================] - 0s 17ms/step - loss: 0.0172 - accuracy: 1.0000 - val_loss: 0.1070 - val_accuracy: 0.9700
모델 성능 평가
Keras Model.evaluate를 사용하여 테스트 데이터 세트에 대한 손실 및 정확성을 구합니다.
classifier.evaluate(x=x_val, y=y_val, return_dict=True)
4/4 [==============================] - 0s 4ms/step - loss: 0.1070 - accuracy: 0.9700
{'loss': 0.10700511932373047, 'accuracy': 0.9700000286102295}
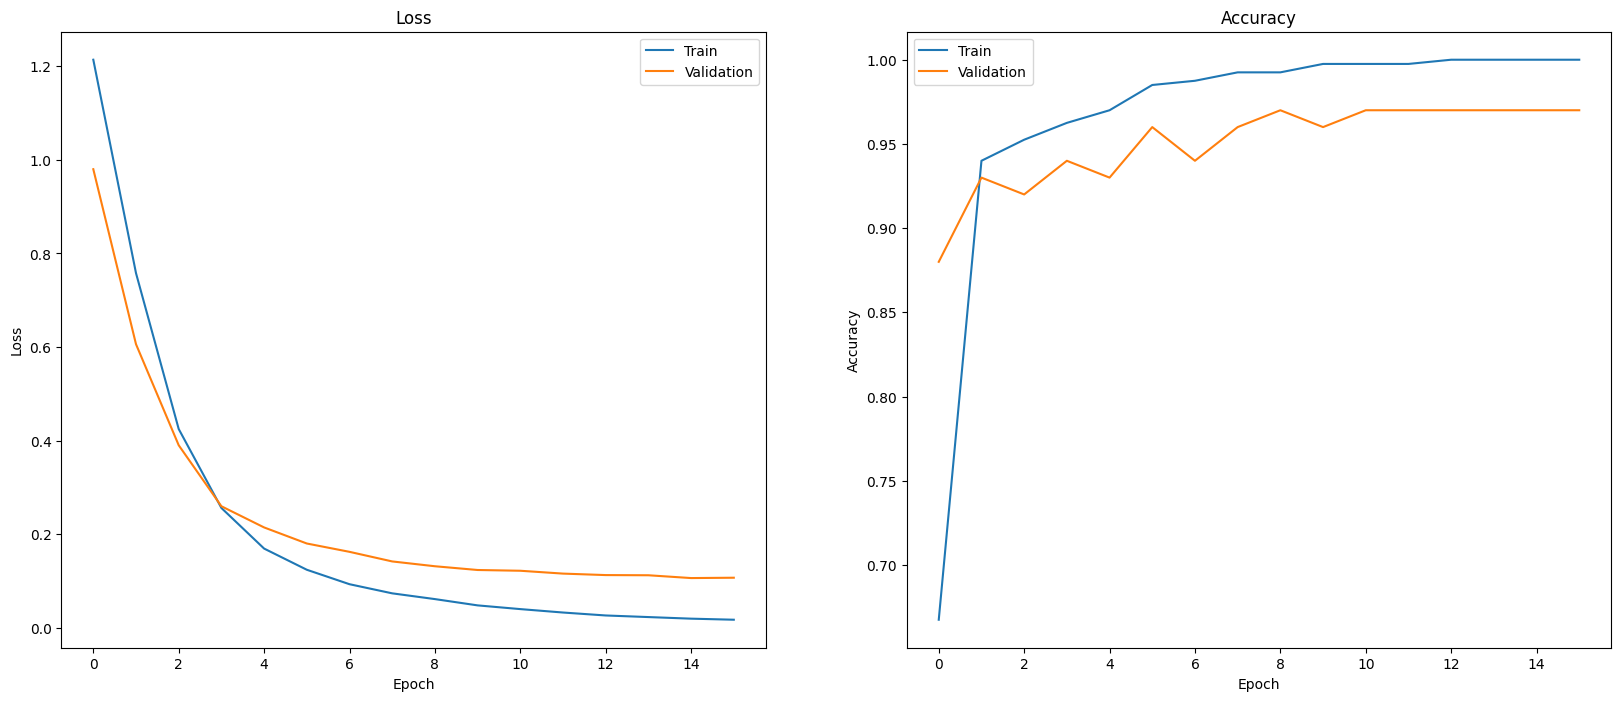
모델 성능을 평가하는 한 가지 방법은 분류기 성능을 시각화하는 것입니다. plot_history를 사용하여 에포크에 따른 손실 및 정확도 추세를 확인합니다.
def plot_history(history):
  """
    Plotting training and validation learning curves.

    Args:
      history: model history with all the metric measures
  """
  fig, (ax1, ax2) = plt.subplots(1,2)
  fig.set_size_inches(20, 8)

  # Plot loss
  ax1.set_title('Loss')
  ax1.plot(history.history['loss'], label = 'train')
  ax1.plot(history.history['val_loss'], label = 'test')
  ax1.set_ylabel('Loss')

  ax1.set_xlabel('Epoch')
  ax1.legend(['Train', 'Validation'])

  # Plot accuracy
  ax2.set_title('Accuracy')
  ax2.plot(history.history['accuracy'],  label = 'train')
  ax2.plot(history.history['val_accuracy'], label = 'test')
  ax2.set_ylabel('Accuracy')
  ax2.set_xlabel('Epoch')
  ax2.legend(['Train', 'Validation'])

  plt.show()

plot_history(history)
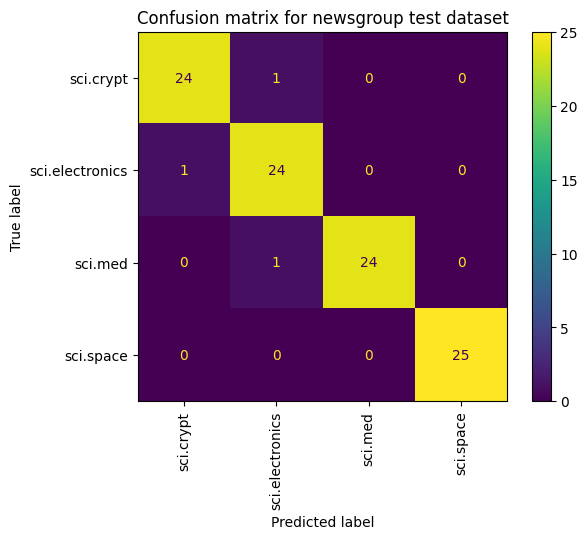
손실과 정확성을 측정하는 것 외에 모델 성능을 확인하는 또 다른 방법은 혼동 행렬을 사용하는 것입니다. 혼동 행렬을 사용하면 정확성 외에도 분류 모델의 성능을 평가할 수 있습니다. 잘못 분류된 포인트를 확인할 수 있습니다. 이 다중 클래스 분류 문제에 대한 혼동행렬을 작성하려면 테스트 세트의 실제 값과 예측 값을 가져옵니다.
먼저 Model.predict()를 사용하여 검증 세트의 각 예시에 대해 예측된 클래스를 생성합니다.
y_hat = classifier.predict(x=x_val)
y_hat = np.argmax(y_hat, axis=1)
4/4 [==============================] - 0s 4ms/step
labels_dict = dict(zip(df_test['Class Name'], df_test['Encoded Label']))
labels_dict
{'sci.crypt': 0, 'sci.electronics': 1, 'sci.med': 2, 'sci.space': 3}
cm = skmetrics.confusion_matrix(y_val, y_hat)
disp = skmetrics.ConfusionMatrixDisplay(confusion_matrix=cm,
                              display_labels=labels_dict.keys())
disp.plot(xticks_rotation='vertical')
plt.title('Confusion matrix for newsgroup test dataset');
plt.grid(False)
다음 단계
임베딩 사용 방법을 자세히 알아보려면 제공되는 예를 참고하세요. Gemini API에서 다른 서비스를 사용하는 방법을 알아보려면 Python 빠른 시작을 방문하세요.