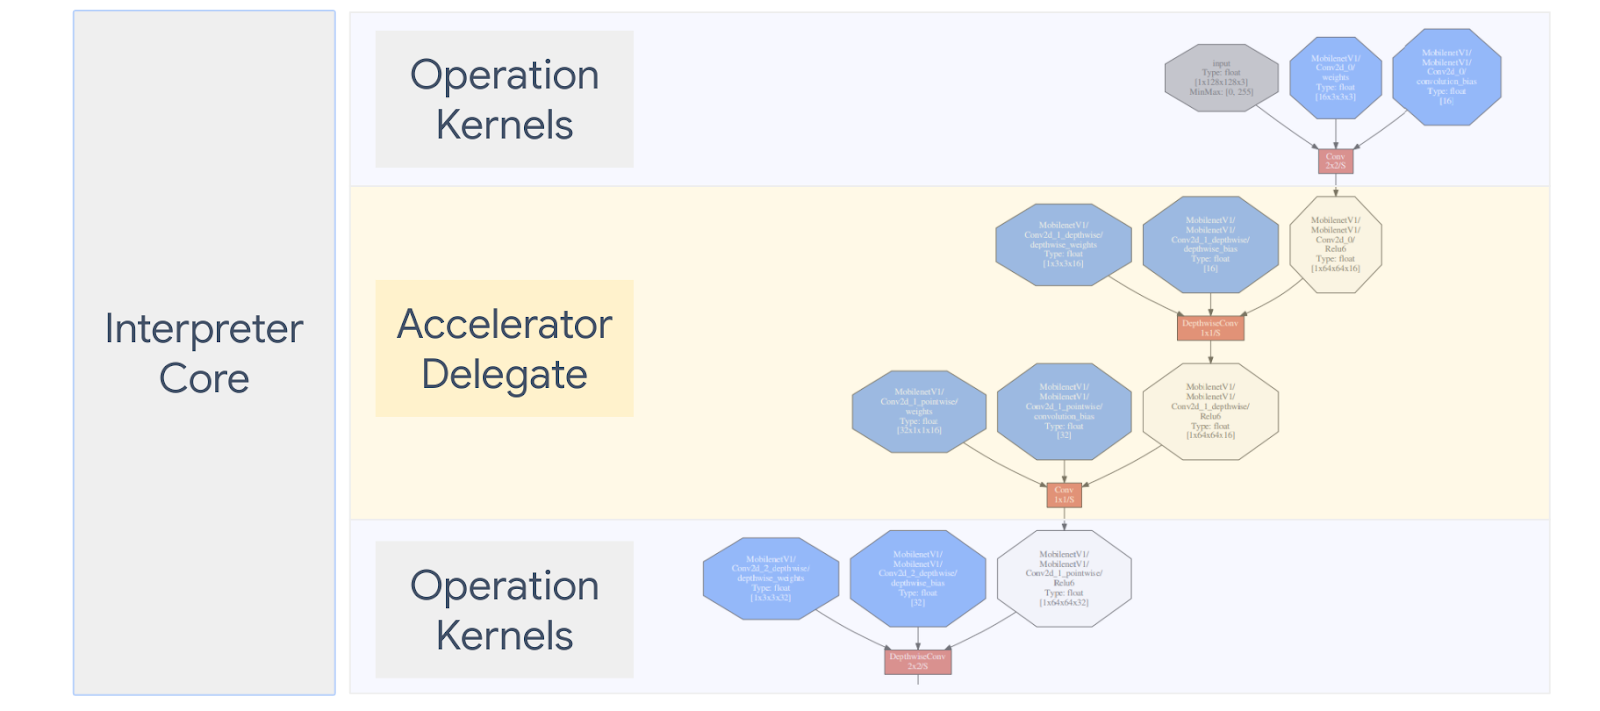
लाइटआरटी डेलिगेट की मदद से, आपको ये काम करने की अनुमति मिलती है अपने मॉडल (हिस्सा या पूरा) को किसी दूसरे एक्ज़िक्यूटर पर चलाएं. इस सिस्टम का फ़ायदा लिया जा सकता है, डिवाइस पर मौजूद कई तरह के ऐक्सेलरेटर, जैसे कि जीपीयू या एज TPU (Tensor प्रोसेसिंग यूनिट) का इस्तेमाल अनुमान के लिए किया जाता है. इससे डेवलपर को लचीला और ज़्यादा तेज़ी से अनुमान लगाने के लिए, डिफ़ॉल्ट TFLite से अलग किए गए तरीके को हटा दिया जाएगा.
यहां दिए गए डायग्राम में उन लोगों के बारे में खास जानकारी दी गई है जिन्हें संपर्कों का ऐक्सेस दिया गया है. ज़्यादा जानकारी नीचे दिए गए सेक्शन में दी गई है.

मुझे कस्टम डेलिगेट कब बनाना चाहिए?
LiteRT को टारगेट करने वाले लोगों के लिए कई तरह के डेलिगेट के वोट हैं, जैसे कि जीपीयू, DSP, और EdgeTPU.
अपना खुद का प्रतिनिधि बनाना इन स्थितियों में फ़ायदेमंद होता है:
- आपको एक ऐसा नया एमएल अनुमान इंजन जोड़ना है जो किसी भी टूल के साथ काम न करता हो ऐक्सेस दिया जा सकता है.
- आपके पास कस्टम हार्डवेयर ऐक्सेलरेटर है, जो .
- आप ऐसे सीपीयू ऑप्टिमाइज़ेशन (जैसे कि ऑपरेटर फ़्यूज़िंग) डेवलप कर रहे हैं जो कुछ खास मॉडल की स्पीड को बढ़ाने में मदद करता है.
प्रतिनिधि कैसे काम करते हैं?
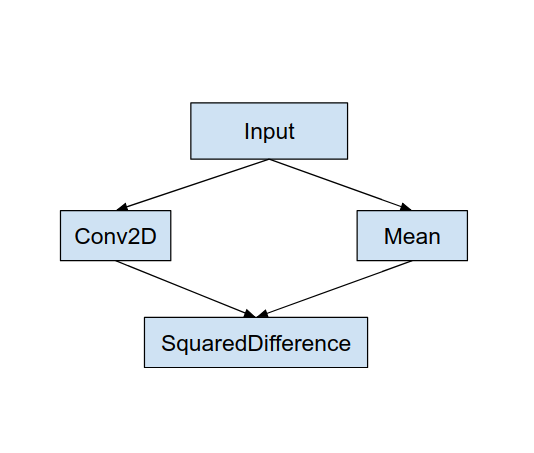
एक सामान्य मॉडल ग्राफ़, जैसे कि नीचे दिए गए कॉलम में एक प्रतिनिधि “MyDelegate” का इस्तेमाल करें का इस्तेमाल किया गया है, जिसमें Conv2D और मीन कार्रवाइयों के लिए ज़्यादा तेज़ी से लागू किया गया है.

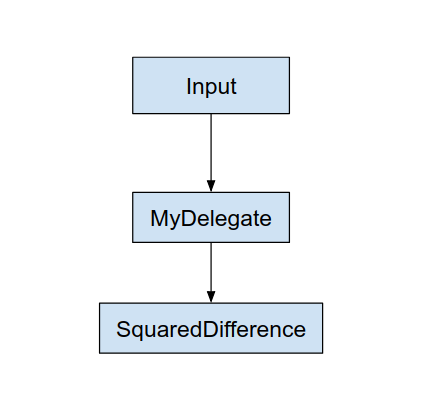
“MyDelegate” को लागू करने के बाद, मूल LiteRT ग्राफ़ की तरह अपडेट किया गया:

ऊपर दिया गया ग्राफ़, LiteRT से मूल ग्राफ़ को अलग-अलग करके दिखाया गया है ये दो नियम हैं:
- जिन खास कार्रवाइयों को डेलिगेट मैनेज करता है उन्हें इसमें रखा जाता है मूल कंप्यूटिंग वर्कफ़्लो को पूरा करते हुए विभाजन डिपेंडेंसी.
- सौंपे जाने वाले हर हिस्से में सिर्फ़ ऐसे इनपुट और आउटपुट नोड होते हैं जो जिसे प्रतिनिधि मैनेज करता है.
हर पार्टीशन जिसे कोई डेलिगेट मैनेज करता है उसे डेलिगेट नोड से बदल दिया जाता है (यह हो सकता है को डेलिगेट कर्नेल के रूप में भी कॉल किया जाएगा) जो विभाजन.
मॉडल के आधार पर, आखिरी ग्राफ़ एक या उससे ज़्यादा नोड के साथ आ सकता है. बाद का अर्थ है कि कुछ ऑपरेशन डेलिगेट के द्वारा समर्थित नहीं हैं. सामान्य तौर पर, आप डेलिगेट की ओर से मैनेज किए जाने वाले कई सेगमेंट नहीं होने चाहिए, क्योंकि हर डेलिगेट के बजाय मुख्य ग्राफ़ पर जाने का समय, दिए गए सबग्राफ़ से नतीजों को मुख्य ग्राफ़ में पास करना (उदाहरण के लिए, जीपीयू से सीपीयू पर). इस तरह के ओवरहेड से की परफ़ॉर्मेंस बेहतर होती है. खास तौर पर, जब बड़ी संख्या में मेमोरी कॉपी हों.
अपना कस्टम डेलिगेट लागू करना
किसी व्यक्ति को अपने ईमेल खाते का ऐक्सेस देने के लिए, सबसे पहले इन्हें जोड़ने का पसंदीदा तरीका इस्तेमाल किया जाता है SimpleDelegate API.
नया प्रतिनिधि बनाने के लिए, आपको दो इंटरफ़ेस लागू करने होंगे आपको खुद ही लागू करने की सुविधा मिलती है.
1 से SimpleDelegateInterface
इस क्लास में, प्रतिनिधि की उन क्षमताओं के बारे में पता चलता है जिनका काम संगठन को करना है की मदद ली जाती है और एक फ़ैक्ट्री क्लास की मदद से उसे बनाया जाता है, जो दिखाया गया ग्राफ़. ज़्यादा जानकारी के लिए, इसमें बताया गया इंटरफ़ेस देखें C++ हेडर फ़ाइल. कोड में दी गई टिप्पणियां, हर एपीआई के बारे में विस्तार से बताती हैं.
2 से SimpleDelegateKernelInterface
यह क्लास, इवेंट शुरू करने / तैयार करने / और चलाने के लिए लॉजिक को एन्क्रिप्ट (सुरक्षित) करती है असाइन किया गया बंटवारा.
इसमें हैं: (देखें परिभाषा)
- Init(...): कोई भी एक बार शुरू करने के लिए इसे एक बार कॉल किया जाएगा.
- तैयार करें(...): इस नोड के हर एक अलग इन्सटेंस के लिए कॉल किया जाता है - यह होता है अगर आपके पास सेगमेंट के लिए कई सेगमेंट हैं. आम तौर पर, आपको मेमोरी सेव करनी होती है यहां असाइन किया गया है, क्योंकि हर बार टेंसर का साइज़ बदलने पर इसे कॉल किया जाएगा.
- शुरू करें(...): अनुमान लगाने के लिए कहा जाएगा.
उदाहरण
इस उदाहरण में, आपको एक ऐसा सामान्य प्रतिनिधि बनाना होगा जो सिर्फ़ दो सिर्फ़ float32 टेंसर वाले ऑपरेशन के टाइप (ADD) और (SUB) हैं.
// MyDelegate implements the interface of SimpleDelegateInterface.
// This holds the Delegate capabilities.
class MyDelegate : public SimpleDelegateInterface {
 public:
  bool IsNodeSupportedByDelegate(const TfLiteRegistration* registration,
                                 const TfLiteNode* node,
                                 TfLiteContext* context) const override {
    // Only supports Add and Sub ops.
    if (kTfLiteBuiltinAdd != registration->builtin_code &&
        kTfLiteBuiltinSub != registration->builtin_code)
      return false;
    // This delegate only supports float32 types.
    for (int i = 0; i < node->inputs->size; ++i) {
      auto& tensor = context->tensors[node->inputs->data[i]];
      if (tensor.type != kTfLiteFloat32) return false;
    }
    return true;
  }

  TfLiteStatus Initialize(TfLiteContext* context) override { return kTfLiteOk; }

  const char* Name() const override {
    static constexpr char kName[] = "MyDelegate";
    return kName;
  }

  std::unique_ptr<SimpleDelegateKernelInterface> CreateDelegateKernelInterface()
      override {
    return std::make_unique<MyDelegateKernel>();
  }
};
इसके बाद,
SimpleDelegateKernelInterface अभी तक किसी भी व्यक्ति ने चेक इन नहीं किया है
// My delegate kernel.
class MyDelegateKernel : public SimpleDelegateKernelInterface {
 public:
  TfLiteStatus Init(TfLiteContext* context,
                    const TfLiteDelegateParams* params) override {
    // Save index to all nodes which are part of this delegate.
    inputs_.resize(params->nodes_to_replace->size);
    outputs_.resize(params->nodes_to_replace->size);
    builtin_code_.resize(params->nodes_to_replace->size);
    for (int i = 0; i < params->nodes_to_replace->size; ++i) {
      const int node_index = params->nodes_to_replace->data[i];
      // Get this node information.
      TfLiteNode* delegated_node = nullptr;
      TfLiteRegistration* delegated_node_registration = nullptr;
      TF_LITE_ENSURE_EQ(
          context,
          context->GetNodeAndRegistration(context, node_index, &delegated_node,
                                          &delegated_node_registration),
          kTfLiteOk);
      inputs_[i].push_back(delegated_node->inputs->data[0]);
      inputs_[i].push_back(delegated_node->inputs->data[1]);
      outputs_[i].push_back(delegated_node->outputs->data[0]);
      builtin_code_[i] = delegated_node_registration->builtin_code;
    }
    return kTfLiteOk;
  }

  TfLiteStatus Prepare(TfLiteContext* context, TfLiteNode* node) override {
    return kTfLiteOk;
  }

  TfLiteStatus Eval(TfLiteContext* context, TfLiteNode* node) override {
    // Evaluate the delegated graph.
    // Here we loop over all the delegated nodes.
    // We know that all the nodes are either ADD or SUB operations and the
    // number of nodes equals ''inputs_.size()'' and inputs[i] is a list of
    // tensor indices for inputs to node ''i'', while outputs_[i] is the list of
    // outputs for node
    // ''i''. Note, that it is intentional we have simple implementation as this
    // is for demonstration.

    for (int i = 0; i < inputs_.size(); ++i) {
      // Get the node input tensors.
      // Add/Sub operation accepts 2 inputs.
      auto& input_tensor_1 = context->tensors[inputs_[i][0]];
      auto& input_tensor_2 = context->tensors[inputs_[i][1]];
      auto& output_tensor = context->tensors[outputs_[i][0]];
      TF_LITE_ENSURE_EQ(
          context,
          ComputeResult(context, builtin_code_[i], &input_tensor_1,
                        &input_tensor_2, &output_tensor),
          kTfLiteOk);
    }
    return kTfLiteOk;
  }

 private:
  // Computes the result of addition of 'input_tensor_1' and 'input_tensor_2'
  // and store the result in 'output_tensor'.
  TfLiteStatus ComputeResult(TfLiteContext* context, int builtin_code,
                             const TfLiteTensor* input_tensor_1,
                             const TfLiteTensor* input_tensor_2,
                             TfLiteTensor* output_tensor) {
    if (NumElements(input_tensor_1) != NumElements(input_tensor_2) ||
        NumElements(input_tensor_1) != NumElements(output_tensor)) {
      return kTfLiteDelegateError;
    }
    // This code assumes no activation, and no broadcasting needed (both inputs
    // have the same size).
    auto* input_1 = GetTensorData<float>(input_tensor_1);
    auto* input_2 = GetTensorData<float>(input_tensor_2);
    auto* output = GetTensorData<float>(output_tensor);
    for (int i = 0; i < NumElements(input_tensor_1); ++i) {
      if (builtin_code == kTfLiteBuiltinAdd)
        output[i] = input_1[i] + input_2[i];
      else
        output[i] = input_1[i] - input_2[i];
    }
    return kTfLiteOk;
  }

  // Holds the indices of the input/output tensors.
  // inputs_[i] is list of all input tensors to node at index 'i'.
  // outputs_[i] is list of all output tensors to node at index 'i'.
  std::vector<std::vector<int>> inputs_, outputs_;
  // Holds the builtin code of the ops.
  // builtin_code_[i] is the type of node at index 'i'
  std::vector<int> builtin_code_;
};
डेलिगेट के नए लोगों को बेंचमार्क और उनका आकलन करना
TFLite में ऐसे टूल का सेट होता है जिनका इस्तेमाल करके आप TFLite मॉडल के लिए तेज़ी से परीक्षण कर सकते हैं.
- मॉडल बेंचमार्क टूल: यह टूल एक TFLite मॉडल लेता है, रैंडम इनपुट जनरेट करता है और फिर बार-बार रन की तय संख्या के लिए मॉडल चलाता है. यह, इंतज़ार के समय का कुल समय प्रिंट करता है आंकड़े देखें.
- अनुमान के अंतर का टूल: दिए गए मॉडल के लिए, यह टूल रैंडम गॉसियन डेटा जनरेट करता है और उसे यह दो अलग-अलग TFLite अनुवादकों के ज़रिए, एक सिंगल थ्रेड वाला सीपीयू है कर्नेल और अन्य उपयोगकर्ता तय निर्देश का इस्तेमाल करते हैं. यह हर इंटरप्रेटर के आउटपुट टेंसर के बीच का अंतर, हर एलिमेंट के आधार पर. यह टूल, डीबग करने की सटीक जानकारी देने में भी मदद कर सकता है समस्याएं.
- इसके अलावा, इमेज की कैटगरी तय करने के लिए, टास्क के हिसाब से आकलन करने वाले टूल भी उपलब्ध हैं. ऑब्जेक्ट की पहचान करने की सुविधा. ये टूल आसानी से देखे जा सकते हैं यहां
इसके अलावा, TFLite में कर्नेल और ऑप इकाई परीक्षणों का एक बड़ा सेट है जो इसका फिर से इस्तेमाल किया गया, ताकि ज़्यादा कवरेज के साथ नए प्रतिनिधि की जांच की जा सके. साथ ही, यह पक्का किया जा सके कि TFLite एक्ज़ीक्यूशन पाथ पूरा नहीं हुआ है.
अगर आपको अपने नए प्रतिनिधि के लिए TFLite के टेस्ट और टूल दोबारा इस्तेमाल करने का मौका चाहिए, तो इनमें से कोई एक विकल्प चुनें:
- Google Tag Manager का इस्तेमाल डेलीगेट रजिस्ट्रार मैकेनिज़्म.
- Google Tag Manager का इस्तेमाल बाहरी डेलिगेट मैकेनिज़्म.
सबसे सही तरीका चुनना
दोनों तरीकों में कुछ बदलावों की ज़रूरत है, जैसा कि नीचे बताया गया है. हालांकि, पहले अप्रोच का इस्तेमाल, उस प्रतिनिधि को स्टैटिक तरीके से करने के लिए करता है और टेस्टिंग के लिए फिर से काम करना पड़ता है, मानदंड और मूल्यांकन टूल. इसके उलट, दूसरा विकल्प को शेयर की गई लाइब्रेरी के रूप में ऐक्सेस करना है और आपको दस्तावेज़ बनाना/मिटाना तरीकों का इस्तेमाल करें.
इस वजह से, बाहरी प्रतिनिधि का तंत्र TFLite के साथ काम करेगा पहले से बनी LiteRT टूलिंग बाइनरी. हालांकि, इसमें साफ़ तौर पर जानकारी नहीं दी गई है. साथ ही, इसे ऑटोमेटेड इंटिग्रेशन की जांच की जा सकती है. बेहतर तरीके से जानकारी पाने के लिए, प्रतिनिधि रजिस्ट्रार के तरीके का इस्तेमाल करें.
पहला विकल्प: डेलिगेट रजिस्ट्रार का इस्तेमाल करें
कॉन्टेंट बनाने डेलीगेट रजिस्ट्रार प्रतिनिधि कंपनियों की एक सूची होती है, जिसमें से हर एक सूची बनाने का एक आसान तरीका है कमांड-लाइन फ़्लैग के आधार पर TFLite डेलिगेट. इसलिए, ये इन लोगों के लिए आसान हैं टूलिंग. बताए गए सभी LiteRT टूल से नए डेलिगेट को कनेक्ट करने के लिए तो पहले आप एक नया प्रतिनिधि कंपनी बनाते हैं, और फिर 'बिल्ड' के नियमों में सिर्फ़ कुछ बदलाव करें. इसका पूरा उदाहरण इंटिग्रेशन की प्रोसेस नीचे दिखाई गई है (और कोड यहां देखें).
मान लें कि आपके पास SimpleDelegate API को लागू करने वाला कोई डेलिगेट है और बाहरी "C" इस 'डमी' को बनाने/मिटाने के API प्रतिनिधि के तौर पर नीचे दिखाया गया है:
// Returns default options for DummyDelegate.
DummyDelegateOptions TfLiteDummyDelegateOptionsDefault();

// Creates a new delegate instance that need to be destroyed with
// `TfLiteDummyDelegateDelete` when delegate is no longer used by TFLite.
// When `options` is set to `nullptr`, the above default values are used:
TfLiteDelegate* TfLiteDummyDelegateCreate(const DummyDelegateOptions* options);

// Destroys a delegate created with `TfLiteDummyDelegateCreate` call.
void TfLiteDummyDelegateDelete(TfLiteDelegate* delegate);
“DummyDelegate” को बेंचमार्क टूल और अनुमान टूल के साथ इंटिग्रेट करने के लिए, नीचे दिए गए DelegateProvider की तरह:
class DummyDelegateProvider : public DelegateProvider {
 public:
  DummyDelegateProvider() {
    default_params_.AddParam("use_dummy_delegate",
                             ToolParam::Create<bool>(false));
  }

  std::vector<Flag> CreateFlags(ToolParams* params) const final;

  void LogParams(const ToolParams& params) const final;

  TfLiteDelegatePtr CreateTfLiteDelegate(const ToolParams& params) const final;

  std::string GetName() const final { return "DummyDelegate"; }
};
REGISTER_DELEGATE_PROVIDER(DummyDelegateProvider);

std::vector<Flag> DummyDelegateProvider::CreateFlags(ToolParams* params) const {
  std::vector<Flag> flags = {CreateFlag<bool>("use_dummy_delegate", params,
                                              "use the dummy delegate.")};
  return flags;
}

void DummyDelegateProvider::LogParams(const ToolParams& params) const {
  TFLITE_LOG(INFO) << "Use dummy test delegate : ["
                   << params.Get<bool>("use_dummy_delegate") << "]";
}

TfLiteDelegatePtr DummyDelegateProvider::CreateTfLiteDelegate(
    const ToolParams& params) const {
  if (params.Get<bool>("use_dummy_delegate")) {
    auto default_options = TfLiteDummyDelegateOptionsDefault();
    return TfLiteDummyDelegateCreateUnique(&default_options);
  }
  return TfLiteDelegatePtr(nullptr, [](TfLiteDelegate*) {});
}
BUILD नियम की परिभाषाएं अहम हैं, क्योंकि आपको पक्का करना होगा कि लाइब्रेरी हमेशा लिंक रहती है और ऑप्टिमाइज़र द्वारा भेजी नहीं जाती है.
#### The following are for using the dummy test delegate in TFLite tooling ####
cc_library(
    name = "dummy_delegate_provider",
    srcs = ["dummy_delegate_provider.cc"],
    copts = tflite_copts(),
    deps = [
        ":dummy_delegate",
        "//tensorflow/lite/tools/delegates:delegate_provider_hdr",
    ],
    alwayslink = 1, # This is required so the optimizer doesn't optimize the library away.
)
अब अपनी BUILD फ़ाइल में इन दो रैपर नियमों को जोड़ें, ताकि बेंचमार्क टूल, अनुमान टूल, और अन्य आकलन टूल, जो साथ मिलकर काम करने में मदद मिलती है.
cc_binary(
    name = "benchmark_model_plus_dummy_delegate",
    copts = tflite_copts(),
    linkopts = task_linkopts(),
    deps = [
        ":dummy_delegate_provider",
        "//tensorflow/lite/tools/benchmark:benchmark_model_main",
    ],
)

cc_binary(
    name = "inference_diff_plus_dummy_delegate",
    copts = tflite_copts(),
    linkopts = task_linkopts(),
    deps = [
        ":dummy_delegate_provider",
        "//tensorflow/lite/tools/evaluation/tasks:task_executor_main",
        "//tensorflow/lite/tools/evaluation/tasks/inference_diff:run_eval_lib",
    ],
)

cc_binary(
    name = "imagenet_classification_eval_plus_dummy_delegate",
    copts = tflite_copts(),
    linkopts = task_linkopts(),
    deps = [
        ":dummy_delegate_provider",
        "//tensorflow/lite/tools/evaluation/tasks:task_executor_main",
        "//tensorflow/lite/tools/evaluation/tasks/imagenet_image_classification:run_eval_lib",
    ],
)

cc_binary(
    name = "coco_object_detection_eval_plus_dummy_delegate",
    copts = tflite_copts(),
    linkopts = task_linkopts(),
    deps = [
        ":dummy_delegate_provider",
        "//tensorflow/lite/tools/evaluation/tasks:task_executor_main",
        "//tensorflow/lite/tools/evaluation/tasks/coco_object_detection:run_eval_lib",
    ],
)
बताए गए तरीके से, इस सेवा देने वाली कंपनी को TFLite के कर्नेल टेस्ट में भी प्लग-इन किया जा सकता है यहां पढ़ें.
दूसरा विकल्प: दूसरों को अपने ईमेल खाते का ऐक्सेस देना
इस विकल्प में, आप पहले एक बाहरी डेलिगेट अडैप्टर external_delegate_adaptor.cc जैसा कि नीचे दिखाया गया है. ध्यान दें, यह तरीका पहला विकल्प, जैसा कि ऊपर बताया गया है.
TfLiteDelegate* CreateDummyDelegateFromOptions(char** options_keys,
                                               char** options_values,
                                               size_t num_options) {
  DummyDelegateOptions options = TfLiteDummyDelegateOptionsDefault();

  // Parse key-values options to DummyDelegateOptions.
  // You can achieve this by mimicking them as command-line flags.
  std::unique_ptr<const char*> argv =
      std::unique_ptr<const char*>(new const char*[num_options + 1]);
  constexpr char kDummyDelegateParsing[] = "dummy_delegate_parsing";
  argv.get()[0] = kDummyDelegateParsing;

  std::vector<std::string> option_args;
  option_args.reserve(num_options);
  for (int i = 0; i < num_options; ++i) {
    option_args.emplace_back("--");
    option_args.rbegin()->append(options_keys[i]);
    option_args.rbegin()->push_back('=');
    option_args.rbegin()->append(options_values[i]);
    argv.get()[i + 1] = option_args.rbegin()->c_str();
  }

  // Define command-line flags.
  // ...
  std::vector<tflite::Flag> flag_list = {
      tflite::Flag::CreateFlag(...),
      ...,
      tflite::Flag::CreateFlag(...),
  };

  int argc = num_options + 1;
  if (!tflite::Flags::Parse(&argc, argv.get(), flag_list)) {
    return nullptr;
  }

  return TfLiteDummyDelegateCreate(&options);
}

#ifdef __cplusplus
extern "C" {
#endif  // __cplusplus

// Defines two symbols that need to be exported to use the TFLite external
// delegate. See tensorflow/lite/delegates/external for details.
TFL_CAPI_EXPORT TfLiteDelegate* tflite_plugin_create_delegate(
    char** options_keys, char** options_values, size_t num_options,
    void (*report_error)(const char*)) {
  return tflite::tools::CreateDummyDelegateFromOptions(
      options_keys, options_values, num_options);
}

TFL_CAPI_EXPORT void tflite_plugin_destroy_delegate(TfLiteDelegate* delegate) {
  TfLiteDummyDelegateDelete(delegate);
}

#ifdef __cplusplus
}
#endif  // __cplusplus
अब जैसा दिखाया गया है, उसके हिसाब से डाइनैमिक लाइब्रेरी बनाने के लिए, संबंधित BUILD टारगेट बनाएं नीचे दिया गया है:
cc_binary(
    name = "dummy_external_delegate.so",
    srcs = [
        "external_delegate_adaptor.cc",
    ],
    linkshared = 1,
    linkstatic = 1,
    deps = [
        ":dummy_delegate",
        "//tensorflow/lite/c:common",
        "//tensorflow/lite/tools:command_line_flags",
        "//tensorflow/lite/tools:logging",
    ],
)
बाहरी प्रतिनिधि .so फ़ाइल बनाने के बाद, आप बाइनरी बना सकते हैं या इनका इस्तेमाल कर सकते हैं ये पहले से बनाए गए हो सकते हैं, जो नए प्रतिनिधि के साथ तब तक चलते हैं, जब तक बाइनरी यह external_delegate_provider ऐसी लाइब्रेरी जो बताए गए तरीके से कमांड लाइन फ़्लैग की सुविधा देती है यहां क्लिक करें. ध्यान दें: आपने संगठन से बाहर के लोगों को अपने ईमेल खाते का ऐक्सेस देने वाली सेवा को पहले ही मौजूदा टेस्टिंग और टूलिंग बाइनरी.
जानकारी देखें यहां ताकि डमी डेलिगेट को बेंचमार्क के तौर पर संगठन को काम करने का फ़ैसला लेने में मदद मिलती है. टेस्टिंग के लिए मिलते-जुलते निर्देशों का इस्तेमाल करें और आकलन करने में इस्तेमाल होने वाले टूल के बारे में ज़्यादा जानें.
यह ध्यान देने वाली बात है कि बाहरी डेलिगेट, संबंधित C++ LiteRT Python बाइंडिंग में डेलीगेट को लागू करना, जैसा कि दिखाया गया है यहां क्लिक करें. इसलिए, यहां बनाई गई डाइनैमिक एक्सटर्नल डेलिगेट अडैप्टर लाइब्रेरी इसका इस्तेमाल, LiteRT Python API के साथ सीधे तौर पर किया जाता है.
संसाधन
रात में पहले से बनी TFLite टूलिंग बाइनरी के लिए लिंक डाउनलोड करें
| ओएस | ARCH | BINARY_NAME |
| Linux | x86_64 | |
| समूह | ||
| aarch64 | ||
| Android | समूह | |
| aarch64 |
