
Getting code assistance from artificial intelligence (AI) models can be very useful, but what if you are restricted from using third-party, hosted generative AI models because of connectivity, cost, or data security restrictions? Google's family of Gemma models are available to download and run on your own hardware, so you can keep everything local and even have the option to tune the model to work better with your codebase.
Running your own instance of Gemma or CodeGemma can get you AI coding assistance with low latency, high availability, potentially lower cost, and the ability to keep all your coding data on your own network. This project shows you how to set up your own web service for hosting Gemma and connecting it to a Microsoft Visual Studio Code extension, to make using the model more convenient while coding. This project includes two sub-projects: One project to set up and wrap Gemma into a web service, and a second project for a VS Code extension that connects and uses the web service.
For a video overview of this project and how to extend it, including insights from the folks who built it, check out the Personal AI Code Assistant Build with Google AI video. You can also review the code for this project in the Gemma Cookbook code repository. Otherwise, you can get started extending the project using the following instructions.
Overview
This tutorial shows you how to set up and extend two projects: a web service for Gemma and a VS Code extension to use to that service. The web service uses Python, Keras, JAX, and the FastAPI libraries to serve the Gemma model and handle requests. The VS Code extension, called Pipet, adds commands to the Command Palette that let you make requests to the Gemma web service by selecting code, text, or comments in a code editing window, as shown in Figure 1.
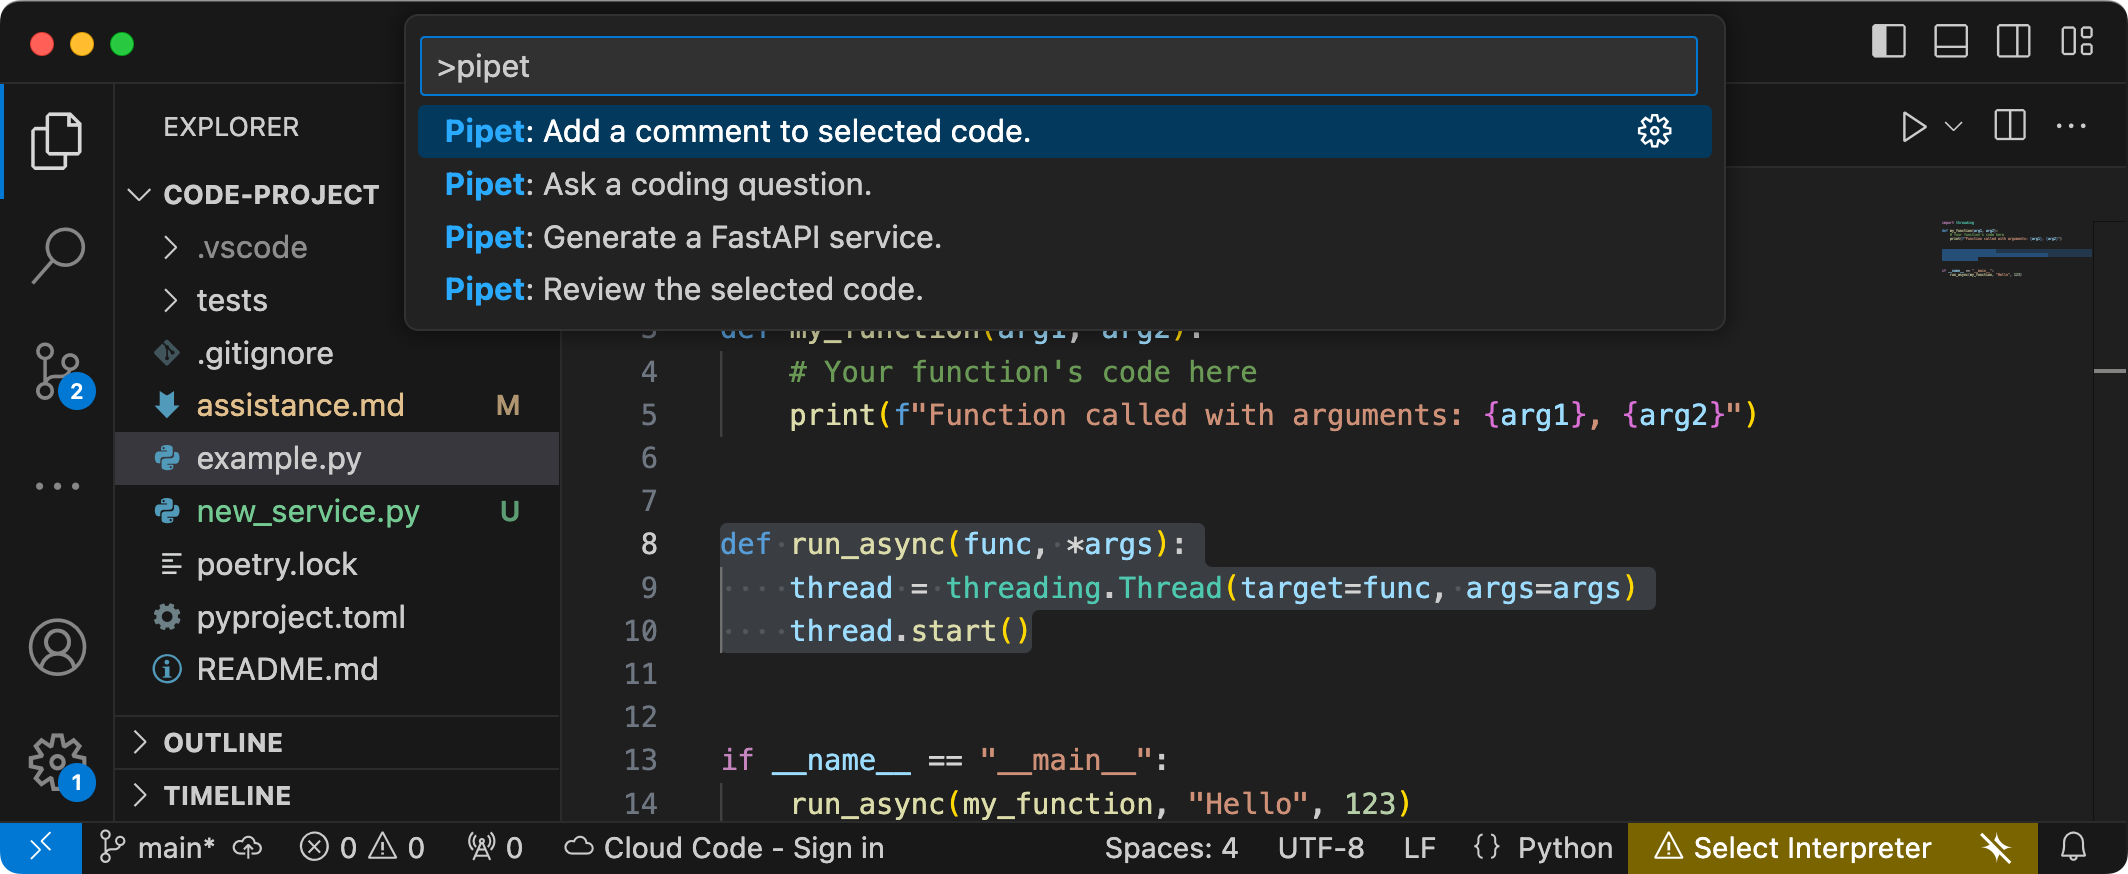
Figure 1. Project command user interface for the Pipet extension in Visual Studio Code
The complete source code for both projects is provided in the Gemma Cookbook code repository and you can extend both projects to adapt to your needs and preferred workflow.
Project setup
These instructions walk you through getting this project ready for development and testing. The general setup steps include installing prerequisite software, cloning the project from the code repository, setting a few environment variables, installing Python and Node.js libraries, and testing the web application.
Install required software
This project uses Python 3, Virtual Environments (venv), Node.js, and Node
Package Manager (npm) to manage packages and run the two projects.
To install the required software:
Install Python 3, the virtual environment (
venv)package for Python, Node.js, and the Node.js package manager (npm):sudo apt update sudo apt install git pip python3-venv nodejs npm
Clone the project
Download the project code to your development computer. You need git source control software to retrieve the project source code.
To download the project code:
Clone the git repository using the following command:
git clone https://github.com/google-gemini/gemma-cookbook.gitOptional: Configure your local git repository to use sparse checkout, so you have only the files for the project:
cd gemma-cookbook/
git sparse-checkout set Demos/personal-code-assistant/
git sparse-checkout init --cone
Gemma web service project
The web service portion of this project (gemma-web-service) creates an
independently hosted instance of Gemma 2 2B wrapped with a basic web service to
handle generation requests and responses. The VS Code extension,
covered later in this tutorial, connects to this service to handle code
assistance requests.
These instructions walk you through getting this project ready for development and testing. The general setup steps include installing prerequisite software, cloning the project from the code repository, setting a few environment variables, installing Python libraries, and testing the web service.
Hardware requirements
Run the Gemma web service project on a computer with a graphics processing unit (GPU) or a Tensor processing unit (TPU), and sufficient GPU or TPU memory to hold the model. To run the Gemma 2 2B configuration in this web service project, you need about 16GB of GPU memory, about the same amount of regular RAM, and a minimum of 20GB of disk space.
If you are deploying the Gemma web service project on a Google Cloud VM instance, configure the instance following these requirements:
- GPU hardware: A NVIDIA T4 is required to run this project (NVIDIA L4 or higher recommended)
- Operating System: Choose a Deep Learning on Linux option, specifically Deep Learning VM with CUDA 12.3 M124 with pre-installed GPU software drivers.
- Boot disk size: Provision at least 20GB of disk space for your data, model, and supporting software.
Configure project
This project uses Python 3 and Virtual Environments (venv) to manage packages
and run the web service. Install the Python libraries with the venv Python
virtual environment activated to manage Python packages and dependencies. Make
sure you activate the Python virtual environment before installing Python
libraries with the setup_python script or with the pip installer. For more
information about using Python virtual environments, see the
Python venv documentation.
To install the Python libraries:
In a terminal window, navigate to the
gemma-web-servicedirectory:cd Demos/personal-code-assistant/gemma-web-service/Configure and activate a Python virtual environment (venv) for this project:
python3 -m venv venv
source venv/bin/activate
Install the required Python libraries for this project using the
setup_pythonscript:./setup_python.sh
Set environment variables
This project requires a few environment variables to run,
including a Kaggle username and a Kaggle API token. You must have a Kaggle
account and request access to the Gemma models to be able to download them. For
this project, you add your Kaggle Username and Kaggle API token in an .env
file, which is used by the web service program to download the model.
To set the environment variables:
- Obtain your Kaggle username and your API token by following the instructions in the Kaggle documentation.
- Get access to the Gemma model by following the Get access to Gemma instructions in the Gemma Setup page.
Create an environment variable file for the project, by creating a
.envtext file at this location in your clone of the project:personal-code-assistant/gemma-web-service/.envAfter creating the
.envtext file, add the following settings to it:KAGGLE_USERNAME=<YOUR_KAGGLE_USERNAME_HERE> KAGGLE_KEY=<YOUR_KAGGLE_KEY_HERE>
Run and test the web service
Once you have completed the installation and configuration of the project, run the web application to confirm that you have configured it correctly. You should do this as a baseline check before editing the project for your own use.
To run and test the project:
In a terminal window, navigate to the
gemma-web-servicedirectory:cd personal-code-assistant/gemma-web-service/Run the application using the
run_servicescript:./run_service.shAfter starting the web service, the program code lists a URL where you can access the service. Typically, this address is:
http://localhost:8000/Test the service by running the
test_postscript:./test/test_post.sh
When you have successfully run and tested the service with this script, you should be ready to connect to it with the VS Code extension in the next section of this tutorial.
VS Code extension project
The VS Code extension of this project (pipet-code-agent-2) creates a software
extension of the Microsoft Visual Studio Code application that's designed to add
new AI coding commands. This extension communicates with the
Gemma web service described previously in this tutorial. The
extension communicates with the web services over http using JSON-format
messages.
Configure project
These instructions walk you through getting the Pipet Code Agent v2 project set up for development and testing. The general steps are installing required software, running the configuration installation, configuring an extension setting, and testing the extension.
Install required software
The Pipet Code Agent project runs as an extension of Microsoft
Visual Studio Code, and uses
Node.js and the Node Package Manager (npm) tool to
manage packages and run the application.
To install the required software:
- Download and install Visual Studio Code for your platform.
- Make sure Node.js is installed by following the installation instructions for your platform.
Configure project libraries
Use the npm command line tool to download the required dependencies and
configure the project.
To configure the project code:
Navigate to the Pipet Code Agent project root directory.
cd Demos/personal-code-assistant/pipet-code-agent-2/Run the install command to download dependencies and configure the project:
npm install
Configure the extension
You should now be able to test your installation by running Pipet Code Agent as a development extension in VS Code on your device. The test opens a separate VS Code Extension Development Host window where the new extension is available. In this new window, you configure the settings for the extension uses to access your personal Gemma web service.
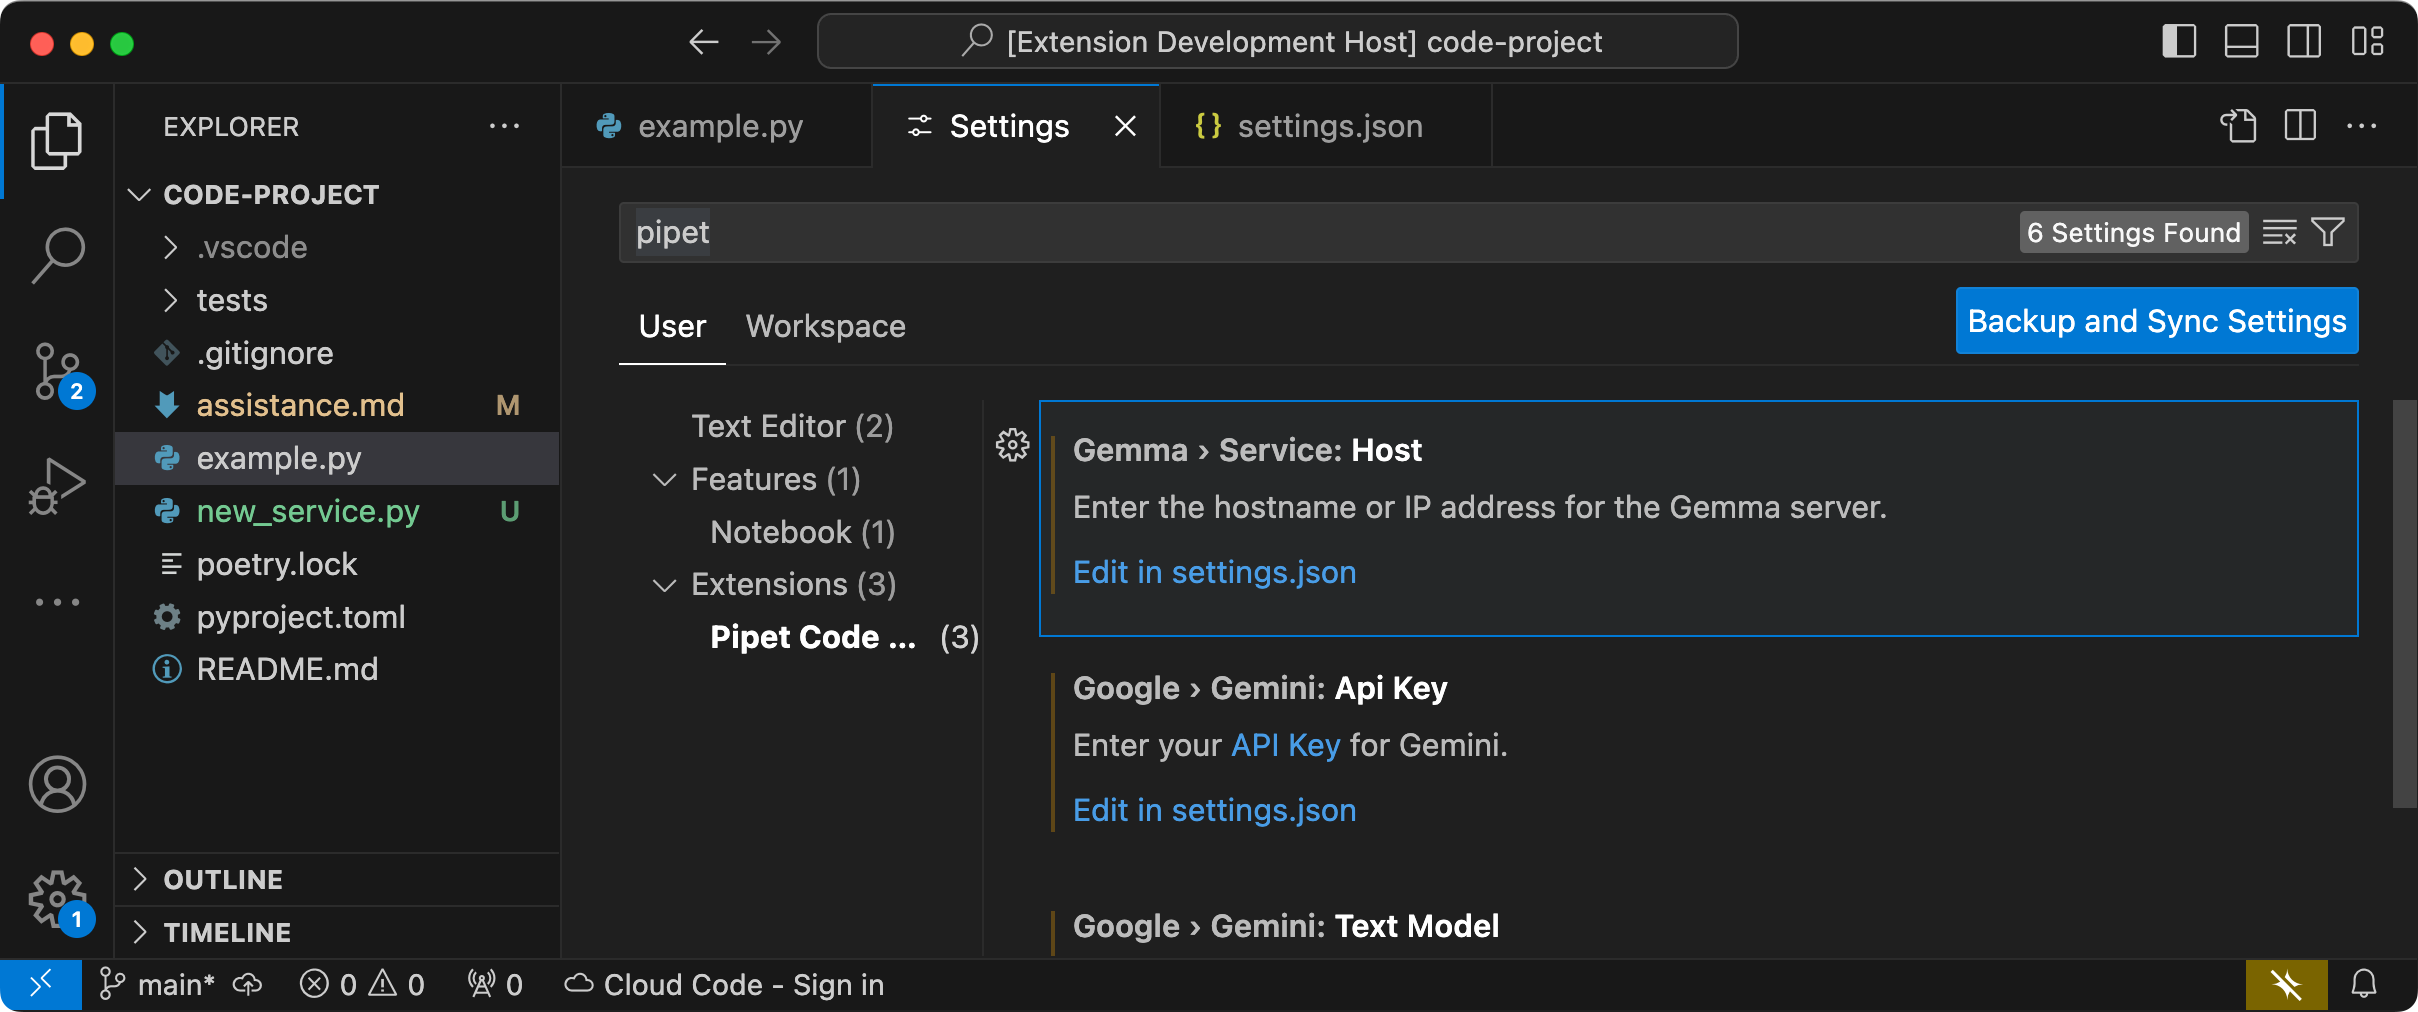 Figure 2. VS Code Extension Development Host window with the Pipet
extension Settings.
Figure 2. VS Code Extension Development Host window with the Pipet
extension Settings.
To configure and test your setup:
- Start the VS Code application.
- In VS Code, create a new window by selecting File > New Window.
- Open the Pipet Code Agent project by selecting File > Open Folder,
and selecting the
personal-code-assistant/pipet-code-agent-2/folder. - Open the
pipet-code-agent-2/src/extension.tsfile. - Run the extension in debug mode by selecting Run > Start Debugging and if necessary, select the VS Code Extension Development Host option. This step opens a separate Extension Development Host window.
- In the new VS Code window, open the VS Code settings by selecting Code > Settings > Settings.
Set the host address of your Gemma web service server as a configuration setting. In the Search Settings field, type
Gemma, select the User tab, and in the Gemma > Service: Host setting, click the Edit in settings.json link, and add the host address such as127.0.0.1,localhost, ormy-server.my-local-domain.com:"gemma.service.host": "your-host-address-here"Save the changes to the
settings.jsonfile and close the settings tabs.
Test the extension
You should now be able to test your installation by running Pipet Code Agent as a development extension in VS Code on your device. The test opens a separate VS Code Extension Development Host window where the new extension is available.
To test the extension commands:
- In the VS Code Extension Development Host window, select any code in the editor window.
- Open the command palette by selecting View > Command Palette.
- In the Command Palette, type
Pipetand select one of the commands with that prefix.
Modify existing commands
Modifying the commands provided in Pipet Code Agent is the simplest way to change the behavior and capabilities of the extension. This prompt context information guides the Gemma generative model in forming a response. By changing the prompt instructions in the existing Pipet commands, you can change how each of the commands behave.
This set of instructions explains how to modify the review.ts command by
changing the prompt text of the command.
To prepare to edit the review.ts command:
- Start the VS Code application.
- In VS Code, create a new window by selecting File > New Window.
- Open the Pipet Code Agent project by selecting File > Open Folder,
and selecting the
pipet-code-agent/folder. - Open
pipet-code-agent/src/review.tsfile.
To modify the behavior of the review.ts command:
In the
review.tsfile, change the second to last line ofPROMPT_INSTRUCTIONSconstant to addAlso note potential performance improvements.const PROMPT_INSTRUCTIONS = ` Reviewing code involves finding bugs and increasing code quality. Examples of bugs are syntax errors or typos, out of memory errors, and boundary value errors. Increasing code quality entails reducing complexity of code, eliminating duplicate code, and ensuring other developers are able to understand the code. Also note potential performance improvements. Write a review of the following code: `;Save the changes to the
review.tsfile.
To test the modified command:
- In your VS Code Pipet extension project window, open the
src/extension.tsfile. - Build the updated code by selecting Terminal > Run Build Task... and then the npm: compile option.
- Restart the debugger by selecting Run > Restart Debugging.
- In the VS Code Extension Development Host window, select any code in the editor window.
- Open the command palette by selecting View > Command Palette.
- In the Command Palette, type
Pipetand select the Pipet: Review the selected code command.
Create new commands
You can extend Pipet by creating new commands that perform completely new tasks
with the Gemma model. Each command file, such as comment.ts or review.ts, is
mostly self-contained, and includes code for collecting text from the active
editor, composing a prompt, connecting to the Gemma web service, sending a
prompt, and handling the response.
This set of instructions explains how to build a new command using the code of
an existing command, question.ts, as a template.
To create a command that recommends names for functions:
- Make a copy of the
pipet-code-agent-2/src/question.tsfile callednew-service.tsin thesrc/directory. - In VS Code, open the
src/new-service.tsfile. Change the prompt instructions in the new file by editing the
PROMPT_INSTRUCTIONSvalue.// Provide instructions for the AI model const PROMPT_INSTRUCTIONS = ` Build a Python web API service using FastAPI and uvicorn. - Just output the code, DO NOT include any explanations. - Do not include an 'if __name__ == "__main__":' statement. - Do not include a '@app.get("/")' statement - Do not include a '@app.get("/info")' statement `;Add the service boilerplate by creating a new
BOILERPLATE_CODEconstant.const BOILERPLATE_CODE = ` # the following code for testing and diagnosis: @app.get("/") async def root(): return "Server: OK" @app.get("/info") async def info(): return "Service using FastAPI version: " + fastapi.__version__ # Run the service if __name__ == "__main__": # host setting makes service available to other devices uvicorn.run(app, host="0.0.0.0", port=8000) `;Change the name of the command function to
newService()and update its information message.export async function newService() { vscode.window.showInformationMessage('Building new service from template...'); ...Update the prompt assembly code to include the text selected in the editor and the
PROMPT_INSTRUCTIONS.// Build the full prompt using the template. const promptText = `${selectedCode}${PROMPT_INSTRUCTIONS}`;Change the response insert code to include the response and the boilerplate code.
// Insert answer after selection.
editor.edit((editBuilder) => {
    editBuilder.insert(selection.end, "\n\n" + responseText);
    editBuilder.insert(selection.end, "\n" + BOILERPLATE_CODE);
});
Save the changes to the
new-service.tsfile.
Integrate the new command
After you complete the code for the new command, you need to integrate it with
the rest of the extension. Update the extension.ts and package.json files to
make the new command part of the extension, and enable VS Code to invoke
the new command.
To integrate the new-service command with the extension code:
- In VS Code, open the
pipet-code-agent-2/src/extension.tsfile. Add the new code file to the extension by adding a new import statement.
import { newService } from './new-service';Register the new command by adding the following code to the
activate()function.export function activate(context: vscode.ExtensionContext) { ... vscode.commands.registerCommand('pipet-code-agent.newService', newService); }Save the changes to the
extension.tsfile.
To integrate the name command with the extension package:
- In VS Code, open the
pipet-code-agent/package.jsonfile. Add the new command to the
commandssection of the package file."contributes": { "commands": [ ... { "command": "pipet-code-agent.newService", "title": "Pipet: Generate a FastAPI service." } ],Save the changes to the
package.jsonfile.
Test the new command
Once you have completed coding the command and integrating it with the extension, you can test it. Your new command is only available in the VS Code Extension Development Host window, and not in the VS Code window where you edited the code for the extension.
To test the modified command:
- In your VS Code Pipet extension project window, open the
src/extension.tsfile. - Build the updated code by selecting Terminal > Run Build Task... and then the npm: compile option.
- In your VS Code Pipet extension project window, restart the debugger by selecting Run > Restart Debugging, which restarts a separate Extension Development Host window.
- In the VS Code Extension Development Host window, select some code in the editor window.
- Open the command palette by selecting View > Command Palette.
- In the Command Palette, type
Pipetand select the Pipet: Generate a FastAPI service command.
You have now built a VS Code extension command that works with a Gemma AI model! Try experimenting with different commands and instructions to build an AI-assisted code development workflow that works for you!
Package and install the extension
You can package your extension as a .vsix file for local installation in your
VS Code instance. Use the vsce command line tool to generate a .vsix package
file from your extension project, which you can then install in your VS Code
instance. For details on packaging your extension, see the VS Code
Publishing Extensions
documentation. When you have completed packaging your extension as a VSIX file,
you can then manually install it into VS Code.
To install the VSIX packaged extension:
- In your VS Code instance, open the Extensions panel by choosing File > Extensions.
- In the Extensions panel, select the three dot menu on the top right and then Install from VSIX.
- Open the
.vsixpackage file you generated from your extension project to install it.
Additional resources
For more details on the code for this project, see the Gemma Cookbook code repository. If you need help building the application or are looking to collaborate with other developers, check out the Google Developers Community Discord server. For more Build with Google AI projects, check out the video playlist.