
Handling customer inquiries, including emails, is a necessary part of running many businesses, but it can quickly get overwhelming. With a bit of effort, artificial intelligence (AI) models like Gemma can help make this work easier.
Every business handles inquiries like emails a little differently, so it's important to be able to adapt technologies like generative AI to the needs of your business. This project tackles the specific problem of extracting order information from emails to a bakery into structured data, so it can be quickly added to an order handling system. Using 10 to 20 examples of inquiries and the output you want, you can tune a Gemma model to process emails from your customers, help you respond quickly, and integrate with your existing business systems. This project is built as an AI application pattern you can extend and adapt to get value from Gemma models for your business.
For a video overview of the project and how to extend it, including insights from the folks who built it, check out the Business Email AI Assistant Build with Google AI video. You can also review the code for this project in the Gemma Cookbook code repository. Otherwise, you can get started extending the project using the following instructions.
Overview
This tutorial walks you through setting up, running, and extending a business email assistant application built with Gemma, Python, and Flask. The project provides a basic web user interface that you can modify to fit your needs. The application is built to extract data from customer emails into a structure for a fictitious bakery. You can use this application pattern for any business task that uses text input and text output.
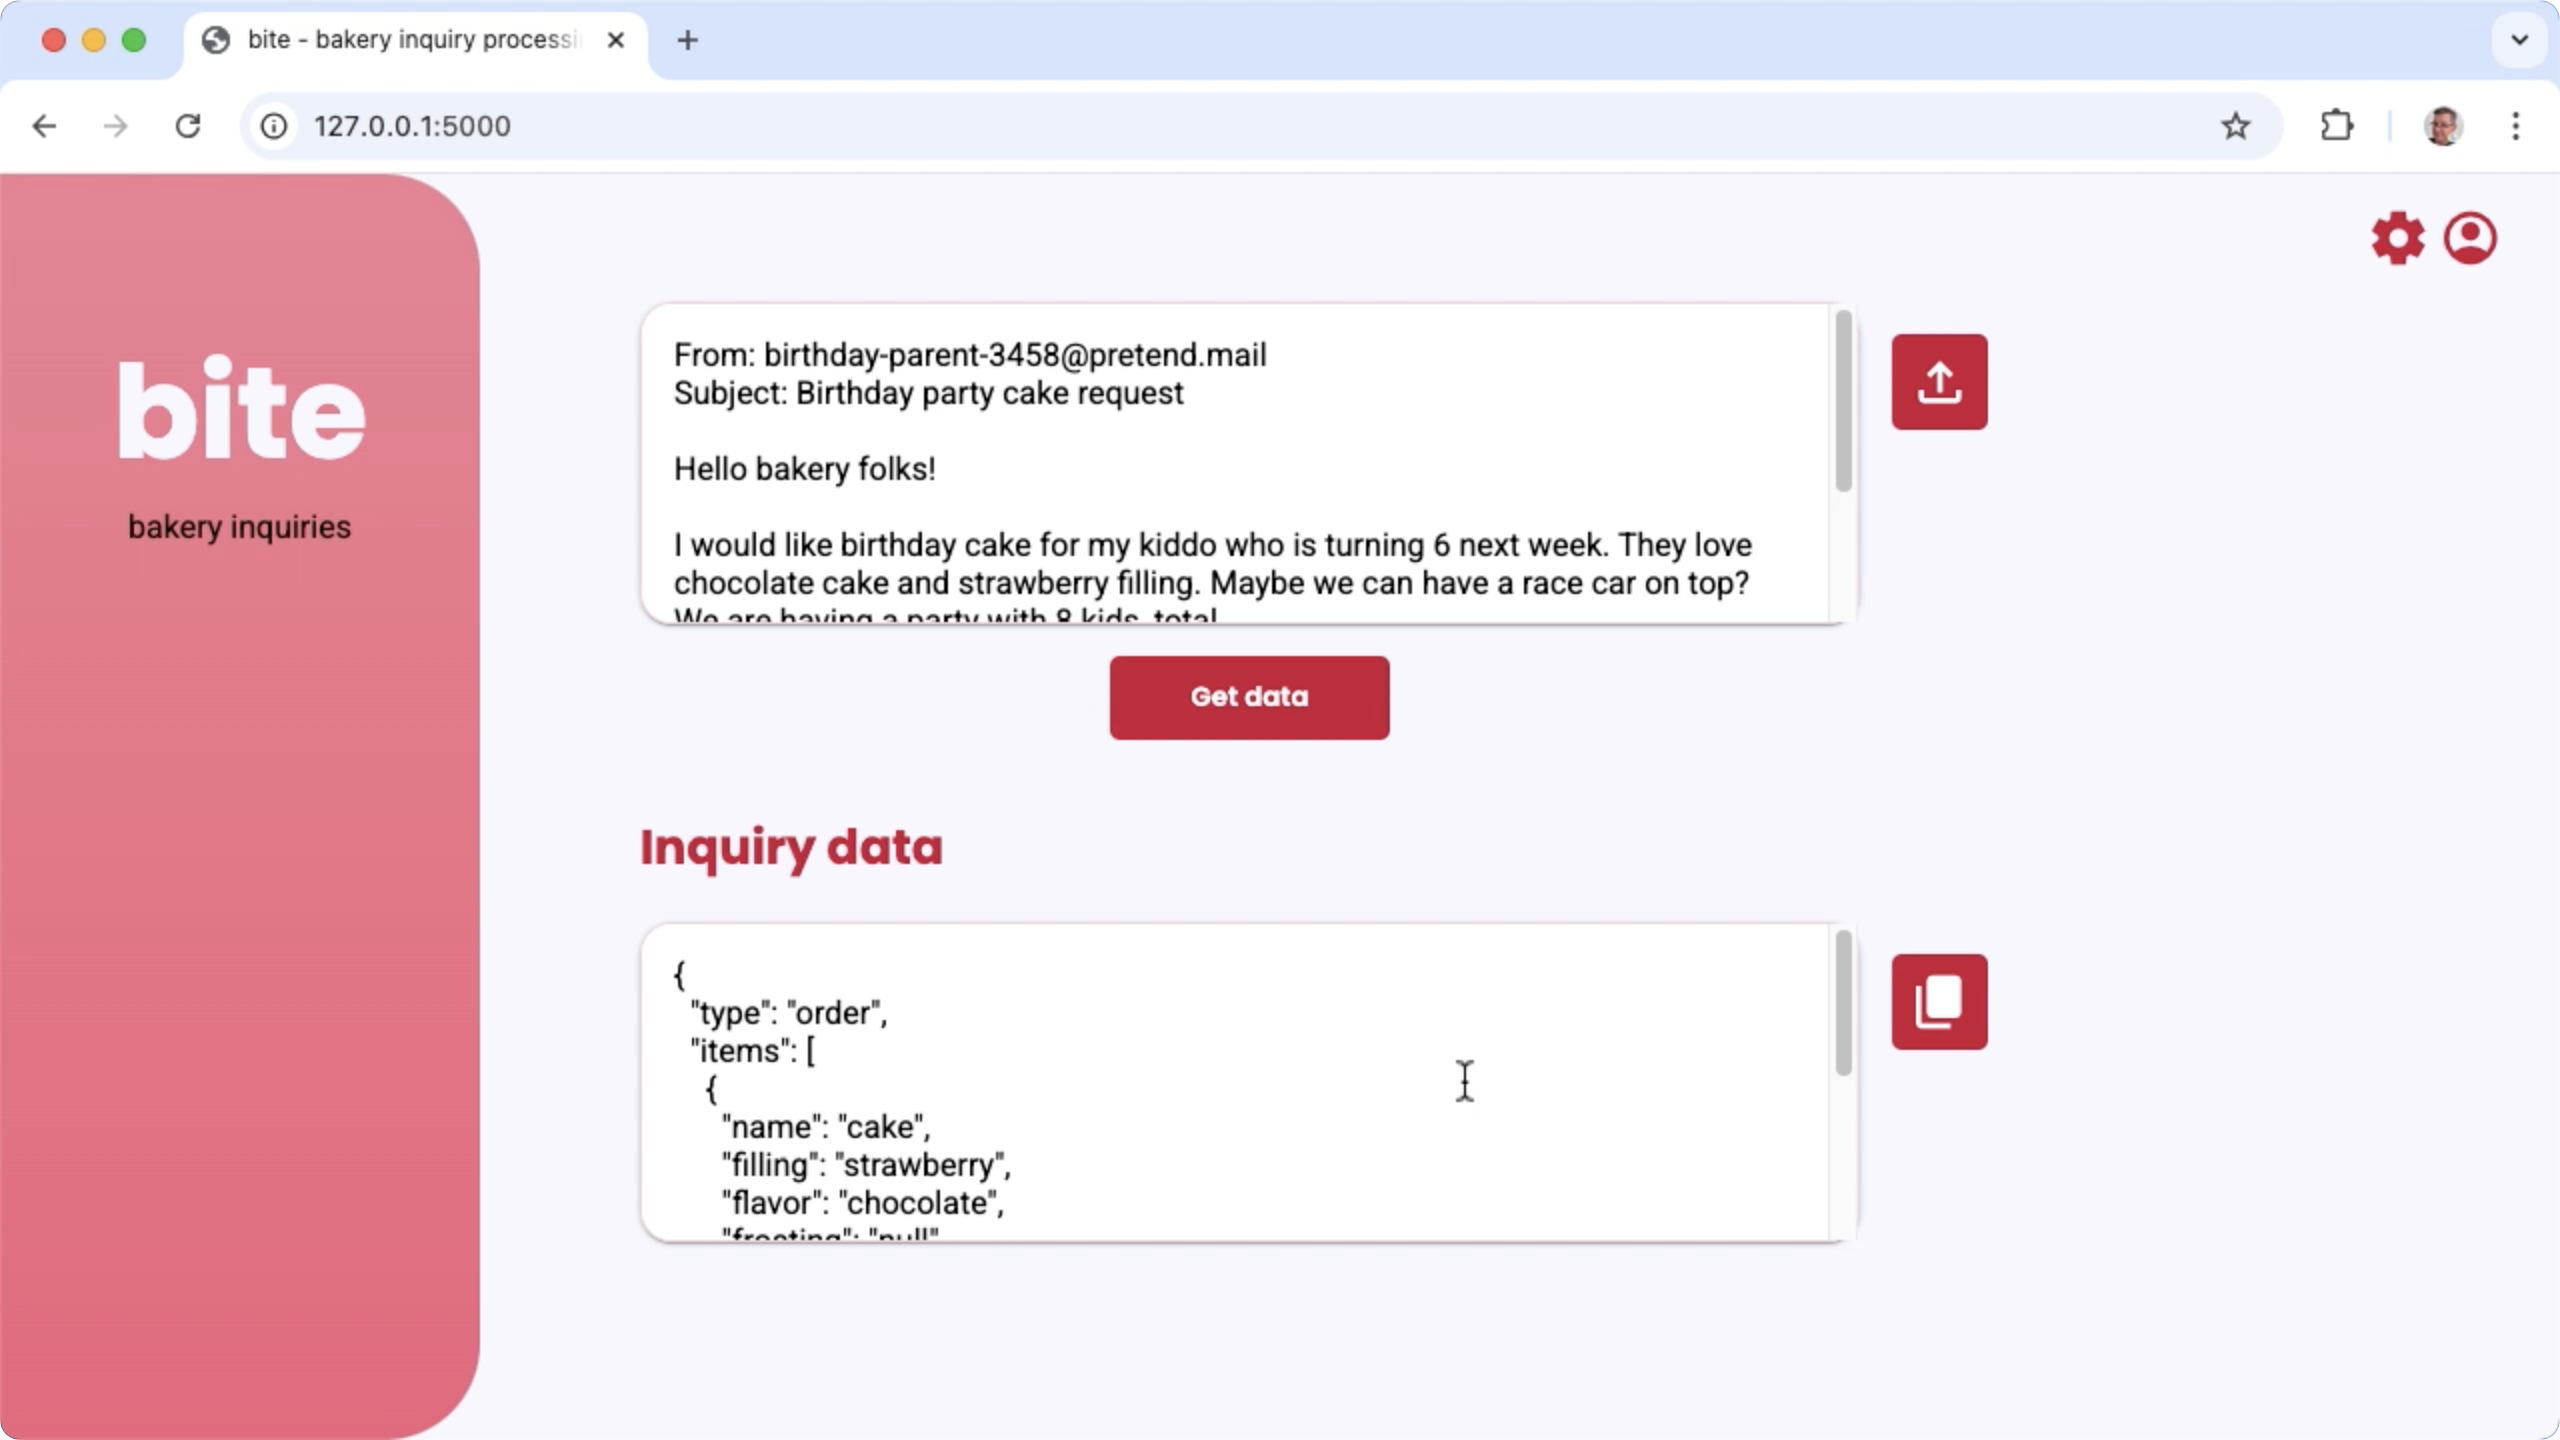
Figure 1. Project user interface for processing bakery email inquiries
Hardware requirements
Run this tuning process on a computer with a graphics processing unit (GPU) or a Tensor processing unit (TPU), and sufficient GPU or TPU memory to hold the existing model, plus the tuning data. To run the tuning configuration in this project, you need about 16GB of GPU memory, about the same amount of regular RAM, and a minimum of 50GB of disk space.
You can run the Gemma model tuning portion of this tutorial using a Colab environment with a T4 GPU runtime. If you are building this project on a Google Cloud VM instance, configure the instance following these requirements:
- GPU hardware: A NVIDIA T4 is required to run this project (NVIDIA L4 or higher recommended)
- Operating System: Choose a Deep Learning on Linux option, specifically Deep Learning VM with CUDA 12.3 M124 with pre-installed GPU software drivers.
- Boot disk size: Provision at least 50GB of disk space for your data, models, and supporting software.
Project setup
These instructions walk you through getting this project ready for development and testing. The general setup steps include installing prerequisite software, cloning the project from the code repository, setting a few environment variables, installing Python libraries, and testing the web application.
Install and configure
This project uses Python 3 and Virtual Environments (venv) to manage packages
and run the application. The following installation instructions are for a Linux
host machine.
To install the required software:
Install Python 3 and the
venvvirtual environment package for Python:sudo apt update sudo apt install git pip python3-venv
Clone the project
Download the project code to your development computer. You need git source control software to retrieve the project source code.
To download the project code:
Clone the git repository using the following command:
git clone https://github.com/google-gemini/gemma-cookbook.gitOptionally, configure your local git repository to use sparse checkout, so you have only the files for the project:
cd gemma-cookbook/
git sparse-checkout set Demos/business-email-assistant/
git sparse-checkout init --cone
Install Python libraries
Install the Python libraries with the venv Python virtual environment
activated to manage Python packages and dependencies. Make sure you activate the
Python virtual environment before installing Python libraries with the pip
installer. For more information about using Python virtual environments, see the
Python venv documentation.
To install the Python libraries:
In a terminal window, navigate to the
business-email-assistantdirectory:cd Demos/business-email-assistant/Configure and activate Python virtual environment (venv) for this project:
python3 -m venv venv
source venv/bin/activate
Install the required Python libraries for this project using the
setup_pythonscript:./setup_python.sh
Set environment variables
This project requires a few environment variables to run,
including a Kaggle username and a Kaggle API token. You must have a Kaggle
account and request access to the Gemma models to be able to download them. For
this project, you add your Kaggle Username and Kaggle API token to two .env
files, which are read by the web application and the tuning program,
respectively.
To set the environment variables:
- Obtain your Kaggle username and your token key by following the instructions in the Kaggle documentation.
- Get access to the Gemma model by following the Get access to Gemma instructions in the Gemma Setup page.
- Create environment variable files for the project, by creating a
.envtext file at each these locations in your clone of the project:email-processing-webapp/.env model-tuning/.env
After creating the
.envtext files, add the following settings to both files:KAGGLE_USERNAME=<YOUR_KAGGLE_USERNAME_HERE> KAGGLE_KEY=<YOUR_KAGGLE_KEY_HERE>
Run and test the application
Once you have completed the installation and configuration of the project, run the web application to confirm that you have configured it correctly. You should do this as a baseline check before editing the project for your own use.
To run and test the project:
In a terminal window, navigate to the
email-processing-webappdirectory:cd business-email-assistant/email-processing-webapp/Run the application using the
run_appscript:./run_app.shAfter starting the web application, the program code lists a URL where you can browse and test. Typically, this address is:
http://127.0.0.1:5000/In the web interface, press the Get data button below the first input field to generate a response from the model.
The first response from the model after you run the application takes longer since it must complete initialization steps on the first generation run. Subsequent prompt requests and generation on an already-running web application complete in less time.
Extend the application
Once you have the application running, you can extend it by modifying the user interface and business logic to make it work for tasks that are relevant to you or your business. You can also modify the behavior of the Gemma model using the application code by changing the components of the prompt that the app sends to the generative AI model.
The application provides instructions to the model along with the input data from the user a complete prompt of the model. You can modify these instructions to change the behavior of the model, such as specifying the names of parameters and structure of the JSON to generate. A simpler way to change the behavior of the model is to provide additional instructions or guidance for the model's response, such as specifying that the generated replies should not include any Markdown formatting.
To modify prompt instructions:
- In the development project, open the
business-email-assistant/email-processing-webapp/app.pycode file. In the
app.pycode, add additions instructions to theget_prompt():function:def get_prompt(): return """ Extract the relevant details of this request and return them in JSON code, with no additional markdown formatting:\n"""
This example adds the phrase "with no additional markdown formatting" to the instructions.
Providing additional prompt instruction can strongly influence the generated output, and takes significantly less effort to implement. You should try this method first to see if you can get the behavior you want from the model. However, using prompt instructions to modify a Gemma model's behavior has its limits. In particular, the overall input token limit of the model, which is 8,192 tokens for Gemma 2, requires you to balance detailed prompt instructions with the size of the new data you provide so that you stay under that limit.
Tune the model
Performing fine-tuning of a Gemma model is the recommended way to get it to respond more reliably for specific tasks. In particular, if you want the model to generate JSON in with a specific structure, including specifically named parameters, you should consider tuning the model for that behavior. Depending on the task you want the model to complete, you can achieve basic functionality with 10 to 20 examples. This section of the tutorial explains how to set up and run fine-tuning on a Gemma model for a specific task.
The following directions explain how to perform the fine-tuning operation on a VM environment, however, you can also perform this tuning operation using the associated Colab noteboook for this project.
Hardware requirements
The compute requirements for fine-tuning are the same as the hardware requirements for rest of the project. You can run the tuning operation in a Colab environment with a T4 GPU runtime if you limit the input tokens to 256 and the batch size to 1.
Prepare data
Before you start tuning a Gemma model, you must prepare data for tuning. When you are tuning a model for a specific task, you need a set of request and response examples. These examples should show the request text, without any instructions, and the expected response text. To start with, you should prepare a dataset with around 10 examples. These examples should represent a full variety of requests and the ideal responses. Make sure that the requests and responses are not repetitive, as that can cause the models responses to be repetitive and not adjust appropriately to variations in requests. If you are tuning the model to produce a structured data format, make sure all the provided responses strictly conform to the data output format you want. The following table shows a few sample records from the dataset of this code example:
| Request | Response |
|---|---|
| Hi Indian Bakery Central,\nDo you happen to have 10 pendas, and thirty bundi ladoos on hand? Also do you sell a vanilla frosting and chocolate flavor cakes. I'm looking for a 6 inch size | { "type": "inquiry", "items": [ { "name": "pendas", "quantity": 10 }, { "name": "bundi ladoos", "quantity": 30 }, { "name": "cake", "filling": null, "frosting": "vanilla", "flavor": "chocolate", "size": "6 in" } ] } |
| I saw your business on google maps. Do you sell jellabi and gulab jamun? | { "type": "inquiry", "items": [ { "name": "jellabi", "quantity": null }, { "name": "gulab jamun", "quantity": null } ] } |
Table 1. Partial listing of the tuning dataset for the bakery email data extractor.
Data format and loading
You can store your tuning data in any format that is convenient, including
database records, JSON files, CSV, or plain text files, as long as you have the
means to retrieve the records with Python code. This project reads JSON files
from a data directory into an array of dictionary objects.
In this example tuning program, the tuning dataset is loaded in the
model-tuning/main.py module using the prepare_tuning_dataset() function:
def prepare_tuning_dataset():
    # collect data from JSON files
    prompt_data = read_json_files_to_dicts("./data")
    ...
As mentioned previously, you can store the dataset in a format that is convenient, as long as you can retrieve the requests with the associated responses and assemble them into a text string which is used as a tuning record.
Assemble tuning records
For the actual tuning process, the program assembles each request and response
into a single string with the prompt instructions and the content of the
response. The tuning program then tokenizes the string for consumption by the
model. You can see the code for assembling a tuning record in the
model-tuning/main.py module prepare_tuning_dataset() function, as follows:
def prepare_tuning_dataset():
    ...
    # prepare data for tuning
    tuning_dataset = []
    template = "{instruction}\n{response}"

    for prompt in prompt_data:
        tuning_dataset.append(template.format(instruction=prompt["prompt"],
                                              response=prompt["response"]))

    return tuning_dataset
This function takes the data as its input and formats it by adding a line break between the instruction and the response.
Generate model weights
Once you have the tuning data in place and loading, you can run the tuning program. The tuning process for this example application uses the Keras NLP library to tune the model with a Low Rank Adaptation, or LoRA technique, to generate new model weights. Compared to full precision tuning, using LoRA is significantly more memory-efficient because it approximates the changes to the model weights. You can then overlay these approximated weights onto the existing model weights to change the model's behavior.
To perform the tuning run and calculate new weights:
In a terminal window, navigate to the
model-tuning/directory.cd business-email-assistant/model-tuning/Run the tuning process using the
tune_modelscript:./tune_model.sh
The tuning process takes several minutes depending on your available compute
resources. When it completes successfully, the tuning program writes new *.h5
weight files in the model-tuning/weights directory with the following format:
gemma2-2b_inquiry_tuned_4_epoch##.lora.h5
Troubleshooting
If the tuning does not complete successfully, there are two likely reasons:
- Out of memory or resources exhausted: These errors occur when the
tuning process requests memory that exceeds the available GPU memory or CPU
memory. Make sure you are not running the web application while the tuning
process is running. If you are tuning on a device with 16GB of GPU memory,
makes sure your have the
token_limitset to 256 and thebatch_sizeset to 1. - GPU drivers not installed or incompatible with JAX: The tuning process requires that the compute device has hardware drivers installed which are compatible with the version of the JAX libraries. For more details, see the JAX installation documentation.
Deploy tuned model
The tuning process generates multiple weights based on the tuning data and the total number of epochs set in the tuning application. By default, the tuning program generates 3 model weight files, one for each tuning epoch. Each successive tuning epoch produces weights that more accurately reproduce the results of the tuning data. You can see the accuracy rates for each epoch in the terminal output of the tuning process, as follows:
...
8/8 ━━━━━━━━━━━━━━━━━━━━ 121s 195ms/step - loss: 0.5432 - sparse_categorical_accuracy: 0.5982
Epoch 2/3
8/8 ━━━━━━━━━━━━━━━━━━━━ 2s 194ms/step - loss: 0.3320 - sparse_categorical_accuracy: 0.6966
Epoch 3/3
8/8 ━━━━━━━━━━━━━━━━━━━━ 2s 192ms/step - loss: 0.2135 - sparse_categorical_accuracy: 0.7848
While you want the accuracy rate to be relatively high, around 0.80, you do not want the rate to be too high, or very close to 1.00, because that means the weights have come close to overfitting the tuning data. When that happens, the model does not perform well on requests that are significantly different from the tuning examples. By default, the deployment script picks the epoch 3 weights, which typically have an accuracy rate around 0.80.
To deploy the generated weights to the web application:
In a terminal window, navigate to the
model-tuningdirectory:cd business-email-assistant/model-tuning/Run the tuning process using the
deploy_weightsscript:./deploy_weights.sh
After running this script, you should see a new *.h5 file in the
email-processing-webapp/weights/ directory.
Test the new model
Once you have deployed the new weights to the application, it's time to try out the newly tuned model. You can do this by re-running the web application and generating a response.
To run and test the project:
In a terminal window, navigate to the
email-processing-webappdirectory:cd business-email-assistant/email-processing-webapp/Run the application using the
run_appscript:./run_app.shAfter starting the web application, the program code lists a URL where you can browse and test, typically this address is:
http://127.0.0.1:5000/In the web interface, press the Get data button below the first input field to generate a response from the model.
You have now tuned and deployed a Gemma model in an application! Experiment with the application and try to determine the limits of the tuned model's generation capability for your task. If you find scenarios where the model does not perform well, consider adding some of those requests to your list of tuning example data by adding the request and providing an ideal response. Then re-run the tuning process, re-deploy the new weights, and test the output.
Additional resources
For more information about this project, see the Gemma Cookbook code repository. If you need help building the application or are looking to collaborate with other developers, check out the Google Developers Community Discord server. For more Build with Google AI projects, check out the video playlist.