The MediaPipe Interactive Image Segmenter task takes a location in an image, estimates the boundaries of an object at that location, and returns the segmentation for the object as image data. These instructions show you how to use the Interactive Image Segmenter with Android apps. The code example described in these instructions is available on GitHub. For more information about the capabilities, models, and configuration options of this task, see the Overview.
Code example
The MediaPipe Tasks code example is a simple implementation of a Interactive Image Segmenter app for Android. The example works with images selected from the device gallery.
You can use the app as a starting point for your own Android app, or refer to it when modifying an existing app. The Interactive Image Segmenter example code is hosted on GitHub.
Download the code
The following instructions show you how to create a local copy of the example code using the git command line tool.
To download the example code:
- Clone the git repository using the following command:
git clone https://github.com/google-ai-edge/mediapipe-samples
- Optionally, configure your git instance to use sparse checkout,
so you have only the files for the Interactive Image Segmenter example app:
cd mediapipe-samples
git sparse-checkout init --cone
git sparse-checkout set examples/interactive_segmentation/android
After creating a local version of the example code, you can import the project into Android Studio and run the app. For instructions, see the Setup Guide for Android.
Key components
The following files contain the crucial code for this image segmentation example application:
- InteractiveSegmentationHelper.kt - Initializes the Interactive Image Segmenter task and handles the model and delegate selection.
- OverlayView.kt - Handles and formats the segmentation results.
Setup
This section describes key steps for setting up your development environment and code projects to use Interactive Image Segmenter. For general information on setting up your development environment for using MediaPipe tasks, including platform version requirements, see the Setup guide for Android.
Dependencies
Interactive Image Segmenter uses the com.google.mediapipe:tasks-vision library. Add this
dependency to the build.gradle file of your
Android app development project. Import the required dependencies with
the following code:
dependencies {
    ...
    implementation 'com.google.mediapipe:tasks-vision:latest.release'
}
Model
The MediaPipe Interactive Image Segmenter task requires a trained model that is compatible with this task. For more information on available trained models for Interactive Image Segmenter, see the task overview Models section.
Select and download the model, and then store it within your project directory:
<dev-project-root>/src/main/assets
Use the BaseOptions.Builder.setModelAssetPath() method to specify the path
used by the model. This method is shown in the code example in the next
section.
In the Interactive Image Segmenter
example code,
the model is defined in the InteractiveSegmenterHelper.kt
class in the setupInteractiveSegmenter() function.
Create the task
You can use the createFromOptions function to create the task. The
createFromOptions function accepts configuration options including
mask output types. For more information on configuration
options, see Configuration Overview.
InteractiveSegmenterOptions options =
  InteractiveSegmenterOptions.builder()
    .setBaseOptions(
      BaseOptions.builder().setModelAssetPath("model.tflite").build())
    .setOutputCategoryMask(true)
    .setOutputConfidenceMasks(false)
    .setResultListener((result, inputImage) -> {
         // Process the segmentation result here.
    })
    .setErrorListener(exception -> {
         // Process the segmentation errors here.
    })
    .build();
interactivesegmenter = InteractiveSegmenter.createFromOptions(context, options);
For a more detailed example of setting up this task, see the
InteractiveSegmenterHelper
class setupInteractiveSegmenter() function.
Configuration options
This task has the following configuration options for Android apps:
| Option Name | Description | Value Range | Default Value |
|---|---|---|---|
outputCategoryMask |
If set to True, the output includes a segmentation mask
as a uint8 image, where each pixel value indicates if the pixel is part of
the object located at the area of interest. |
{True, False} |
False |
outputConfidenceMasks |
If set to True, the output includes a segmentation mask
as a float value image, where each float value represents the confidence
that the pixel is part of the object located at the area of interest. |
{True, False} |
True |
displayNamesLocale |
Sets the language of labels to use for display names provided in the
metadata of the task's model, if available. Default is en for
English. You can add localized labels to the metadata of a custom model
using the TensorFlow Lite Metadata Writer API
| Locale code | en |
errorListener |
Sets an optional error listener. | N/A | Not set |
Prepare data
Interactive Image Segmenter works with images, and the task handles the data input
preprocessing, including resizing, rotation and value normalization.
You need to convert the input image to a
com.google.mediapipe.framework.image.MPImage object before passing it to the
task.
import com.google.mediapipe.framework.image.BitmapImageBuilder;
import com.google.mediapipe.framework.image.MPImage;

// Load an image on the user’s device as a Bitmap object using BitmapFactory.

// Convert an Android’s Bitmap object to a MediaPipe’s Image object.
MPImage mpImage = new BitmapImageBuilder(bitmap).build();
In the Interactive Image Segmenter example code, the data preparation is handled in the
InteractiveSegmenterHelper
class by the segment() function.
Run the task
Call the segment function to run the prediction and generate segments.
The Interactive Image Segmenter task returns the identified segment regions within the
input image.
RegionOfInterest roi = RegionOfInterest.create(
    NormalizedKeypoint.create(
        normX * it.width,
        normY * it.height
    )
);

ImageSegmenterResult segmenterResult = interactivesegmenter.segment(image, roi);
In the Interactive Image Segmenter example code, the segment functions are defined in the
InteractiveSegmenterHelper.kt
file.
Handle and display results
Upon running inference, the Interactive Image Segmenter task returns an
ImageSegmenterResult object which contains the results of the
segmentation task. The content of the output may include a category mask,
confidence mask, or both, depending on what you set when you
configured the task.
The following sections further explain the output data from this task:
Category mask
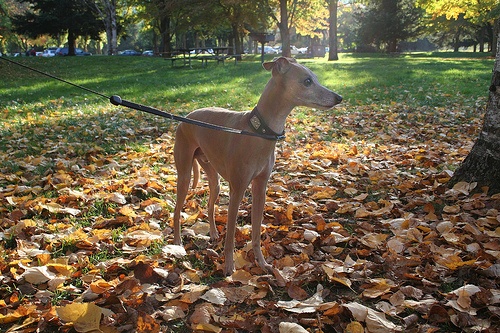
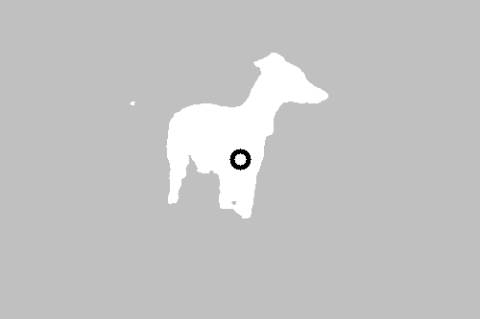
The following images show a visualization of the task output for a category
value mask with a point area of interest indicated. Each pixel is a uint8
value indicating if the pixel is part of the object located at the area of
interest. The black and white circle on the second image indicates the selected
area of interest.


Original image and category mask output. Source image from the Pascal VOC 2012 dataset.
Confidence mask
The output for a confidence mask contains float values between [0, 1] for
each image input channel. Higher values indicate a higher confidence that
the image pixel is part of the object located at the area of interest.
