
|
|
|
 الاطّلاع على المصدر على GitHub الاطّلاع على المصدر على GitHub
|
نظرة عامة
ستتعلم في الدفتر هذا كيفية استخدام التضمينات التي أنتجتها واجهة برمجة تطبيقات Gemini لتدريب نموذج يمكنه تصنيف أنواع مختلفة من مشاركات مجموعات الأخبار استنادًا إلى الموضوع.
سيتم في هذا البرنامج التعليمي تدريب مُصنِّف على التنبؤ بالفئة التي تنتمي إليها مشاركة مجموعة أخبار.
المتطلبات الأساسية
يمكنك تشغيل دليل البدء السريع هذا في Google Colab.
لإكمال هذه البدء السريع في بيئة التطوير الخاصة بك، تأكد من أن بيئتك تفي بالمتطلبات التالية:
- Python 3.9 أو إصدار أحدث
- تثبيت
jupyterلتشغيل دفتر الملاحظات.
ضبط إعدادات الجهاز
أولاً، عليك تنزيل مكتبة Gemini API Python وتثبيتها.
pip install -U -q google.generativeai
import re
import tqdm
import keras
import numpy as np
import pandas as pd

import google.generativeai as genai
import google.ai.generativelanguage as glm

# Used to securely store your API key
from google.colab import userdata

import seaborn as sns
import matplotlib.pyplot as plt

from keras import layers
from matplotlib.ticker import MaxNLocator
from sklearn.datasets import fetch_20newsgroups
import sklearn.metrics as skmetrics
الحصول على مفتاح واجهة برمجة التطبيقات
قبل أن تتمكّن من استخدام واجهة برمجة تطبيقات Gemini، يجب أولاً الحصول على مفتاح واجهة برمجة التطبيقات. أنشِئ مفتاحًا بنقرة واحدة في "استوديو Google AI" إذا لم يكن لديك مفتاح.
الحصول على مفتاح واجهة برمجة التطبيقات
في Colab، أضِف المفتاح إلى أداة إدارة الأسرار ضمن "🔑" في اللوحة اليمنى. أدخِل الاسم "API_KEY".
بعد حصولك على مفتاح واجهة برمجة التطبيقات، أرسِله إلى حزمة تطوير البرامج (SDK). هناك طريقتان لإجراء ذلك:
- ضَع المفتاح في متغيّر بيئة
GOOGLE_API_KEY(ستحصل عليه حزمة تطوير البرامج (SDK) تلقائيًا من هناك). - تمرير المفتاح إلى "
genai.configure(api_key=...)"
# Or use `os.getenv('API_KEY')` to fetch an environment variable.
API_KEY=userdata.get('API_KEY')

genai.configure(api_key=API_KEY)
for m in genai.list_models():
  if 'embedContent' in m.supported_generation_methods:
    print(m.name)
models/embedding-001
models/embedding-001
مجموعة البيانات
تضم مجموعة البيانات النصية الخاصة بـ 20 مجموعة إخبارية 18,000 مشاركة في المجموعات الإخبارية حول 20 موضوعًا يتم تقسيمها إلى مجموعات تدريب واختبار. يستند التقسيم بين مجموعات بيانات التدريب والاختبار على الرسائل المنشورة قبل تاريخ محدّد وبعده. في هذا البرنامج التعليمي، ستستخدم مجموعات فرعية من مجموعات بيانات التدريب والاختبار. ستقوم بمعالجة البيانات مسبقًا وتنظيمها في إطارات بيانات Pandas.
newsgroups_train = fetch_20newsgroups(subset='train')
newsgroups_test = fetch_20newsgroups(subset='test')

# View list of class names for dataset
newsgroups_train.target_names
['alt.atheism',
 'comp.graphics',
 'comp.os.ms-windows.misc',
 'comp.sys.ibm.pc.hardware',
 'comp.sys.mac.hardware',
 'comp.windows.x',
 'misc.forsale',
 'rec.autos',
 'rec.motorcycles',
 'rec.sport.baseball',
 'rec.sport.hockey',
 'sci.crypt',
 'sci.electronics',
 'sci.med',
 'sci.space',
 'soc.religion.christian',
 'talk.politics.guns',
 'talk.politics.mideast',
 'talk.politics.misc',
 'talk.religion.misc']
في ما يلي مثال على شكل نقطة بيانات من مجموعة التطبيق.
idx = newsgroups_train.data[0].index('Lines')
print(newsgroups_train.data[0][idx:])
Lines: 15

 I was wondering if anyone out there could enlighten me on this car I saw
the other day. It was a 2-door sports car, looked to be from the late 60s/
early 70s. It was called a Bricklin. The doors were really small. In addition,
the front bumper was separate from the rest of the body. This is
all I know. If anyone can tellme a model name, engine specs, years
of production, where this car is made, history, or whatever info you
have on this funky looking car, please e-mail.

Thanks,

- IL
   ---- brought to you by your neighborhood Lerxst ----
ستبدأ الآن في معالجة بيانات هذا البرنامج التعليمي مسبقًا. يُرجى إزالة أي معلومات حسّاسة، مثل الأسماء أو الرسائل الإلكترونية أو الأجزاء المكرّرة من النص، مثل "From: " و"\nSubject: ". تنظيم المعلومات في إطار بيانات Pandas بحيث تكون أكثر قابلية للقراءة.
def preprocess_newsgroup_data(newsgroup_dataset):
  # Apply functions to remove names, emails, and extraneous words from data points in newsgroups.data
  newsgroup_dataset.data = [re.sub(r'[\w\.-]+@[\w\.-]+', '', d) for d in newsgroup_dataset.data] # Remove email
  newsgroup_dataset.data = [re.sub(r"\([^()]*\)", "", d) for d in newsgroup_dataset.data] # Remove names
  newsgroup_dataset.data = [d.replace("From: ", "") for d in newsgroup_dataset.data] # Remove "From: "
  newsgroup_dataset.data = [d.replace("\nSubject: ", "") for d in newsgroup_dataset.data] # Remove "\nSubject: "

  # Cut off each text entry after 5,000 characters
  newsgroup_dataset.data = [d[0:5000] if len(d) > 5000 else d for d in newsgroup_dataset.data]

  # Put data points into dataframe
  df_processed = pd.DataFrame(newsgroup_dataset.data, columns=['Text'])
  df_processed['Label'] = newsgroup_dataset.target
  # Match label to target name index
  df_processed['Class Name'] = ''
  for idx, row in df_processed.iterrows():
    df_processed.at[idx, 'Class Name'] = newsgroup_dataset.target_names[row['Label']]

  return df_processed
# Apply preprocessing function to training and test datasets
df_train = preprocess_newsgroup_data(newsgroups_train)
df_test = preprocess_newsgroup_data(newsgroups_test)

df_train.head()
بعد ذلك، ستقوم بأخذ عينة من بعض البيانات عن طريق أخذ 100 نقطة بيانات في مجموعة بيانات التدريب، وإسقاط بعض الفئات لتشغيلها من خلال هذا البرنامج التعليمي. اختيار الفئات العلمية لمقارنتها
def sample_data(df, num_samples, classes_to_keep):
  df = df.groupby('Label', as_index = False).apply(lambda x: x.sample(num_samples)).reset_index(drop=True)

  df = df[df['Class Name'].str.contains(classes_to_keep)]

  # Reset the encoding of the labels after sampling and dropping certain categories
  df['Class Name'] = df['Class Name'].astype('category')
  df['Encoded Label'] = df['Class Name'].cat.codes

  return df
TRAIN_NUM_SAMPLES = 100
TEST_NUM_SAMPLES = 25
CLASSES_TO_KEEP = 'sci' # Class name should contain 'sci' in it to keep science categories
df_train = sample_data(df_train, TRAIN_NUM_SAMPLES, CLASSES_TO_KEEP)
df_test = sample_data(df_test, TEST_NUM_SAMPLES, CLASSES_TO_KEEP)
df_train.value_counts('Class Name')
Class Name
sci.crypt          100
sci.electronics    100
sci.med            100
sci.space          100
dtype: int64
df_test.value_counts('Class Name')
Class Name
sci.crypt          25
sci.electronics    25
sci.med            25
sci.space          25
dtype: int64
إنشاء التضمينات
في هذا القسم، ستطّلع على كيفية إنشاء عمليات تضمين لجزء من النص باستخدام التضمينات من واجهة برمجة تطبيقات Gemini. للاطّلاع على مزيد من المعلومات عن عمليات التضمين، انتقِل إلى دليل عمليات التضمين.
تغييرات واجهة برمجة التطبيقات على التضمينات-001
بالنسبة إلى نموذج التضمين الجديد، تتوفّر معلَمة نوع مهمة جديدة وعنوان اختياري (صالح فقط مع task_type=RETRIEVAL_DOCUMENT).
لا تنطبق هذه المَعلمات الجديدة إلّا على أحدث نماذج التضمينات.وفي ما يلي أنواع المهام:
| نوع المهمة | الوصف |
|---|---|
| RETRIEVAL_QUERY | لتحديد النص المحدد عبارة عن طلب بحث في إعداد بحث/استرداد. |
| RETRIEVAL_DOCUMENT | لتحديد النص المحدد هو مستند في إعداد البحث/الاسترجاع. |
| SEMANTIC_SIMILARITY | لتحديد هذا الخيار، سيتم استخدام النص المحدَّد في التشابه الدلالي (STS). |
| التصنيف | تُحدِّد أنه سيتم استخدام التضمينات للتصنيف. |
| التجميع | تحدّد هذه السمة أنّه سيتم استخدام التضمينات للتجميع العنقودي. |
from tqdm.auto import tqdm
tqdm.pandas()

from google.api_core import retry

def make_embed_text_fn(model):

  @retry.Retry(timeout=300.0)
  def embed_fn(text: str) -> list[float]:
    # Set the task_type to CLASSIFICATION.
    embedding = genai.embed_content(model=model,
                                    content=text,
                                    task_type="classification")
    return embedding['embedding']

  return embed_fn

def create_embeddings(model, df):
  df['Embeddings'] = df['Text'].progress_apply(make_embed_text_fn(model))
  return df
model = 'models/embedding-001'
df_train = create_embeddings(model, df_train)
df_test = create_embeddings(model, df_test)
0%|          | 0/400 [00:00<?, ?it/s]
0%|          | 0/100 [00:00<?, ?it/s]
df_train.head()
إنشاء نموذج تصنيف بسيط
ستقوم هنا بتعريف نموذج بسيط بطبقة مخفية واحدة وناتج احتمالية من فئة واحدة. سيتجاوب التوقع مع احتمالية انتماء جزء من النص لفئة معينة من الأخبار. عند إنشاء النموذج، ستعمل Keras تلقائيًا على ترتيب نقاط البيانات عشوائيًا.
def build_classification_model(input_size: int, num_classes: int) -> keras.Model:
  inputs = x = keras.Input(input_size)
  x = layers.Dense(input_size, activation='relu')(x)
  x = layers.Dense(num_classes, activation='sigmoid')(x)
  return keras.Model(inputs=[inputs], outputs=x)
# Derive the embedding size from the first training element.
embedding_size = len(df_train['Embeddings'].iloc[0])

# Give your model a different name, as you have already used the variable name 'model'
classifier = build_classification_model(embedding_size, len(df_train['Class Name'].unique()))
classifier.summary()

classifier.compile(loss = keras.losses.SparseCategoricalCrossentropy(from_logits=True),
                   optimizer = keras.optimizers.Adam(learning_rate=0.001),
                   metrics=['accuracy'])
Model: "model"
_________________________________________________________________
 Layer (type)                Output Shape              Param #
=================================================================
 input_1 (InputLayer)        [(None, 768)]             0

 dense (Dense)               (None, 768)               590592

 dense_1 (Dense)             (None, 4)                 3076

=================================================================
Total params: 593668 (2.26 MB)
Trainable params: 593668 (2.26 MB)
Non-trainable params: 0 (0.00 Byte)
_________________________________________________________________
embedding_size
768
تدريب النموذج على تصنيف المجموعات الإخبارية
وأخيرًا، يمكنك تدريب نموذج بسيط. استخدم عددًا صغيرًا من الحقبات لتجنب فرط التخصيص. تستغرق الفترة الأولى وقتًا أطول من غيرها، إذ يجب حساب التضمينات مرة واحدة فقط.
NUM_EPOCHS = 20
BATCH_SIZE = 32

# Split the x and y components of the train and validation subsets.
y_train = df_train['Encoded Label']
x_train = np.stack(df_train['Embeddings'])
y_val = df_test['Encoded Label']
x_val = np.stack(df_test['Embeddings'])

# Train the model for the desired number of epochs.
callback = keras.callbacks.EarlyStopping(monitor='accuracy', patience=3)

history = classifier.fit(x=x_train,
                         y=y_train,
                         validation_data=(x_val, y_val),
                         callbacks=[callback],
                         batch_size=BATCH_SIZE,
                         epochs=NUM_EPOCHS,)
Epoch 1/20
/usr/local/lib/python3.10/dist-packages/keras/src/backend.py:5729: UserWarning: "`sparse_categorical_crossentropy` received `from_logits=True`, but the `output` argument was produced by a Softmax activation and thus does not represent logits. Was this intended?
  output, from_logits = _get_logits(
13/13 [==============================] - 1s 30ms/step - loss: 1.2141 - accuracy: 0.6675 - val_loss: 0.9801 - val_accuracy: 0.8800
Epoch 2/20
13/13 [==============================] - 0s 12ms/step - loss: 0.7580 - accuracy: 0.9400 - val_loss: 0.6061 - val_accuracy: 0.9300
Epoch 3/20
13/13 [==============================] - 0s 13ms/step - loss: 0.4249 - accuracy: 0.9525 - val_loss: 0.3902 - val_accuracy: 0.9200
Epoch 4/20
13/13 [==============================] - 0s 13ms/step - loss: 0.2561 - accuracy: 0.9625 - val_loss: 0.2597 - val_accuracy: 0.9400
Epoch 5/20
13/13 [==============================] - 0s 13ms/step - loss: 0.1693 - accuracy: 0.9700 - val_loss: 0.2145 - val_accuracy: 0.9300
Epoch 6/20
13/13 [==============================] - 0s 13ms/step - loss: 0.1240 - accuracy: 0.9850 - val_loss: 0.1801 - val_accuracy: 0.9600
Epoch 7/20
13/13 [==============================] - 0s 21ms/step - loss: 0.0931 - accuracy: 0.9875 - val_loss: 0.1623 - val_accuracy: 0.9400
Epoch 8/20
13/13 [==============================] - 0s 16ms/step - loss: 0.0736 - accuracy: 0.9925 - val_loss: 0.1418 - val_accuracy: 0.9600
Epoch 9/20
13/13 [==============================] - 0s 20ms/step - loss: 0.0613 - accuracy: 0.9925 - val_loss: 0.1315 - val_accuracy: 0.9700
Epoch 10/20
13/13 [==============================] - 0s 20ms/step - loss: 0.0479 - accuracy: 0.9975 - val_loss: 0.1235 - val_accuracy: 0.9600
Epoch 11/20
13/13 [==============================] - 0s 19ms/step - loss: 0.0399 - accuracy: 0.9975 - val_loss: 0.1219 - val_accuracy: 0.9700
Epoch 12/20
13/13 [==============================] - 0s 21ms/step - loss: 0.0326 - accuracy: 0.9975 - val_loss: 0.1158 - val_accuracy: 0.9700
Epoch 13/20
13/13 [==============================] - 0s 19ms/step - loss: 0.0263 - accuracy: 1.0000 - val_loss: 0.1127 - val_accuracy: 0.9700
Epoch 14/20
13/13 [==============================] - 0s 17ms/step - loss: 0.0229 - accuracy: 1.0000 - val_loss: 0.1123 - val_accuracy: 0.9700
Epoch 15/20
13/13 [==============================] - 0s 20ms/step - loss: 0.0195 - accuracy: 1.0000 - val_loss: 0.1063 - val_accuracy: 0.9700
Epoch 16/20
13/13 [==============================] - 0s 17ms/step - loss: 0.0172 - accuracy: 1.0000 - val_loss: 0.1070 - val_accuracy: 0.9700
تقييم أداء النموذج
استخدِم Keras Model.evaluate للحصول على دقة وفقدان مجموعة بيانات الاختبار.
classifier.evaluate(x=x_val, y=y_val, return_dict=True)
4/4 [==============================] - 0s 4ms/step - loss: 0.1070 - accuracy: 0.9700
{'loss': 0.10700511932373047, 'accuracy': 0.9700000286102295}
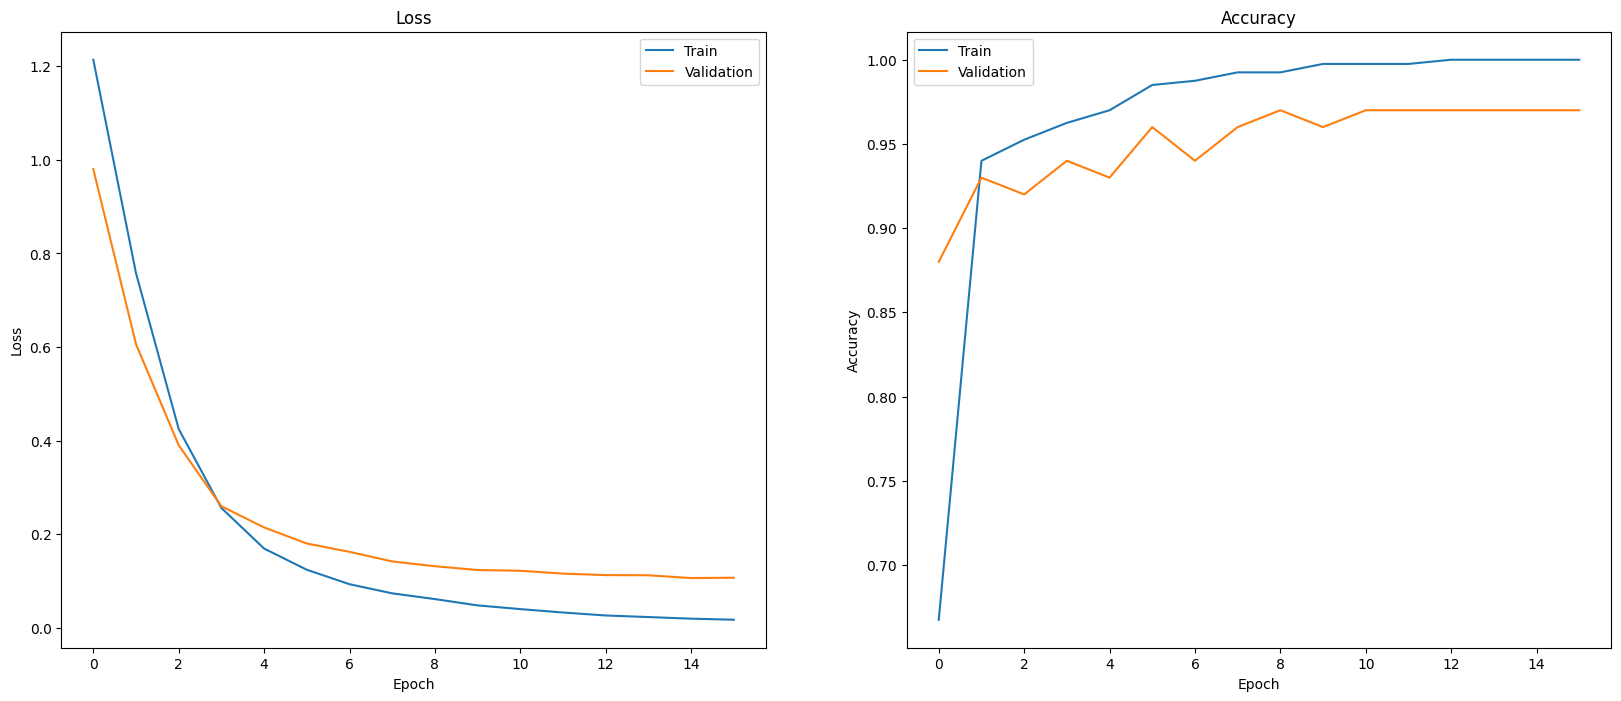
لتقييم أداء النموذج، يمكنك عرض أداء المصنِّف. استخدِم plot_history للاطّلاع على مؤشرات الخسارة والدقة على مدار الفترات.
def plot_history(history):
  """
    Plotting training and validation learning curves.

    Args:
      history: model history with all the metric measures
  """
  fig, (ax1, ax2) = plt.subplots(1,2)
  fig.set_size_inches(20, 8)

  # Plot loss
  ax1.set_title('Loss')
  ax1.plot(history.history['loss'], label = 'train')
  ax1.plot(history.history['val_loss'], label = 'test')
  ax1.set_ylabel('Loss')

  ax1.set_xlabel('Epoch')
  ax1.legend(['Train', 'Validation'])

  # Plot accuracy
  ax2.set_title('Accuracy')
  ax2.plot(history.history['accuracy'],  label = 'train')
  ax2.plot(history.history['val_accuracy'], label = 'test')
  ax2.set_ylabel('Accuracy')
  ax2.set_xlabel('Epoch')
  ax2.legend(['Train', 'Validation'])

  plt.show()

plot_history(history)
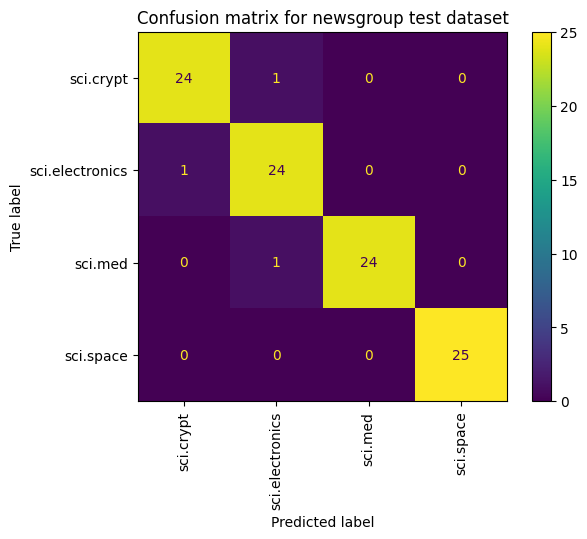
هناك طريقة أخرى لعرض أداء النموذج، بخلاف قياس الخسارة والدقة، وهي استخدام مصفوفة التشويش. وتتيح لك مصفوفة التشويش تقييم أداء نموذج التصنيف بطريقة تتجاوز الدقة. ستظهر لك النقاط التي تم تصنيفها بشكل خاطئ. ولإنشاء مصفوفة التشويش لمشكلة التصنيف متعدد الفئات، احصل على القيم الفعلية في مجموعة الاختبار والقيم المتنبأ بها.
ابدأ بإنشاء الفئة المتوقّعة لكل مثال في مجموعة التحقّق باستخدام Model.predict().
y_hat = classifier.predict(x=x_val)
y_hat = np.argmax(y_hat, axis=1)
4/4 [==============================] - 0s 4ms/step
labels_dict = dict(zip(df_test['Class Name'], df_test['Encoded Label']))
labels_dict
{'sci.crypt': 0, 'sci.electronics': 1, 'sci.med': 2, 'sci.space': 3}
cm = skmetrics.confusion_matrix(y_val, y_hat)
disp = skmetrics.ConfusionMatrixDisplay(confusion_matrix=cm,
                              display_labels=labels_dict.keys())
disp.plot(xticks_rotation='vertical')
plt.title('Confusion matrix for newsgroup test dataset');
plt.grid(False)
الخطوات التالية
للمزيد من المعلومات حول كيفية استخدام التضمينات، يمكنك الاطّلاع على الأمثلة المتاحة. لمعرفة كيفية استخدام الخدمات الأخرى في Gemini API، يُرجى الانتقال إلى Python quickstart (البدء السريع) في Python.