
图片分类是机器学习的一项常见应用,用于识别图片所代表的内容。例如,我们可能想知道给定图片中出现了哪种动物。预测图片所代表的内容的任务称为图片分类。训练图片分类器以识别各种类别的图片。例如,模型可能经过训练,能够识别代表三种不同类型动物(兔子、仓鼠和狗)的照片。如需详细了解图片分类器,请参阅图片分类示例。
使用 Task Library ImageClassifier API 将自定义图片分类器或预训练的图片分类器部署到移动应用中。
ImageClassifier API 的主要功能
输入图像处理,包括旋转、调整大小和颜色空间转换。
输入图片的感兴趣区域。
标签地图语言区域。
用于过滤结果的分数阈值。
前 k 名分类结果。
标签许可名单和拒绝名单。
支持的图片分类器模型
以下型号保证与 ImageClassifier API 兼容。
由 AutoML Vision Edge 图片分类创建的模型。
符合模型兼容性要求的自定义模型。
在 Java 中运行推理
如需查看如何在 Android 应用中使用 ImageClassifier 的示例,请参阅图片分类参考应用。
第 1 步:导入 Gradle 依赖项和其他设置
将 .tflite 模型文件复制到将运行该模型的 Android 模块的 assets 目录中。指定不应压缩该文件,并将 TensorFlow Lite 库添加到模块的 build.gradle 文件中:
android {
    // Other settings

    // Specify tflite file should not be compressed for the app apk
    aaptOptions {
        noCompress "tflite"
    }
}

dependencies {
    // Other dependencies

    // Import the Task Vision Library dependency
    implementation 'org.tensorflow:tensorflow-lite-task-vision'
    // Import the GPU delegate plugin Library for GPU inference
    implementation 'org.tensorflow:tensorflow-lite-gpu-delegate-plugin'
}
第 2 步:使用模型
// Initialization
ImageClassifierOptions options =
    ImageClassifierOptions.builder()
        .setBaseOptions(BaseOptions.builder().useGpu().build())
        .setMaxResults(1)
        .build();
ImageClassifier imageClassifier =
    ImageClassifier.createFromFileAndOptions(
        context, modelFile, options);

// Run inference
List<Classifications> results = imageClassifier.classify(image);
如需了解配置 ImageClassifier 的更多选项,请参阅源代码和 Javadoc。
在 iOS 中运行推理
第 1 步:安装依赖项
Task 库支持使用 CocoaPods 进行安装。确保您的系统上安装了 CocoaPods。如需了解相关说明,请参阅 CocoaPods 安装指南。
如需详细了解如何向 Xcode 项目添加 pod,请参阅 CocoaPods 指南。
在 Podfile 中添加 TensorFlowLiteTaskVision pod。
target 'MyAppWithTaskAPI' do
  use_frameworks!
  pod 'TensorFlowLiteTaskVision'
end
确保您将用于推理的 .tflite 模型存在于应用软件包中。
第 2 步:使用模型
Swift
// Imports
import TensorFlowLiteTaskVision

// Initialization
guard let modelPath = Bundle.main.path(forResource: "birds_V1",
                                            ofType: "tflite") else { return }

let options = ImageClassifierOptions(modelPath: modelPath)

// Configure any additional options:
// options.classificationOptions.maxResults = 3

let classifier = try ImageClassifier.classifier(options: options)

// Convert the input image to MLImage.
// There are other sources for MLImage. For more details, please see:
// https://developers.google.com/ml-kit/reference/ios/mlimage/api/reference/Classes/GMLImage
guard let image = UIImage (named: "sparrow.jpg"), let mlImage = MLImage(image: image) else { return }

// Run inference
let classificationResults = try classifier.classify(mlImage: mlImage)
Objective-C
// Imports
#import <TensorFlowLiteTaskVision/TensorFlowLiteTaskVision.h>

// Initialization
NSString *modelPath = [[NSBundle mainBundle] pathForResource:@"birds_V1" ofType:@"tflite"];

TFLImageClassifierOptions *options =
    [[TFLImageClassifierOptions alloc] initWithModelPath:modelPath];

// Configure any additional options:
// options.classificationOptions.maxResults = 3;

TFLImageClassifier *classifier = [TFLImageClassifier imageClassifierWithOptions:options
                                                                          error:nil];

// Convert the input image to MLImage.
UIImage *image = [UIImage imageNamed:@"sparrow.jpg"];

// There are other sources for GMLImage. For more details, please see:
// https://developers.google.com/ml-kit/reference/ios/mlimage/api/reference/Classes/GMLImage
GMLImage *gmlImage = [[GMLImage alloc] initWithImage:image];

// Run inference
TFLClassificationResult *classificationResult =
    [classifier classifyWithGMLImage:gmlImage error:nil];
如需了解更多用于配置 TFLImageClassifier 的选项,请参阅源代码。
在 Python 中运行推理
第 1 步:安装 pip 软件包
pip install tflite-support
第 2 步:使用模型
# Imports
from tflite_support.task import vision
from tflite_support.task import core
from tflite_support.task import processor

# Initialization
base_options = core.BaseOptions(file_name=model_path)
classification_options = processor.ClassificationOptions(max_results=2)
options = vision.ImageClassifierOptions(base_options=base_options, classification_options=classification_options)
classifier = vision.ImageClassifier.create_from_options(options)

# Alternatively, you can create an image classifier in the following manner:
# classifier = vision.ImageClassifier.create_from_file(model_path)

# Run inference
image = vision.TensorImage.create_from_file(image_path)
classification_result = classifier.classify(image)
如需了解更多用于配置 ImageClassifier 的选项,请参阅源代码。
在 C++ 中运行推理
// Initialization
ImageClassifierOptions options;
options.mutable_base_options()->mutable_model_file()->set_file_name(model_path);
std::unique_ptr<ImageClassifier> image_classifier = ImageClassifier::CreateFromOptions(options).value();

// Create input frame_buffer from your inputs, `image_data` and `image_dimension`.
// See more information here: tensorflow_lite_support/cc/task/vision/utils/frame_buffer_common_utils.h

std::unique_ptr<FrameBuffer> frame_buffer = CreateFromRgbRawBuffer(
      image_data, image_dimension);

// Run inference
const ClassificationResult result = image_classifier->Classify(*frame_buffer).value();
如需了解更多用于配置 ImageClassifier 的选项,请参阅源代码。
示例结果
以下是鸟类分类器的分类结果示例。
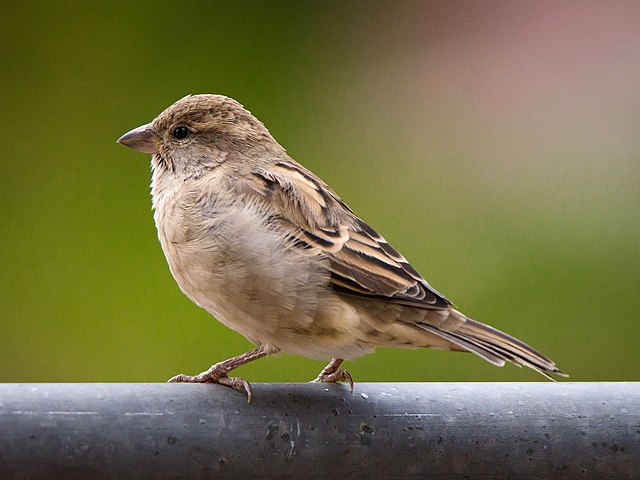
Results:
  Rank #0:
   index       : 671
   score       : 0.91406
   class name  : /m/01bwb9
   display name: Passer domesticus
  Rank #1:
   index       : 670
   score       : 0.00391
   class name  : /m/01bwbt
   display name: Passer montanus
  Rank #2:
   index       : 495
   score       : 0.00391
   class name  : /m/0bwm6m
   display name: Passer italiae
使用您自己的模型和测试数据试用简单的 ImageClassifier CLI 演示工具。
模型兼容性要求
ImageClassifier API 需要具有强制性 TFLite 模型元数据的 TFLite 模型。查看使用 TensorFlow Lite 元数据写入器 API 为图片分类器创建元数据的示例。
兼容的图片分类器模型应满足以下要求:
输入图片张量 (kTfLiteUInt8/kTfLiteFloat32)
- 大小为
[batch x height x width x channels]的图片输入。 - 不支持批量推理(
batch必须为 1)。 - 仅支持 RGB 输入(
channels必须为 3)。 - 如果类型为 kTfLiteFloat32,则必须将 NormalizationOptions 附加到元数据以进行输入归一化。
- 大小为
输出得分张量 (kTfLiteUInt8/kTfLiteFloat32)
- 具有
N类,且维度为 2 或 4,即[1 x N]或[1 x 1 x 1 x N] - 可选(但建议使用)标签映射,以 AssociatedFile 的形式提供,类型为 TENSOR_AXIS_LABELS,每行包含一个标签。请参阅示例标签文件。
第一个此类 AssociatedFile(如果有)用于填充结果的
label字段(在 C++ 中命名为class_name)。display_name字段是从语言区域与创建时所用ImageClassifierOptions的display_names_locale字段相匹配的 AssociatedFile(如果有)填充的(默认情况下为“en”,即英语)。如果上述任何一个都不可用,则只会填充结果的index字段。
- 具有