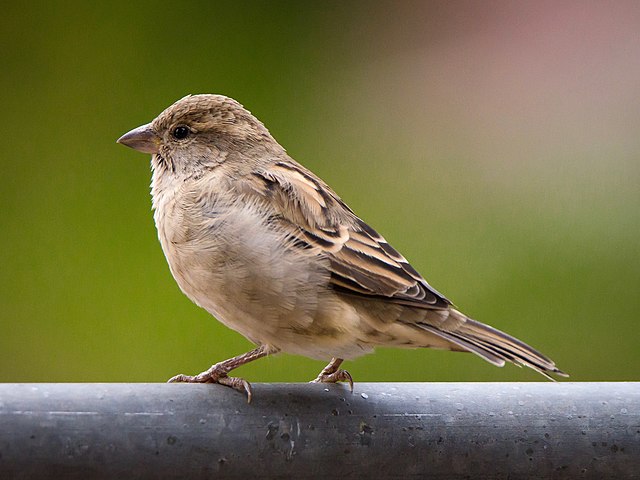
การจัดประเภทรูปภาพเป็นการใช้แมชชีนเลิร์นนิงที่พบบ่อยเพื่อระบุว่ารูปภาพแสดงถึงอะไร เช่น เราอาจต้องการทราบว่าสัตว์ที่ปรากฏในรูปภาพที่กำหนดเป็นสัตว์ประเภทใด งานในการคาดการณ์ว่ารูปภาพแสดงถึงอะไรเรียกว่าการจัดประเภทรูปภาพ ระบบจะฝึกตัวแยกประเภทรูปภาพให้จดจำคลาสต่างๆ ของรูปภาพ เช่น โมเดลอาจได้รับการฝึกให้จดจำรูปภาพ ที่แสดงสัตว์ 3 ประเภท ได้แก่ กระต่าย แฮมสเตอร์ และสุนัข ดูข้อมูลเพิ่มเติมเกี่ยวกับตัวแยกประเภทรูปภาพได้ที่ตัวอย่างการแยกประเภทรูปภาพ
ใช้ Task Library ImageClassifier API เพื่อติดตั้งใช้งานเครื่องมือแยกประเภทรูปภาพที่กำหนดเองหรือที่ฝึกไว้ล่วงหน้าในแอปบนอุปกรณ์เคลื่อนที่
ฟีเจอร์หลักของ ImageClassifier API
การประมวลผลรูปภาพอินพุต รวมถึงการหมุน การปรับขนาด และการแปลงพื้นที่สี
ภูมิภาคที่สนใจของรูปภาพอินพุต
ป้ายกำกับภาษาของแผนที่
เกณฑ์คะแนนเพื่อกรองผลลัพธ์
ผลการจัดประเภท Top-k
รายการที่อนุญาตและไม่อนุญาตของป้ายกำกับ
โมเดลตัวแยกประเภทรูปภาพที่รองรับ
เรารับประกันว่ารุ่นต่อไปนี้จะใช้ได้กับ ImageClassifier
API
โมเดลที่สร้างโดย TensorFlow Lite Model Maker สำหรับการจัดประเภทรูปภาพ
โมเดลที่สร้างโดยการจัดประเภทรูปภาพของ AutoML Vision Edge
โมเดลที่กำหนดเองซึ่งเป็นไปตามข้อกำหนดด้านความเข้ากันได้ของโมเดล
เรียกใช้การอนุมานใน Java
ดูตัวอย่างวิธีใช้ ImageClassifier ในแอป Android ได้ที่ข้อมูลอ้างอิงการแยกประเภทรูปภาพ
แอป
ขั้นตอนที่ 1: นำเข้าการอ้างอิง Gradle และการตั้งค่าอื่นๆ
คัดลอก.tfliteไฟล์โมเดลไปยังไดเรกทอรีชิ้นงานของโมดูล Android
ที่จะเรียกใช้โมเดล ระบุว่าไม่ควรบีบอัดไฟล์ และ
เพิ่มไลบรารี TensorFlow Lite ลงในไฟล์ build.gradle ของโมดูล
android {
    // Other settings

    // Specify tflite file should not be compressed for the app apk
    aaptOptions {
        noCompress "tflite"
    }
}

dependencies {
    // Other dependencies

    // Import the Task Vision Library dependency
    implementation 'org.tensorflow:tensorflow-lite-task-vision'
    // Import the GPU delegate plugin Library for GPU inference
    implementation 'org.tensorflow:tensorflow-lite-gpu-delegate-plugin'
}
ขั้นตอนที่ 2: การใช้โมเดล
// Initialization
ImageClassifierOptions options =
    ImageClassifierOptions.builder()
        .setBaseOptions(BaseOptions.builder().useGpu().build())
        .setMaxResults(1)
        .build();
ImageClassifier imageClassifier =
    ImageClassifier.createFromFileAndOptions(
        context, modelFile, options);

// Run inference
List<Classifications> results = imageClassifier.classify(image);
ดูตัวเลือกเพิ่มเติมในการกำหนดค่า ImageClassifier ได้ในซอร์สโค้ดและ
javadoc
เรียกใช้การอนุมานใน iOS
ขั้นตอนที่ 1: ติดตั้งการอ้างอิง
คลังงานรองรับการติดตั้งโดยใช้ CocoaPods ตรวจสอบว่าได้ติดตั้ง CocoaPods ในระบบแล้ว โปรดดูวิธีการในคู่มือการติดตั้ง CocoaPods
โปรดดูรายละเอียดเกี่ยวกับการเพิ่มพ็อดลงในโปรเจ็กต์ Xcode ในคู่มือ CocoaPods
เพิ่มพ็อด TensorFlowLiteTaskVision ใน Podfile
target 'MyAppWithTaskAPI' do
  use_frameworks!
  pod 'TensorFlowLiteTaskVision'
end
ตรวจสอบว่า.tfliteโมเดลที่คุณจะใช้สำหรับการอนุมานอยู่ใน
App Bundle
ขั้นตอนที่ 2: การใช้โมเดล
Swift
// Imports
import TensorFlowLiteTaskVision

// Initialization
guard let modelPath = Bundle.main.path(forResource: "birds_V1",
                                            ofType: "tflite") else { return }

let options = ImageClassifierOptions(modelPath: modelPath)

// Configure any additional options:
// options.classificationOptions.maxResults = 3

let classifier = try ImageClassifier.classifier(options: options)

// Convert the input image to MLImage.
// There are other sources for MLImage. For more details, please see:
// https://developers.google.com/ml-kit/reference/ios/mlimage/api/reference/Classes/GMLImage
guard let image = UIImage (named: "sparrow.jpg"), let mlImage = MLImage(image: image) else { return }

// Run inference
let classificationResults = try classifier.classify(mlImage: mlImage)
Objective-C
// Imports
#import <TensorFlowLiteTaskVision/TensorFlowLiteTaskVision.h>

// Initialization
NSString *modelPath = [[NSBundle mainBundle] pathForResource:@"birds_V1" ofType:@"tflite"];

TFLImageClassifierOptions *options =
    [[TFLImageClassifierOptions alloc] initWithModelPath:modelPath];

// Configure any additional options:
// options.classificationOptions.maxResults = 3;

TFLImageClassifier *classifier = [TFLImageClassifier imageClassifierWithOptions:options
                                                                          error:nil];

// Convert the input image to MLImage.
UIImage *image = [UIImage imageNamed:@"sparrow.jpg"];

// There are other sources for GMLImage. For more details, please see:
// https://developers.google.com/ml-kit/reference/ios/mlimage/api/reference/Classes/GMLImage
GMLImage *gmlImage = [[GMLImage alloc] initWithImage:image];

// Run inference
TFLClassificationResult *classificationResult =
    [classifier classifyWithGMLImage:gmlImage error:nil];
ดูตัวเลือกเพิ่มเติมในการกำหนดค่า TFLImageClassifier ได้ในซอร์สโค้ด
เรียกใช้การอนุมานใน Python
ขั้นตอนที่ 1: ติดตั้งแพ็กเกจ pip
pip install tflite-support
ขั้นตอนที่ 2: การใช้โมเดล
# Imports
from tflite_support.task import vision
from tflite_support.task import core
from tflite_support.task import processor

# Initialization
base_options = core.BaseOptions(file_name=model_path)
classification_options = processor.ClassificationOptions(max_results=2)
options = vision.ImageClassifierOptions(base_options=base_options, classification_options=classification_options)
classifier = vision.ImageClassifier.create_from_options(options)

# Alternatively, you can create an image classifier in the following manner:
# classifier = vision.ImageClassifier.create_from_file(model_path)

# Run inference
image = vision.TensorImage.create_from_file(image_path)
classification_result = classifier.classify(image)
ดูตัวเลือกเพิ่มเติมในการกำหนดค่า ImageClassifier ได้ในซอร์สโค้ด
เรียกใช้การอนุมานใน C++
// Initialization
ImageClassifierOptions options;
options.mutable_base_options()->mutable_model_file()->set_file_name(model_path);
std::unique_ptr<ImageClassifier> image_classifier = ImageClassifier::CreateFromOptions(options).value();

// Create input frame_buffer from your inputs, `image_data` and `image_dimension`.
// See more information here: tensorflow_lite_support/cc/task/vision/utils/frame_buffer_common_utils.h

std::unique_ptr<FrameBuffer> frame_buffer = CreateFromRgbRawBuffer(
      image_data, image_dimension);

// Run inference
const ClassificationResult result = image_classifier->Classify(*frame_buffer).value();
ดูตัวเลือกเพิ่มเติมในการกำหนดค่า ImageClassifier ได้ในซอร์สโค้ด
ตัวอย่างผลการแข่ง
ต่อไปนี้คือตัวอย่างผลการจัดประเภทของเครื่องมือจำแนกประเภทนก

Results:
  Rank #0:
   index       : 671
   score       : 0.91406
   class name  : /m/01bwb9
   display name: Passer domesticus
  Rank #1:
   index       : 670
   score       : 0.00391
   class name  : /m/01bwbt
   display name: Passer montanus
  Rank #2:
   index       : 495
   score       : 0.00391
   class name  : /m/0bwm6m
   display name: Passer italiae
ลองใช้เครื่องมือเดโม CLI แบบง่ายสำหรับ ImageClassifier กับโมเดลและข้อมูลทดสอบของคุณเอง
ข้อกำหนดความเข้ากันได้ของโมเดล
ImageClassifier API คาดหวังโมเดล TFLite ที่มีข้อมูลเมตาของโมเดล TFLite ที่จำเป็น ดูตัวอย่างการสร้าง
ข้อมูลเมตาสำหรับตัวแยกประเภทรูปภาพโดยใช้ TensorFlow Lite Metadata Writer
API
โมเดลตัวแยกประเภทรูปภาพที่เข้ากันได้ควรเป็นไปตามข้อกำหนดต่อไปนี้
Tensor รูปภาพอินพุต (kTfLiteUInt8/kTfLiteFloat32)
- อินพุตรูปภาพขนาด
[batch x height x width x channels] - ไม่รองรับการอนุมานแบบกลุ่ม (ต้องตั้งค่า
batchเป็น 1) - รองรับเฉพาะอินพุต RGB (
channelsต้องเป็น 3) - หากประเภทเป็น kTfLiteFloat32 จะต้องแนบ NormalizationOptions ไปกับข้อมูลเมตาสำหรับการปรับอินพุตให้เป็นมาตรฐาน
- อินพุตรูปภาพขนาด
Tensor คะแนนเอาต์พุต (kTfLiteUInt8/kTfLiteFloat32)
- โดยมี
Nคลาสและมิติข้อมูล 2 หรือ 4 รายการ เช่น[1 x N]หรือ[1 x 1 x 1 x N] - แผนที่ป้ายกำกับที่ไม่บังคับ (แต่แนะนำ) เป็น AssociatedFile-s ที่มีประเภท
TENSOR_AXIS_LABELS ซึ่งมีป้ายกำกับ 1 รายการต่อบรรทัด ดูตัวอย่าง
ป้ายกำกับ
ไฟล์
ระบบจะใช้ AssociatedFile รายการแรก (หากมี) เพื่อกรอกข้อมูลในฟิลด์
label(ชื่อclass_nameใน C++) ของผลการค้นหา ระบบจะกรอกข้อมูลในdisplay_nameฟิลด์ จาก AssociatedFile (หากมี) ซึ่งมีภาษาตรงกับdisplay_names_localeฟิลด์ของImageClassifierOptionsที่ใช้ใน เวลาที่สร้าง ("en" โดยค่าเริ่มต้น ซึ่งก็คือภาษาอังกฤษ) หากไม่มีข้อมูลใดเลย ระบบจะกรอกเฉพาะช่องindexของผลลัพธ์
- โดยมี
