
เครื่องแบ่งกลุ่มรูปภาพจะคาดการณ์ว่าพิกเซลแต่ละพิกเซลของรูปภาพเชื่อมโยงกับคลาสหนึ่งๆ หรือไม่ ซึ่งแตกต่างจากการตรวจหาออบเจ็กต์ที่ตรวจหาออบเจ็กต์ใน พื้นที่สี่เหลี่ยม และการจัดประเภทรูปภาพที่จัดประเภทรูปภาพโดยรวม ดูข้อมูลเพิ่มเติมเกี่ยวกับตัวแบ่งกลุ่มรูปภาพได้ที่ภาพรวมการแบ่งกลุ่มรูปภาพ ตัวอย่าง
ใช้ API ของคลังงาน ImageSegmenter เพื่อติดตั้งใช้งานเครื่องแบ่งส่วนรูปภาพที่กำหนดเอง
หรือเครื่องที่ฝึกไว้ล่วงหน้าในแอปบนอุปกรณ์เคลื่อนที่
ฟีเจอร์หลักของ ImageSegmenter API
การประมวลผลรูปภาพอินพุต รวมถึงการหมุน การปรับขนาด และการแปลงพื้นที่สี
ป้ายกำกับภาษาของแผนที่
เอาต์พุต 2 ประเภท ได้แก่ มาสก์หมวดหมู่และมาสก์ความมั่นใจ
ป้ายกำกับสีเพื่อวัตถุประสงค์ในการแสดง
โมเดล Image Segmenter ที่รองรับ
เรารับประกันว่ารุ่นต่อไปนี้จะใช้ได้กับ ImageSegmenter
API
โมเดลที่กำหนดเองซึ่งเป็นไปตามข้อกำหนดด้านความเข้ากันได้ของโมเดล
เรียกใช้การอนุมานใน Java
ดูตัวอย่างวิธีใช้ ImageSegmenter ในแอป Android ได้ที่แอปการอ้างอิงการแบ่งกลุ่มรูปภาพ
ขั้นตอนที่ 1: นำเข้าการอ้างอิง Gradle และการตั้งค่าอื่นๆ
คัดลอก.tfliteไฟล์โมเดลไปยังไดเรกทอรีชิ้นงานของโมดูล Android
ที่จะเรียกใช้โมเดล ระบุว่าไม่ควรบีบอัดไฟล์ และ
เพิ่มไลบรารี TensorFlow Lite ลงในไฟล์ build.gradle ของโมดูล
android {
    // Other settings

    // Specify tflite file should not be compressed for the app apk
    aaptOptions {
        noCompress "tflite"
    }
}

dependencies {
    // Other dependencies

    // Import the Task Vision Library dependency
    implementation 'org.tensorflow:tensorflow-lite-task-vision'
    // Import the GPU delegate plugin Library for GPU inference
    implementation 'org.tensorflow:tensorflow-lite-gpu-delegate-plugin'
}
ขั้นตอนที่ 2: การใช้โมเดล
// Initialization
ImageSegmenterOptions options =
    ImageSegmenterOptions.builder()
        .setBaseOptions(BaseOptions.builder().useGpu().build())
        .setOutputType(OutputType.CONFIDENCE_MASK)
        .build();
ImageSegmenter imageSegmenter =
    ImageSegmenter.createFromFileAndOptions(context, modelFile, options);

// Run inference
List<Segmentation> results = imageSegmenter.segment(image);
ดูตัวเลือกเพิ่มเติมในการกำหนดค่า ImageSegmenter ได้ในซอร์สโค้ดและ
javadoc
เรียกใช้การอนุมานใน iOS
ขั้นตอนที่ 1: ติดตั้งการอ้างอิง
คลังงานรองรับการติดตั้งโดยใช้ CocoaPods ตรวจสอบว่าได้ติดตั้ง CocoaPods ในระบบแล้ว โปรดดูวิธีการในคู่มือการติดตั้ง CocoaPods
โปรดดูรายละเอียดเกี่ยวกับการเพิ่มพ็อดลงในโปรเจ็กต์ Xcode ในคู่มือ CocoaPods
เพิ่มพ็อด TensorFlowLiteTaskVision ใน Podfile
target 'MyAppWithTaskAPI' do
  use_frameworks!
  pod 'TensorFlowLiteTaskVision'
end
ตรวจสอบว่า.tfliteโมเดลที่คุณจะใช้สำหรับการอนุมานอยู่ใน
App Bundle
ขั้นตอนที่ 2: การใช้โมเดล
Swift
// Imports
import TensorFlowLiteTaskVision
// Initialization
guard let modelPath = Bundle.main.path(forResource: "deeplabv3",
ofType: "tflite") else { return }
let options = ImageSegmenterOptions(modelPath: modelPath)
// Configure any additional options:
// options.outputType = OutputType.confidenceMasks
let segmenter = try ImageSegmenter.segmenter(options: options)
// Convert the input image to MLImage.
// There are other sources for MLImage. For more details, please see:
// https://developers.google.com/ml-kit/reference/ios/mlimage/api/reference/Classes/GMLImage
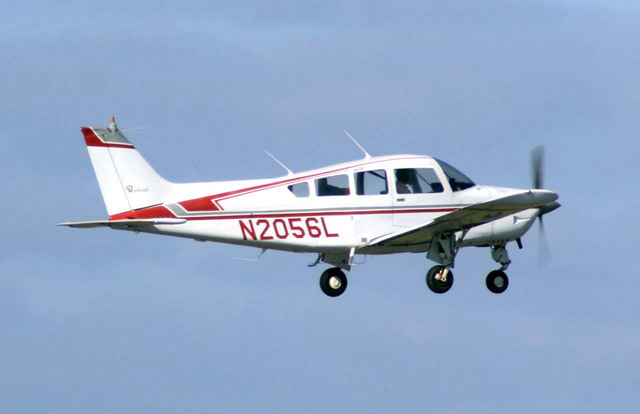
guard let image = UIImage (named: "plane.jpg"), let mlImage = MLImage(image: image) else { return }
// Run inference
let segmentationResult = try segmenter.segment(mlImage: mlImage)
Objective-C
// Imports
#import <TensorFlowLiteTaskVision/TensorFlowLiteTaskVision.h>

// Initialization
NSString *modelPath = [[NSBundle mainBundle] pathForResource:@"deeplabv3" ofType:@"tflite"];

TFLImageSegmenterOptions *options =
    [[TFLImageSegmenterOptions alloc] initWithModelPath:modelPath];

// Configure any additional options:
// options.outputType = TFLOutputTypeConfidenceMasks;

TFLImageSegmenter *segmenter = [TFLImageSegmenter imageSegmenterWithOptions:options
                                                                      error:nil];

// Convert the input image to MLImage.
UIImage *image = [UIImage imageNamed:@"plane.jpg"];

// There are other sources for GMLImage. For more details, please see:
// https://developers.google.com/ml-kit/reference/ios/mlimage/api/reference/Classes/GMLImage
GMLImage *gmlImage = [[GMLImage alloc] initWithImage:image];

// Run inference
TFLSegmentationResult *segmentationResult =
    [segmenter segmentWithGMLImage:gmlImage error:nil];
ดูตัวเลือกเพิ่มเติมในการกำหนดค่า TFLImageSegmenter ได้ในซอร์สโค้ด
เรียกใช้การอนุมานใน Python
ขั้นตอนที่ 1: ติดตั้งแพ็กเกจ pip
pip install tflite-support
ขั้นตอนที่ 2: การใช้โมเดล
# Imports
from tflite_support.task import vision
from tflite_support.task import core
from tflite_support.task import processor

# Initialization
base_options = core.BaseOptions(file_name=model_path)
segmentation_options = processor.SegmentationOptions(
    output_type=processor.SegmentationOptions.output_type.CATEGORY_MASK)
options = vision.ImageSegmenterOptions(base_options=base_options, segmentation_options=segmentation_options)
segmenter = vision.ImageSegmenter.create_from_options(options)

# Alternatively, you can create an image segmenter in the following manner:
# segmenter = vision.ImageSegmenter.create_from_file(model_path)

# Run inference
image_file = vision.TensorImage.create_from_file(image_path)
segmentation_result = segmenter.segment(image_file)
ดูตัวเลือกเพิ่มเติมในการกำหนดค่า ImageSegmenter ได้ในซอร์สโค้ด
เรียกใช้การอนุมานใน C++
// Initialization
ImageSegmenterOptions options;
options.mutable_base_options()->mutable_model_file()->set_file_name(model_path);
std::unique_ptr<ImageSegmenter> image_segmenter = ImageSegmenter::CreateFromOptions(options).value();

// Create input frame_buffer from your inputs, `image_data` and `image_dimension`.
// See more information here: tensorflow_lite_support/cc/task/vision/utils/frame_buffer_common_utils.h
std::unique_ptr<FrameBuffer> frame_buffer = CreateFromRgbRawBuffer(
      image_data, image_dimension);

// Run inference
const SegmentationResult result = image_segmenter->Segment(*frame_buffer).value();
ดูตัวเลือกเพิ่มเติมในการกำหนดค่า ImageSegmenter ได้ในซอร์สโค้ด
ตัวอย่างผลการแข่ง
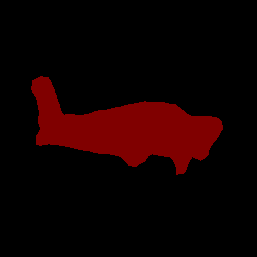
ต่อไปนี้เป็นตัวอย่างผลลัพธ์การแบ่งกลุ่มของ deeplab_v3 ซึ่งเป็นโมเดลการแบ่งกลุ่มทั่วไปที่มีอยู่ใน TensorFlow Hub
Color Legend:
 (r: 000, g: 000, b: 000):
  index       : 0
  class name  : background
 (r: 128, g: 000, b: 000):
  index       : 1
  class name  : aeroplane

# (omitting multiple lines for conciseness) ...

 (r: 128, g: 192, b: 000):
  index       : 19
  class name  : train
 (r: 000, g: 064, b: 128):
  index       : 20
  class name  : tv
Tip: use a color picker on the output PNG file to inspect the output mask with
this legend.
มาสก์หมวดหมู่การแบ่งกลุ่มควรมีลักษณะดังนี้
ลองใช้เครื่องมือเดโม CLI แบบง่ายสำหรับ ImageSegmenter กับโมเดลและข้อมูลทดสอบของคุณเอง
ข้อกำหนดความเข้ากันได้ของโมเดล
ImageSegmenter API คาดหวังโมเดล TFLite ที่มีข้อมูลเมตาของโมเดล TFLite ที่จำเป็น ดูตัวอย่างการสร้าง
ข้อมูลเมตาสำหรับเครื่องมือแบ่งกลุ่มรูปภาพโดยใช้ TensorFlow Lite Metadata Writer
API
Tensor รูปภาพอินพุต (kTfLiteUInt8/kTfLiteFloat32)
- อินพุตรูปภาพขนาด
[batch x height x width x channels] - ไม่รองรับการอนุมานแบบกลุ่ม (ต้องตั้งค่า
batchเป็น 1) - รองรับเฉพาะอินพุต RGB (
channelsต้องเป็น 3) - หากประเภทเป็น kTfLiteFloat32 จะต้องแนบ NormalizationOptions ไปกับข้อมูลเมตาสำหรับการปรับอินพุตให้เป็นมาตรฐาน
- อินพุตรูปภาพขนาด
Tensor มาสก์เอาต์พุต: (kTfLiteUInt8/kTfLiteFloat32)
- เทนเซอร์ขนาด
[batch x mask_height x mask_width x num_classes]โดยที่batchต้องเป็น 1,mask_widthและmask_heightคือ ขนาดของมาสก์การแบ่งกลุ่มที่โมเดลสร้างขึ้น และnum_classesคือจำนวนคลาสที่โมเดลรองรับ - คุณแนบไฟล์แผนที่ป้ายกำกับ (ไม่บังคับแต่แนะนำ) เป็น
AssociatedFile-s ที่มีประเภท TENSOR_AXIS_LABELS ซึ่งมีป้ายกำกับ 1 รายการต่อ
บรรทัดได้ ระบบจะใช้ AssociatedFile รายการแรก (หากมี) เพื่อกรอกข้อมูลใน
labelฟิลด์ (ชื่อclass_nameใน C++) ของผลลัพธ์ ระบบจะกรอกข้อมูลในฟิลด์display_nameจาก AssociatedFile (หากมี) ซึ่งมีภาษาตรงกับฟิลด์display_names_localeของImageSegmenterOptionsที่ใช้ในเวลาสร้าง ("en" โดยค่าเริ่มต้น ซึ่งก็คือภาษาอังกฤษ) หากไม่มีข้อมูลใดเลย ระบบจะกรอกเฉพาะช่องindexของผลลัพธ์
- เทนเซอร์ขนาด