เครื่องตรวจจับออบเจ็กต์สามารถระบุได้ว่าออบเจ็กต์ใดในชุดออบเจ็กต์ที่รู้จักอาจมีอยู่ และให้ข้อมูลเกี่ยวกับตำแหน่งของออบเจ็กต์ภายในรูปภาพหรือสตรีมวิดีโอที่กำหนด ระบบจะฝึกเครื่องตรวจหาวัตถุให้ตรวจหาการมีอยู่และตำแหน่งของ วัตถุหลายคลาส ตัวอย่างเช่น โมเดลอาจได้รับการฝึกด้วยรูปภาพ ที่มีผลไม้ต่างๆ พร้อมกับป้ายกำกับที่ระบุ คลาสของผลไม้ที่รูปภาพนั้นแสดง (เช่น แอปเปิล กล้วย หรือสตรอว์เบอร์รี) และ ข้อมูลที่ระบุตำแหน่งของแต่ละออบเจ็กต์ในรูปภาพ ดูข้อมูลเพิ่มเติมเกี่ยวกับเครื่องตรวจจับออบเจ็กต์ได้ที่ตัวอย่าง การตรวจจับ ออบเจ็กต์
ใช้ Task Library ObjectDetector API เพื่อติดตั้งใช้งานเครื่องตรวจจับออบเจ็กต์ที่กำหนดเอง
หรือเครื่องตรวจจับที่ผ่านการฝึกมาก่อนในแอปบนอุปกรณ์เคลื่อนที่
ฟีเจอร์หลักของ ObjectDetector API
การประมวลผลรูปภาพอินพุต รวมถึงการหมุน การปรับขนาด และการแปลงพื้นที่สี
ป้ายกำกับภาษาของแผนที่
เกณฑ์คะแนนเพื่อกรองผลลัพธ์
ผลการตรวจจับอันดับต้นๆ
รายการที่อนุญาตและไม่อนุญาตของป้ายกำกับ
โมเดลตรวจจับออบเจ็กต์ที่รองรับ
เรารับประกันว่ารุ่นต่อไปนี้จะใช้ได้กับ ObjectDetector
API
โมเดลที่สร้างโดยการตรวจจับออบเจ็กต์ AutoML Vision Edge
โมเดลที่สร้างโดย TensorFlow Lite Model Maker สำหรับเครื่องตรวจจับ ออบเจ็กต์
โมเดลที่กำหนดเองซึ่งเป็นไปตามข้อกำหนดด้านความเข้ากันได้ของโมเดล
เรียกใช้การอนุมานใน Java
ดูตัวอย่างวิธีใช้ ObjectDetector ในแอป Android ได้ที่การอ้างอิงการตรวจหาออบเจ็กต์
แอป
ขั้นตอนที่ 1: นำเข้าการอ้างอิง Gradle และการตั้งค่าอื่นๆ
คัดลอก.tfliteไฟล์โมเดลไปยังไดเรกทอรีชิ้นงานของโมดูล Android
ที่จะเรียกใช้โมเดล ระบุว่าไม่ควรบีบอัดไฟล์ และ
เพิ่มไลบรารี TensorFlow Lite ลงในไฟล์ build.gradle ของโมดูล
android {
    // Other settings

    // Specify tflite file should not be compressed for the app apk
    aaptOptions {
        noCompress "tflite"
    }
}

dependencies {
    // Other dependencies

    // Import the Task Vision Library dependency
    implementation 'org.tensorflow:tensorflow-lite-task-vision'
    // Import the GPU delegate plugin Library for GPU inference
    implementation 'org.tensorflow:tensorflow-lite-gpu-delegate-plugin'
}
ขั้นตอนที่ 2: การใช้โมเดล
// Initialization
ObjectDetectorOptions options =
    ObjectDetectorOptions.builder()
        .setBaseOptions(BaseOptions.builder().useGpu().build())
        .setMaxResults(1)
        .build();
ObjectDetector objectDetector =
    ObjectDetector.createFromFileAndOptions(
        context, modelFile, options);

// Run inference
List<Detection> results = objectDetector.detect(image);
ดูตัวเลือกเพิ่มเติมในการกำหนดค่า ObjectDetector ได้ในซอร์สโค้ดและ
javadoc
เรียกใช้การอนุมานใน iOS
ขั้นตอนที่ 1: ติดตั้งการอ้างอิง
คลังงานรองรับการติดตั้งโดยใช้ CocoaPods ตรวจสอบว่าได้ติดตั้ง CocoaPods ในระบบแล้ว โปรดดูวิธีการในคู่มือการติดตั้ง CocoaPods
โปรดดูรายละเอียดเกี่ยวกับการเพิ่มพ็อดลงในโปรเจ็กต์ Xcode ในคู่มือ CocoaPods
เพิ่มพ็อด TensorFlowLiteTaskVision ใน Podfile
target 'MyAppWithTaskAPI' do
  use_frameworks!
  pod 'TensorFlowLiteTaskVision'
end
ตรวจสอบว่า.tfliteโมเดลที่คุณจะใช้สำหรับการอนุมานอยู่ใน
App Bundle
ขั้นตอนที่ 2: การใช้โมเดล
Swift
// Imports
import TensorFlowLiteTaskVision

// Initialization
guard let modelPath = Bundle.main.path(forResource: "ssd_mobilenet_v1",
                                            ofType: "tflite") else { return }

let options = ObjectDetectorOptions(modelPath: modelPath)

// Configure any additional options:
// options.classificationOptions.maxResults = 3

let detector = try ObjectDetector.detector(options: options)

// Convert the input image to MLImage.
// There are other sources for MLImage. For more details, please see:
// https://developers.google.com/ml-kit/reference/ios/mlimage/api/reference/Classes/GMLImage
guard let image = UIImage (named: "cats_and_dogs.jpg"), let mlImage = MLImage(image: image) else { return }

// Run inference
let detectionResult = try detector.detect(mlImage: mlImage)
Objective-C
// Imports
#import <TensorFlowLiteTaskVision/TensorFlowLiteTaskVision.h>

// Initialization
NSString *modelPath = [[NSBundle mainBundle] pathForResource:@"ssd_mobilenet_v1" ofType:@"tflite"];

TFLObjectDetectorOptions *options = [[TFLObjectDetectorOptions alloc] initWithModelPath:modelPath];

// Configure any additional options:
// options.classificationOptions.maxResults = 3;

TFLObjectDetector *detector = [TFLObjectDetector objectDetectorWithOptions:options
                                                                     error:nil];

// Convert the input image to MLImage.
UIImage *image = [UIImage imageNamed:@"dogs.jpg"];

// There are other sources for GMLImage. For more details, please see:
// https://developers.google.com/ml-kit/reference/ios/mlimage/api/reference/Classes/GMLImage
GMLImage *gmlImage = [[GMLImage alloc] initWithImage:image];

// Run inference
TFLDetectionResult *detectionResult = [detector detectWithGMLImage:gmlImage error:nil];
ดูตัวเลือกเพิ่มเติมในการกำหนดค่า TFLObjectDetector ได้ในซอร์สโค้ด
เรียกใช้การอนุมานใน Python
ขั้นตอนที่ 1: ติดตั้งแพ็กเกจ pip
pip install tflite-support
ขั้นตอนที่ 2: การใช้โมเดล
# Imports
from tflite_support.task import vision
from tflite_support.task import core
from tflite_support.task import processor

# Initialization
base_options = core.BaseOptions(file_name=model_path)
detection_options = processor.DetectionOptions(max_results=2)
options = vision.ObjectDetectorOptions(base_options=base_options, detection_options=detection_options)
detector = vision.ObjectDetector.create_from_options(options)

# Alternatively, you can create an object detector in the following manner:
# detector = vision.ObjectDetector.create_from_file(model_path)

# Run inference
image = vision.TensorImage.create_from_file(image_path)
detection_result = detector.detect(image)
ดูตัวเลือกเพิ่มเติมในการกำหนดค่า ObjectDetector ได้ในซอร์สโค้ด
เรียกใช้การอนุมานใน C++
// Initialization
ObjectDetectorOptions options;
options.mutable_base_options()->mutable_model_file()->set_file_name(model_path);
std::unique_ptr<ObjectDetector> object_detector = ObjectDetector::CreateFromOptions(options).value();

// Create input frame_buffer from your inputs, `image_data` and `image_dimension`.
// See more information here: tensorflow_lite_support/cc/task/vision/utils/frame_buffer_common_utils.h
std::unique_ptr<FrameBuffer> frame_buffer = CreateFromRgbRawBuffer(
      image_data, image_dimension);

// Run inference
const DetectionResult result = object_detector->Detect(*frame_buffer).value();
ดูตัวเลือกเพิ่มเติมในการกำหนดค่า ObjectDetector ได้ในซอร์สโค้ด
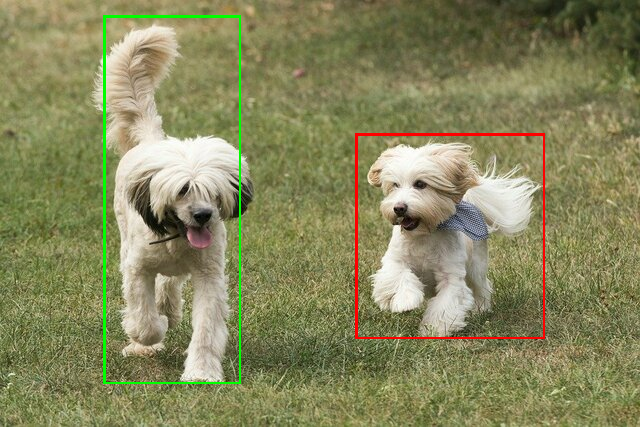
ตัวอย่างผลการแข่ง
นี่คือตัวอย่างผลการตรวจหาของ ssd mobilenet v1 จาก TensorFlow Hub

Results:
 Detection #0 (red):
  Box: (x: 355, y: 133, w: 190, h: 206)
  Top-1 class:
   index       : 17
   score       : 0.73828
   class name  : dog
 Detection #1 (green):
  Box: (x: 103, y: 15, w: 138, h: 369)
  Top-1 class:
   index       : 17
   score       : 0.73047
   class name  : dog
แสดงผลกรอบล้อมรอบบนรูปภาพอินพุต

ลองใช้เครื่องมือสาธิต CLI แบบง่ายสำหรับ ObjectDetector กับโมเดลและข้อมูลทดสอบของคุณเอง
ข้อกำหนดความเข้ากันได้ของโมเดล
ObjectDetector API คาดหวังโมเดล TFLite ที่มีข้อมูลเมตาของโมเดล TFLite ที่จำเป็น ดูตัวอย่างการสร้าง
ข้อมูลเมตาสำหรับเครื่องตรวจจับออบเจ็กต์โดยใช้ TensorFlow Lite Metadata Writer
API
โมเดลตรวจหาออบเจ็กต์ที่รองรับควรเป็นไปตามข้อกำหนดต่อไปนี้
Tensor รูปภาพอินพุต: (kTfLiteUInt8/kTfLiteFloat32)
- อินพุตรูปภาพขนาด
[batch x height x width x channels] - ไม่รองรับการอนุมานแบบกลุ่ม (ต้องตั้งค่า
batchเป็น 1) - รองรับเฉพาะอินพุต RGB (
channelsต้องเป็น 3) - หากประเภทเป็น kTfLiteFloat32 จะต้องแนบ NormalizationOptions ไปกับข้อมูลเมตาสำหรับการปรับอินพุตให้เป็นมาตรฐาน
- อินพุตรูปภาพขนาด
Tensor เอาต์พุตต้องเป็นเอาต์พุต 4 รายการของ Op
DetectionPostProcessกล่าวคือ- Tensor สถานที่ตั้ง (kTfLiteFloat32)
- เทนเซอร์ขนาด
[1 x num_results x 4]อาร์เรย์ด้านในแสดง กรอบล้อมรอบในรูปแบบ [บน, ซ้าย, ขวา, ล่าง] - ต้องแนบ BoundingBoxProperties ไปกับข้อมูลเมตาและต้องระบุ
type=BOUNDARIESและ `coordinate_type=RATIO` Tensor ของคลาส (kTfLiteFloat32)
เทนเซอร์ขนาด
[1 x num_results]โดยแต่ละค่าแสดงถึงดัชนีจำนวนเต็มของคลาสคุณแนบไฟล์แผนที่ป้ายกำกับ (ไม่บังคับแต่แนะนำ) เป็น AssociatedFile-s ที่มีประเภท TENSOR_VALUE_LABELS ซึ่งมีป้ายกำกับ 1 รายการต่อ บรรทัดได้ ดูไฟล์ป้ายกำกับตัวอย่าง ระบบจะใช้ AssociatedFile รายการแรก (หากมี) เพื่อกรอกข้อมูลในช่อง
class_nameของผลการค้นหา ระบบจะกรอกข้อมูลในช่องdisplay_nameจาก AssociatedFile (หากมี) ซึ่งมีภาษาตรงกับช่องdisplay_names_localeของObjectDetectorOptionsที่ใช้ในเวลาที่สร้าง ("en" โดยค่าเริ่มต้น เช่น ภาษาอังกฤษ) หากไม่มีข้อมูลใดๆ เหล่านี้ ระบบจะกรอกเฉพาะช่องindexของ ผลลัพธ์เทนเซอร์คะแนน (kTfLiteFloat32)
เทนเซอร์ขนาด
[1 x num_results]โดยแต่ละค่าแสดงถึงคะแนนของ ออบเจ็กต์ที่ตรวจพบจำนวนเทนเซอร์การตรวจจับ (kTfLiteFloat32)
จำนวนเต็ม num_results เป็นเทนเซอร์ขนาด
[1]
