
簡介
哈囉,世界!教學課程使用 MediaPipe Framework 開發 在 Android 上執行 MediaPipe 圖表。
建構目標
簡易的相機應用程式,可對即時影像進行即時 Sobel 邊緣偵測 透過 Android 裝置串流播放
設定
- 在系統中安裝 MediaPipe Framework,請參閱「架構安裝 指南。
- 安裝 Android Development SDK 和 Android NDK。操作方法也在 [Framework 安裝指南]。
- 在 Android 裝置上啟用開發人員選項。
- 在系統上設定 Bazel,以便建構及部署 Android 應用程式。
邊緣偵測圖形
我們會使用以下圖表:edge_detection_mobile_gpu.pbtxt:
# MediaPipe graph that performs GPU Sobel edge detection on a live video stream.
# Used in the examples in
# mediapipe/examples/android/src/java/com/mediapipe/apps/basic and
# mediapipe/examples/ios/edgedetectiongpu.

# Images coming into and out of the graph.
input_stream: "input_video"
output_stream: "output_video"

# Converts RGB images into luminance images, still stored in RGB format.
node: {
  calculator: "LuminanceCalculator"
  input_stream: "input_video"
  output_stream: "luma_video"
}

# Applies the Sobel filter to luminance images stored in RGB format.
node: {
  calculator: "SobelEdgesCalculator"
  input_stream: "luma_video"
  output_stream: "output_video"
}
圖表如下圖所示:
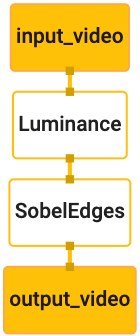
此圖表中,所有傳入的影格都有一個名為 input_video 的單一輸入串流
應用程式相機會提供這項資料
圖中的第一個節點 LuminanceCalculator 採用單一封包 (圖片)
影格),並使用 OpenGL 著色器套用亮度變更。最終產生的
圖片影格傳送至 luma_video 輸出串流。
第二個節點 SobelEdgesCalculator 會將邊緣偵測功能套用至連入
位於 luma_video 資料流並輸出的封包會產生 output_video 的輸出內容
串流。
Android 應用程式會顯示
output_video 個串流。
最低限度的應用程式設定
首先,我們首先從顯示「Hello World!」的簡易 Android 應用程式開始著手。
。如果您熟悉 Android 建構方式,可以略過這個步驟。
使用 bazel 存取應用程式。
建立用來建立 Android 應用程式的新目錄。適用對象
本教學課程的完整程式碼位於
mediapipe/examples/android/src/java/com/google/mediapipe/apps/basic。我們會
在程式碼研究室中,請將這個路徑稱為 $APPLICATION_PATH。
請注意,在應用程式路徑中:
- 這個應用程式的名稱為
helloworld。 - 應用程式的
$PACKAGE_PATH為com.google.mediapipe.apps.basic。 在本教學課程中的程式碼片段中會用到這個程式碼,因此請務必使用 自己的$PACKAGE_PATH本身。
在 $APPLICATION_PATH/res/layout 中新增檔案 activity_main.xml。這個畫面
應用程式全螢幕畫面的 TextView,包含 Hello
World! 字串:
<?xml version="1.0" encoding="utf-8"?>
<android.support.constraint.ConstraintLayout xmlns:android="http://schemas.android.com/apk/res/android"
xmlns:app="http://schemas.android.com/apk/res-auto"
xmlns:tools="http://schemas.android.com/tools"
android:layout_width="match_parent"
android:layout_height="match_parent">
<TextView
android:layout_width="wrap_content"
android:layout_height="wrap_content"
android:text="Hello World!"
app:layout_constraintBottom_toBottomOf="parent"
app:layout_constraintLeft_toLeftOf="parent"
app:layout_constraintRight_toRightOf="parent"
app:layout_constraintTop_toTopOf="parent" />
</android.support.constraint.ConstraintLayout>
將簡單的 MainActivity.java 新增至 $APPLICATION_PATH,以便載入內容
activity_main.xml 版面配置的結構,如下所示:
package com.google.mediapipe.apps.basic;
import android.os.Bundle;
import androidx.appcompat.app.AppCompatActivity;
/** Bare-bones main activity. */
public class MainActivity extends AppCompatActivity {
@Override
protected void onCreate(Bundle savedInstanceState) {
super.onCreate(savedInstanceState);
setContentView(R.layout.activity_main);
}
}
將 AndroidManifest.xml 至 $APPLICATION_PATH 的資訊清單檔案
在應用程式啟動時啟動 MainActivity:
<?xml version="1.0" encoding="utf-8"?>
<manifest xmlns:android="http://schemas.android.com/apk/res/android"
package="com.google.mediapipe.apps.basic">
<uses-sdk
android:minSdkVersion="19"
android:targetSdkVersion="19" />
<application
android:allowBackup="true"
android:label="${appName}"
android:supportsRtl="true"
android:theme="@style/AppTheme">
<activity
android:name="${mainActivity}"
android:exported="true"
android:screenOrientation="portrait">
<intent-filter>
<action android:name="android.intent.action.MAIN" />
<category android:name="android.intent.category.LAUNCHER" />
</intent-filter>
</activity>
</application>
</manifest>
在應用程式中,我們會使用 Theme.AppCompat 主題,因此需要
適當的主題參考資料。將 colors.xml新增至
$APPLICATION_PATH/res/values/:
<?xml version="1.0" encoding="utf-8"?>
<resources>
<color name="colorPrimary">#008577</color>
<color name="colorPrimaryDark">#00574B</color>
<color name="colorAccent">#D81B60</color>
</resources>
將 styles.xml 新增至 $APPLICATION_PATH/res/values/:
<resources>
<!-- Base application theme. -->
<style name="AppTheme" parent="Theme.AppCompat.Light.DarkActionBar">
<!-- Customize your theme here. -->
<item name="colorPrimary">@color/colorPrimary</item>
<item name="colorPrimaryDark">@color/colorPrimaryDark</item>
<item name="colorAccent">@color/colorAccent</item>
</style>
</resources>
如要建構應用程式,請在 $APPLICATION_PATH 中新增 BUILD 檔案,並且
資訊清單中的 ${appName} 和 ${mainActivity} 將由字串取代
指定為 BUILD,如下所示。
android_library(
name = "basic_lib",
srcs = glob(["*.java"]),
manifest = "AndroidManifest.xml",
resource_files = glob(["res/**"]),
deps = [
"@maven//:androidx_appcompat_appcompat",
"@maven//:androidx_constraintlayout_constraintlayout",
],
)
android_binary(
name = "helloworld",
manifest = "AndroidManifest.xml",
manifest_values = {
"applicationId": "com.google.mediapipe.apps.basic",
"appName": "Hello World",
"mainActivity": ".MainActivity",
},
multidex = "native",
deps = [
":basic_lib",
],
)
android_library 規則會為 MainActivity 資源檔案新增依附元件
和 AndroidManifest.xml。
android_binary 規則會使用產生的 basic_lib Android 程式庫
建立可在 Android 裝置上安裝的二進位 APK。
如要建構應用程式,請使用下列指令:
bazel build -c opt --config=android_arm64 $APPLICATION_PATH:helloworld
使用 adb install 安裝產生的 APK 檔案。例如:
adb install bazel-bin/$APPLICATION_PATH/helloworld.apk
在裝置上開啟應用程式。畫面上應該會顯示含有文字的畫面
Hello World!。

透過「CameraX」使用相機
相機權限
為了在應用程式中使用相機,我們必須要求使用者提供
相機權限。如要要求相機權限,請將以下內容新增至
AndroidManifest.xml:
<!-- For using the camera -->
<uses-permission android:name="android.permission.CAMERA" />
<uses-feature android:name="android.hardware.camera" />
將最低 SDK 版本改為 21,並在27
相同檔案:
<uses-sdk
    android:minSdkVersion="21"
    android:targetSdkVersion="27" />
這能確保系統會提示使用者要求相機權限,並允許 我們使用 CameraX 程式庫存取相機。
如要要求相機權限,我們可以使用 MediaPipe Framework 提供的公用程式
元件,即 PermissionHelper。如要使用,請新增依附元件
"//mediapipe/java/com/google/mediapipe/components:android_components" 是
「BUILD」有 mediapipe_lib 項規則。
如要在 MainActivity 中使用 PermissionHelper,請在
onCreate 函式:
PermissionHelper.checkAndRequestCameraPermissions(this);
這會提示使用者要求取得 在這個應用程式中使用相機
新增下列程式碼來處理使用者回應:
@Override
public void onRequestPermissionsResult(
    int requestCode, String[] permissions, int[] grantResults) {
  super.onRequestPermissionsResult(requestCode, permissions, grantResults);
  PermissionHelper.onRequestPermissionsResult(requestCode, permissions, grantResults);
}

@Override
protected void onResume() {
  super.onResume();
  if (PermissionHelper.cameraPermissionsGranted(this)) {
    startCamera();
  }
}

public void startCamera() {}
我們目前會將 startCamera() 方法留空。使用者回覆時
觸發後,MainActivity 將繼續執行,並呼叫 onResume()。
程式碼會確認系統已授予相機使用權限
然後啟動相機
重新建構並安裝應用程式。現在您應該會看到 應用程式相機的存取權。
攝影機存取權
取得相機權限後,我們就可以從 相機上
如要查看相機畫面,請使用 SurfaceView。每個畫面
系統會將相機擷取到 SurfaceTexture 物件中。為了使用這些功能,我們
必須先變更應用程式的版面配置
將整個 TextView 程式碼區塊從以下位置移除:
$APPLICATION_PATH/res/layout/activity_main.xml 並加入下列程式碼
請改採以下做法:
<FrameLayout
    android:id="@+id/preview_display_layout"
    android:layout_width="fill_parent"
    android:layout_height="fill_parent"
    android:layout_weight="1">
    <TextView
        android:id="@+id/no_camera_access_view"
        android:layout_height="fill_parent"
        android:layout_width="fill_parent"
        android:gravity="center"
        android:text="@string/no_camera_access" />
</FrameLayout>
這個程式碼區塊具有名為 preview_display_layout 的新 FrameLayout 和
巢狀結構包含 TextView,名為 no_camera_access_preview。相機開啟時
如未授予存取權限,應用程式會顯示
TextView 含有字串訊息,儲存在變數 no_camera_access 中。
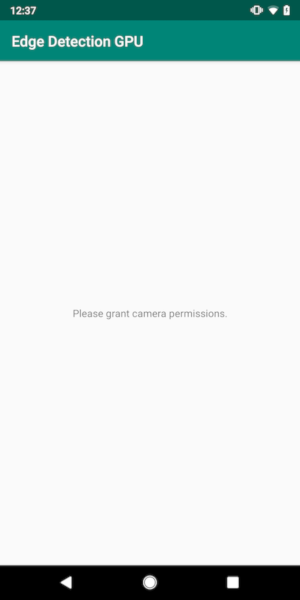
在 $APPLICATION_PATH/res/values/strings.xml 檔案中新增下列程式碼:
<string name="no_camera_access" translatable="false">Please grant camera permissions.</string>
如果使用者未授予相機權限,螢幕畫面會看起來像 :
現在,我們將 SurfaceTexture 和 SurfaceView 物件新增至
MainActivity:
private SurfaceTexture previewFrameTexture;
private SurfaceView previewDisplayView;
在 onCreate(Bundle) 函式中,於 之前 加入以下兩行
要求相機權限:
previewDisplayView = new SurfaceView(this);
setupPreviewDisplayView();
現在,請新增定義 setupPreviewDisplayView() 的程式碼:
private void setupPreviewDisplayView() {
  previewDisplayView.setVisibility(View.GONE);
  ViewGroup viewGroup = findViewById(R.id.preview_display_layout);
  viewGroup.addView(previewDisplayView);
}
定義新的 SurfaceView 物件並將其加入
preview_display_layout FrameLayout 物件,以便我們使用該物件來顯示內容
使用名為 previewFrameTexture 的 SurfaceTexture 物件擷取相機影格。
如要利用 previewFrameTexture 取得相機影格,我們將使用 CameraX。
架構提供名為 CameraXPreviewHelper 的公用程式,以便使用 CameraX。
這個類別會在透過以下方式啟動相機時,更新事件監聽器:
onCameraStarted(@Nullable SurfaceTexture)。
如要使用這個公用程式,請修改 BUILD 檔案,新增以下依附元件
"//mediapipe/java/com/google/mediapipe/components:android_camerax_helper"。
現在匯入 CameraXPreviewHelper,並將下列程式碼新增至
MainActivity:
private CameraXPreviewHelper cameraHelper;
現在,我們可以將實作新增至 startCamera():
public void startCamera() {
  cameraHelper = new CameraXPreviewHelper();
  cameraHelper.setOnCameraStartedListener(
    surfaceTexture -> {
      previewFrameTexture = surfaceTexture;
      // Make the display view visible to start showing the preview.
      previewDisplayView.setVisibility(View.VISIBLE);
    });
}
這項操作會建立新的 CameraXPreviewHelper 物件,並新增匿名資訊
特定接聽程式。cameraHelper 指示攝影機已開始時
可使用 surfaceTexture 來擷取影格,我們會儲存
以 previewFrameTexture 的身分為 surfaceTexture,然後讓 previewDisplayView
顯示,我們就可以開始看到 previewFrameTexture 中的影格。
不過,在啟動相機之前,我們需要決定
相關單位會如何運用資料,並讓他們覺得自己
獲得充分告知,且能夠針對該使用方式表示同意CameraXPreviewHelper 繼承自提供兩個選項的 CameraHelper
選項、FRONT 和 BACK。我們可以從 BUILD 檔案傳入決定
例如,無須變更程式碼即可建構其他版本的
使用不同的相機
假設我們想使用 BACK 攝影機在即時場景上執行邊緣偵測
我們會將中繼資料新增至 AndroidManifest.xml:
      ...
      <meta-data android:name="cameraFacingFront" android:value="${cameraFacingFront}"/>
  </application>
</manifest>
並在 helloworld Android 二進位檔規則的 BUILD 中指定所選項目
包含 manifest_values 中的新項目:
manifest_values = {
    "applicationId": "com.google.mediapipe.apps.basic",
    "appName": "Hello World",
    "mainActivity": ".MainActivity",
    "cameraFacingFront": "False",
},
現在,使用 MainActivity 擷取 manifest_values 中指定的中繼資料,
新增 ApplicationInfo 物件:
private ApplicationInfo applicationInfo;
在 onCreate() 函式中新增:
try {
  applicationInfo =
      getPackageManager().getApplicationInfo(getPackageName(), PackageManager.GET_META_DATA);
} catch (NameNotFoundException e) {
  Log.e(TAG, "Cannot find application info: " + e);
}
現在,請在 startCamera() 函式的結尾加入下列程式碼:
CameraHelper.CameraFacing cameraFacing =
    applicationInfo.metaData.getBoolean("cameraFacingFront", false)
        ? CameraHelper.CameraFacing.FRONT
        : CameraHelper.CameraFacing.BACK;
cameraHelper.startCamera(this, cameraFacing, /*unusedSurfaceTexture=*/ null);
此時,應用程式應會成功建構。不過,當您在
裝置上的應用程式,仍會顯示黑色畫面 (即使相機鏡頭已啟動)
已授予相關權限)。這是因為雖然我們儲存了
surfaceTexture 變數 (由 CameraXPreviewHelper 提供),
previewSurfaceView 尚未使用輸出內容,也尚未顯示在螢幕上。
由於我們想在 MediaPipe 圖表中使用影格,因此不會新增程式碼至 直接在本教學課程中查看相機輸出內容而是直接說明 我們可以傳送要處理的相機影格到 MediaPipe 圖,然後顯示 圖表輸出內容
「ExternalTextureConverter」設定
SurfaceTexture 會以 OpenGL ES 的形式從串流擷取圖片影格
生成的圖片如要使用 MediaPipe 圖表,從相機擷取的畫面必須
儲存在一般 Open GL 紋理物件中架構提供一個類別
ExternalTextureConverter 可轉換 SurfaceTexture 中儲存的圖片
物件新增至一般 OpenGL 紋理物件。
如要使用 ExternalTextureConverter,我們還需要 EGLContext,也就是
由 EglManager 物件建立與管理。將依附元件新增至 BUILD
檔案,即可使用 EglManager、"//mediapipe/java/com/google/mediapipe/glutil"。
在 MainActivity 中新增下列宣告:
private EglManager eglManager;
private ExternalTextureConverter converter;
在 onCreate(Bundle) 函式中新增陳述式,以便初始化
再要求相機權限前 eglManager 個物件:
eglManager = new EglManager(null);
提醒您,我們已在 MainActivity 中定義 onResume() 函式來確認
已授予攝影機權限並呼叫 startCamera()。在此之前
檢查,在 onResume() 中加入以下一行內容來初始化 converter
物件:
converter = new ExternalTextureConverter(eglManager.getContext());
這個 converter 現在使用由 eglManager 管理的 GLContext。
我們也需要覆寫 MainActivity 中的 onPause() 函式,以使
如果應用程式進入暫停狀態,我們會正確關閉 converter:
@Override
protected void onPause() {
  super.onPause();
  converter.close();
}
如要透過管道傳遞 previewFrameTexture 的輸出內容至 converter,請新增
將下列程式碼區塊傳送給 setupPreviewDisplayView():
previewDisplayView
 .getHolder()
 .addCallback(
     new SurfaceHolder.Callback() {
       @Override
       public void surfaceCreated(SurfaceHolder holder) {}

       @Override
       public void surfaceChanged(SurfaceHolder holder, int format, int width, int height) {
         // (Re-)Compute the ideal size of the camera-preview display (the area that the
         // camera-preview frames get rendered onto, potentially with scaling and rotation)
         // based on the size of the SurfaceView that contains the display.
         Size viewSize = new Size(width, height);
         Size displaySize = cameraHelper.computeDisplaySizeFromViewSize(viewSize);

         // Connect the converter to the camera-preview frames as its input (via
         // previewFrameTexture), and configure the output width and height as the computed
         // display size.
         converter.setSurfaceTextureAndAttachToGLContext(
             previewFrameTexture, displaySize.getWidth(), displaySize.getHeight());
       }

       @Override
       public void surfaceDestroyed(SurfaceHolder holder) {}
     });
在這個程式碼區塊中,我們會將自訂 SurfaceHolder.Callback 新增至
previewDisplayView 並實作 surfaceChanged(SurfaceHolder holder, int
format, int width, int height) 函式,以計算適當的顯示大小
以及相機影格的對應部分,以便和 previewFrameTexture
物件,並將運算的 displaySize 影格傳送至 converter。
現在可以在 MediaPipe 圖表中使用相機影格。
在 Android 中使用 MediaPipe 圖表
新增相關依附元件
如要使用 MediaPipe 圖表,我們必須將依附元件新增至 MediaPipe 架構
。首先要新增建構規則,以便使用 JNI 程式碼建構 cc_binary
然後建構 cc_library 規則,以使用此二進位檔
我們的應用程式在 BUILD 檔案中新增以下程式碼區塊:
cc_binary(
    name = "libmediapipe_jni.so",
    linkshared = 1,
    linkstatic = 1,
    deps = [
        "//mediapipe/java/com/google/mediapipe/framework/jni:mediapipe_framework_jni",
    ],
)

cc_library(
    name = "mediapipe_jni_lib",
    srcs = [":libmediapipe_jni.so"],
    alwayslink = 1,
)
將依附元件 ":mediapipe_jni_lib" 新增至 mediapipe_lib 建構規則:
BUILD 檔案。
接著,我們要針對要使用的 MediaPipe 圖表,新增特定依附元件 應用程式。
首先,請將依附元件新增至 libmediapipe_jni.so 中的所有計算機程式碼
建構規則:
"//mediapipe/graphs/edge_detection:mobile_calculators",
MediaPipe 圖形為 .pbtxt 檔案。如要在應用程式中使用這類圖表,我們需要
使用 mediapipe_binary_graph 建構規則產生 .binarypb 檔案。
在 helloworld Android 二進位檔建構規則中新增 mediapipe_binary_graph
以資產形式,指定圖表的特定資產:
assets = [
  "//mediapipe/graphs/edge_detection:mobile_gpu_binary_graph",
],
assets_dir = "",
在 assets 建構規則中,您也可以新增其他資產,例如 TensorFlowLite
圖表中顯示的各種模型
另外,針對專屬的 manifest_values 屬性
圖形,以便稍後在 MainActivity 中擷取:
manifest_values = {
    "applicationId": "com.google.mediapipe.apps.basic",
    "appName": "Hello World",
    "mainActivity": ".MainActivity",
    "cameraFacingFront": "False",
    "binaryGraphName": "mobile_gpu.binarypb",
    "inputVideoStreamName": "input_video",
    "outputVideoStreamName": "output_video",
},
請注意,binaryGraphName 表示二進位圖表的檔案名稱。
取決於 mediapipe_binary_graph 目標的 output_name 欄位。
inputVideoStreamName 和 outputVideoStreamName 是輸入和輸出內容
圖表中指定的影片串流名稱。
現在,MainActivity 需要載入 MediaPipe 架構。此外,
架構使用 OpenCV,因此 MainActvity 也應載入 OpenCV。使用
MainActivity 中的程式碼 (在類別中,但不出現在任何函式中)
載入兩個依附元件:
static {
  // Load all native libraries needed by the app.
  System.loadLibrary("mediapipe_jni");
  System.loadLibrary("opencv_java3");
}
使用 MainActivity 中的圖表
首先,我們必須載入素材資源,其中包含用來編譯的 .binarypb
圖表的 .pbtxt 檔案。為此,我們可以使用 MediaPipe 公用程式
AndroidAssetUtil。
請先初始化「onCreate(Bundle)」中的資產管理工具,再初始化
eglManager:
// Initialize asset manager so that MediaPipe native libraries can access the app assets, e.g.,
// binary graphs.
AndroidAssetUtil.initializeNativeAssetManager(this);
現在,我們需要設定傳送相機影格的 FrameProcessor 物件
根據 converter 準備到 MediaPipe 圖表並執行圖表,
然後更新 previewDisplayView 以顯示輸出內容。新增
下列程式碼宣告 FrameProcessor:
private FrameProcessor processor;
並在初始化 eglManager 後在 onCreate(Bundle) 中初始化:
processor =
    new FrameProcessor(
        this,
        eglManager.getNativeContext(),
        applicationInfo.metaData.getString("binaryGraphName"),
        applicationInfo.metaData.getString("inputVideoStreamName"),
        applicationInfo.metaData.getString("outputVideoStreamName"));
processor 需要使用 converter 轉換的影格,
和資料處理之間初始化onResume()
converter:
converter.setConsumer(processor);
processor 應將其輸出內容傳送至 previewDisplayView。如要執行這項操作,請將
將下列函式定義加到自訂 SurfaceHolder.Callback:
@Override
public void surfaceCreated(SurfaceHolder holder) {
  processor.getVideoSurfaceOutput().setSurface(holder.getSurface());
}

@Override
public void surfaceDestroyed(SurfaceHolder holder) {
  processor.getVideoSurfaceOutput().setSurface(null);
}
建立 SurfaceHolder 時,我們會將 Surface 提供給
processor 的 VideoSurfaceOutput。刪除後,我們會將它從
processor 的 VideoSurfaceOutput。
大功告成!現在,您應該可以成功建構及執行 並查看即時相機上執行的 Sobel 邊緣偵測 動態饋給!恭喜!
如果遇到任何問題,請查看完整的教學課程程式碼 請按這裡。