
MediaPipe 얼굴 감지기 태스크를 사용하면 이미지 또는 동영상에서 얼굴을 감지할 수 있습니다. 이 작업을 사용하여 프레임 내에서 얼굴과 얼굴 특징을 찾을 수 있습니다. 이 태스크에서는 단일 이미지 또는 연속 이미지 스트림에서 작동하는 머신러닝 (ML) 모델을 사용합니다. 이 작업은 얼굴 위치와 함께 왼쪽 눈, 오른쪽 눈, 코 끝, 입, 왼쪽 눈 이주, 오른쪽 눈 이주 등의 얼굴 주요 지점을 출력합니다.
이 안내에 설명된 코드 샘플은 GitHub에서 확인할 수 있습니다. 이 태스크의 기능, 모델, 구성 옵션에 관한 자세한 내용은 개요를 참고하세요.
코드 예
얼굴 감지기의 예시 코드는 참고용으로 Python에서 이 작업을 완전히 구현한 코드를 제공합니다. 이 코드를 사용하면 이 작업을 테스트하고 자체 얼굴 감지기 빌드를 시작할 수 있습니다. 웹브라우저만 사용하여 얼굴 감지기 예시 코드를 보고, 실행하고, 수정할 수 있습니다.
Raspberry Pi용 얼굴 인식기를 구현하는 경우 Raspberry Pi 예시 앱을 참고하세요.
설정
이 섹션에서는 특히 얼굴 감지기를 사용하도록 개발 환경 및 코드 프로젝트를 설정하는 주요 단계를 설명합니다. 플랫폼 버전 요구사항을 비롯하여 MediaPipe 작업을 사용하기 위한 개발 환경 설정에 관한 일반적인 정보는 Python 설정 가이드를 참고하세요.
패키지
MediaPipe 얼굴 감지기 태스크에는 mediapipe PyPI 패키지가 필요합니다. 다음을 사용하여 이러한 종속 항목을 설치하고 가져올 수 있습니다.
$ python -m pip install mediapipe
가져오기
얼굴 감지기 태스크 함수에 액세스하려면 다음 클래스를 가져옵니다.
import mediapipe as mp
from mediapipe.tasks import python
from mediapipe.tasks.python import vision
모델
MediaPipe 얼굴 감지기 태스크에는 이 태스크와 호환되는 학습된 모델이 필요합니다. 얼굴 감지기에 사용할 수 있는 학습된 모델에 관한 자세한 내용은 작업 개요 모델 섹션을 참고하세요.
모델을 선택하고 다운로드한 다음 로컬 디렉터리에 저장합니다.
model_path = '/absolute/path/to/face_detector.task'
BaseOptions 객체 model_asset_path 매개변수를 사용하여 사용할 모델의 경로를 지정합니다. 코드 예시는 다음 섹션을 참고하세요.
할 일 만들기
MediaPipe 얼굴 감지기 태스크는 create_from_options 함수를 사용하여 태스크를 설정합니다. create_from_options 함수는 구성 옵션이 처리할 값을 허용합니다. 구성 옵션에 관한 자세한 내용은 구성 옵션을 참고하세요.
다음 코드는 이 태스크를 빌드하고 구성하는 방법을 보여줍니다.
또한 이러한 샘플은 이미지, 동영상 파일, 라이브 스트림의 작업 구성 변형을 보여줍니다.
이미지
import mediapipe as mp

BaseOptions = mp.tasks.BaseOptions
FaceDetector = mp.tasks.vision.FaceDetector
FaceDetectorOptions = mp.tasks.vision.FaceDetectorOptions
VisionRunningMode = mp.tasks.vision.RunningMode

# Create a face detector instance with the image mode:
options = FaceDetectorOptions(
    base_options=BaseOptions(model_asset_path='/path/to/model.task'),
    running_mode=VisionRunningMode.IMAGE)
with FaceDetector.create_from_options(options) as detector:
  # The detector is initialized. Use it here.
  # ...
동영상
import mediapipe as mp

BaseOptions = mp.tasks.BaseOptions
FaceDetector = mp.tasks.vision.FaceDetector
FaceDetectorOptions = mp.tasks.vision.FaceDetectorOptions
VisionRunningMode = mp.tasks.vision.RunningMode

# Create a face detector instance with the video mode:
options = FaceDetectorOptions(
    base_options=BaseOptions(model_asset_path='/path/to/model.task'),
    running_mode=VisionRunningMode.VIDEO)
with FaceDetector.create_from_options(options) as detector:
  # The detector is initialized. Use it here.
  # ...
실시간 스트림
import mediapipe as mp

BaseOptions = mp.tasks.BaseOptions
FaceDetector = mp.tasks.vision.FaceDetector
FaceDetectorOptions = mp.tasks.vision.FaceDetectorOptions
FaceDetectorResult = mp.tasks.vision.FaceDetectorResult
VisionRunningMode = mp.tasks.vision.RunningMode

# Create a face detector instance with the live stream mode:
def print_result(result: FaceDetectorResult, output_image: mp.Image, timestamp_ms: int):
    print('face detector result: {}'.format(result))

options = FaceDetectorOptions(
    base_options=BaseOptions(model_asset_path='/path/to/model.task'),
    running_mode=VisionRunningMode.LIVE_STREAM,
    result_callback=print_result)
with FaceDetector.create_from_options(options) as detector:
  # The detector is initialized. Use it here.
  # ...
이미지와 함께 사용할 얼굴 감지기를 만드는 전체 예시는 코드 예시를 참고하세요.
구성 옵션
이 작업에는 Python 애플리케이션의 다음 구성 옵션이 있습니다.
| 옵션 이름 | 설명 | 값 범위 | 기본값 |
|---|---|---|---|
running_mode |
태스크의 실행 모드를 설정합니다. 모드는 세 가지입니다. IMAGE: 단일 이미지 입력의 모드입니다. 동영상: 동영상의 디코딩된 프레임 모드입니다. LIVE_STREAM: 카메라와 같은 입력 데이터의 라이브 스트림 모드입니다. 이 모드에서는 결과를 비동기식으로 수신할 리스너를 설정하려면 resultListener를 호출해야 합니다. |
{IMAGE, VIDEO, LIVE_STREAM} |
IMAGE |
min_detection_confidence |
얼굴 감지가 성공으로 간주되는 최소 신뢰도 점수입니다. | Float [0,1] |
0.5 |
min_suppression_threshold |
얼굴 감지가 겹쳐 있다고 간주되는 최소 비최대 억제 기준점입니다. | Float [0,1] |
0.3 |
result_callback |
얼굴 감지기가 라이브 스트림 모드일 때 감지 결과를 비동기식으로 수신하도록 결과 리스너를 설정합니다. 실행 모드가 LIVE_STREAM로 설정된 경우에만 사용할 수 있습니다. |
N/A |
Not set |
데이터 준비
입력을 이미지 파일 또는 numpy 배열로 준비한 다음 mediapipe.Image 객체로 변환합니다. 입력이 동영상 파일 또는 웹캠의 라이브 스트림인 경우 OpenCV와 같은 외부 라이브러리를 사용하여 입력 프레임을 numpy 배열로 로드할 수 있습니다.
이미지
import mediapipe as mp

# Load the input image from an image file.
mp_image = mp.Image.create_from_file('/path/to/image')

# Load the input image from a numpy array.
mp_image = mp.Image(image_format=mp.ImageFormat.SRGB, data=numpy_image)
동영상
import mediapipe as mp

# Use OpenCV’s VideoCapture to load the input video.

# Load the frame rate of the video using OpenCV’s CV_CAP_PROP_FPS
# You’ll need it to calculate the timestamp for each frame.

# Loop through each frame in the video using VideoCapture#read()

# Convert the frame received from OpenCV to a MediaPipe’s Image object.
mp_image = mp.Image(image_format=mp.ImageFormat.SRGB, data=numpy_frame_from_opencv)
실시간 스트림
import mediapipe as mp

# Use OpenCV’s VideoCapture to start capturing from the webcam.

# Create a loop to read the latest frame from the camera using VideoCapture#read()

# Convert the frame received from OpenCV to a MediaPipe’s Image object.
mp_image = mp.Image(image_format=mp.ImageFormat.SRGB, data=numpy_frame_from_opencv)
태스크 실행
얼굴 감지기는 detect, detect_for_video, detect_async 함수를 사용하여 추론을 트리거합니다. 얼굴 감지의 경우 입력 데이터를 사전 처리하고 이미지에서 얼굴을 감지하는 작업이 포함됩니다.
다음 코드는 작업 모델로 처리를 실행하는 방법을 보여줍니다.
이미지
# Perform face detection on the provided single image.
# The face detector must be created with the image mode.
face_detector_result = detector.detect(mp_image)
동영상
# Perform face detection on the provided single image.
# The face detector must be created with the video mode.
face_detector_result = detector.detect_for_video(mp_image, frame_timestamp_ms)
실시간 스트림
# Send live image data to perform face detection.
# The results are accessible via the `result_callback` provided in
# the `FaceDetectorOptions` object.
# The face detector must be created with the live stream mode.
detector.detect_async(mp_image, frame_timestamp_ms)
다음에 유의하세요.
- 동영상 모드 또는 라이브 스트림 모드에서 실행할 때는 얼굴 감지기 태스크에 입력 프레임의 타임스탬프도 제공합니다.
- 이미지 또는 동영상 모델에서 실행되면 얼굴 인식기 작업은 입력 이미지 또는 프레임 처리를 완료할 때까지 현재 스레드를 차단합니다.
- 라이브 스트림 모드에서 실행하면 얼굴 감지기 작업이 즉시 반환되고 현재 스레드를 차단하지 않습니다. 입력 프레임 처리가 완료될 때마다 감지 결과와 함께 결과 리스너를 호출합니다. 얼굴 감지기 태스크가 다른 프레임을 처리하느라 바쁠 때 감지 함수가 호출되면 태스크는 새 입력 프레임을 무시합니다.
이미지에서 얼굴 감지기를 실행하는 전체 예시는 코드 예시를 참고하세요.
결과 처리 및 표시
얼굴 감지기는 감지 실행마다 FaceDetectorResult 객체를 반환합니다. 결과 객체에는 감지된 얼굴의 경계 상자와 감지된 각 얼굴의 신뢰도 점수가 포함됩니다.
다음은 이 태스크의 출력 데이터 예시입니다.
FaceDetectionResult:
  Detections:
    Detection #0:
      BoundingBox:
        origin_x: 126
        origin_y: 100
        width: 463
        height: 463
      Categories:
        Category #0:
          index: 0
          score: 0.9729152917861938
      NormalizedKeypoints:
        NormalizedKeypoint #0:
          x: 0.18298381567001343
          y: 0.2961040139198303
        NormalizedKeypoint #1:
          x: 0.3302789330482483
          y: 0.29289937019348145
        ... (6 keypoints for each face)
    Detection #1:
      BoundingBox:
        origin_x: 616
        origin_y: 193
        width: 430
        height: 430
      Categories:
        Category #0:
          index: 0
          score: 0.9251380562782288
      NormalizedKeypoints:
        NormalizedKeypoint #0:
          x: 0.6151331663131714
          y: 0.3713381886482239
        NormalizedKeypoint #1:
          x: 0.7460576295852661
          y: 0.38825345039367676
        ... (6 keypoints for each face)
다음 이미지는 태스크 출력의 시각화를 보여줍니다.
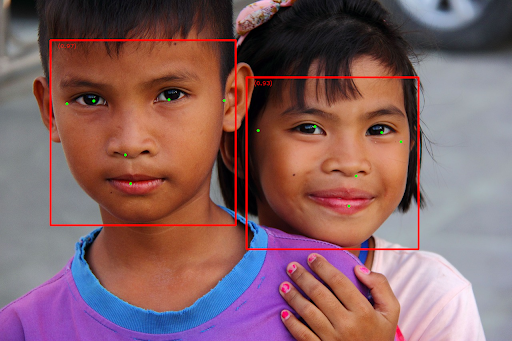
경계 상자가 없는 이미지는 원본 이미지를 참고하세요.
얼굴 감지기 예시 코드는 태스크에서 반환된 결과를 표시하는 방법을 보여줍니다. 자세한 내용은 코드 예시를 참고하세요.