
Tugas MediaPipe Face Detector memungkinkan Anda mendeteksi wajah dalam gambar atau video. Anda dapat menggunakan tugas ini untuk menemukan wajah dan fitur wajah dalam bingkai. Tugas ini menggunakan model machine learning (ML) yang berfungsi dengan satu gambar atau streaming gambar yang berkelanjutan. Tugas ini menghasilkan lokasi wajah, beserta titik-titik penting wajah berikut: mata kiri, mata kanan, ujung hidung, mulut, tragion mata kiri, dan tragion mata kanan.
Contoh kode yang dijelaskan dalam petunjuk ini tersedia di GitHub. Untuk informasi selengkapnya tentang kemampuan, model, dan opsi konfigurasi tugas ini, lihat Ringkasan.
Contoh kode
Contoh kode untuk Face Detector memberikan implementasi lengkap tugas ini di Python sebagai referensi Anda. Kode ini membantu Anda menguji tugas ini dan mulai membangun detektor wajah Anda sendiri. Anda dapat melihat, menjalankan, dan mengedit kode contoh Face Detector hanya menggunakan browser web.
Jika Anda menerapkan Detektor Wajah untuk Raspberry Pi, lihat aplikasi contoh Raspberry Pi.
Penyiapan
Bagian ini menjelaskan langkah-langkah utama untuk menyiapkan lingkungan pengembangan dan project kode Anda secara khusus untuk menggunakan Face Detector. Untuk informasi umum tentang menyiapkan lingkungan pengembangan untuk menggunakan tugas MediaPipe, termasuk persyaratan versi platform, lihat Panduan penyiapan untuk Python.
Paket
Tugas MediaPipe Face Detector memerlukan paket mediapipe PyPI. Anda dapat menginstal dan mengimpor dependensi ini dengan cara berikut:
$ python -m pip install mediapipe
Impor
Impor class berikut untuk mengakses fungsi tugas Face Detector:
import mediapipe as mp
from mediapipe.tasks import python
from mediapipe.tasks.python import vision
Model
Tugas MediaPipe Face Detector memerlukan model terlatih yang kompatibel dengan tugas ini. Untuk mengetahui informasi selengkapnya tentang model terlatih yang tersedia untuk Face Detector, lihat bagian Model ringkasan tugas.
Pilih dan download model, lalu simpan di direktori lokal:
model_path = '/absolute/path/to/face_detector.task'
Gunakan parameter model_asset_path objek BaseOptions untuk menentukan jalur
model yang akan digunakan. Untuk contoh kode, lihat bagian berikutnya.
Membuat tugas
Tugas MediaPipe Face Detector menggunakan fungsi create_from_options untuk
menyiapkan tugas. Fungsi create_from_options menerima nilai
untuk opsi konfigurasi yang akan ditangani. Untuk informasi selengkapnya tentang opsi
konfigurasi, lihat Opsi konfigurasi.
Kode berikut menunjukkan cara mem-build dan mengonfigurasi tugas ini.
Contoh ini juga menunjukkan variasi konstruksi tugas untuk gambar, file video, dan live stream.
Gambar
import mediapipe as mp

BaseOptions = mp.tasks.BaseOptions
FaceDetector = mp.tasks.vision.FaceDetector
FaceDetectorOptions = mp.tasks.vision.FaceDetectorOptions
VisionRunningMode = mp.tasks.vision.RunningMode

# Create a face detector instance with the image mode:
options = FaceDetectorOptions(
    base_options=BaseOptions(model_asset_path='/path/to/model.task'),
    running_mode=VisionRunningMode.IMAGE)
with FaceDetector.create_from_options(options) as detector:
  # The detector is initialized. Use it here.
  # ...
Video
import mediapipe as mp

BaseOptions = mp.tasks.BaseOptions
FaceDetector = mp.tasks.vision.FaceDetector
FaceDetectorOptions = mp.tasks.vision.FaceDetectorOptions
VisionRunningMode = mp.tasks.vision.RunningMode

# Create a face detector instance with the video mode:
options = FaceDetectorOptions(
    base_options=BaseOptions(model_asset_path='/path/to/model.task'),
    running_mode=VisionRunningMode.VIDEO)
with FaceDetector.create_from_options(options) as detector:
  # The detector is initialized. Use it here.
  # ...
Live stream
import mediapipe as mp

BaseOptions = mp.tasks.BaseOptions
FaceDetector = mp.tasks.vision.FaceDetector
FaceDetectorOptions = mp.tasks.vision.FaceDetectorOptions
FaceDetectorResult = mp.tasks.vision.FaceDetectorResult
VisionRunningMode = mp.tasks.vision.RunningMode

# Create a face detector instance with the live stream mode:
def print_result(result: FaceDetectorResult, output_image: mp.Image, timestamp_ms: int):
    print('face detector result: {}'.format(result))

options = FaceDetectorOptions(
    base_options=BaseOptions(model_asset_path='/path/to/model.task'),
    running_mode=VisionRunningMode.LIVE_STREAM,
    result_callback=print_result)
with FaceDetector.create_from_options(options) as detector:
  # The detector is initialized. Use it here.
  # ...
Untuk contoh lengkap pembuatan Face Detector yang akan digunakan dengan gambar, lihat contoh kode.
Opsi konfigurasi
Tugas ini memiliki opsi konfigurasi berikut untuk aplikasi Python:
| Nama Opsi | Deskripsi | Rentang Nilai | Nilai Default |
|---|---|---|---|
running_mode |
Menetapkan mode berjalan untuk tugas. Ada tiga
mode: GAMBAR: Mode untuk input gambar tunggal. VIDEO: Mode untuk frame video yang didekode. LIVE_STREAM: Mode untuk live stream data input, seperti dari kamera. Dalam mode ini, resultListener harus dipanggil untuk menyiapkan pemroses guna menerima hasil secara asinkron. |
{IMAGE, VIDEO, LIVE_STREAM} |
IMAGE |
min_detection_confidence |
Skor keyakinan minimum agar deteksi wajah dianggap berhasil. | Float [0,1] |
0.5 |
min_suppression_threshold |
Batas minimum non-maximum-suppression agar deteksi wajah dianggap tumpang-tindih. | Float [0,1] |
0.3 |
result_callback |
Menetapkan pemroses hasil untuk menerima hasil deteksi secara asinkron saat Face Detector berada dalam mode live stream. Hanya dapat digunakan jika mode berjalan disetel ke LIVE_STREAM. |
N/A |
Not set |
Menyiapkan data
Siapkan input Anda sebagai file gambar atau array numpy,
lalu konversikan ke objek mediapipe.Image. Jika input Anda adalah file video
atau live stream dari webcam, Anda dapat menggunakan library eksternal seperti
OpenCV untuk memuat frame input sebagai array
numpy.
Gambar
import mediapipe as mp

# Load the input image from an image file.
mp_image = mp.Image.create_from_file('/path/to/image')

# Load the input image from a numpy array.
mp_image = mp.Image(image_format=mp.ImageFormat.SRGB, data=numpy_image)
Video
import mediapipe as mp

# Use OpenCV’s VideoCapture to load the input video.

# Load the frame rate of the video using OpenCV’s CV_CAP_PROP_FPS
# You’ll need it to calculate the timestamp for each frame.

# Loop through each frame in the video using VideoCapture#read()

# Convert the frame received from OpenCV to a MediaPipe’s Image object.
mp_image = mp.Image(image_format=mp.ImageFormat.SRGB, data=numpy_frame_from_opencv)
Live stream
import mediapipe as mp

# Use OpenCV’s VideoCapture to start capturing from the webcam.

# Create a loop to read the latest frame from the camera using VideoCapture#read()

# Convert the frame received from OpenCV to a MediaPipe’s Image object.
mp_image = mp.Image(image_format=mp.ImageFormat.SRGB, data=numpy_frame_from_opencv)
Menjalankan tugas
Face Detector menggunakan fungsi detect, detect_for_video, dan detect_async
untuk memicu inferensi. Untuk deteksi wajah, hal ini mencakup
prapemrosesan data input dan mendeteksi wajah dalam gambar.
Kode berikut menunjukkan cara menjalankan pemrosesan dengan model tugas.
Gambar
# Perform face detection on the provided single image.
# The face detector must be created with the image mode.
face_detector_result = detector.detect(mp_image)
Video
# Perform face detection on the provided single image.
# The face detector must be created with the video mode.
face_detector_result = detector.detect_for_video(mp_image, frame_timestamp_ms)
Live stream
# Send live image data to perform face detection.
# The results are accessible via the `result_callback` provided in
# the `FaceDetectorOptions` object.
# The face detector must be created with the live stream mode.
detector.detect_async(mp_image, frame_timestamp_ms)
Perhatikan hal berikut:
- Saat berjalan dalam mode video atau mode live stream, berikan juga stempel waktu frame input ke tugas Face Detector.
- Saat berjalan dalam model gambar atau video, tugas Detektor Wajah akan memblokir thread saat ini hingga selesai memproses gambar atau frame input.
- Saat berjalan dalam mode live stream, tugas Face Detector akan segera ditampilkan dan tidak memblokir thread saat ini. Fungsi ini akan memanggil pemroses hasil dengan hasil deteksi setiap kali selesai memproses frame input. Jika fungsi deteksi dipanggil saat tugas Face Detector sibuk memproses frame lain, tugas akan mengabaikan frame input baru.
Untuk contoh lengkap menjalankan Face Detector pada gambar, lihat contoh kode untuk mengetahui detailnya.
Menangani dan menampilkan hasil
Face Detector menampilkan objek FaceDetectorResult untuk setiap deteksi
yang dijalankan. Objek hasil berisi kotak pembatas untuk wajah yang terdeteksi dan
skor keyakinan untuk setiap wajah yang terdeteksi.
Berikut adalah contoh data output dari tugas ini:
FaceDetectionResult:
  Detections:
    Detection #0:
      BoundingBox:
        origin_x: 126
        origin_y: 100
        width: 463
        height: 463
      Categories:
        Category #0:
          index: 0
          score: 0.9729152917861938
      NormalizedKeypoints:
        NormalizedKeypoint #0:
          x: 0.18298381567001343
          y: 0.2961040139198303
        NormalizedKeypoint #1:
          x: 0.3302789330482483
          y: 0.29289937019348145
        ... (6 keypoints for each face)
    Detection #1:
      BoundingBox:
        origin_x: 616
        origin_y: 193
        width: 430
        height: 430
      Categories:
        Category #0:
          index: 0
          score: 0.9251380562782288
      NormalizedKeypoints:
        NormalizedKeypoint #0:
          x: 0.6151331663131714
          y: 0.3713381886482239
        NormalizedKeypoint #1:
          x: 0.7460576295852661
          y: 0.38825345039367676
        ... (6 keypoints for each face)
Gambar berikut menunjukkan visualisasi output tugas:
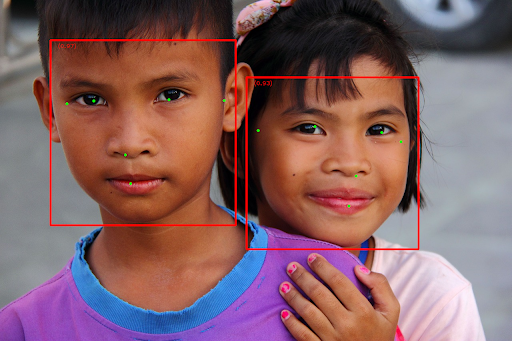
Untuk gambar tanpa kotak pembatas, lihat gambar asli.
Kode contoh Face Detector menunjukkan cara menampilkan hasil yang ditampilkan dari tugas, lihat contoh kode. untuk mengetahui detailnya.