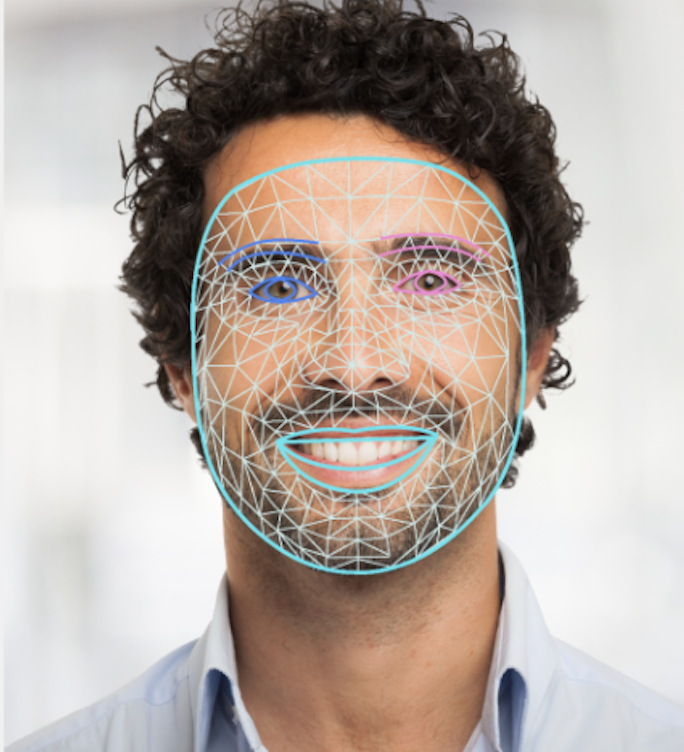
MediaPipe Face Landmarker タスクを使用すると、画像や動画内の顔のランドマークと表情を検出できます。このタスクを使用すると、人間の表情を特定し、顔のフィルタとエフェクトを適用して仮想アバターを作成できます。このタスクでは、単一の画像または連続した画像ストリームを処理できる ML モデルを使用します。このタスクは、3 次元の顔のランドマーク、詳細な顔面サーフェスをリアルタイムで推測するためのブレンドシェイプ スコア(顔の表情を表す係数)、エフェクトのレンダリングに必要な変換を実行するための変換行列を出力します。
これらの手順で説明するコードサンプルは GitHub で入手できます。このタスクの機能、モデル、構成オプションの詳細については、概要をご覧ください。
サンプルコード
Face Landmarker のサンプルコードには、このタスクの Python での完全な実装が含まれています。このコードは、このタスクをテストし、独自の顔ランドマークの作成を開始するのに役立ちます。 Face Landmarker のサンプルコードは、ウェブブラウザだけで表示、実行、編集できます。
Raspberry Pi 用に Face Landmarker を実装する場合は、Raspberry Pi のサンプルアプリをご覧ください。
セットアップ
このセクションでは、Face Landmarker を使用するように開発環境とコード プロジェクトを設定する主な手順について説明します。プラットフォーム バージョンの要件など、MediaPipe タスクを使用する開発環境の設定に関する一般的な情報については、Python の設定ガイドをご覧ください。
パッケージ
MediaPipe Face Landmarker タスクには、mediapipe PyPI パッケージが必要です。これらの依存関係は、次のようにインストールしてインポートできます。
$ python -m pip install mediapipe
インポート
次のクラスをインポートして、Face Landmarker タスク関数にアクセスします。
import mediapipe as mp
from mediapipe.tasks import python
from mediapipe.tasks.python import vision
モデル
MediaPipe Face Landmarker タスクには、このタスクに対応したトレーニング済みモデルが必要です。Face Landmarker で使用可能なトレーニング済みモデルの詳細については、タスクの概要のモデルのセクションをご覧ください。
モデルを選択してダウンロードし、ローカル ディレクトリに保存します。
model_path = '/absolute/path/to/face_landmarker.task'
BaseOptions オブジェクトの model_asset_path パラメータを使用して、使用するモデルのパスを指定します。コード例については、次のセクションをご覧ください。
タスクを作成する
MediaPipe Face Landmarker タスクは、create_from_options 関数を使用してタスクを設定します。create_from_options 関数は、処理する構成オプションの値を受け入れます。構成オプションの詳細については、構成オプションをご覧ください。
次のコードは、このタスクをビルドして構成する方法を示しています。
これらのサンプルでは、画像、動画ファイル、ライブ配信のタスクの作成方法の違いも示しています。
画像
import mediapipe as mp

BaseOptions = mp.tasks.BaseOptions
FaceLandmarker = mp.tasks.vision.FaceLandmarker
FaceLandmarkerOptions = mp.tasks.vision.FaceLandmarkerOptions
VisionRunningMode = mp.tasks.vision.RunningMode

options = FaceLandmarkerOptions(
    base_options=BaseOptions(model_asset_path=model_path),
    running_mode=VisionRunningMode.IMAGE)

with FaceLandmarker.create_from_options(options) as landmarker:
  # The landmarker is initialized. Use it here.
  # ...
動画
import mediapipe as mp

BaseOptions = mp.tasks.BaseOptions
FaceLandmarker = mp.tasks.vision.FaceLandmarker
FaceLandmarkerOptions = mp.tasks.vision.FaceLandmarkerOptions
VisionRunningMode = mp.tasks.vision.RunningMode

# Create a face landmarker instance with the video mode:
options = FaceLandmarkerOptions(
    base_options=BaseOptions(model_asset_path=model_path),
    running_mode=VisionRunningMode.VIDEO)

with FaceLandmarker.create_from_options(options) as landmarker:
  # The landmarker is initialized. Use it here.
  # ...
ライブ配信
import mediapipe as mp

BaseOptions = mp.tasks.BaseOptions
FaceLandmarker = mp.tasks.vision.FaceLandmarker
FaceLandmarkerOptions = mp.tasks.vision.FaceLandmarkerOptions
FaceLandmarkerResult = mp.tasks.vision.FaceLandmarkerResult
VisionRunningMode = mp.tasks.vision.RunningMode

# Create a face landmarker instance with the live stream mode:
def print_result(result: FaceLandmarkerResult, output_image: mp.Image, timestamp_ms: int):
    print('face landmarker result: {}'.format(result))

options = FaceLandmarkerOptions(
    base_options=BaseOptions(model_asset_path=model_path),
    running_mode=VisionRunningMode.LIVE_STREAM,
    result_callback=print_result)

with FaceLandmarker.create_from_options(options) as landmarker:
  # The landmarker is initialized. Use it here.
  # ...
画像で使用する顔ランドマークの作成例については、コード例をご覧ください。
設定オプション
このタスクには、Python アプリケーション用の次の構成オプションがあります。
| オプション名 | 説明 | 値の範囲 | デフォルト値 |
|---|---|---|---|
running_mode |
タスクの実行モードを設定します。モードは次の 3 つです。 IMAGE: 単一画像入力のモード。 動画: 動画のデコードされたフレームのモード。 LIVE_STREAM: カメラなどからの入力データのライブ配信モード。このモードでは、resultListener を呼び出して、結果を非同期で受信するリスナーを設定する必要があります。 |
{IMAGE, VIDEO, LIVE_STREAM} |
IMAGE |
num_faces |
FaceLandmarker で検出できる顔の最大数。スムージングは、num_faces が 1 に設定されている場合にのみ適用されます。 |
Integer > 0 |
1 |
min_face_detection_confidence |
顔検出が成功とみなされるための最小信頼スコア。 | Float [0.0,1.0] |
0.5 |
min_face_presence_confidence |
顔のランドマーク検出における顔の存在スコアの最小信頼度スコア。 | Float [0.0,1.0] |
0.5 |
min_tracking_confidence |
顔トラッキングが成功とみなされるための最小信頼スコア。 | Float [0.0,1.0] |
0.5 |
output_face_blendshapes |
Face Landmarker が顔のブレンドシェイプを出力するかどうか。顔のブレンドシェイプは、3D 顔モデルのレンダリングに使用されます。 | Boolean |
False |
output_facial_transformation_matrixes |
FaceLandmarker が顔変換行列を出力するかどうか。FaceLandmarker は、マトリックスを使用して顔ランドマークを標準の顔モデルから検出された顔に変換します。これにより、ユーザーは検出されたランドマークにエフェクトを適用できます。 | Boolean |
False |
result_callback |
FaceLandmarker がライブ配信モードの場合に、ランドマークの結果を非同期的に受け取るように結果リスナーを設定します。実行モードが LIVE_STREAM に設定されている場合にのみ使用できます。 |
ResultListener |
N/A |
データの準備
入力を画像ファイルまたは NumPy 配列として準備し、mediapipe.Image オブジェクトに変換します。入力が動画ファイルまたはウェブカメラからのライブ配信の場合は、OpenCV などの外部ライブラリを使用して、入力フレームを numpy 配列として読み込むことができます。
画像
import mediapipe as mp

# Load the input image from an image file.
mp_image = mp.Image.create_from_file('/path/to/image')

# Load the input image from a numpy array.
mp_image = mp.Image(image_format=mp.ImageFormat.SRGB, data=numpy_image)
動画
import mediapipe as mp

# Use OpenCV’s VideoCapture to load the input video.

# Load the frame rate of the video using OpenCV’s CV_CAP_PROP_FPS
# You’ll need it to calculate the timestamp for each frame.

# Loop through each frame in the video using VideoCapture#read()

# Convert the frame received from OpenCV to a MediaPipe’s Image object.
mp_image = mp.Image(image_format=mp.ImageFormat.SRGB, data=numpy_frame_from_opencv)
ライブ配信
import mediapipe as mp

# Use OpenCV’s VideoCapture to start capturing from the webcam.

# Create a loop to read the latest frame from the camera using VideoCapture#read()

# Convert the frame received from OpenCV to a MediaPipe’s Image object.
mp_image = mp.Image(image_format=mp.ImageFormat.SRGB, data=numpy_frame_from_opencv)
タスクを実行する
Face Landmarker は、detect、detect_for_video、detect_async 関数を使用して推論をトリガーします。顔のランドマークの場合、入力データの前処理と画像内の顔の検出が必要です。
次のコードは、タスクモデルを使用して処理を実行する方法を示しています。
画像
# Perform face landmarking on the provided single image.
# The face landmarker must be created with the image mode.
face_landmarker_result = landmarker.detect(mp_image)
動画
# Perform face landmarking on the provided single image.
# The face landmarker must be created with the video mode.
face_landmarker_result = landmarker.detect_for_video(mp_image, frame_timestamp_ms)
ライブ配信
# Send live image data to perform face landmarking.
# The results are accessible via the `result_callback` provided in
# the `FaceLandmarkerOptions` object.
# The face landmarker must be created with the live stream mode.
landmarker.detect_async(mp_image, frame_timestamp_ms)
次の点にご注意ください。
- 動画モードまたはライブ配信モードで実行する場合は、Face Landmarker タスクに入力フレームのタイムスタンプも指定します。
- 画像モデルまたは動画モデルで実行する場合、Face Landmarker タスクは、入力画像またはフレームの処理が完了するまで現在のスレッドをブロックします。
- ライブ配信モードで実行すると、Face Landmarker タスクはすぐに返され、現在のスレッドはブロックされません。入力フレームの処理が完了するたびに、検出結果とともに結果リスナーが呼び出されます。Face Landmarker タスクが別のフレームの処理でビジー状態になっているときに検出関数が呼び出されると、タスクは新しい入力フレームを無視します。
画像で Face Landmarker を実行する完全な例については、コードサンプルをご覧ください。
結果を処理して表示する
Face Landmarker は、検出の実行ごとに FaceLandmarkerResult オブジェクトを返します。結果オブジェクトには、検出された各顔の顔メッシュと、各顔ランドマークの座標が含まれます。必要に応じて、結果オブジェクトに、顔の表情を表すブレンドシェイプと、検出されたランドマークに顔エフェクトを適用する顔変換マトリックスを含めることもできます。
このタスクの出力データの例を次に示します。
FaceLandmarkerResult:
  face_landmarks:
    NormalizedLandmark #0:
      x: 0.5971359014511108
      y: 0.485361784696579
      z: -0.038440968841314316
    NormalizedLandmark #1:
      x: 0.3302789330482483
      y: 0.29289937019348145
      z: -0.09489090740680695
    ... (478 landmarks for each face)
  face_blendshapes:
    browDownLeft: 0.8296722769737244
    browDownRight: 0.8096957206726074
    browInnerUp: 0.00035583582939580083
    browOuterUpLeft: 0.00035752105759456754
    ... (52 blendshapes for each face)
  facial_transformation_matrixes:
    [9.99158978e-01, -1.23036895e-02, 3.91213447e-02, -3.70770246e-01]
    [1.66496094e-02,  9.93480563e-01, -1.12779640e-01, 2.27719707e+01]
    ...
次の図は、タスク出力の可視化を示しています。

Face Landmarker のサンプルコードは、タスクから返された結果を表示する方法を示しています。詳細については、コードサンプルをご覧ください。

