
MediaPipe インタラクティブ画像セグメンテーション タスクは、画像内の位置を取り、その位置にあるオブジェクトの境界を推定し、オブジェクトのセグメンテーションを画像データとして返します。ここでは、Python 言語でインタラクティブ画像セグメンテーションを使用する方法について説明します。このタスクの機能、モデル、構成オプションの詳細については、概要をご覧ください。
サンプルコード
インタラクティブ画像セグメンテーションのサンプルコードには、このタスクの Python での完全な実装が示されています。このコードは、このタスクをテストし、独自のインタラクティブな画像分割アプリケーションの作成を開始するのに役立ちます。インタラクティブ画像セグメンテーションのサンプルコードは、ウェブブラウザだけで表示、実行、編集できます。
セットアップ
このセクションでは、インタラクティブ イメージ セグメンタを使用するように開発環境とコード プロジェクトを設定する主な手順について説明します。プラットフォーム バージョンの要件など、MediaPipe タスクを使用する開発環境の設定に関する一般的な情報については、Python の設定ガイドをご覧ください。この例のソースコードは GitHub で確認できます。
パッケージ
MediaPipe インタラクティブ画像セグメンテーション タスクには mediapipe パッケージが必要です。必要な依存関係は、次のコマンドでインストールできます。
$ python -m pip install mediapipe
インポート
インタラクティブ画像セグメンテーション タスクの関数にアクセスするには、次のクラスをインポートします。
import mediapipe as mp
from mediapipe.tasks import python
from mediapipe.tasks.python import vision
モデル
MediaPipe インタラクティブ画像セグメンテーション タスクには、このタスクに対応したトレーニング済みモデルが必要です。インタラクティブ画像セグメンテーションで使用可能なトレーニング済みモデルの詳細については、タスクの概要のモデルのセクションをご覧ください。
モデルを選択してダウンロードし、プロジェクト ディレクトリに保存します。
model_path = '/absolute/path/to/model.tflite'
次のように、model_asset_path パラメータ内にモデルのパスを指定します。
base_options = BaseOptions(model_asset_path=model_path)
タスクを作成する
MediaPipe インタラクティブ画像セグメンテーション タスクは、create_from_options 関数を使用してタスクを設定します。create_from_options 関数は、処理する構成オプションの値を受け入れます。構成オプションの詳細については、構成オプションをご覧ください。次のコードは、このタスクをビルドして構成する方法を示しています。
BaseOptions = mp.tasks.BaseOptions
InteractiveSegmenter = mp.tasks.vision.InteractiveSegmenter
InteractiveSegmenterOptions = mp.tasks.vision.InteractiveSegmenterOptions
VisionRunningMode = mp.tasks.vision.RunningMode

# Create a image segmenter instance with the image mode:
options = InteractiveSegmenterOptions(
    base_options=BaseOptions(model_asset_path='/path/to/model.task'),
    running_mode=VisionRunningMode.IMAGE,
    output_type=InteractiveSegmenterOptions.OutputType.CATEGORY_MASK)
with InteractiveSegmenter.create_from_options(options) as segmenter:
# segmenter is initialized and ready to use
設定オプション
このタスクには、Python アプリケーション用の次の構成オプションがあります。
| オプション名 | 説明 | 値の範囲 | デフォルト値 |
|---|---|---|---|
output_category_mask |
True に設定した場合、出力には uint8 画像としてセグメンテーション マスクが含まれます。各ピクセル値は、ピクセルが関心領域にあるオブジェクトの一部であるかどうかを示します。 |
{True, False} |
False |
output_confidence_masks |
True に設定すると、出力には浮動小数点値画像としてセグメンテーション マスクが含まれます。各浮動小数点値は、ピクセルが対象領域にあるオブジェクトの一部であるという信頼度を表します。 |
{True, False} |
True |
display_names_locale |
タスクのモデルのメタデータで指定されている表示名に使用するラベルの言語を設定します(利用可能な場合)。デフォルトは英語で en です。TensorFlow Lite Metadata Writer API を使用して、カスタムモデルのメタデータにローカライズされたラベルを追加できます。 | 言語 / 地域コード | en |
データの準備
入力を画像ファイルまたは NumPy 配列として準備し、mediapipe.Image オブジェクトに変換します。
# Load the input image from an image file.
mp_image = mp.Image.create_from_file('/path/to/image')

# Load the input image from a numpy array.
mp_image = mp.Image(image_format=mp.ImageFormat.SRGB, data=numpy_image)
インタラクティブ画像セグメンテーション用のデータの準備を示すコード例については、コード例をご覧ください。
タスクを実行する
インタラクティブ画像セグメンタは、segment 関数を使用して推論をトリガーします。画像セグメンテーションの場合、これには入力データの前処理、セグメンテーション モデルの実行、未加工モデル出力の後処理によるセグメント化マスクの作成が含まれます。
次のコード例は、タスクモデルを使用して処理を実行する方法を示しています。
RegionOfInterest = vision.InteractiveSegmenterRegionOfInterest
# Perform image segmentation on the provided single image.
# The image segmenter must be created with the image mode.
roi = RegionOfInterest(format=RegionOfInterest.Format.KEYPOINT,
                          keypoint=NormalizedKeypoint(x, y))
segmented_masks = segmenter.segment(mp_image, roi)
インタラクティブ画像セグメンテーション推論の実行の詳細な例については、コードサンプルをご覧ください。
結果を処理して表示する
インタラクティブ画像セグメンテーションの出力結果は Image データのリストです。タスクの構成時に設定した内容に応じて、カテゴリ マスク、信頼度マスク、またはその両方が含まれる場合があります。output_category_mask を True に設定すると、出力は、単一のセグメント化されたマスクを uint8 画像として含むリストになります。ピクセル値は、対象領域内のオブジェクトの一部であるかどうかを示します。入力画像の認識されたカテゴリ インデックス。output_confidence_masks を True に設定すると、出力は、関心領域のオブジェクトに属するピクセルの信頼スコアを表す [0,1] の範囲内のピクセル値を含むチャネルのリストになります。
以降のセクションでは、このタスクの出力データについて詳しく説明します。
カテゴリ マスク
次の画像は、関心領域の点が表示されたカテゴリ値マスクのタスク出力の可視化を示しています。各ピクセルは、ピクセルが対象領域にあるオブジェクトの一部であるかどうかを示す uint8 値です。2 番目の画像の白黒の円は、選択した対象領域を示しています。
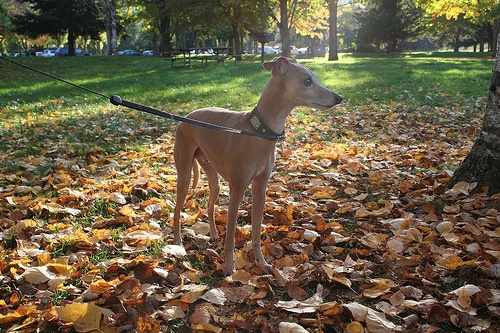
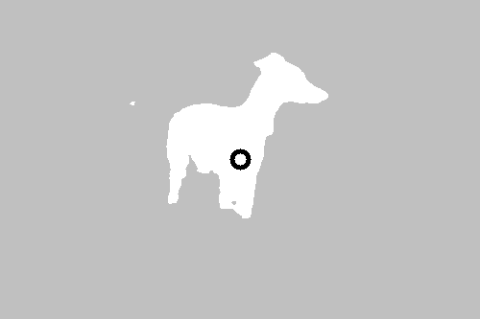
元の画像とカテゴリ マスクの出力。Pascal VOC 2012 データセットのソース画像。
信頼度マスク
信頼度マスクの出力には、各画像入力チャネルの [0, 1] の間の浮動小数点値が含まれます。値が大きいほど、画像ピクセルが対象領域にあるオブジェクトの一部である可能性が高いことを示します。