
オブジェクト検出タスクを使用すると、複数のクラスのオブジェクトの存在と位置を検出できます。たとえば、オブジェクト検出機能では、画像内の犬を特定できます。以下では、iOS でオブジェクト検出タスクを使用する方法について説明します。これらの手順で説明するコードサンプルは GitHub で入手できます。
このタスクの動作を確認するには、こちらのウェブデモをご覧ください。このタスクの機能、モデル、構成オプションの詳細については、概要をご覧ください。
サンプルコード
MediaPipe Tasks のサンプルコードは、iOS 向けのオブジェクト検出アプリの基本的な実装です。この例では、物理的な iOS デバイスのカメラを使用してオブジェクトを継続的に検出します。また、デバイスのギャラリーにある画像や動画を使用して、オブジェクトを静的に検出することもできます。
このアプリは、独自の iOS アプリの開始点として使用できます。また、既存のアプリを変更する際にも参照できます。オブジェクト検出のサンプルコードは GitHub でホストされています。
コードをダウンロードする
次の手順では、git コマンドライン ツールを使用してサンプルコードのローカルコピーを作成する方法について説明します。
サンプルコードをダウンロードするには:
次のコマンドを使用して、Git リポジトリのクローンを作成します。
git clone https://github.com/google-ai-edge/mediapipe-samples必要に応じて、オブジェクト検出サンプルアプリのファイルのみが取得されるように、スパース チェックアウトを使用するように Git インスタンスを構成します。
cd mediapipe-samples
git sparse-checkout init --cone
git sparse-checkout set examples/object_detection/ios/
ローカル バージョンのサンプルコードを作成したら、MediaPipe タスク ライブラリをインストールし、Xcode を使用してプロジェクトを開いてアプリを実行できます。手順については、iOS 用セットアップ ガイドをご覧ください。
主要コンポーネント
次のファイルには、Object Detector サンプル アプリケーションの重要なコードが含まれています。
- ObjectDetectorService.swift: 検出機能を初期化し、モデル選択を処理し、入力データに対して推論を実行します。
- CameraViewController.swift: ライブカメラ フィード入力モードの UI を実装し、検出結果を可視化します。
- MediaLibraryViewController.swift: 静止画像と動画ファイルの入力モードの UI を実装し、検出結果を可視化します。
セットアップ
このセクションでは、Object Detector を使用するように開発環境とコード プロジェクトを設定する主な手順について説明します。プラットフォーム バージョンの要件など、MediaPipe タスクを使用する開発環境の設定に関する一般的な情報については、iOS 用セットアップ ガイドをご覧ください。
依存関係
オブジェクト検出機能は MediaPipeTasksVision ライブラリを使用します。このライブラリは CocoaPods を使用してインストールする必要があります。このライブラリは Swift アプリと Objective-C アプリの両方に対応しており、言語固有の追加設定は必要ありません。
macOS に CocoaPods をインストールする手順については、CocoaPods インストール ガイドをご覧ください。アプリに必要な Pod を使用して Podfile を作成する方法については、CocoaPods の使用をご覧ください。
次のコードを使用して、Podfile に MediaPipeTasksVision Pod を追加します。
target 'MyObjectDetectorApp' do
  use_frameworks!
  pod 'MediaPipeTasksVision'
end
アプリに単体テスト ターゲットが含まれている場合は、Podfile の設定について詳しくは、iOS 用セットアップ ガイドをご覧ください。
モデル
MediaPipe オブジェクト検出タスクには、このタスクに対応したトレーニング済みモデルが必要です。オブジェクト検出機能で使用可能なトレーニング済みモデルの詳細については、タスクの概要のモデルセクションをご覧ください。
モデルを選択してダウンロードし、Xcode を使用してプロジェクト ディレクトリに追加します。Xcode プロジェクトにファイルを追加する方法については、Xcode プロジェクト内のファイルとフォルダを管理するをご覧ください。
BaseOptions.modelAssetPath プロパティを使用して、アプリバンドルのモデルのパスを指定します。コード例については、次のセクションをご覧ください。
タスクを作成する
オブジェクト検出タスクを作成するには、いずれかの初期化子を呼び出します。ObjectDetector(options:) イニシャライザは、実行モード、表示名のロケール、結果の最大数、信頼度しきい値、カテゴリの許可リストと拒否リストなどの構成オプションの値を設定します。
カスタマイズされた構成オプションで初期化されたオブジェクト検出が不要な場合は、ObjectDetector(modelPath:) イニシャライザを使用して、デフォルト オプションでオブジェクト検出を作成できます。構成オプションの詳細については、構成の概要をご覧ください。
オブジェクト検出タスクは、静止画像、動画ファイル、ライブ動画ストリームの 3 つの入力データ型をサポートしています。デフォルトでは、ObjectDetector(modelPath:) は静止画像のタスクを初期化します。動画ファイルまたはライブ動画ストリームを処理するようにタスクを初期化する場合は、ObjectDetector(options:) を使用して動画またはライブ配信の実行モードを指定します。ライブ配信モードでは、オブジェクト検出機能が検出結果を非同期でデリゲートに配信できるように、objectDetectorLiveStreamDelegate 構成オプションも追加する必要があります。
実行モードに対応するタブを選択して、タスクを作成し推論を実行する方法を確認します。
Swift
画像
import MediaPipeTasksVision

let modelPath = Bundle.main.path(forResource: "model",
                                      ofType: "tflite")

let options = ObjectDetectorOptions()
options.baseOptions.modelAssetPath = modelPath
options.runningMode = .image
options.maxResults = 5

let objectDetector = try ObjectDetector(options: options)
動画
import MediaPipeTasksVision

let modelPath = Bundle.main.path(forResource: "model",
                                      ofType: "tflite")

let options = ObjectDetectorOptions()
options.baseOptions.modelAssetPath = modelPath
options.runningMode = .video
options.maxResults = 5

let objectDetector = try ObjectDetector(options: options)
ライブ配信
import MediaPipeTasksVision

// Class that conforms to the `ObjectDetectorLiveStreamDelegate` protocol and
// implements the method that the object detector calls once it
// finishes performing detection on each input frame.
class ObjectDetectorResultProcessor: NSObject, ObjectDetectorLiveStreamDelegate {

  func objectDetector(
    _ objectDetector: ObjectDetector,
    didFinishDetection objectDetectionResult: ObjectDetectorResult?,
    timestampInMilliseconds: Int,
    error: Error?) {
    // Process the detection result or errors here.
  }
}

let modelPath = Bundle.main.path(forResource: "model",
                                      ofType: "tflite")

let options = ObjectDetectorOptions()
options.baseOptions.modelAssetPath = modelPath
options.runningMode = .liveStream
options.maxResults = 5

// Assign an object of the class to the `objectDetectorLiveStreamDelegate`
// property.
let processor = ObjectDetectorResultProcessor()
options.objectDetectorLiveStreamDelegate = processor

let objectDetector = try ObjectDetector(options: options)
Objective-C
画像
@import MediaPipeTasksVision;

NSString *modelPath = [[NSBundle mainBundle] pathForResource:@"model"
                                                      ofType:@"tflite"];

MPPObjectDetectorOptions *options = [[MPPObjectDetectorOptions alloc] init];
options.baseOptions.modelAssetPath = modelPath;
options.runningMode = MPPRunningModeImage;
options.maxResults = 5;

MPPObjectDetector *objectDetector =
      [[MPPObjectDetector alloc] initWithOptions:options error:nil];
動画
@import MediaPipeTasksVision;

NSString *modelPath = [[NSBundle mainBundle] pathForResource:@"model"
                                                      ofType:@"tflite"];

MPPObjectDetectorOptions *options = [[MPPObjectDetectorOptions alloc] init];
options.baseOptions.modelAssetPath = modelPath;
options.runningMode = MPPRunningModeVideo;
options.maxResults = 5;

MPPObjectDetector *objectDetector =
      [[MPPObjectDetector alloc] initWithOptions:options error:nil];
ライブ配信
@import MediaPipeTasksVision; // Class that conforms to the `ObjectDetectorLiveStreamDelegate` protocol and // implements the method that the object detector calls once it // finishes performing detection on each input frame. @interface APPObjectDetectorResultProcessor : NSObject@end @implementation MPPObjectDetectorResultProcessor - (void)objectDetector:(MPPObjectDetector *)objectDetector didFinishDetectionWithResult:(MPPObjectDetectorResult *)ObjectDetectorResult timestampInMilliseconds:(NSInteger)timestampInMilliseconds error:(NSError *)error { // Process the detection result or errors here. } @end NSString *modelPath = [[NSBundle mainBundle] pathForResource:@"model" ofType:@"tflite"]; MPPObjectDetectorOptions *options = [[MPPObjectDetectorOptions alloc] init]; options.baseOptions.modelAssetPath = modelPath; options.runningMode = MPPRunningModeLiveStream; options.maxResults = 5; // Assign an object of the class to the `objectDetectorLiveStreamDelegate` // property. APPObjectDetectorResultProcessor *processor = [APPObjectDetectorResultProcessor new]; options.objectDetectorLiveStreamDelegate = processor; MPPObjectDetector *objectDetector = [[MPPObjectDetector alloc] initWithOptions:options error:nil];
設定オプション
このタスクには、iOS アプリ用の次の構成オプションがあります。
| オプション名 | 説明 | 値の範囲 | デフォルト値 |
|---|---|---|---|
runningMode |
タスクの実行モードを設定します。モードは次の 3 つです。 IMAGE: 単一画像入力のモード。 動画: 動画のデコードされたフレームのモード。 LIVE_STREAM: カメラなどからの入力データのライブ配信モード。このモードでは、resultListener を呼び出して、結果を非同期で受信するリスナーを設定する必要があります。 |
{RunningMode.image, RunningMode.video, RunningMode.liveStream} |
RunningMode.image |
displayNamesLocales |
タスクのモデルのメタデータで指定されている表示名に使用するラベルの言語を設定します(利用可能な場合)。デフォルトは英語で en です。TensorFlow Lite Metadata Writer API を使用して、カスタムモデルのメタデータにローカライズされたラベルを追加できます。 |
言語 / 地域コード | en |
maxResults |
返されるスコア上位の検出結果の最大数を設定します(省略可)。 | 任意の正の数 | -1(すべての結果が返されます) |
scoreThreshold |
モデル メタデータで指定された予測スコアしきい値(存在する場合)をオーバーライドする予測スコアしきい値を設定します。この値を下回る結果は拒否されます。 | 任意の浮動小数点数 | 未設定 |
categoryAllowlist |
許可されるカテゴリ名のリスト(省略可)。空でない場合、このセットにカテゴリ名が含まれていない検出結果は除外されます。重複するカテゴリ名または不明なカテゴリ名は無視されます。このオプションは categoryDenylist とは相互に排他的であり、両方を使用するとエラーが発生します。 |
任意の文字列 | 未設定 |
categoryDenylist |
許可されないカテゴリ名のリスト(省略可)。空でない場合、このセットにカテゴリ名が含まれている検出結果は除外されます。重複するカテゴリ名または不明なカテゴリ名は無視されます。このオプションは categoryAllowlist と相互排他的であり、両方を使用するとエラーが発生します。 |
任意の文字列 | 未設定 |
ライブ配信の設定
実行モードがライブ配信に設定されている場合、オブジェクト検出には追加の objectDetectorLiveStreamDelegate 構成オプションが必要です。これにより、検出結果を非同期で配信できます。デリゲートには objectDetector(_objectDetector:didFinishDetection:timestampInMilliseconds:error:) メソッドを実装します。このメソッドは、各フレームの検出結果を処理した後にオブジェクト検出によって呼び出されます。
| オプション名 | 説明 | 値の範囲 | デフォルト値 |
|---|---|---|---|
objectDetectorLiveStreamDelegate |
オブジェクト検出がライブ配信モードで検出結果を非同期的に受信できるようにします。このプロパティにインスタンスが設定されているクラスは、objectDetector(_:didFinishDetection:timestampInMilliseconds:error:) メソッドを実装する必要があります。 |
該当なし | 未設定 |
データの準備
入力画像またはフレームをオブジェクト検出機能に渡す前に、MPImage オブジェクトに変換する必要があります。MPImage はさまざまな種類の iOS 画像形式をサポートしており、推論の実行モードで使用できます。MPImage の詳細については、MPImage API をご覧ください。
ユースケースと、アプリに必要な実行モードに基づいて iOS イメージ形式を選択します。MPImage は、UIImage、CVPixelBuffer、CMSampleBuffer の iOS イメージ形式を受け入れます。
UIImage
UIImage 形式は、次の実行モードに適しています。
画像: アプリバンドル、ユーザー ギャラリー、または
UIImageイメージとしてフォーマットされたファイル システムの画像は、MPImageオブジェクトに変換できます。動画: AVAssetImageGenerator を使用して動画フレームを CGImage 形式に抽出し、
UIImage画像に変換します。
Swift
// Load an image on the user's device as an iOS `UIImage` object.

// Convert the `UIImage` object to a MediaPipe's Image object having the default
// orientation `UIImage.Orientation.up`.
let image = try MPImage(uiImage: image)
Objective-C
// Load an image on the user's device as an iOS `UIImage` object.

// Convert the `UIImage` object to a MediaPipe's Image object having the default
// orientation `UIImageOrientationUp`.
MPImage *image = [[MPPImage alloc] initWithUIImage:image error:nil];
この例では、デフォルトの UIImage.Orientation.Up の向きで MPImage を初期化しています。MPImage は、サポートされている UIImage.Orientation 値のいずれかで初期化できます。オブジェクト検出では、.upMirrored、.downMirrored、.leftMirrored、.rightMirrored などのミラーリングされた向きはサポートされていません。
UIImage の詳細については、UIImage Apple デベロッパー ドキュメントをご覧ください。
CVPixelBuffer
CVPixelBuffer 形式は、フレームを生成し、iOS の CoreImage フレームワークを使用して処理するアプリケーションに適しています。
CVPixelBuffer 形式は、次の実行モードに適しています。
画像: iOS の
CoreImageフレームワークを使用して処理を行った後にCVPixelBuffer画像を生成するアプリは、画像実行モードのオブジェクト検出機能に送信できます。動画: 動画フレームは処理用に
CVPixelBuffer形式に変換してから、動画モードのオブジェクト検出機能に送信できます。ライブ配信: iOS カメラを使用してフレームを生成するアプリは、処理のために
CVPixelBuffer形式に変換された後、ライブ配信モードのオブジェクト検出機能に送信されます。
Swift
// Obtain a CVPixelBuffer.

// Convert the `CVPixelBuffer` object to a MediaPipe's Image object having the default
// orientation `UIImage.Orientation.up`.
let image = try MPImage(pixelBuffer: pixelBuffer)
Objective-C
// Obtain a CVPixelBuffer.

// Convert the `CVPixelBuffer` object to a MediaPipe's Image object having the
// default orientation `UIImageOrientationUp`.
MPImage *image = [[MPPImage alloc] initWithUIImage:image error:nil];
CVPixelBuffer の詳細については、CVPixelBuffer Apple デベロッパー ドキュメントをご覧ください。
CMSampleBuffer
CMSampleBuffer 形式は、統一されたメディアタイプのメディア サンプルを保存し、ライブ配信の実行モードに適しています。iOS カメラのライブフレームは、iOS の AVCaptureVideoDataOutput によって CMSampleBuffer 形式で非同期的に配信されます。
Swift
// Obtain a CMSampleBuffer.

// Convert the `CMSampleBuffer` object to a MediaPipe's Image object having the default
// orientation `UIImage.Orientation.up`.
let image = try MPImage(sampleBuffer: sampleBuffer)
Objective-C
// Obtain a `CMSampleBuffer`.

// Convert the `CMSampleBuffer` object to a MediaPipe's Image object having the
// default orientation `UIImageOrientationUp`.
MPImage *image = [[MPPImage alloc] initWithSampleBuffer:sampleBuffer error:nil];
CMSampleBuffer の詳細については、CMSampleBuffer Apple デベロッパー ドキュメントをご覧ください。
タスクを実行する
オブジェクト検出機能を実行するには、割り当てられた実行モードに固有の detect() メソッドを使用します。
- 静止画像:
detect(image:) - 動画:
detect(videoFrame:timestampInMilliseconds:) - livestream:
detectAsync(image:)
次のコードサンプルは、これらのさまざまな実行モードでオブジェクト検出を実行する方法の基本的な例を示しています。
Swift
画像
let objectDetector.detect(image:image)
動画
let objectDetector.detect(videoFrame:image)
ライブ配信
let objectDetector.detectAsync(image:image)
Objective-C
画像
MPPObjectDetectorResult *result = [objectDetector detectInImage:image error:nil];
動画
MPPObjectDetectorResult *result = [objectDetector detectInVideoFrame:image timestampInMilliseconds:timestamp error:nil];
ライブ配信
BOOL success = [objectDetector detectAsyncInImage:image
                          timestampInMilliseconds:timestamp
                                            error:nil];
オブジェクト検出器のコード例では、これらのモード(detect(image:)、detect(videoFrame:)、detectAsync(image:))の実装について詳しく説明しています。サンプルコードでは、ユーザーが処理モードを切り替えることができますが、ユースケースで必要ない場合もあります。
次の点にご注意ください。
動画モードまたはライブ配信モードで実行する場合は、入力フレームのタイムスタンプをオブジェクト検出タスクに指定する必要があります。
画像モードまたは動画モードで実行する場合、オブジェクト検出タスクは、入力画像またはフレームの処理が完了するまで現在のスレッドをブロックします。現在のスレッドをブロックしないようにするには、iOS の Dispatch フレームワークまたは NSOperation フレームワークを使用して、バックグラウンド スレッドで処理を実行します。
ライブ配信モードで実行すると、オブジェクト検出タスクはすぐに返され、現在のスレッドはブロックされません。各入力フレームを処理した後、検出結果を使用して
objectDetector(_objectDetector:didFinishDetection:timestampInMilliseconds:error:)メソッドを呼び出します。オブジェクト検出機能は、専用のシリアル ディスパッチ キューでこのメソッドを非同期的に呼び出します。結果をユーザー インターフェースに表示するには、結果を処理した後に結果をメインキューにディスパッチします。Object Detection タスクが別のフレームの処理でビジー状態になっているときにdetectAsync関数が呼び出されると、Object Detection は新しい入力フレームを無視します。
結果を処理して表示する
推論を実行すると、オブジェクト検出タスクは、入力画像で検出されたオブジェクトを記述する ObjectDetectorResult オブジェクトを返します。
このタスクの出力データの例を次に示します。
ObjectDetectorResult:
 Detection #0:
  Box: (x: 355, y: 133, w: 190, h: 206)
  Categories:
   index       : 17
   score       : 0.73828
   class name  : dog
 Detection #1:
  Box: (x: 103, y: 15, w: 138, h: 369)
  Categories:
   index       : 17
   score       : 0.73047
   class name  : dog
次の画像は、タスク出力の可視化を示しています。
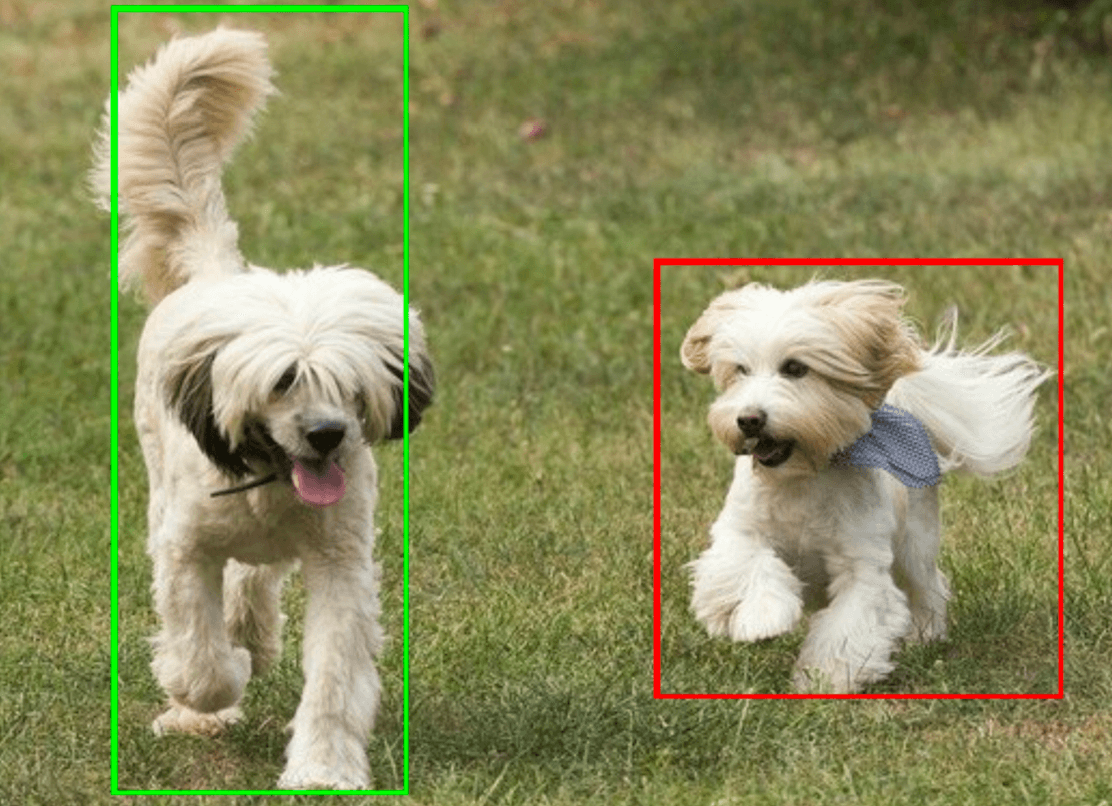
オブジェクト検出のサンプルコードでは、タスクから返された検出結果を表示する方法を示しています。詳細については、コードサンプルをご覧ください。