
|
|
|
 Xem nguồn trên GitHub Xem nguồn trên GitHub
|
Tổng quan
Trong sổ tay này, bạn sẽ tìm hiểu cách sử dụng các phương thức nhúng do API Gemini tạo ra để huấn luyện một mô hình có thể phân loại nhiều loại bài đăng trong nhóm tin dựa trên chủ đề.
Trong hướng dẫn này, bạn sẽ huấn luyện một thuật toán phân loại để dự đoán xem một bài đăng của nhóm tin tức sẽ thuộc lớp nào.
Điều kiện tiên quyết
Bạn có thể chạy quy trình hướng dẫn nhanh này trong Google Colab.
Để hoàn tất quá trình bắt đầu nhanh này trên môi trường phát triển của riêng bạn, hãy đảm bảo rằng môi trường của bạn đáp ứng các yêu cầu sau:
- Python 3.9 trở lên
- Cài đặt
jupyterđể chạy sổ tay.
Thiết lập
Trước tiên, hãy tải xuống và cài đặt thư viện Gemini API Python.
pip install -U -q google.generativeai
import re
import tqdm
import keras
import numpy as np
import pandas as pd

import google.generativeai as genai
import google.ai.generativelanguage as glm

# Used to securely store your API key
from google.colab import userdata

import seaborn as sns
import matplotlib.pyplot as plt

from keras import layers
from matplotlib.ticker import MaxNLocator
from sklearn.datasets import fetch_20newsgroups
import sklearn.metrics as skmetrics
Lấy khoá API
Để có thể sử dụng API Gemini, trước tiên, bạn phải có được khoá API. Nếu bạn chưa có khoá, hãy tạo khoá chỉ bằng một lần nhấp trong Google AI Studio.
Trong Colab, hãy thêm khoá vào trình quản lý khoá bí mật trong mục "🔑" trên bảng điều khiển bên trái. Đặt tên cho API_KEY.
Sau khi bạn có khoá API, hãy truyền khoá đó vào SDK. Bạn có thể làm điều này theo hai cách:
- Đặt khoá vào biến môi trường
GOOGLE_API_KEY(SDK sẽ tự động nhận khoá từ đó). - Truyền khoá đến
genai.configure(api_key=...)
# Or use `os.getenv('API_KEY')` to fetch an environment variable.
API_KEY=userdata.get('API_KEY')

genai.configure(api_key=API_KEY)
for m in genai.list_models():
  if 'embedContent' in m.supported_generation_methods:
    print(m.name)
models/embedding-001
models/embedding-001
Tập dữ liệu
20 Tập dữ liệu văn bản về nhóm tin chứa 18.000 bài đăng về nhóm tin tức về 20 chủ đề,được chia thành các bộ huấn luyện và kiểm thử. Sự phân chia giữa tập dữ liệu huấn luyện và tập dữ liệu kiểm tra dựa trên các thông báo đăng trước và sau một ngày cụ thể. Đối với hướng dẫn này, bạn sẽ sử dụng các tập hợp con của tập dữ liệu huấn luyện và kiểm thử. Bạn sẽ xử lý trước và sắp xếp dữ liệu vào các khung dữ liệu của Pandas.
newsgroups_train = fetch_20newsgroups(subset='train')
newsgroups_test = fetch_20newsgroups(subset='test')

# View list of class names for dataset
newsgroups_train.target_names
['alt.atheism',
 'comp.graphics',
 'comp.os.ms-windows.misc',
 'comp.sys.ibm.pc.hardware',
 'comp.sys.mac.hardware',
 'comp.windows.x',
 'misc.forsale',
 'rec.autos',
 'rec.motorcycles',
 'rec.sport.baseball',
 'rec.sport.hockey',
 'sci.crypt',
 'sci.electronics',
 'sci.med',
 'sci.space',
 'soc.religion.christian',
 'talk.politics.guns',
 'talk.politics.mideast',
 'talk.politics.misc',
 'talk.religion.misc']
Dưới đây là một ví dụ về hình thức của điểm dữ liệu trong tập huấn luyện.
idx = newsgroups_train.data[0].index('Lines')
print(newsgroups_train.data[0][idx:])
Lines: 15

 I was wondering if anyone out there could enlighten me on this car I saw
the other day. It was a 2-door sports car, looked to be from the late 60s/
early 70s. It was called a Bricklin. The doors were really small. In addition,
the front bumper was separate from the rest of the body. This is
all I know. If anyone can tellme a model name, engine specs, years
of production, where this car is made, history, or whatever info you
have on this funky looking car, please e-mail.

Thanks,

- IL
   ---- brought to you by your neighborhood Lerxst ----
Bây giờ, bạn sẽ bắt đầu xử lý trước dữ liệu cho hướng dẫn này. Xoá mọi thông tin nhạy cảm như tên, email hoặc phần thừa của văn bản như "From: " và "\nSubject: ". Sắp xếp thông tin vào khung dữ liệu của Pandas để dễ đọc hơn.
def preprocess_newsgroup_data(newsgroup_dataset):
  # Apply functions to remove names, emails, and extraneous words from data points in newsgroups.data
  newsgroup_dataset.data = [re.sub(r'[\w\.-]+@[\w\.-]+', '', d) for d in newsgroup_dataset.data] # Remove email
  newsgroup_dataset.data = [re.sub(r"\([^()]*\)", "", d) for d in newsgroup_dataset.data] # Remove names
  newsgroup_dataset.data = [d.replace("From: ", "") for d in newsgroup_dataset.data] # Remove "From: "
  newsgroup_dataset.data = [d.replace("\nSubject: ", "") for d in newsgroup_dataset.data] # Remove "\nSubject: "

  # Cut off each text entry after 5,000 characters
  newsgroup_dataset.data = [d[0:5000] if len(d) > 5000 else d for d in newsgroup_dataset.data]

  # Put data points into dataframe
  df_processed = pd.DataFrame(newsgroup_dataset.data, columns=['Text'])
  df_processed['Label'] = newsgroup_dataset.target
  # Match label to target name index
  df_processed['Class Name'] = ''
  for idx, row in df_processed.iterrows():
    df_processed.at[idx, 'Class Name'] = newsgroup_dataset.target_names[row['Label']]

  return df_processed
# Apply preprocessing function to training and test datasets
df_train = preprocess_newsgroup_data(newsgroups_train)
df_test = preprocess_newsgroup_data(newsgroups_test)

df_train.head()
Tiếp theo, bạn sẽ lấy mẫu một số dữ liệu bằng cách lấy 100 điểm dữ liệu trong tập dữ liệu huấn luyện và loại bỏ một vài danh mục để chạy theo hướng dẫn này. Chọn danh mục khoa học để so sánh.
def sample_data(df, num_samples, classes_to_keep):
  df = df.groupby('Label', as_index = False).apply(lambda x: x.sample(num_samples)).reset_index(drop=True)

  df = df[df['Class Name'].str.contains(classes_to_keep)]

  # Reset the encoding of the labels after sampling and dropping certain categories
  df['Class Name'] = df['Class Name'].astype('category')
  df['Encoded Label'] = df['Class Name'].cat.codes

  return df
TRAIN_NUM_SAMPLES = 100
TEST_NUM_SAMPLES = 25
CLASSES_TO_KEEP = 'sci' # Class name should contain 'sci' in it to keep science categories
df_train = sample_data(df_train, TRAIN_NUM_SAMPLES, CLASSES_TO_KEEP)
df_test = sample_data(df_test, TEST_NUM_SAMPLES, CLASSES_TO_KEEP)
df_train.value_counts('Class Name')
Class Name
sci.crypt          100
sci.electronics    100
sci.med            100
sci.space          100
dtype: int64
df_test.value_counts('Class Name')
Class Name
sci.crypt          25
sci.electronics    25
sci.med            25
sci.space          25
dtype: int64
Tạo các video nhúng
Trong phần này, bạn sẽ tìm hiểu cách tạo tính năng nhúng cho một đoạn văn bản bằng cách sử dụng tính năng nhúng từ API Gemini. Để tìm hiểu thêm về tính năng nhúng, hãy xem hướng dẫn về tính năng nhúng.
Thay đổi API đối với Nhúng nhúng-001
Đối với mô hình nhúng mới, có một tham số loại tác vụ mới và tiêu đề không bắt buộc (chỉ hợp lệ với task_type=RETRIEVAL_DOCUMENT).
Các thông số mới này chỉ áp dụng cho các mô hình nhúng mới nhất.Các loại tác vụ là:
| Loại việc cần làm | Nội dung mô tả |
|---|---|
| RETRIEVAL_QUERY | Chỉ định văn bản đã cho là truy vấn trong cài đặt tìm kiếm/truy xuất. |
| RETRIEVAL_DOCUMENT | Chỉ định văn bản đã cho là một tài liệu trong cài đặt tìm kiếm/truy xuất. |
| SEMANTIC_SIMILARITY | Chỉ định văn bản đã cho sẽ được dùng cho tính tương đồng về mặt ngữ nghĩa (STS). |
| PHÂN LOẠI | Chỉ định việc các nội dung nhúng sẽ được dùng để phân loại. |
| CỤM | Chỉ định việc các nội dung nhúng sẽ được dùng để phân cụm. |
from tqdm.auto import tqdm
tqdm.pandas()

from google.api_core import retry

def make_embed_text_fn(model):

  @retry.Retry(timeout=300.0)
  def embed_fn(text: str) -> list[float]:
    # Set the task_type to CLASSIFICATION.
    embedding = genai.embed_content(model=model,
                                    content=text,
                                    task_type="classification")
    return embedding['embedding']

  return embed_fn

def create_embeddings(model, df):
  df['Embeddings'] = df['Text'].progress_apply(make_embed_text_fn(model))
  return df
model = 'models/embedding-001'
df_train = create_embeddings(model, df_train)
df_test = create_embeddings(model, df_test)
0%|          | 0/400 [00:00<?, ?it/s]
0%|          | 0/100 [00:00<?, ?it/s]
df_train.head()
Xây dựng mô hình phân loại đơn giản
Ở đây, bạn sẽ xác định một mô hình đơn giản có một lớp ẩn và một đầu ra xác suất của lớp. Dự đoán sẽ tương ứng với xác suất một đoạn văn bản là một loại tin tức cụ thể. Khi bạn xây dựng mô hình, Keras sẽ tự động trộn các điểm dữ liệu.
def build_classification_model(input_size: int, num_classes: int) -> keras.Model:
  inputs = x = keras.Input(input_size)
  x = layers.Dense(input_size, activation='relu')(x)
  x = layers.Dense(num_classes, activation='sigmoid')(x)
  return keras.Model(inputs=[inputs], outputs=x)
# Derive the embedding size from the first training element.
embedding_size = len(df_train['Embeddings'].iloc[0])

# Give your model a different name, as you have already used the variable name 'model'
classifier = build_classification_model(embedding_size, len(df_train['Class Name'].unique()))
classifier.summary()

classifier.compile(loss = keras.losses.SparseCategoricalCrossentropy(from_logits=True),
                   optimizer = keras.optimizers.Adam(learning_rate=0.001),
                   metrics=['accuracy'])
Model: "model"
_________________________________________________________________
 Layer (type)                Output Shape              Param #
=================================================================
 input_1 (InputLayer)        [(None, 768)]             0

 dense (Dense)               (None, 768)               590592

 dense_1 (Dense)             (None, 4)                 3076

=================================================================
Total params: 593668 (2.26 MB)
Trainable params: 593668 (2.26 MB)
Non-trainable params: 0 (0.00 Byte)
_________________________________________________________________
embedding_size
768
Huấn luyện mô hình để phân loại các nhóm tin
Cuối cùng, bạn có thể huấn luyện một mô hình đơn giản. Sử dụng một số lượng nhỏ khoảng thời gian bắt đầu của hệ thống để tránh tình trạng quá mức. Thời gian bắt đầu của hệ thống đầu tiên mất nhiều thời gian hơn nhiều so với thời gian còn lại vì các lượt nhúng chỉ cần được tính một lần.
NUM_EPOCHS = 20
BATCH_SIZE = 32

# Split the x and y components of the train and validation subsets.
y_train = df_train['Encoded Label']
x_train = np.stack(df_train['Embeddings'])
y_val = df_test['Encoded Label']
x_val = np.stack(df_test['Embeddings'])

# Train the model for the desired number of epochs.
callback = keras.callbacks.EarlyStopping(monitor='accuracy', patience=3)

history = classifier.fit(x=x_train,
                         y=y_train,
                         validation_data=(x_val, y_val),
                         callbacks=[callback],
                         batch_size=BATCH_SIZE,
                         epochs=NUM_EPOCHS,)
Epoch 1/20
/usr/local/lib/python3.10/dist-packages/keras/src/backend.py:5729: UserWarning: "`sparse_categorical_crossentropy` received `from_logits=True`, but the `output` argument was produced by a Softmax activation and thus does not represent logits. Was this intended?
  output, from_logits = _get_logits(
13/13 [==============================] - 1s 30ms/step - loss: 1.2141 - accuracy: 0.6675 - val_loss: 0.9801 - val_accuracy: 0.8800
Epoch 2/20
13/13 [==============================] - 0s 12ms/step - loss: 0.7580 - accuracy: 0.9400 - val_loss: 0.6061 - val_accuracy: 0.9300
Epoch 3/20
13/13 [==============================] - 0s 13ms/step - loss: 0.4249 - accuracy: 0.9525 - val_loss: 0.3902 - val_accuracy: 0.9200
Epoch 4/20
13/13 [==============================] - 0s 13ms/step - loss: 0.2561 - accuracy: 0.9625 - val_loss: 0.2597 - val_accuracy: 0.9400
Epoch 5/20
13/13 [==============================] - 0s 13ms/step - loss: 0.1693 - accuracy: 0.9700 - val_loss: 0.2145 - val_accuracy: 0.9300
Epoch 6/20
13/13 [==============================] - 0s 13ms/step - loss: 0.1240 - accuracy: 0.9850 - val_loss: 0.1801 - val_accuracy: 0.9600
Epoch 7/20
13/13 [==============================] - 0s 21ms/step - loss: 0.0931 - accuracy: 0.9875 - val_loss: 0.1623 - val_accuracy: 0.9400
Epoch 8/20
13/13 [==============================] - 0s 16ms/step - loss: 0.0736 - accuracy: 0.9925 - val_loss: 0.1418 - val_accuracy: 0.9600
Epoch 9/20
13/13 [==============================] - 0s 20ms/step - loss: 0.0613 - accuracy: 0.9925 - val_loss: 0.1315 - val_accuracy: 0.9700
Epoch 10/20
13/13 [==============================] - 0s 20ms/step - loss: 0.0479 - accuracy: 0.9975 - val_loss: 0.1235 - val_accuracy: 0.9600
Epoch 11/20
13/13 [==============================] - 0s 19ms/step - loss: 0.0399 - accuracy: 0.9975 - val_loss: 0.1219 - val_accuracy: 0.9700
Epoch 12/20
13/13 [==============================] - 0s 21ms/step - loss: 0.0326 - accuracy: 0.9975 - val_loss: 0.1158 - val_accuracy: 0.9700
Epoch 13/20
13/13 [==============================] - 0s 19ms/step - loss: 0.0263 - accuracy: 1.0000 - val_loss: 0.1127 - val_accuracy: 0.9700
Epoch 14/20
13/13 [==============================] - 0s 17ms/step - loss: 0.0229 - accuracy: 1.0000 - val_loss: 0.1123 - val_accuracy: 0.9700
Epoch 15/20
13/13 [==============================] - 0s 20ms/step - loss: 0.0195 - accuracy: 1.0000 - val_loss: 0.1063 - val_accuracy: 0.9700
Epoch 16/20
13/13 [==============================] - 0s 17ms/step - loss: 0.0172 - accuracy: 1.0000 - val_loss: 0.1070 - val_accuracy: 0.9700
Đánh giá hiệu suất của mô hình
Sử dụng Keras Model.evaluate để biết dữ liệu bị mất và độ chính xác trên tập dữ liệu kiểm thử.
classifier.evaluate(x=x_val, y=y_val, return_dict=True)
4/4 [==============================] - 0s 4ms/step - loss: 0.1070 - accuracy: 0.9700
{'loss': 0.10700511932373047, 'accuracy': 0.9700000286102295}
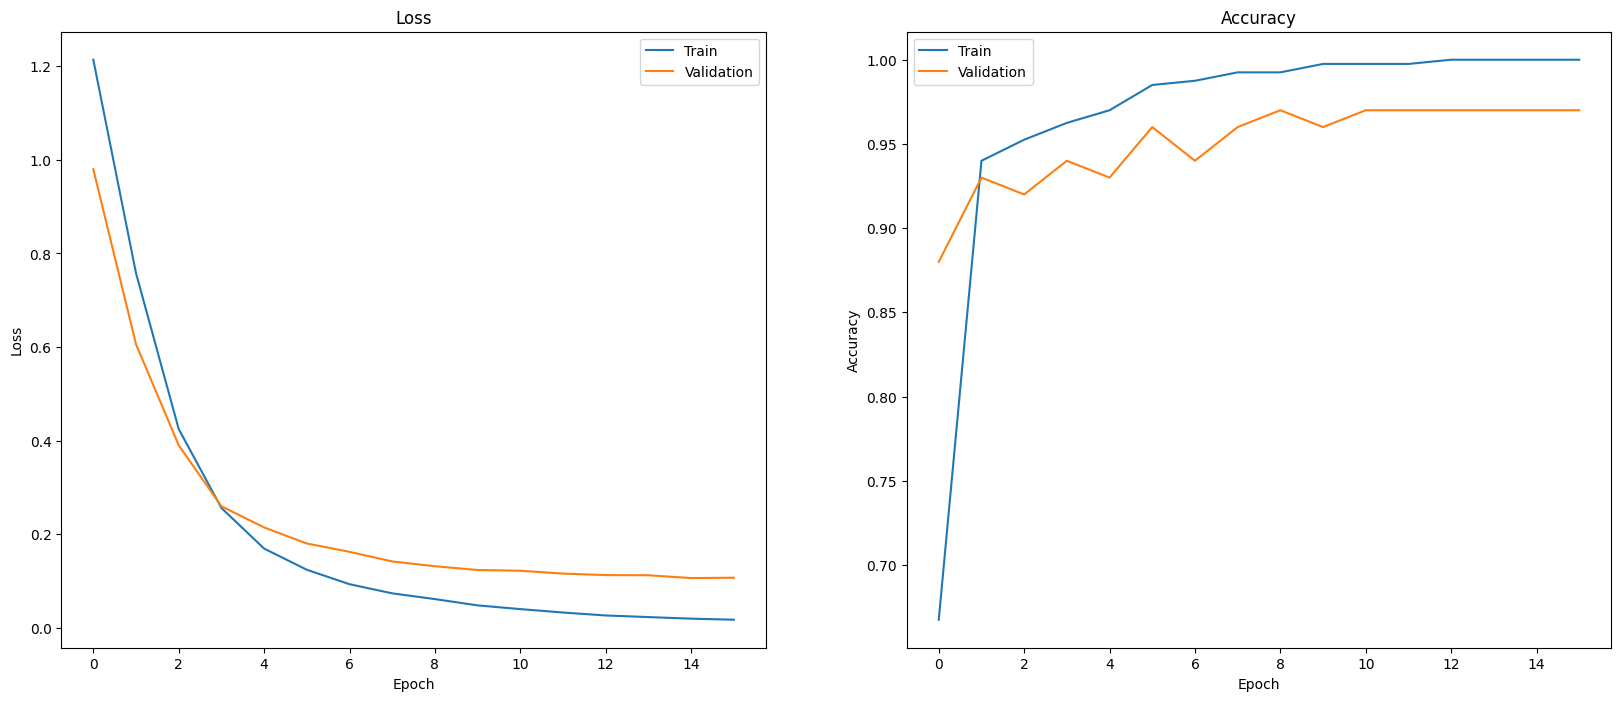
Một cách để đánh giá hiệu suất của mô hình là trực quan hoá hiệu suất của thuật toán phân loại. Sử dụng plot_history để xem xu hướng mất dữ liệu và độ chính xác theo khoảng thời gian bắt đầu của hệ thống.
def plot_history(history):
  """
    Plotting training and validation learning curves.

    Args:
      history: model history with all the metric measures
  """
  fig, (ax1, ax2) = plt.subplots(1,2)
  fig.set_size_inches(20, 8)

  # Plot loss
  ax1.set_title('Loss')
  ax1.plot(history.history['loss'], label = 'train')
  ax1.plot(history.history['val_loss'], label = 'test')
  ax1.set_ylabel('Loss')

  ax1.set_xlabel('Epoch')
  ax1.legend(['Train', 'Validation'])

  # Plot accuracy
  ax2.set_title('Accuracy')
  ax2.plot(history.history['accuracy'],  label = 'train')
  ax2.plot(history.history['val_accuracy'], label = 'test')
  ax2.set_ylabel('Accuracy')
  ax2.set_xlabel('Epoch')
  ax2.legend(['Train', 'Validation'])

  plt.show()

plot_history(history)
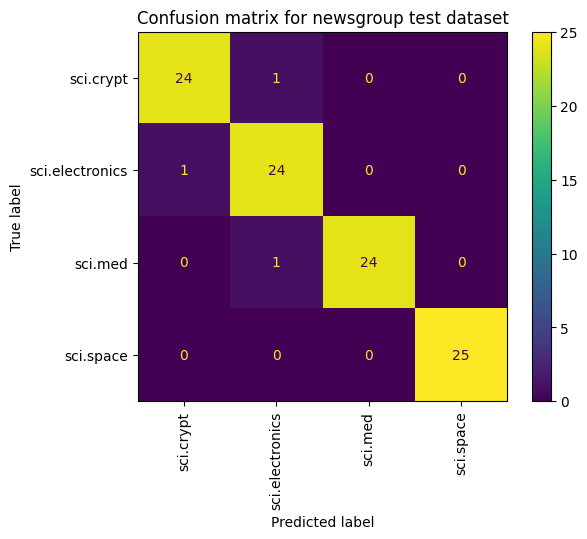
Một cách khác để xem hiệu suất của mô hình, ngoài việc chỉ đo lường mức độ mất mát và độ chính xác là sử dụng ma trận nhầm lẫn. Ma trận nhầm lẫn cho phép bạn đánh giá hiệu suất của mô hình phân loại ngoài độ chính xác. Bạn có thể xem điểm bị phân loại sai là như thế nào. Để xây dựng ma trận nhầm lẫn cho bài toán phân loại nhiều lớp này, hãy lấy các giá trị thực tế trong tập hợp kiểm thử và giá trị dự đoán.
Bắt đầu bằng cách tạo lớp được dự đoán cho từng ví dụ trong tập hợp xác thực bằng Model.predict().
y_hat = classifier.predict(x=x_val)
y_hat = np.argmax(y_hat, axis=1)
4/4 [==============================] - 0s 4ms/step
labels_dict = dict(zip(df_test['Class Name'], df_test['Encoded Label']))
labels_dict
{'sci.crypt': 0, 'sci.electronics': 1, 'sci.med': 2, 'sci.space': 3}
cm = skmetrics.confusion_matrix(y_val, y_hat)
disp = skmetrics.ConfusionMatrixDisplay(confusion_matrix=cm,
                              display_labels=labels_dict.keys())
disp.plot(xticks_rotation='vertical')
plt.title('Confusion matrix for newsgroup test dataset');
plt.grid(False)
Các bước tiếp theo
Để tìm hiểu thêm về cách sử dụng tính năng nhúng, hãy xem các ví dụ có sẵn. Để tìm hiểu cách sử dụng các dịch vụ khác trong API Gemini, hãy truy cập vào phần hướng dẫn bắt đầu nhanh về Python.