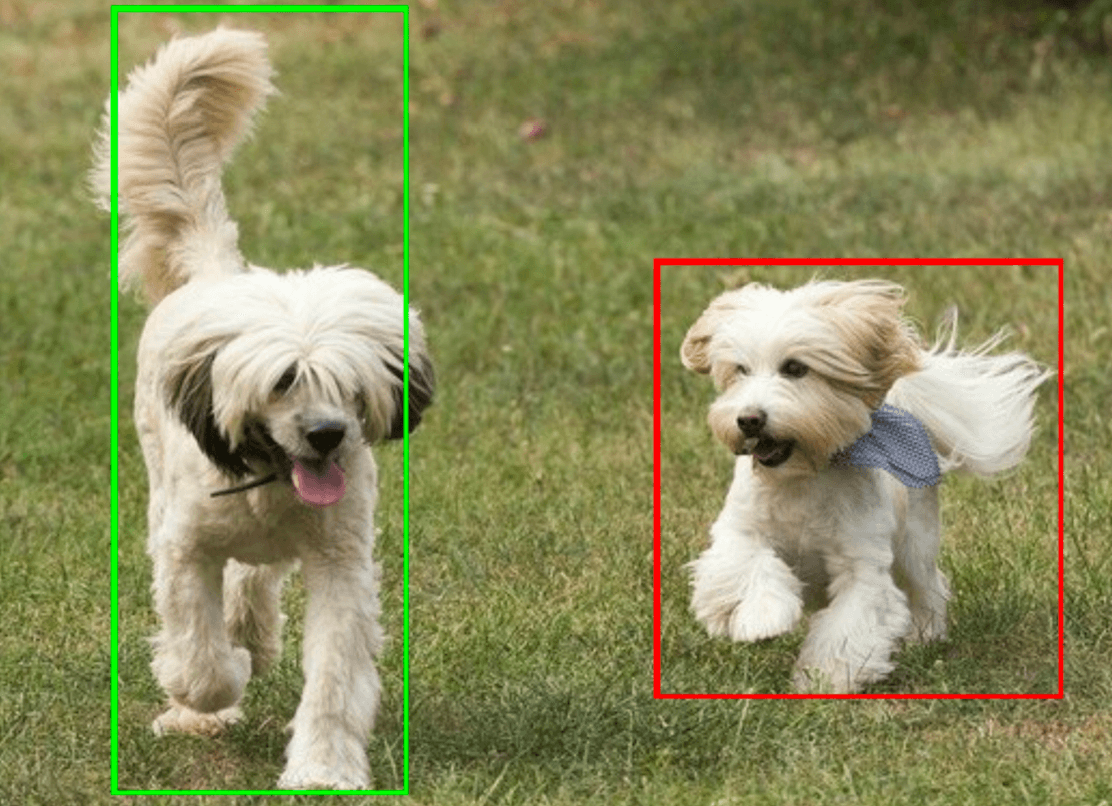
MediaPipe オブジェクト検出タスクを使用すると、複数のクラスのオブジェクトの存在と位置を検出できます。ここでは、Python でオブジェクト検出タスクを使用する方法について説明します。この手順で説明するコードサンプルは GitHub で入手できます。
このタスクの動作を確認するには、ウェブデモをご覧ください。このタスクの機能、モデル、構成オプションの詳細については、概要をご覧ください。
サンプルコード
オブジェクト検出器のサンプルコードには、このタスクの Python での完全な実装が示されています。このコードは、このタスクをテストし、独自のテキスト分類アプリの作成を開始するのに役立ちます。ウェブブラウザのみを使用して、オブジェクト検出のサンプルコードを表示、実行、編集できます。
Raspberry Pi 用オブジェクト検出器を実装する場合は、Raspberry Pi の例アプリをご覧ください。
セットアップ
このセクションでは、Object Detector を使用するように開発環境とコード プロジェクトを設定する主な手順について説明します。プラットフォーム バージョンの要件など、MediaPipe タスクを使用する開発環境の設定に関する一般的な情報については、Python の設定ガイドをご覧ください。
パッケージ
オブジェクト検出タスクには、mediapipe pip パッケージが必要です。必要なパッケージは、次のコマンドを使用してインストールできます。
$ python -m pip install mediapipe
インポート
次のクラスをインポートして、Object Detector タスク関数にアクセスします。
import mediapipe as mp
from mediapipe.tasks import python
from mediapipe.tasks.python import vision
モデル
MediaPipe オブジェクト検出タスクには、このタスクに対応したトレーニング済みモデルが必要です。Object Detector で使用可能なトレーニング済みモデルの詳細については、タスクの概要のモデルのセクションをご覧ください。
モデルを選択してダウンロードし、ローカル ディレクトリに保存します。
model_path = '/absolute/path/to/lite-model_efficientdet_lite0_detection_metadata_1.tflite'
BaseOptions オブジェクトの model_asset_path パラメータを使用して、使用するモデルのパスを指定します。コード例については、次のセクションをご覧ください。
タスクを作成する
create_from_options 関数を使用してタスクを作成します。create_from_options 関数は、実行モード、表示名のロケール、結果の最大数、信頼度のしきい値、カテゴリの許可リスト、拒否リストなどの構成オプションを受け入れます。構成オプションを設定しない場合は、タスクはデフォルト値を使用します。構成オプションの詳細については、構成オプションのセクションをご覧ください。
オブジェクト検出タスクは、静止画像、動画ファイル、ライブ動画ストリーミングなど、複数の入力データ型をサポートしています。入力データの種類に対応するタブを選択して、タスクを作成し推論を実行する方法を確認します。
画像
import mediapipe as mp

BaseOptions = mp.tasks.BaseOptions
ObjectDetector = mp.tasks.vision.ObjectDetector
ObjectDetectorOptions = mp.tasks.vision.ObjectDetectorOptions
VisionRunningMode = mp.tasks.vision.RunningMode

options = ObjectDetectorOptions(
    base_options=BaseOptions(model_asset_path='/path/to/model.tflite'),
    max_results=5,
    running_mode=VisionRunningMode.IMAGE)

with ObjectDetector.create_from_options(options) as detector:
  # The detector is initialized. Use it here.
  # ...
動画
import mediapipe as mp

BaseOptions = mp.tasks.BaseOptions
ObjectDetector = mp.tasks.vision.ObjectDetector
ObjectDetectorOptions = mp.tasks.vision.ObjectDetectorOptions
VisionRunningMode = mp.tasks.vision.RunningMode

options = ObjectDetectorOptions(
    base_options=BaseOptions(model_asset_path='/path/to/model.tflite'),
    max_results=5,
    running_mode=VisionRunningMode.VIDEO)

with ObjectDetector.create_from_options(options) as detector:
  # The detector is initialized. Use it here.
  # ...
ライブ配信
import mediapipe as mp

BaseOptions = mp.tasks.BaseOptions
DetectionResult = mp.tasks.components.containers.detections.DetectionResult
ObjectDetector = mp.tasks.vision.ObjectDetector
ObjectDetectorOptions = mp.tasks.vision.ObjectDetectorOptions
VisionRunningMode = mp.tasks.vision.RunningMode

def print_result(result: DetectionResult, output_image: mp.Image, timestamp_ms: int):
    print('detection result: {}'.format(result))

options = ObjectDetectorOptions(
    base_options=BaseOptions(model_asset_path='/path/to/model.tflite'),
    running_mode=VisionRunningMode.LIVE_STREAM,
    max_results=5,
    result_callback=print_result)

with ObjectDetector.create_from_options(options) as detector:
  # The detector is initialized. Use it here.
  # ...
画像で使用するオブジェクト検出ツールを作成する完全な例については、コードサンプルをご覧ください。
設定オプション
このタスクには、Python アプリケーション用の次の構成オプションがあります。
| オプション名 | 説明 | 値の範囲 | デフォルト値 |
|---|---|---|---|
running_mode |
タスクの実行モードを設定します。モードは次の 3 つです。 IMAGE: 単一画像入力のモード。 動画: 動画のデコードされたフレームのモード。 LIVE_STREAM: カメラなどからの入力データのライブ配信モード。このモードでは、resultListener を呼び出して、結果を非同期で受信するリスナーを設定する必要があります。 |
{IMAGE, VIDEO, LIVE_STREAM} |
IMAGE |
display_names |
タスクのモデルのメタデータで指定されている表示名に使用するラベルの言語を設定します(利用可能な場合)。デフォルトは英語で en です。TensorFlow Lite Metadata Writer API を使用して、カスタムモデルのメタデータにローカライズされたラベルを追加できます。 |
言語 / 地域コード | en |
max_results |
返されるスコア上位の検出結果の最大数を設定します(省略可)。 | 任意の正の数 | -1(すべての結果が返されます) |
score_threshold |
モデル メタデータで指定された予測スコアしきい値(存在する場合)をオーバーライドする予測スコアしきい値を設定します。この値を下回る結果は拒否されます。 | 任意の浮動小数点数 | 未設定 |
category_allowlist |
許可されるカテゴリ名のリスト(省略可)。空でない場合、このセットにカテゴリ名が含まれていない検出結果は除外されます。重複するカテゴリ名または不明なカテゴリ名は無視されます。このオプションは category_denylist とは相互に排他的であり、両方を使用するとエラーが発生します。 |
任意の文字列 | 未設定 |
category_denylist |
許可されないカテゴリ名のリスト(省略可)。空でない場合、このセットにカテゴリ名が含まれている検出結果は除外されます。重複するカテゴリ名または不明なカテゴリ名は無視されます。このオプションは category_allowlist と相互排他的であり、両方を使用するとエラーが発生します。 |
任意の文字列 | 未設定 |
データの準備
入力を画像ファイルまたは NumPy 配列として準備し、mediapipe.Image オブジェクトに変換します。入力が動画ファイルまたはウェブカメラからのライブ配信の場合は、OpenCV などの外部ライブラリを使用して、入力フレームを numpy 配列として読み込むことができます。
次の例では、使用可能なデータ型ごとに、処理用にデータを準備する方法について説明します。
画像
import mediapipe as mp

# Load the input image from an image file.
mp_image = mp.Image.create_from_file('/path/to/image')

# Load the input image from a numpy array.
mp_image = mp.Image(image_format=mp.ImageFormat.SRGB, data=numpy_image)
動画
import mediapipe as mp

# Use OpenCV’s VideoCapture to load the input video.

# Load the frame rate of the video using OpenCV’s CV_CAP_PROP_FPS
# You’ll need it to calculate the timestamp for each frame.

# Loop through each frame in the video using VideoCapture#read()

# Convert the frame received from OpenCV to a MediaPipe’s Image object.
mp_image = mp.Image(image_format=mp.ImageFormat.SRGB, data=numpy_frame_from_opencv)
ライブ配信
import mediapipe as mp

# Use OpenCV’s VideoCapture to start capturing from the webcam.

# Create a loop to read the latest frame from the camera using VideoCapture#read()

# Convert the frame received from OpenCV to a MediaPipe’s Image object.
mp_image = mp.Image(image_format=mp.ImageFormat.SRGB, data=numpy_frame_from_opencv)
タスクを実行する
検出関数のいずれかを呼び出して推論をトリガーできます。オブジェクト検出タスクは、入力画像またはフレーム内で検出されたオブジェクトを返します。
画像
# Perform object detection on the provided single image.
detection_result = detector.detect(mp_image)
動画
# Calculate the timestamp of the current frame
frame_timestamp_ms = 1000 * frame_index / video_file_fps

# Perform object detection on the video frame.
detection_result = detector.detect_for_video(mp_image, frame_timestamp_ms)
ライブ配信
# Send the latest frame to perform object detection.
# Results are sent to the `result_callback` provided in the `ObjectDetectorOptions`.
detector.detect_async(mp_image, frame_timestamp_ms)
画像でオブジェクト検出を実行する完全な例については、コード例をご覧ください。
次の点にご注意ください。
- 動画モードまたはライブ配信モードで実行する場合は、入力フレームのタイムスタンプをオブジェクト検出タスクに指定する必要があります。
- 画像モデルまたは動画モデルで実行する場合、オブジェクト検出タスクは、入力画像またはフレームの処理が完了するまで現在のスレッドをブロックします。
- ライブ配信モードで実行する場合、オブジェクト検出タスクは現在のスレッドをブロックせず、すぐに返します。入力フレームの処理が完了するたびに、検出結果とともに結果リスナーが呼び出されます。オブジェクト検出タスクが別のフレームの処理でビジー状態になっているときに detect 関数が呼び出されると、新しい入力フレームは無視されます。
結果を処理して表示する
推論を実行すると、オブジェクト検出タスクは、入力画像で検出されたオブジェクトを記述する ObjectDetectionResult オブジェクトを返します。
このタスクの出力データの例を次に示します。
ObjectDetectorResult:
 Detection #0:
  Box: (x: 355, y: 133, w: 190, h: 206)
  Categories:
   index       : 17
   score       : 0.73828
   class name  : dog
 Detection #1:
  Box: (x: 103, y: 15, w: 138, h: 369)
  Categories:
   index       : 17
   score       : 0.73047
   class name  : dog
次の図は、タスク出力の可視化を示しています。

オブジェクト検出のサンプルコードは、タスクから返された検出結果を表示する方法を示しています。詳細については、コードサンプルをご覧ください。
