
ไลบรารี MediaPipe Framework Android Archive (AAR) เป็นวิธีที่สะดวกในการใช้ เฟรมเวิร์ก MediaPipe พร้อม Android Studio และ Gradle เฟรมเวิร์ก MediaPipe ไม่ เผยแพร่ AAR ทั่วไปที่โปรเจ็กต์ทั้งหมดใช้ได้ แต่นักพัฒนาซอฟต์แวร์จะต้อง เพื่อสร้างเป้าหมาย mediapipe_aar() เพื่อสร้างไฟล์ AAR ที่กำหนดเอง โปรเจ็กต์ วิธีนี้จำเป็นเพื่อรวมทรัพยากรที่เฉพาะเจาะจง เช่น ต้องใช้เครื่องคำนวณ MediaPipe สำหรับแต่ละโปรเจ็กต์
ขั้นตอนในการสร้าง AAR ของ MediaPipe Framework
สร้างเป้าหมาย mediapipe_aar()
ในไดเรกทอรี MediaPipe ให้สร้างเป้าหมาย mediapipe_aar() ใหม่ใน BUILD คุณต้องหาว่าในกราฟใช้เครื่องคิดเลขอะไรและ ให้ทรัพยากร Dependency ของเครื่องคำนวณไปยัง mediapipe_aar() ตัวอย่างเช่น หากต้องการ สร้าง AAR สำหรับกราฟการตรวจจับใบหน้า คุณสามารถวางโค้ดต่อไปนี้ลงใน mediapipe/examples/android/src/java/com/google/mediapipe/apps/aar_example/BUILD.
load("//mediapipe/java/com/google/mediapipe:mediapipe_aar.bzl", "mediapipe_aar")

mediapipe_aar(
    name = "mediapipe_face_detection",
    calculators = ["//mediapipe/graphs/face_detection:mobile_calculators"],
)
เรียกใช้คำสั่งบิลด์ Bazel เพื่อสร้าง AAR
bazel build -c opt --strip=ALWAYS \
    --host_crosstool_top=@bazel_tools//tools/cpp:toolchain \
    --fat_apk_cpu=arm64-v8a,armeabi-v7a \
    --legacy_whole_archive=0 \
    --features=-legacy_whole_archive \
    --copt=-fvisibility=hidden \
    --copt=-ffunction-sections \
    --copt=-fdata-sections \
    --copt=-fstack-protector \
    --copt=-Oz \
    --copt=-fomit-frame-pointer \
    --copt=-DABSL_MIN_LOG_LEVEL=2 \
    --linkopt=-Wl,--gc-sections,--strip-all \
    //path/to/the/aar/build/file:aar_name.aar
สำหรับเป้าหมาย AAR ในการตรวจจับใบหน้าที่เราสร้างในขั้นตอนที่ 1 ให้เรียกใช้
bazel build -c opt --strip=ALWAYS \
    --host_crosstool_top=@bazel_tools//tools/cpp:toolchain \
    --fat_apk_cpu=arm64-v8a,armeabi-v7a \
    --legacy_whole_archive=0 \
    --features=-legacy_whole_archive \
    --copt=-fvisibility=hidden \
    --copt=-ffunction-sections \
    --copt=-fdata-sections \
    --copt=-fstack-protector \
    --copt=-Oz \
    --copt=-fomit-frame-pointer \
    --copt=-DABSL_MIN_LOG_LEVEL=2 \
    --linkopt=-Wl,--gc-sections,--strip-all \
    //mediapipe/examples/android/src/java/com/google/mediapipe/apps/aar_example:mediapipe_face_detection.aar

# It should print:
# Target //mediapipe/examples/android/src/java/com/google/mediapipe/apps/aar_example:mediapipe_face_detection.aar up-to-date:
# bazel-bin/mediapipe/examples/android/src/java/com/google/mediapipe/apps/aar_example/mediapipe_face_detection.aar
(ไม่บังคับ) บันทึก AAR ไปยังตำแหน่งที่คุณต้องการ
cp bazel-bin/mediapipe/examples/android/src/java/com/google/mediapipe/apps/aar_example/mediapipe_face_detection.aar
/absolute/path/to/your/preferred/location
ขั้นตอนการใช้ AAR ของ MediaPipe Framework ใน Android Studio ด้วย Gradle
เปิด Android Studio และไปที่โปรเจ็กต์
คัดลอก AAR ไปยังแอป/ไลบรารี
cp bazel-bin/mediapipe/examples/android/src/java/com/google/mediapipe/apps/aar_example/mediapipe_face_detection.aar
/path/to/your/app/libs/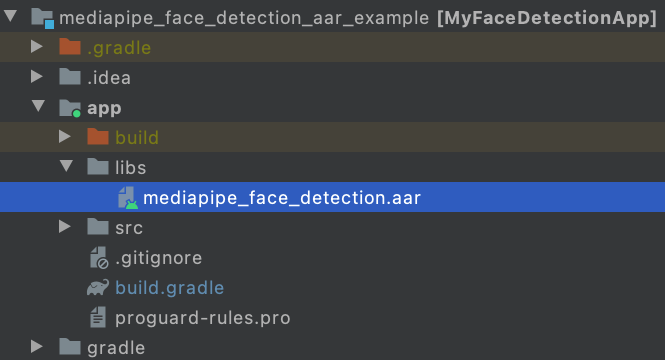
สร้าง app/src/main/assets และคัดลอกเนื้อหา (กราฟ โมเดล และอื่นๆ) ลงใน app/src/main/assets.
สร้างกราฟไบนารีของ MediaPipe และคัดลอกเนื้อหาลงใน app/src/main/assets เช่น สำหรับกราฟการตรวจจับใบหน้า คุณจะต้องสร้าง และคัดลอกไบนารี กราฟ และโมเดล tflite การตรวจจับใบหน้า
bazel build -c opt mediapipe/graphs/face_detection:face_detection_mobile_gpu_binary_graph
cp bazel-bin/mediapipe/graphs/face_detection/face_detection_mobile_gpu.binarypb /path/to/your/app/src/main/assets/
cp mediapipe/modules/face_detection/face_detection_short_range.tflite /path/to/your/app/src/main/assets/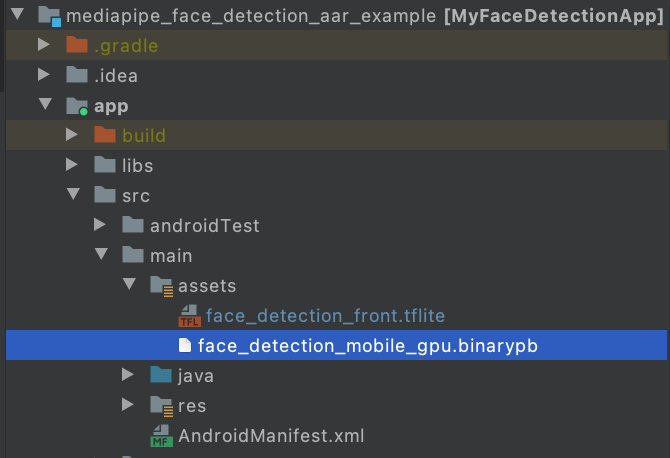
แก้ไข app/build.gradle เพื่อเพิ่มทรัพยากร Dependency ของ MediaPipe และ MediaPipe AAR
dependencies {
    implementation fileTree(dir: 'libs', include: ['*.jar', '*.aar'])
    implementation 'androidx.appcompat:appcompat:1.0.2'
    implementation 'androidx.constraintlayout:constraintlayout:1.1.3'
    testImplementation 'junit:junit:4.12'
    androidTestImplementation 'androidx.test.ext:junit:1.1.0'
    androidTestImplementation 'androidx.test.espresso:espresso-core:3.1.1'
    // MediaPipe deps
    implementation 'com.google.flogger:flogger:latest.release'
    implementation 'com.google.flogger:flogger-system-backend:latest.release'
    implementation 'com.google.code.findbugs:jsr305:latest.release'
    implementation 'com.google.guava:guava:27.0.1-android'
    implementation 'com.google.protobuf:protobuf-javalite:3.19.1'
    // CameraX core library
    def camerax_version = "1.0.0-beta10"
    implementation "androidx.camera:camera-core:$camerax_version"
    implementation "androidx.camera:camera-camera2:$camerax_version"
    implementation "androidx.camera:camera-lifecycle:$camerax_version"
    // AutoValue
    def auto_value_version = "1.8.1"
    implementation "com.google.auto.value:auto-value-annotations:$auto_value_version"
    annotationProcessor "com.google.auto.value:auto-value:$auto_value_version"
}
ทำตามตัวอย่างแอป Android เพื่อใช้ MediaPipe ใน Android Studio สำหรับ Use Case หากคุณต้องการดูตัวอย่าง ตัวอย่างการตรวจจับใบหน้าอาจมีลักษณะดังนี้ พบ ที่นี่ และ สามารถดูตัวอย่างการติดตามแบบหลายมือได้ ที่นี่