
确保您拥有可正常使用的 MediaPipe 框架版本。请参阅 安装说明。
如需运行
hello world示例,请执行以下操作:$ git clone https://github.com/google/mediapipe.git $ cd mediapipe $ export GLOG_logtostderr=1 # Need bazel flag 'MEDIAPIPE_DISABLE_GPU=1' as desktop GPU is not supported currently. $ bazel run --define MEDIAPIPE_DISABLE_GPU=1 \ mediapipe/examples/desktop/hello_world:hello_world # It should print 10 rows of Hello World! # Hello World! # Hello World! # Hello World! # Hello World! # Hello World! # Hello World! # Hello World! # Hello World! # Hello World! # Hello World!hello world示例在PrintHelloWorld()函数,在CalculatorGraphConfigproto 中定义。absl::Status PrintHelloWorld() { // Configures a simple graph, which concatenates 2 PassThroughCalculators. CalculatorGraphConfig config = ParseTextProtoOrDie<CalculatorGraphConfig>(R"( input_stream: "in" output_stream: "out" node { calculator: "PassThroughCalculator" input_stream: "in" output_stream: "out1" } node { calculator: "PassThroughCalculator" input_stream: "out1" output_stream: "out" } )");您可以使用 MediaPipe Visualizer,方法是将 CalculatorGraphConfig 内容复制到可视化工具中。请参阅 此处,获取有关可视化工具的帮助。
    input_stream: "in"
    output_stream: "out"
    node {
      calculator: "PassThroughCalculator"
      input_stream: "in"
      output_stream: "out1"
    }
    node {
      calculator: "PassThroughCalculator"
      input_stream: "out1"
      output_stream: "out"
    }
此图包含 1 个图表输入流 (
in) 和 1 个图表输出流 (out) 和 2 个PassThroughCalculator串行连接。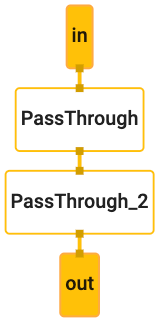
在运行图之前,
OutputStreamPoller对象会连接到 输出流以稍后检索图输出,以及运行图 开头是StartRun。CalculatorGraph graph; MP_RETURN_IF_ERROR(graph.Initialize(config)); MP_ASSIGN_OR_RETURN(OutputStreamPoller poller, graph.AddOutputStreamPoller("out")); MP_RETURN_IF_ERROR(graph.StartRun({}));然后,此示例创建了 10 个数据包(每个数据包都包含一个字符串“Hello”, 世界!”时间戳值的范围为 0、1 ... 9)
MakePacket函数,通过in将每个数据包添加到图中 输入流,最后关闭输入流以完成图运行。for (int i = 0; i < 10; ++i) { MP_RETURN_IF_ERROR(graph.AddPacketToInputStream("in", MakePacket<std::string>("Hello World!").At(Timestamp(i)))); } MP_RETURN_IF_ERROR(graph.CloseInputStream("in"));然后,通过
OutputStreamPoller对象,该示例会检索全部 10 个 输出流中的数据包,从每个数据包中获取字符串内容 并将其输出到输出日志中。mediapipe::Packet packet; while (poller.Next(&packet)) { LOG(INFO) << packet.Get<string>(); }
Hello World! (C++)
如未另行说明,那么本页面中的内容已根据知识共享署名 4.0 许可获得了许可,并且代码示例已根据 Apache 2.0 许可获得了许可。有关详情,请参阅 Google 开发者网站政策。Java 是 Oracle 和/或其关联公司的注册商标。
最后更新时间 (UTC):2025-07-24。