
소개
Hello World! 튜토리얼에서는 MediaPipe 프레임워크를 사용하여 iOS를 개발합니다. iOS에서 MediaPipe 그래프를 실행하는 애플리케이션입니다.
빌드 대상
라이브 동영상에 적용되는 실시간 Sobel 에지 감지를 위한 간단한 카메라 앱 iOS 기기에서 스트리밍할 수 있습니다.
설정
- 시스템에 MediaPipe 프레임워크를 설치합니다. 프레임워크 설치 참조 가이드를 참조하세요.
- 개발용 iOS 기기를 설정합니다.
- 시스템에 Bazel을 설정하여 iOS 앱을 빌드하고 배포합니다.
에지 감지 그래프
edge_detection_mobile_gpu.pbtxt 그래프를 사용합니다.
# MediaPipe graph that performs GPU Sobel edge detection on a live video stream.
# Used in the examples
# mediapipe/examples/android/src/java/com/google/mediapipe/apps/basic:helloworld
# and mediapipe/examples/ios/helloworld.

# Images coming into and out of the graph.
input_stream: "input_video"
output_stream: "output_video"

# Converts RGB images into luminance images, still stored in RGB format.
node: {
  calculator: "LuminanceCalculator"
  input_stream: "input_video"
  output_stream: "luma_video"
}

# Applies the Sobel filter to luminance images stored in RGB format.
node: {
  calculator: "SobelEdgesCalculator"
  input_stream: "luma_video"
  output_stream: "output_video"
}
다음은 그래프를 시각화한 것입니다.
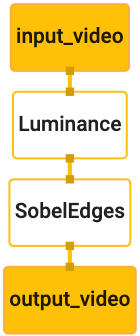
이 그래프에는 모든 수신 프레임에 input_video라는 단일 입력 스트림이 있습니다.
기기의 카메라에서 제공합니다.
그래프의 첫 번째 노드인 LuminanceCalculator는 단일 패킷을 가져옵니다.
OpenGL 셰이더를 사용하여 휘도 변경을 적용합니다. 결과
luma_video 출력 스트림으로 전송됩니다.
두 번째 노드 SobelEdgesCalculator는 수신에 에지 감지를 적용합니다.
luma_video 스트림의 패킷 및 출력 결과 output_video 출력
있습니다.
iOS 애플리케이션이 output_video의 출력 이미지 프레임을 표시합니다.
있습니다.
초기 최소 애플리케이션 설정
먼저 간단한 iOS 애플리케이션으로 시작하여 bazel 사용 방법을 보여드리겠습니다.
있습니다.
먼저 파일 > 신규 > 단일 뷰 앱
제품 이름을 'HelloWorld'로 설정하고 적절한 조직을 사용합니다.
식별자(예: com.google.mediapipe) 조직 식별자
애플리케이션의 bundle_id가 됩니다. 예를 들면 다음과 같습니다.
com.google.mediapipe.HelloWorld입니다.
언어를 Objective-C로 설정합니다.
프로젝트를 적절한 위치에 저장합니다. 이것을
$PROJECT_TEMPLATE_LOC 따라서 프로젝트는
$PROJECT_TEMPLATE_LOC/HelloWorld 디렉터리에 있습니다. 이 디렉터리에는
이름이 HelloWorld인 다른 디렉터리와 HelloWorld.xcodeproj 파일이 있습니다.
HelloWorld.xcodeproj는 이 튜토리얼에서 유용하지 않습니다.
bazel을 사용하여 iOS 애플리케이션을 빌드합니다. 이
$PROJECT_TEMPLATE_LOC/HelloWorld/HelloWorld 디렉터리는 아래와 같습니다.
AppDelegate.h및AppDelegate.mViewController.h및ViewController.mmain.mInfo.plistMain.storyboard및Launch.storyboardAssets.xcassets디렉토리 외부에 있어야 합니다.
이 파일을 액세스할 수 있는 위치의 HelloWorld 디렉터리에 복사하세요.
MediaPipe 프레임워크 소스 코드를
확인할 수 있습니다 예를 들어
이 튜토리얼에서 빌드할 애플리케이션의
mediapipe/examples/ios/HelloWorld 이 과정을
$APPLICATION_PATH에 관해 알아봅니다.
$APPLICATION_PATH에서 BUILD 파일을 만들고 다음 빌드를 추가합니다.
규칙:
MIN_IOS_VERSION = "11.0"

load(
    "@build_bazel_rules_apple//apple:ios.bzl",
    "ios_application",
)

ios_application(
    name = "HelloWorldApp",
    bundle_id = "com.google.mediapipe.HelloWorld",
    families = [
        "iphone",
        "ipad",
    ],
    infoplists = ["Info.plist"],
    minimum_os_version = MIN_IOS_VERSION,
    provisioning_profile = "//mediapipe/examples/ios:developer_provisioning_profile",
    deps = [":HelloWorldAppLibrary"],
)

objc_library(
    name = "HelloWorldAppLibrary",
    srcs = [
        "AppDelegate.m",
        "ViewController.m",
        "main.m",
    ],
    hdrs = [
        "AppDelegate.h",
        "ViewController.h",
    ],
    data = [
        "Base.lproj/LaunchScreen.storyboard",
        "Base.lproj/Main.storyboard",
    ],
    sdk_frameworks = [
        "UIKit",
    ],
    deps = [],
)
objc_library 규칙은 AppDelegate 및
ViewController 클래스, main.m 및 애플리케이션 스토리보드. 이
템플릿 형식 앱은 UIKit SDK에만 종속됩니다.
ios_application 규칙은 HelloWorldAppLibrary Objective-C 라이브러리 사용
iOS 기기에 설치할 iOS 애플리케이션을 빌드할 수 있습니다.
앱을 빌드하려면 터미널에서 다음 명령어를 사용합니다.
bazel build -c opt --config=ios_arm64 <$APPLICATION_PATH>:HelloWorldApp'
예를 들어 다음 위치에서 HelloWorldApp 애플리케이션을 빌드하려면
mediapipe/examples/ios/helloworld에서는 다음 명령어를 사용합니다.
bazel build -c opt --config=ios_arm64 mediapipe/examples/ios/helloworld:HelloWorldApp
그런 다음 XCode 로 돌아가서 창을 엽니다. 기기 및 시뮬레이터에서
위의 명령어로 생성된 .ipa 파일을 기기에 추가합니다.
다음은 iOS 프레임워크 앱 설정 및 컴파일에 관한 문서입니다.
기기에서 애플리케이션을 엽니다. 비어 있으므로 빈 흰색 화면이 표시됩니다.
실시간 보기 피드에 카메라 사용
이 튜토리얼에서는 MPPCameraInputSource 클래스를 사용하여
카메라에서 프레임을 잡아냅니다. 이 클래스는 AVCaptureSession API를 사용하여
확인할 수 있습니다.
그러나 이 클래스를 사용하기 전에 카메라를 지원하도록 Info.plist 파일을 변경하세요.
확인할 수 있습니다.
ViewController.m에서 다음 가져오기 줄을 추가합니다.
#import "mediapipe/objc/MPPCameraInputSource.h"
구현 블록에 다음을 추가하여 객체를 만듭니다.
_cameraSource:
@implementation ViewController {
  // Handles camera access via AVCaptureSession library.
  MPPCameraInputSource* _cameraSource;
}
다음 코드를 viewDidLoad()에 추가합니다.
-(void)viewDidLoad {
  [super viewDidLoad];

  _cameraSource = [[MPPCameraInputSource alloc] init];
  _cameraSource.sessionPreset = AVCaptureSessionPresetHigh;
  _cameraSource.cameraPosition = AVCaptureDevicePositionBack;
  // The frame's native format is rotated with respect to the portrait orientation.
  _cameraSource.orientation = AVCaptureVideoOrientationPortrait;
}
이 코드는 _cameraSource를 초기화하고 캡처 세션 사전 설정을 설정하며
카메라가 필요합니다.
_cameraSource에서 애플리케이션으로 프레임을 가져와야 합니다.
ViewController로 표시합니다. MPPCameraInputSource는 다음의 서브클래스입니다.
MPPInputSource:
MPPInputSourceDelegate입니다. 이제 애플리케이션 ViewController가
총 _cameraSource페이지입니다.
적절하게 ViewController의 인터페이스 정의를 업데이트합니다.
@interface ViewController () <MPPInputSourceDelegate>
카메라 설정을 처리하고 수신 프레임을 처리하려면 대기열을 사용해야 함
기본 대기열과 다릅니다. 다음을 구현 블록에 추가합니다.
ViewController:
// Process camera frames on this queue.
dispatch_queue_t _videoQueue;
viewDidLoad()에서 다음을 초기화한 후 다음 줄을 추가합니다.
_cameraSource 객체:
[_cameraSource setDelegate:self queue:_videoQueue];
그리고 다음 코드를 추가하여
_cameraSource 객체:
dispatch_queue_attr_t qosAttribute = dispatch_queue_attr_make_with_qos_class(
      DISPATCH_QUEUE_SERIAL, QOS_CLASS_USER_INTERACTIVE, /*relative_priority=*/0);
_videoQueue = dispatch_queue_create(kVideoQueueLabel, qosAttribute);
다음에 우선순위가 QOS_CLASS_USER_INTERACTIVE인 직렬 큐를 사용하겠습니다.
처리할 수 있습니다.
파일 상단에서 헤더 가져오기 다음에 다음 줄을 추가합니다.
ViewController의 인터페이스/구현:
static const char* kVideoQueueLabel = "com.google.mediapipe.example.videoQueue";
MPPInputSourceDelegate 프로토콜에서 메서드를 구현하려면 먼저 다음을 실행해야 합니다.
먼저 카메라 프레임을 표시하는 방법을 설정해야 합니다. Mediapipe Framework는
MPPLayerRenderer라는 또 다른 유틸리티를 사용하여 화면에 이미지를 표시합니다. 이
유틸리티를 사용하여 CVPixelBufferRef 객체를 표시할 수 있습니다. 이 객체는
MPPCameraInputSource에서 제공한 이미지를 위임에 제공합니다.
ViewController.m에서 다음 가져오기 줄을 추가합니다.
#import "mediapipe/objc/MPPLayerRenderer.h"
화면 이미지를 표시하려면 새 UIView 객체를 추가해야 합니다.
_liveView를 ViewController로 전송합니다.
ViewController의 구현 블록에 다음 줄을 추가합니다.
// Display the camera preview frames.
IBOutlet UIView* _liveView;
// Render frames in a layer.
MPPLayerRenderer* _renderer;
Main.storyboard로 이동하여 객체 라이브러리의 UIView 객체를
ViewController 클래스의 View입니다. 이 뷰에서 참조 아웃렛을
방금 ViewController 클래스에 추가한 _liveView 객체입니다. 크기 조정:
중앙에 위치하고 애플리케이션 화면 전체를 덮을 수 있습니다.
ViewController.m로 돌아가서 다음 코드를 viewDidLoad()에 추가합니다.
_renderer 객체를 초기화합니다.
_renderer = [[MPPLayerRenderer alloc] init];
_renderer.layer.frame = _liveView.layer.bounds;
[_liveView.layer addSublayer:_renderer.layer];
_renderer.frameScaleMode = MPPFrameScaleModeFillAndCrop;
카메라에서 프레임을 가져오기 위해 다음 메서드를 구현합니다.
// Must be invoked on _videoQueue.
-   (void)processVideoFrame:(CVPixelBufferRef)imageBuffer
                timestamp:(CMTime)timestamp
               fromSource:(MPPInputSource*)source {
  if (source != _cameraSource) {
    NSLog(@"Unknown source: %@", source);
    return;
  }
  // Display the captured image on the screen.
  CFRetain(imageBuffer);
  dispatch_async(dispatch_get_main_queue(), ^{
    [_renderer renderPixelBuffer:imageBuffer];
    CFRelease(imageBuffer);
  });
}
MPPInputSource의 위임 메서드입니다. 먼저
올바른 소스(예: _cameraSource)에서 프레임을 가져옵니다. 그런 다음
기본 대기열의 _renderer를 통해 카메라로부터 수신된 프레임입니다.
이제 프레임을 표시할 뷰가 설정되는 즉시 카메라를 시작해야 합니다.
표시됩니다. 이를 위해
viewWillAppear:(BOOL)animated 함수:
-(void)viewWillAppear:(BOOL)animated {
  [super viewWillAppear:animated];
}
카메라를 실행하려면 사용자의 액세스 권한이 필요합니다.
MPPCameraInputSource는 다음 함수를 제공합니다.
사용자가 다음 작업을 할 때 카메라 액세스를 요청하고 작업을 실행하는 requestCameraAccessWithCompletionHandler:(void (^_Nullable)(BOOL
granted))handler
있습니다. viewWillAppear:animated에 다음 코드를 추가합니다.
[_cameraSource requestCameraAccessWithCompletionHandler:^void(BOOL granted) {
  if (granted) {
    dispatch_async(_videoQueue, ^{
      [_cameraSource start];
    });
  }
}];
애플리케이션을 빌드하기 전에 BUILD에 다음 종속 항목을 추가합니다.
파일:
sdk_frameworks = [
    "AVFoundation",
    "CoreGraphics",
    "CoreMedia",
],
deps = [
    "//mediapipe/objc:mediapipe_framework_ios",
    "//mediapipe/objc:mediapipe_input_sources_ios",
    "//mediapipe/objc:mediapipe_layer_renderer",
],
이제 iOS 기기에서 애플리케이션을 빌드하고 실행합니다. 라이브 스트리밍이 카메라 뷰 피드를 전달해야 합니다.
이제 MediaPipe 그래프에서 카메라 프레임을 사용할 준비가 되었습니다.
iOS에서 MediaPipe 그래프 사용
관련 종속 항목 추가
이미 이 종속 항목을 포함하는 MediaPipe 프레임워크 코드의 종속 항목을 추가했습니다.
MediaPipe 그래프를 사용할 수 있습니다. MediaPipe 그래프를 사용하려면 먼저
애플리케이션에서 사용할 그래프에
종속되어야 합니다 다음을 추가합니다.
줄을 BUILD 파일의 data 목록에 추가합니다.
"//mediapipe/graphs/edge_detection:mobile_gpu_binary_graph",
이제 이 그래프에 사용된 계산기의 deps 필드에 종속 항목을 추가합니다.
BUILD 파일에서:
"//mediapipe/graphs/edge_detection:mobile_calculators",
마지막으로 파일 이름을 ViewController.m에서 ViewController.mm로 변경하여
Objective-C++입니다.
ViewController 그래프 사용
ViewController.m에서 다음 가져오기 줄을 추가합니다.
#import "mediapipe/objc/MPPGraph.h"
그래프의 이름, 입력 스트림 및 출력 스트림:
static NSString* const kGraphName = @"mobile_gpu";

static const char* kInputStream = "input_video";
static const char* kOutputStream = "output_video";
ViewController의 인터페이스에 다음 속성을 추가합니다.
// The MediaPipe graph currently in use. Initialized in viewDidLoad, started in viewWillAppear: and
// sent video frames on _videoQueue.
@property(nonatomic) MPPGraph* mediapipeGraph;
위의 주석에서 설명한 것처럼 이 그래프를
먼저 viewDidLoad하세요. 이렇게 하려면 .pbtxt 파일에서 그래프를 로드해야 합니다.
다음 함수를 사용합니다.
+   (MPPGraph*)loadGraphFromResource:(NSString*)resource {
  // Load the graph config resource.
  NSError* configLoadError = nil;
  NSBundle* bundle = [NSBundle bundleForClass:[self class]];
  if (!resource || resource.length == 0) {
    return nil;
  }
  NSURL* graphURL = [bundle URLForResource:resource withExtension:@"binarypb"];
  NSData* data = [NSData dataWithContentsOfURL:graphURL options:0 error:&configLoadError];
  if (!data) {
    NSLog(@"Failed to load MediaPipe graph config: %@", configLoadError);
    return nil;
  }

  // Parse the graph config resource into mediapipe::CalculatorGraphConfig proto object.
  mediapipe::CalculatorGraphConfig config;
  config.ParseFromArray(data.bytes, data.length);

  // Create MediaPipe graph with mediapipe::CalculatorGraphConfig proto object.
  MPPGraph* newGraph = [[MPPGraph alloc] initWithGraphConfig:config];
  [newGraph addFrameOutputStream:kOutputStream outputPacketType:MPPPacketTypePixelBuffer];
  return newGraph;
}
이 함수를 사용하여 다음과 같이 viewDidLoad에서 그래프를 초기화합니다.
self.mediapipeGraph = [[self class] loadGraphFromResource:kGraphName];
그래프는 카메라 프레임 처리 결과를
ViewController 그래프를 초기화한 후 다음 줄을 추가하여
mediapipeGraph 객체의 위임으로서의 ViewController:
self.mediapipeGraph.delegate = self;
실시간 동영상 피드의 프레임을 처리하는 동안 메모리 경합을 방지하려면 다음 줄을 추가합니다.
// Set maxFramesInFlight to a small value to avoid memory contention for real-time processing.
self.mediapipeGraph.maxFramesInFlight = 2;
이제 사용자가 카메라 사용 권한을 부여하면 그래프를 시작합니다. :
[_cameraSource requestCameraAccessWithCompletionHandler:^void(BOOL granted) {
  if (granted) {
    // Start running self.mediapipeGraph.
    NSError* error;
    if (![self.mediapipeGraph startWithError:&error]) {
      NSLog(@"Failed to start graph: %@", error);
    }
    else if (![self.mediapipeGraph waitUntilIdleWithError:&error]) {
      NSLog(@"Failed to complete graph initial run: %@", error);
    }

    dispatch_async(_videoQueue, ^{
      [_cameraSource start];
    });
  }
}];
앞서 processVideoFrame의 카메라에서 프레임을 수신했을 때
함수에서 _renderer를 사용하여 _liveView에 표시했습니다. 이제
대신 해당 프레임을 그래프로 전송하고 결과를 렌더링해야 합니다. 수정
이 함수의 구현을 사용하여 다음을 수행합니다.
-   (void)processVideoFrame:(CVPixelBufferRef)imageBuffer
                timestamp:(CMTime)timestamp
               fromSource:(MPPInputSource*)source {
  if (source != _cameraSource) {
    NSLog(@"Unknown source: %@", source);
    return;
  }
  [self.mediapipeGraph sendPixelBuffer:imageBuffer
                            intoStream:kInputStream
                            packetType:MPPPacketTypePixelBuffer];
}
imageBuffer를 다음 유형의 패킷으로 self.mediapipeGraph에 전송합니다.
입력 스트림 kInputStream에 MPPPacketTypePixelBuffer를 전달합니다. 예:
'input_video'가 포함됩니다.
그래프는 이 입력 패킷으로 실행되며
kOutputStream, 즉 'output_video'입니다. 다음과 같은 위임을 구현할 수 있습니다.
메서드를 사용하여 이 출력 스트림에서 패킷을 수신하여 화면에 표시합니다.
-   (void)mediapipeGraph:(MPPGraph*)graph
   didOutputPixelBuffer:(CVPixelBufferRef)pixelBuffer
             fromStream:(const std::string&)streamName {
  if (streamName == kOutputStream) {
    // Display the captured image on the screen.
    CVPixelBufferRetain(pixelBuffer);
    dispatch_async(dispatch_get_main_queue(), ^{
      [_renderer renderPixelBuffer:pixelBuffer];
      CVPixelBufferRelease(pixelBuffer);
    });
  }
}
ViewController의 인터페이스 정의를 MPPGraphDelegate로 업데이트합니다.
@interface ViewController () <MPPGraphDelegate, MPPInputSourceDelegate>
이게 다입니다. iOS 기기에서 앱을 빌드하고 실행합니다. 그러면 라이브 동영상 피드에서 에지 감지 그래프를 실행한 결과 축하합니다.
iOS 예에서는 이제 일반 템플릿 앱을 사용합니다. 코드
이 튜토리얼은 일반 템플릿 앱에서 사용됩니다. helloworld 앱에는
에지 감지 그래프에 적절한 BUILD 파일 종속 항목이 있습니다.