関数呼び出しを使用すると、モデルを外部ツールや API に接続できます。テキスト レスポンスを生成する代わりに、モデルは特定の関数を呼び出すタイミングを判断し、現実世界のアクションを実行するために必要なパラメータを提供します。これにより、モデルは自然言語と現実世界のアクションやデータとの間の橋渡しとして機能できます。関数呼び出しには、次の 3 つの主なユースケースがあります。
- 知識の拡張: データベース、API、ナレッジベースなどの外部ソースから情報にアクセスします。
- 機能の拡張: 外部ツールを使用して計算を実行し、モデルの制限を拡張します(電卓の使用やグラフの作成など)。
- アクションを実行する: API を使用して外部システムとやり取りします。たとえば、予約のスケジュール設定、請求書の作成、メールの送信、スマートホーム デバイスの制御などです。
Python
from google import genai
from google.genai import types

# Define the function declaration for the model
schedule_meeting_function = {
    "name": "schedule_meeting",
    "description": "Schedules a meeting with specified attendees at a given time and date.",
    "parameters": {
        "type": "object",
        "properties": {
            "attendees": {
                "type": "array",
                "items": {"type": "string"},
                "description": "List of people attending the meeting.",
            },
            "date": {
                "type": "string",
                "description": "Date of the meeting (e.g., '2024-07-29')",
            },
            "time": {
                "type": "string",
                "description": "Time of the meeting (e.g., '15:00')",
            },
            "topic": {
                "type": "string",
                "description": "The subject or topic of the meeting.",
            },
        },
        "required": ["attendees", "date", "time", "topic"],
    },
}

# Configure the client and tools
client = genai.Client()
tools = types.Tool(function_declarations=[schedule_meeting_function])
config = types.GenerateContentConfig(tools=[tools])

# Send request with function declarations
response = client.models.generate_content(
    model="gemini-3-flash-preview",
    contents="Schedule a meeting with Bob and Alice for 03/14/2025 at 10:00 AM about the Q3 planning.",
    config=config,
)

# Check for a function call
if response.candidates[0].content.parts[0].function_call:
    function_call = response.candidates[0].content.parts[0].function_call
    print(f"Function to call: {function_call.name}")
    print(f"Arguments: {function_call.args}")
    #  In a real app, you would call your function here:
    #  result = schedule_meeting(**function_call.args)
else:
    print("No function call found in the response.")
    print(response.text)
JavaScript
import { GoogleGenAI, Type } from '@google/genai';

// Configure the client
const ai = new GoogleGenAI({});

// Define the function declaration for the model
const scheduleMeetingFunctionDeclaration = {
  name: 'schedule_meeting',
  description: 'Schedules a meeting with specified attendees at a given time and date.',
  parameters: {
    type: Type.OBJECT,
    properties: {
      attendees: {
        type: Type.ARRAY,
        items: { type: Type.STRING },
        description: 'List of people attending the meeting.',
      },
      date: {
        type: Type.STRING,
        description: 'Date of the meeting (e.g., "2024-07-29")',
      },
      time: {
        type: Type.STRING,
        description: 'Time of the meeting (e.g., "15:00")',
      },
      topic: {
        type: Type.STRING,
        description: 'The subject or topic of the meeting.',
      },
    },
    required: ['attendees', 'date', 'time', 'topic'],
  },
};

// Send request with function declarations
const response = await ai.models.generateContent({
  model: 'gemini-3-flash-preview',
  contents: 'Schedule a meeting with Bob and Alice for 03/27/2025 at 10:00 AM about the Q3 planning.',
  config: {
    tools: [{
      functionDeclarations: [scheduleMeetingFunctionDeclaration]
    }],
  },
});

// Check for function calls in the response
if (response.functionCalls && response.functionCalls.length > 0) {
  const functionCall = response.functionCalls[0]; // Assuming one function call
  console.log(`Function to call: ${functionCall.name}`);
  console.log(`Arguments: ${JSON.stringify(functionCall.args)}`);
  // In a real app, you would call your actual function here:
  // const result = await scheduleMeeting(functionCall.args);
} else {
  console.log("No function call found in the response.");
  console.log(response.text);
}
REST
curl "https://generativelanguage.googleapis.com/v1beta/models/gemini-3-flash-preview:generateContent" \
  -H "x-goog-api-key: $GEMINI_API_KEY" \
  -H 'Content-Type: application/json' \
  -X POST \
  -d '{
    "contents": [
      {
        "role": "user",
        "parts": [
          {
            "text": "Schedule a meeting with Bob and Alice for 03/27/2025 at 10:00 AM about the Q3 planning."
          }
        ]
      }
    ],
    "tools": [
      {
        "functionDeclarations": [
          {
            "name": "schedule_meeting",
            "description": "Schedules a meeting with specified attendees at a given time and date.",
            "parameters": {
              "type": "object",
              "properties": {
                "attendees": {
                  "type": "array",
                  "items": {"type": "string"},
                  "description": "List of people attending the meeting."
                },
                "date": {
                  "type": "string",
                  "description": "Date of the meeting (e.g., '2024-07-29')"
                },
                "time": {
                  "type": "string",
                  "description": "Time of the meeting (e.g., '15:00')"
                },
                "topic": {
                  "type": "string",
                  "description": "The subject or topic of the meeting."
                }
              },
              "required": ["attendees", "date", "time", "topic"]
            }
          }
        ]
      }
    ]
  }'
関数呼び出しの仕組み
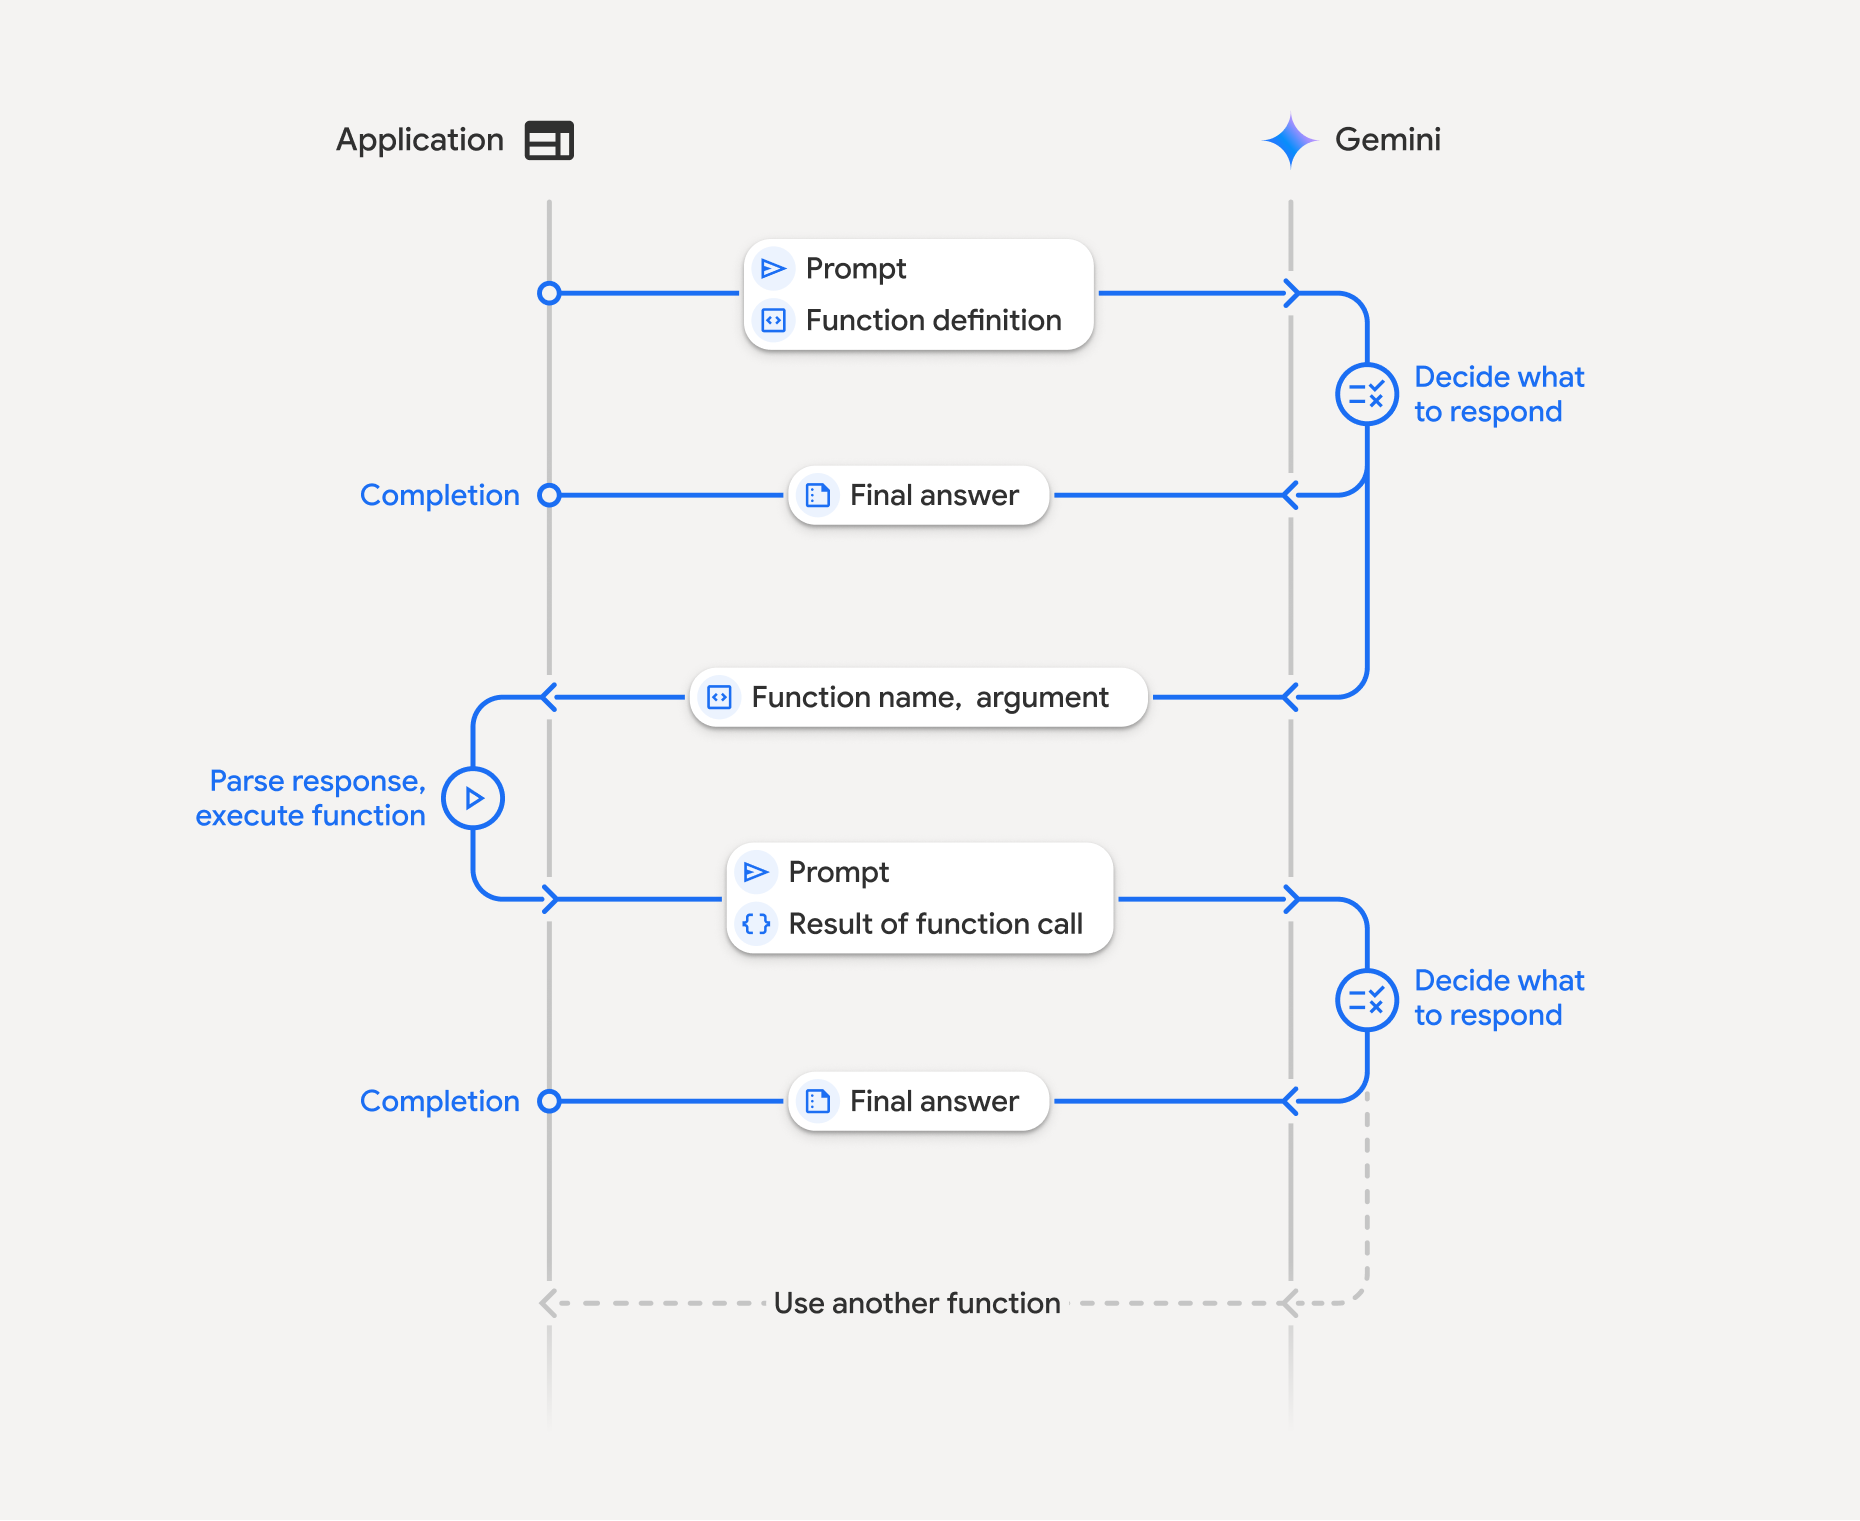
関数呼び出しでは、アプリケーション、モデル、外部関数間の構造化されたやり取りが行われます。プロセスの詳細は次のとおりです。
- 関数宣言を定義する: アプリケーション コードで関数宣言を定義します。関数宣言は、関数名、パラメータ、目的をモデルに記述します。
- 関数宣言を使用して LLM を呼び出す: ユーザーのプロンプトと関数宣言をモデルに送信します。リクエストを分析し、関数呼び出しが役立つかどうかを判断します。その場合、構造化された JSON オブジェクトで応答します。
- 関数コードの実行(ユーザーの責任): モデルは関数自体を実行しません。レスポンスを処理し、関数呼び出しを確認するのは、アプリケーションの責任です。
- はい: 関数の名前と引数を抽出し、アプリ内の対応する関数を実行します。
- いいえ: モデルがプロンプトに対して直接テキスト レスポンスを提供しました(このフローは例ではあまり強調されていませんが、考えられる結果です)。
- ユーザー フレンドリーなレスポンスを作成する: 関数が実行された場合は、結果を取得して、会話の次のターンでモデルに送り返します。この結果を使用して、関数呼び出しからの情報を取り込んだ、ユーザー フレンドリーな最終的なレスポンスを生成します。
このプロセスは複数回繰り返すことができ、複雑なインタラクションとワークフローが可能になります。モデルは、1 回のターンで複数の関数を並列(並列関数呼び出し)または順次(構成関数呼び出し)に呼び出すこともサポートしています。
ステップ 1: 関数宣言を定義する
ユーザーが照明の値を設定して API リクエストを行うことができる関数とその宣言を、アプリコード内で定義します。この関数は、外部サービスまたは API を呼び出す可能性があります。
Python
# Define a function that the model can call to control smart lights
set_light_values_declaration = {
    "name": "set_light_values",
    "description": "Sets the brightness and color temperature of a light.",
    "parameters": {
        "type": "object",
        "properties": {
            "brightness": {
                "type": "integer",
                "description": "Light level from 0 to 100. Zero is off and 100 is full brightness",
            },
            "color_temp": {
                "type": "string",
                "enum": ["daylight", "cool", "warm"],
                "description": "Color temperature of the light fixture, which can be `daylight`, `cool` or `warm`.",
            },
        },
        "required": ["brightness", "color_temp"],
    },
}

# This is the actual function that would be called based on the model's suggestion
def set_light_values(brightness: int, color_temp: str) -> dict[str, int | str]:
    """Set the brightness and color temperature of a room light. (mock API).

    Args:
        brightness: Light level from 0 to 100. Zero is off and 100 is full brightness
        color_temp: Color temperature of the light fixture, which can be `daylight`, `cool` or `warm`.

    Returns:
        A dictionary containing the set brightness and color temperature.
    """
    return {"brightness": brightness, "colorTemperature": color_temp}
JavaScript
import { Type } from '@google/genai';

// Define a function that the model can call to control smart lights
const setLightValuesFunctionDeclaration = {
  name: 'set_light_values',
  description: 'Sets the brightness and color temperature of a light.',
  parameters: {
    type: Type.OBJECT,
    properties: {
      brightness: {
        type: Type.NUMBER,
        description: 'Light level from 0 to 100. Zero is off and 100 is full brightness',
      },
      color_temp: {
        type: Type.STRING,
        enum: ['daylight', 'cool', 'warm'],
        description: 'Color temperature of the light fixture, which can be `daylight`, `cool` or `warm`.',
      },
    },
    required: ['brightness', 'color_temp'],
  },
};

/**

*   Set the brightness and color temperature of a room light. (mock API)
*   @param {number} brightness - Light level from 0 to 100. Zero is off and 100 is full brightness
*   @param {string} color_temp - Color temperature of the light fixture, which can be `daylight`, `cool` or `warm`.
*   @return {Object} A dictionary containing the set brightness and color temperature.
*/
function setLightValues(brightness, color_temp) {
  return {
    brightness: brightness,
    colorTemperature: color_temp
  };
}
ステップ 2: 関数宣言を使用してモデルを呼び出す
関数宣言を定義したら、モデルにそれらを使用するように指示できます。プロンプトと関数宣言を分析し、直接応答するか関数を呼び出すかを決定します。関数が呼び出されると、レスポンス オブジェクトに関数呼び出しの候補が含まれます。
Python
from google.genai import types

# Configure the client and tools
client = genai.Client()
tools = types.Tool(function_declarations=[set_light_values_declaration])
config = types.GenerateContentConfig(tools=[tools])

# Define user prompt
contents = [
    types.Content(
        role="user", parts=[types.Part(text="Turn the lights down to a romantic level")]
    )
]

# Send request with function declarations
response = client.models.generate_content(
    model="gemini-3-flash-preview",
    contents=contents,
    config=config,
)

print(response.candidates[0].content.parts[0].function_call)
JavaScript
import { GoogleGenAI } from '@google/genai';

// Generation config with function declaration
const config = {
  tools: [{
    functionDeclarations: [setLightValuesFunctionDeclaration]
  }]
};

// Configure the client
const ai = new GoogleGenAI({});

// Define user prompt
const contents = [
  {
    role: 'user',
    parts: [{ text: 'Turn the lights down to a romantic level' }]
  }
];

// Send request with function declarations
const response = await ai.models.generateContent({
  model: 'gemini-3-flash-preview',
  contents: contents,
  config: config
});

console.log(response.functionCalls[0]);
モデルは、ユーザーの質問に回答するために宣言された 1 つ以上の関数を呼び出す方法を指定する OpenAPI 互換スキーマで functionCall オブジェクトを返します。
Python
id=None args={'color_temp': 'warm', 'brightness': 25} name='set_light_values'
JavaScript
{
  name: 'set_light_values',
  args: { brightness: 25, color_temp: 'warm' }
}
ステップ 3: set_light_values 関数コードを実行する
モデルのレスポンスから関数呼び出しの詳細を抽出し、引数を解析して、set_light_values 関数を実行します。
Python
# Extract tool call details, it may not be in the first part.
tool_call = response.candidates[0].content.parts[0].function_call

if tool_call.name == "set_light_values":
    result = set_light_values(**tool_call.args)
    print(f"Function execution result: {result}")
JavaScript
// Extract tool call details
const tool_call = response.functionCalls[0]

let result;
if (tool_call.name === 'set_light_values') {
  result = setLightValues(tool_call.args.brightness, tool_call.args.color_temp);
  console.log(`Function execution result: ${JSON.stringify(result)}`);
}
ステップ 4: 関数結果を含むユーザー フレンドリーなレスポンスを作成し、モデルを再度呼び出す
最後に、関数実行の結果をモデルに送り返します。モデルはこの情報をユーザーへの最終的なレスポンスに組み込みます。
Python
from google import genai
from google.genai import types

# Create a function response part
function_response_part = types.Part.from_function_response(
    name=tool_call.name,
    response={"result": result},
)

# Append function call and result of the function execution to contents
contents.append(response.candidates[0].content) # Append the content from the model's response.
contents.append(types.Content(role="user", parts=[function_response_part])) # Append the function response

client = genai.Client()
final_response = client.models.generate_content(
    model="gemini-3-flash-preview",
    config=config,
    contents=contents,
)

print(final_response.text)
JavaScript
// Create a function response part
const function_response_part = {
  name: tool_call.name,
  response: { result }
}

// Append function call and result of the function execution to contents
contents.push(response.candidates[0].content);
contents.push({ role: 'user', parts: [{ functionResponse: function_response_part }] });

// Get the final response from the model
const final_response = await ai.models.generateContent({
  model: 'gemini-3-flash-preview',
  contents: contents,
  config: config
});

console.log(final_response.text);
これで、関数呼び出しフローが完了します。モデルは set_light_values 関数を使用して、ユーザーのリクエスト アクションを正常に実行しました。
関数宣言
プロンプトで関数呼び出しを実装する場合は、1 つ以上の function declarations を含む tools オブジェクトを作成します。関数は JSON を使用して定義します。具体的には、OpenAPI スキーマ形式のサブセットを選択します。1 つの関数宣言に含めることができるパラメータは、次のとおりです。
name(文字列): 関数の固有の名前(get_weather_forecast、send_email)。スペースや特殊文字を含まない説明的な名前を使用します(アンダースコアまたは camelCase を使用します)。description(文字列): 関数の目的と機能についての明確で詳細な説明。これは、モデルが関数を使用するタイミングを理解するために重要です。具体的かつ明確に説明し、必要に応じて例を挙げます(「現在映画館で上映中の映画のタイトルと、必要に応じて場所に基づいて映画館を検索します。」など)。parameters(オブジェクト): 関数が想定する入力パラメータを定義します。type(文字列): 全体的なデータ型(objectなど)を指定します。properties(オブジェクト): 個々のパラメータを一覧表示します。各パラメータには次の情報が含まれます。type(文字列): パラメータのデータ型(string、integer、boolean, arrayなど)。description(文字列): パラメータの目的と形式の説明。例と制約を指定します(「市区町村と都道府県。例: 'San Francisco, CA' または郵便番号(例: '95616'.")。enum(配列、省略可): パラメータ値が固定セットの場合、説明で説明するだけでなく、許可される値を一覧表示するには、「enum」を使用します。これにより、精度が向上します(「enum」: ["daylight", "cool", "warm"])。
required(配列): 関数の動作に必須のパラメータ名を列挙した文字列の配列。
types.FunctionDeclaration.from_callable(client=client, callable=your_function) を使用して、Python 関数から FunctionDeclarations を直接構築することもできます。
思考モデルを使用した関数呼び出し
Gemini 3 シリーズと 2.5 シリーズのモデルは、内部の「思考」プロセスを使用してリクエストを推論します。これにより、関数呼び出しのパフォーマンスが大幅に向上し、モデルが関数を呼び出すタイミングと使用するパラメータをより適切に判断できるようになります。Gemini API はステートレスであるため、モデルは思考シグネチャを使用して、マルチターン会話でコンテキストを維持します。
このセクションでは、思考シグネチャの詳細な管理について説明します。このセクションは、API リクエストを手動で作成する場合(REST 経由など)や、会話履歴を操作する場合にのみ必要です。
Google GenAI SDK(Google の公式ライブラリ)を使用している場合は、このプロセスを管理する必要はありません。SDK は、前の例に示すように、必要な手順を自動的に処理します。
会話履歴を手動で管理する
会話履歴を手動で変更する場合は、以前の完全なレスポンスを送信する代わりに、モデルのターンに含まれる thought_signature を正しく処理する必要があります。
モデルのコンテキストが保持されるように、次のルールに従ってください。
- 常に、元の
Part内のモデルにthought_signatureを送り返します。 - シグネチャを含む
Partと含まないものを結合しないでください。これにより、思考の位置コンテキストが損なわれます。 - 署名文字列はマージできないため、両方に署名が含まれている 2 つの
Partsを結合しないでください。
Gemini 3 の思考シグネチャ
Gemini 3 では、モデル レスポンスの Part に思考シグネチャが含まれることがあります。一般に、すべての Part タイプからシグネチャを返すことをおすすめしますが、関数呼び出しでは思考シグネチャを返すことが必須です。会話履歴を手動で操作しない限り、Google GenAI SDK は思考シグネチャを自動的に処理します。
会話履歴を手動で操作する場合は、思考シグネチャのページで、Gemini 3 の思考シグネチャの処理に関する完全なガイダンスと詳細を参照してください。
思考シグネチャの検査
実装には必要ありませんが、デバッグや学習のためにレスポンスを調べて thought_signature を確認できます。
Python
import base64
# After receiving a response from a model with thinking enabled
# response = client.models.generate_content(...)

# The signature is attached to the response part containing the function call
part = response.candidates[0].content.parts[0]
if part.thought_signature:
  print(base64.b64encode(part.thought_signature).decode("utf-8"))
JavaScript
// After receiving a response from a model with thinking enabled
// const response = await ai.models.generateContent(...)

// The signature is attached to the response part containing the function call
const part = response.candidates[0].content.parts[0];
if (part.thoughtSignature) {
  console.log(part.thoughtSignature);
}
思考シグネチャの制限事項と使用方法、および思考モデル全般については、思考のページをご覧ください。
並列関数呼び出し
単一ターンの関数呼び出しに加えて、複数の関数を一度に呼び出すこともできます。並列関数呼び出しでは、複数の関数を一度に実行できます。関数が相互に依存していない場合に使用されます。これは、複数の独立したソースからデータを収集するシナリオ(異なるデータベースから顧客の詳細を取得する、さまざまな倉庫の在庫レベルを確認する、アパートをディスコに改造するなど複数のアクションを実行する)で役立ちます。
Python
power_disco_ball = {
    "name": "power_disco_ball",
    "description": "Powers the spinning disco ball.",
    "parameters": {
        "type": "object",
        "properties": {
            "power": {
                "type": "boolean",
                "description": "Whether to turn the disco ball on or off.",
            }
        },
        "required": ["power"],
    },
}

start_music = {
    "name": "start_music",
    "description": "Play some music matching the specified parameters.",
    "parameters": {
        "type": "object",
        "properties": {
            "energetic": {
                "type": "boolean",
                "description": "Whether the music is energetic or not.",
            },
            "loud": {
                "type": "boolean",
                "description": "Whether the music is loud or not.",
            },
        },
        "required": ["energetic", "loud"],
    },
}

dim_lights = {
    "name": "dim_lights",
    "description": "Dim the lights.",
    "parameters": {
        "type": "object",
        "properties": {
            "brightness": {
                "type": "number",
                "description": "The brightness of the lights, 0.0 is off, 1.0 is full.",
            }
        },
        "required": ["brightness"],
    },
}
JavaScript
import { Type } from '@google/genai';

const powerDiscoBall = {
  name: 'power_disco_ball',
  description: 'Powers the spinning disco ball.',
  parameters: {
    type: Type.OBJECT,
    properties: {
      power: {
        type: Type.BOOLEAN,
        description: 'Whether to turn the disco ball on or off.'
      }
    },
    required: ['power']
  }
};

const startMusic = {
  name: 'start_music',
  description: 'Play some music matching the specified parameters.',
  parameters: {
    type: Type.OBJECT,
    properties: {
      energetic: {
        type: Type.BOOLEAN,
        description: 'Whether the music is energetic or not.'
      },
      loud: {
        type: Type.BOOLEAN,
        description: 'Whether the music is loud or not.'
      }
    },
    required: ['energetic', 'loud']
  }
};

const dimLights = {
  name: 'dim_lights',
  description: 'Dim the lights.',
  parameters: {
    type: Type.OBJECT,
    properties: {
      brightness: {
        type: Type.NUMBER,
        description: 'The brightness of the lights, 0.0 is off, 1.0 is full.'
      }
    },
    required: ['brightness']
  }
};
指定されたすべてのツールを使用できるように関数呼び出しモードを構成します。詳細については、関数呼び出しの構成をご覧ください。
Python
from google import genai
from google.genai import types

# Configure the client and tools
client = genai.Client()
house_tools = [
    types.Tool(function_declarations=[power_disco_ball, start_music, dim_lights])
]
config = types.GenerateContentConfig(
    tools=house_tools,
    automatic_function_calling=types.AutomaticFunctionCallingConfig(
        disable=True
    ),
    # Force the model to call 'any' function, instead of chatting.
    tool_config=types.ToolConfig(
        function_calling_config=types.FunctionCallingConfig(mode='ANY')
    ),
)

chat = client.chats.create(model="gemini-3-flash-preview", config=config)
response = chat.send_message("Turn this place into a party!")

# Print out each of the function calls requested from this single call
print("Example 1: Forced function calling")
for fn in response.function_calls:
    args = ", ".join(f"{key}={val}" for key, val in fn.args.items())
    print(f"{fn.name}({args})")
JavaScript
import { GoogleGenAI } from '@google/genai';

// Set up function declarations
const houseFns = [powerDiscoBall, startMusic, dimLights];

const config = {
    tools: [{
        functionDeclarations: houseFns
    }],
    // Force the model to call 'any' function, instead of chatting.
    toolConfig: {
        functionCallingConfig: {
            mode: 'any'
        }
    }
};

// Configure the client
const ai = new GoogleGenAI({});

// Create a chat session
const chat = ai.chats.create({
    model: 'gemini-3-flash-preview',
    config: config
});
const response = await chat.sendMessage({message: 'Turn this place into a party!'});

// Print out each of the function calls requested from this single call
console.log("Example 1: Forced function calling");
for (const fn of response.functionCalls) {
    const args = Object.entries(fn.args)
        .map(([key, val]) => `${key}=${val}`)
        .join(', ');
    console.log(`${fn.name}(${args})`);
}
出力された結果はそれぞれ、モデルがリクエストした 1 つの関数呼び出しを反映しています。結果を返すには、リクエストされた順序と同じ順序でレスポンスを含めます。
Python SDK は、Python 関数を宣言に自動的に変換し、関数呼び出しの実行とレスポンスのサイクルを処理する自動関数呼び出しをサポートしています。以下に、ディスコのユースケースの例を示します。
Python
from google import genai
from google.genai import types

# Actual function implementations
def power_disco_ball_impl(power: bool) -> dict:
    """Powers the spinning disco ball.

    Args:
        power: Whether to turn the disco ball on or off.

    Returns:
        A status dictionary indicating the current state.
    """
    return {"status": f"Disco ball powered {'on' if power else 'off'}"}

def start_music_impl(energetic: bool, loud: bool) -> dict:
    """Play some music matching the specified parameters.

    Args:
        energetic: Whether the music is energetic or not.
        loud: Whether the music is loud or not.

    Returns:
        A dictionary containing the music settings.
    """
    music_type = "energetic" if energetic else "chill"
    volume = "loud" if loud else "quiet"
    return {"music_type": music_type, "volume": volume}

def dim_lights_impl(brightness: float) -> dict:
    """Dim the lights.

    Args:
        brightness: The brightness of the lights, 0.0 is off, 1.0 is full.

    Returns:
        A dictionary containing the new brightness setting.
    """
    return {"brightness": brightness}

# Configure the client
client = genai.Client()
config = types.GenerateContentConfig(
    tools=[power_disco_ball_impl, start_music_impl, dim_lights_impl]
)

# Make the request
response = client.models.generate_content(
    model="gemini-3-flash-preview",
    contents="Do everything you need to this place into party!",
    config=config,
)

print("\nExample 2: Automatic function calling")
print(response.text)
# I've turned on the disco ball, started playing loud and energetic music, and dimmed the lights to 50% brightness. Let's get this party started!
コンポジション関数呼び出し
構成的または順次的な関数呼び出しにより、Gemini は複数の関数呼び出しを連結して、複雑なリクエストを満たすことができます。たとえば、「現在地の気温を教えて」という質問に答えるために、Gemini API は最初に get_current_location() 関数を呼び出し、次に場所をパラメータとして受け取る get_weather() 関数を呼び出すことがあります。
次の例は、Python SDK と自動関数呼び出しを使用して合成関数呼び出しを実装する方法を示しています。
Python
この例では、google-genai Python SDK の自動関数呼び出し機能を使用します。SDK は、Python 関数を必要なスキーマに自動的に変換し、モデルからリクエストされたときに関数呼び出しを実行し、結果をモデルに送り返してタスクを完了します。
import os
from google import genai
from google.genai import types

# Example Functions
def get_weather_forecast(location: str) -> dict:
    """Gets the current weather temperature for a given location."""
    print(f"Tool Call: get_weather_forecast(location={location})")
    # TODO: Make API call
    print("Tool Response: {'temperature': 25, 'unit': 'celsius'}")
    return {"temperature": 25, "unit": "celsius"}  # Dummy response

def set_thermostat_temperature(temperature: int) -> dict:
    """Sets the thermostat to a desired temperature."""
    print(f"Tool Call: set_thermostat_temperature(temperature={temperature})")
    # TODO: Interact with a thermostat API
    print("Tool Response: {'status': 'success'}")
    return {"status": "success"}

# Configure the client and model
client = genai.Client()
config = types.GenerateContentConfig(
    tools=[get_weather_forecast, set_thermostat_temperature]
)

# Make the request
response = client.models.generate_content(
    model="gemini-3-flash-preview",
    contents="If it's warmer than 20°C in London, set the thermostat to 20°C, otherwise set it to 18°C.",
    config=config,
)

# Print the final, user-facing response
print(response.text)
想定される出力
コードを実行すると、SDK が関数呼び出しをオーケストレートしていることがわかります。モデルは最初に get_weather_forecast を呼び出し、温度を受け取ってから、プロンプトのロジックに基づいて正しい値で set_thermostat_temperature を呼び出します。
Tool Call: get_weather_forecast(location=London)
Tool Response: {'temperature': 25, 'unit': 'celsius'}
Tool Call: set_thermostat_temperature(temperature=20)
Tool Response: {'status': 'success'}
OK. I've set the thermostat to 20°C.
JavaScript
この例では、JavaScript/TypeScript SDK を使用して、手動実行ループで合成関数呼び出しを行う方法を示します。
import { GoogleGenAI, Type } from "@google/genai";

// Configure the client
const ai = new GoogleGenAI({});

// Example Functions
function get_weather_forecast({ location }) {
  console.log(`Tool Call: get_weather_forecast(location=${location})`);
  // TODO: Make API call
  console.log("Tool Response: {'temperature': 25, 'unit': 'celsius'}");
  return { temperature: 25, unit: "celsius" };
}

function set_thermostat_temperature({ temperature }) {
  console.log(
    `Tool Call: set_thermostat_temperature(temperature=${temperature})`,
  );
  // TODO: Make API call
  console.log("Tool Response: {'status': 'success'}");
  return { status: "success" };
}

const toolFunctions = {
  get_weather_forecast,
  set_thermostat_temperature,
};

const tools = [
  {
    functionDeclarations: [
      {
        name: "get_weather_forecast",
        description:
          "Gets the current weather temperature for a given location.",
        parameters: {
          type: Type.OBJECT,
          properties: {
            location: {
              type: Type.STRING,
            },
          },
          required: ["location"],
        },
      },
      {
        name: "set_thermostat_temperature",
        description: "Sets the thermostat to a desired temperature.",
        parameters: {
          type: Type.OBJECT,
          properties: {
            temperature: {
              type: Type.NUMBER,
            },
          },
          required: ["temperature"],
        },
      },
    ],
  },
];

// Prompt for the model
let contents = [
  {
    role: "user",
    parts: [
      {
        text: "If it's warmer than 20°C in London, set the thermostat to 20°C, otherwise set it to 18°C.",
      },
    ],
  },
];

// Loop until the model has no more function calls to make
while (true) {
  const result = await ai.models.generateContent({
    model: "gemini-3-flash-preview",
    contents,
    config: { tools },
  });

  if (result.functionCalls && result.functionCalls.length > 0) {
    const functionCall = result.functionCalls[0];

    const { name, args } = functionCall;

    if (!toolFunctions[name]) {
      throw new Error(`Unknown function call: ${name}`);
    }

    // Call the function and get the response.
    const toolResponse = toolFunctions[name](args);

    const functionResponsePart = {
      name: functionCall.name,
      response: {
        result: toolResponse,
      },
    };

    // Send the function response back to the model.
    contents.push({
      role: "model",
      parts: [
        {
          functionCall: functionCall,
        },
      ],
    });
    contents.push({
      role: "user",
      parts: [
        {
          functionResponse: functionResponsePart,
        },
      ],
    });
  } else {
    // No more function calls, break the loop.
    console.log(result.text);
    break;
  }
}
想定される出力
コードを実行すると、SDK が関数呼び出しをオーケストレートしていることがわかります。モデルは最初に get_weather_forecast を呼び出し、温度を受け取ってから、プロンプトのロジックに基づいて正しい値で set_thermostat_temperature を呼び出します。
Tool Call: get_weather_forecast(location=London)
Tool Response: {'temperature': 25, 'unit': 'celsius'}
Tool Call: set_thermostat_temperature(temperature=20)
Tool Response: {'status': 'success'}
OK. It's 25°C in London, so I've set the thermostat to 20°C.
コンポジション関数呼び出しは、ネイティブの Live API 機能です。つまり、Live API は Python SDK と同様に関数呼び出しを処理できます。
Python
# Light control schemas
turn_on_the_lights_schema = {'name': 'turn_on_the_lights'}
turn_off_the_lights_schema = {'name': 'turn_off_the_lights'}

prompt = """
  Hey, can you write run some python code to turn on the lights, wait 10s and then turn off the lights?
  """

tools = [
    {'code_execution': {}},
    {'function_declarations': [turn_on_the_lights_schema, turn_off_the_lights_schema]}
]

await run(prompt, tools=tools, modality="AUDIO")
JavaScript
// Light control schemas
const turnOnTheLightsSchema = { name: 'turn_on_the_lights' };
const turnOffTheLightsSchema = { name: 'turn_off_the_lights' };

const prompt = `
  Hey, can you write run some python code to turn on the lights, wait 10s and then turn off the lights?
`;

const tools = [
  { codeExecution: {} },
  { functionDeclarations: [turnOnTheLightsSchema, turnOffTheLightsSchema] }
];

await run(prompt, tools=tools, modality="AUDIO")
関数呼び出しモード
Gemini API を使用すると、モデルが提供されたツール(関数宣言)を使用する方法を制御できます。具体的には、.function_calling_config 内でモードを設定できます。
AUTO (Default): モデルは、プロンプトとコンテキストに基づいて、自然言語によるレスポンスを生成するか、関数呼び出しを提案するかを決定します。これは最も柔軟なモードであり、ほとんどのシナリオにおすすめです。ANY: モデルは常に関数呼び出しを予測するように制約され、関数スキーマの準拠が保証されます。allowed_function_namesが指定されていない場合、モデルは指定された関数宣言のいずれかを選択できます。allowed_function_namesがリストとして指定されている場合、モデルはそのリスト内の関数からのみ選択できます。すべてのプロンプトに関数呼び出しのレスポンスが必要な場合は、このモードを使用します(該当する場合)。NONE: モデルは関数呼び出しを行うことが禁止されています。これは、関数宣言なしでリクエストを送信するのと同じです。これを使用すると、ツール定義を削除せずに、関数呼び出しを一時的に無効にできます。VALIDATED(プレビュー): モデルは、関数呼び出しまたは自然言語のいずれかを予測するように制約され、関数スキーマの準拠が保証されます。allowed_function_namesが指定されていない場合、モデルは使用可能なすべての関数宣言から選択します。allowed_function_namesが指定されている場合、モデルは許可された関数のセットから選択します。
Python
from google.genai import types

# Configure function calling mode
tool_config = types.ToolConfig(
    function_calling_config=types.FunctionCallingConfig(
        mode="ANY", allowed_function_names=["get_current_temperature"]
    )
)

# Create the generation config
config = types.GenerateContentConfig(
    tools=[tools],  # not defined here.
    tool_config=tool_config,
)
JavaScript
import { FunctionCallingConfigMode } from '@google/genai';

// Configure function calling mode
const toolConfig = {
  functionCallingConfig: {
    mode: FunctionCallingConfigMode.ANY,
    allowedFunctionNames: ['get_current_temperature']
  }
};

// Create the generation config
const config = {
  tools: tools, // not defined here.
  toolConfig: toolConfig,
};
自動関数呼び出し(Python のみ)
Python SDK を使用する場合は、Python 関数をツールとして直接指定できます。SDK はこれらの関数を宣言に変換し、関数呼び出しの実行を管理し、レスポンス サイクルを処理します。型ヒントと docstring を使用して関数を定義します。最適な結果を得るには、Google スタイルの docstring を使用することをおすすめします。SDK は、次の処理を自動的に行います。
- モデルから関数呼び出しのレスポンスを検出します。
- コードで対応する Python 関数を呼び出します。
- 関数のレスポンスをモデルに返します。
- モデルの最終的なテキスト レスポンスを返します。
現在、SDK は引数の説明を解析して、生成された関数宣言のプロパティの説明スロットに格納しません。代わりに、docstring 全体を最上位の関数説明として送信します。
Python
from google import genai
from google.genai import types

# Define the function with type hints and docstring
def get_current_temperature(location: str) -> dict:
    """Gets the current temperature for a given location.

    Args:
        location: The city and state, e.g. San Francisco, CA

    Returns:
        A dictionary containing the temperature and unit.
    """
    # ... (implementation) ...
    return {"temperature": 25, "unit": "Celsius"}

# Configure the client
client = genai.Client()
config = types.GenerateContentConfig(
    tools=[get_current_temperature]
)  # Pass the function itself

# Make the request
response = client.models.generate_content(
    model="gemini-3-flash-preview",
    contents="What's the temperature in Boston?",
    config=config,
)

print(response.text)  # The SDK handles the function call and returns the final text
自動関数呼び出しは、次の方法で無効にできます。
Python
config = types.GenerateContentConfig(
    tools=[get_current_temperature],
    automatic_function_calling=types.AutomaticFunctionCallingConfig(disable=True)
)
自動関数スキーマ宣言
API は次のいずれかの型を記述できます。Pydantic 型は、定義されたフィールドも許可された型で構成されている限り許可されます。ここでは辞書型(dict[str: int] など)は十分にサポートされていないため、使用しないでください。
Python
AllowedType = (
  int | float | bool | str | list['AllowedType'] | pydantic.BaseModel)
推定スキーマを確認するには、from_callable を使用して変換します。
Python
from google import genai
from google.genai import types

def multiply(a: float, b: float):
    """Returns a * b."""
    return a * b

client = genai.Client()
fn_decl = types.FunctionDeclaration.from_callable(callable=multiply, client=client)

# to_json_dict() provides a clean JSON representation.
print(fn_decl.to_json_dict())
マルチツールの使用: ネイティブ ツールと関数呼び出しを組み合わせる
複数のツールを同時に有効にして、ネイティブ ツールと関数呼び出しを組み合わせることができます。次の例では、Live API を使用するリクエストで、Google 検索によるグラウンディングとコード実行の 2 つのツールを有効にしています。
Python
# Multiple tasks example - combining lights, code execution, and search
prompt = """
  Hey, I need you to do three things for me.

    1.  Turn on the lights.
    2.  Then compute the largest prime palindrome under 100000.
    3.  Then use Google Search to look up information about the largest earthquake in California the week of Dec 5 2024.

  Thanks!
  """

tools = [
    {'google_search': {}},
    {'code_execution': {}},
    {'function_declarations': [turn_on_the_lights_schema, turn_off_the_lights_schema]} # not defined here.
]

# Execute the prompt with specified tools in audio modality
await run(prompt, tools=tools, modality="AUDIO")
JavaScript
// Multiple tasks example - combining lights, code execution, and search
const prompt = `
  Hey, I need you to do three things for me.

    1.  Turn on the lights.
    2.  Then compute the largest prime palindrome under 100000.
    3.  Then use Google Search to look up information about the largest earthquake in California the week of Dec 5 2024.

  Thanks!
`;

const tools = [
  { googleSearch: {} },
  { codeExecution: {} },
  { functionDeclarations: [turnOnTheLightsSchema, turnOffTheLightsSchema] } // not defined here.
];

// Execute the prompt with specified tools in audio modality
await run(prompt, {tools: tools, modality: "AUDIO"});
Python デベロッパーは、Live API Tool Use ノートブックでこれを試すことができます。
マルチモーダル関数レスポンス
Gemini 3 シリーズのモデルでは、モデルに送信する関数レスポンス部分にマルチモーダル コンテンツを含めることができます。モデルは、次のターンでこのマルチモーダル コンテンツを処理して、より多くの情報に基づいたレスポンスを生成できます。関数レスポンスのマルチモーダル コンテンツでは、次の MIME タイプがサポートされています。
- 画像:
image/png、image/jpeg、image/webp - ドキュメント:
application/pdf、text/plain
関数レスポンスにマルチモーダル データを含めるには、functionResponse 部分内にネストされた 1 つ以上の部分としてデータを含めます。各マルチモーダル部分には、inlineData を含める必要があります。構造化された response フィールド内からマルチモーダル パートを参照する場合は、一意の displayName を含める必要があります。
JSON 参照形式 {"$ref": "<displayName>"} を使用して、functionResponse 部分の構造化された response フィールド内からマルチモーダル部分を参照することもできます。モデルは、レスポンスの処理時に参照をマルチモーダル コンテンツに置き換えます。各 displayName は、構造化された response フィールドで 1 回だけ参照できます。
次の例は、get_image という名前の関数の functionResponse と、displayName: "instrument.jpg" を含む画像データを含むネストされた部分を含むメッセージを示しています。functionResponse の response フィールドは、この画像部分を参照します。
Python
from google import genai
from google.genai import types

import requests

client = genai.Client()

# This is a manual, two turn multimodal function calling workflow:

# 1. Define the function tool
get_image_declaration = types.FunctionDeclaration(
  name="get_image",
  description="Retrieves the image file reference for a specific order item.",
  parameters={
      "type": "object",
      "properties": {
          "item_name": {
              "type": "string",
              "description": "The name or description of the item ordered (e.g., 'instrument')."
          }
      },
      "required": ["item_name"],
  },
)
tool_config = types.Tool(function_declarations=[get_image_declaration])

# 2. Send a message that triggers the tool
prompt = "Show me the instrument I ordered last month."
response_1 = client.models.generate_content(
  model="gemini-3-flash-preview",
  contents=[prompt],
  config=types.GenerateContentConfig(
      tools=[tool_config],
  )
)

# 3. Handle the function call
function_call = response_1.function_calls[0]
requested_item = function_call.args["item_name"]
print(f"Model wants to call: {function_call.name}")

# Execute your tool (e.g., call an API)
# (This is a mock response for the example)
print(f"Calling external tool for: {requested_item}")

function_response_data = {
  "image_ref": {"$ref": "instrument.jpg"},
}
image_path = "https://goo.gle/instrument-img"
image_bytes = requests.get(image_path).content
function_response_multimodal_data = types.FunctionResponsePart(
  inline_data=types.FunctionResponseBlob(
    mime_type="image/jpeg",
    display_name="instrument.jpg",
    data=image_bytes,
  )
)

# 4. Send the tool's result back
# Append this turn's messages to history for a final response.
history = [
  types.Content(role="user", parts=[types.Part(text=prompt)]),
  response_1.candidates[0].content,
  types.Content(
    role="tool",
    parts=[
        types.Part.from_function_response(
          name=function_call.name,
          response=function_response_data,
          parts=[function_response_multimodal_data]
        )
    ],
  )
]

response_2 = client.models.generate_content(
  model="gemini-3-flash-preview",
  contents=history,
  config=types.GenerateContentConfig(
      tools=[tool_config],
      thinking_config=types.ThinkingConfig(include_thoughts=True)
  ),
)

print(f"\nFinal model response: {response_2.text}")
JavaScript
import { GoogleGenAI, Type } from '@google/genai';

const client = new GoogleGenAI({ apiKey: process.env.GEMINI_API_KEY });

// This is a manual, two turn multimodal function calling workflow:
// 1. Define the function tool
const getImageDeclaration = {
  name: 'get_image',
  description: 'Retrieves the image file reference for a specific order item.',
  parameters: {
    type: Type.OBJECT,
    properties: {
      item_name: {
        type: Type.STRING,
        description: "The name or description of the item ordered (e.g., 'instrument').",
      },
    },
    required: ['item_name'],
  },
};

const toolConfig = {
  functionDeclarations: [getImageDeclaration],
};

// 2. Send a message that triggers the tool
const prompt = 'Show me the instrument I ordered last month.';
const response1 = await client.models.generateContent({
  model: 'gemini-3-flash-preview',
  contents: prompt,
  config: {
    tools: [toolConfig],
  },
});

// 3. Handle the function call
const functionCall = response1.functionCalls[0];
const requestedItem = functionCall.args.item_name;
console.log(`Model wants to call: ${functionCall.name}`);

// Execute your tool (e.g., call an API)
// (This is a mock response for the example)
console.log(`Calling external tool for: ${requestedItem}`);

const functionResponseData = {
  image_ref: { $ref: 'instrument.jpg' },
};

const imageUrl = "https://goo.gle/instrument-img";
const response = await fetch(imageUrl);
const imageArrayBuffer = await response.arrayBuffer();
const base64ImageData = Buffer.from(imageArrayBuffer).toString('base64');

const functionResponseMultimodalData = {
  inlineData: {
    mimeType: 'image/jpeg',
    displayName: 'instrument.jpg',
    data: base64ImageData,
  },
};

// 4. Send the tool's result back
// Append this turn's messages to history for a final response.
const history = [
  { role: 'user', parts: [{ text: prompt }] },
  response1.candidates[0].content,
  {
    role: 'tool',
    parts: [
      {
        functionResponse: {
          name: functionCall.name,
          response: functionResponseData,
          parts: [functionResponseMultimodalData],
        },
      },
    ],
  },
];

const response2 = await client.models.generateContent({
  model: 'gemini-3-flash-preview',
  contents: history,
  config: {
    tools: [toolConfig],
    thinkingConfig: { includeThoughts: true },
  },
});

console.log(`\nFinal model response: ${response2.text}`);
REST
IMG_URL="https://goo.gle/instrument-img"

MIME_TYPE=$(curl -sIL "$IMG_URL" | grep -i '^content-type:' | awk -F ': ' '{print $2}' | sed 's/\r$//' | head -n 1)
if [[ -z "$MIME_TYPE" || ! "$MIME_TYPE" == image/* ]]; then
  MIME_TYPE="image/jpeg"
fi

# Check for macOS
if [[ "$(uname)" == "Darwin" ]]; then
  IMAGE_B64=$(curl -sL "$IMG_URL" | base64 -b 0)
elif [[ "$(base64 --version 2>&1)" = *"FreeBSD"* ]]; then
  IMAGE_B64=$(curl -sL "$IMG_URL" | base64)
else
  IMAGE_B64=$(curl -sL "$IMG_URL" | base64 -w0)
fi

curl "https://generativelanguage.googleapis.com/v1beta/models/gemini-3-flash-preview:generateContent" \
  -H "x-goog-api-key: $GEMINI_API_KEY" \
  -H 'Content-Type: application/json' \
  -X POST \
  -d '{
    "contents": [
      ...,
      {
        "role": "user",
        "parts": [
        {
            "functionResponse": {
              "name": "get_image",
              "response": {
                "image_ref": {
                  "$ref": "instrument.jpg"
                }
              },
              "parts": [
                {
                  "inlineData": {
                    "displayName": "instrument.jpg",
                    "mimeType":"'"$MIME_TYPE"'",
                    "data": "'"$IMAGE_B64"'"
                  }
                }
              ]
            }
          }
        ]
      }
    ]
  }'
構造化出力を使用した関数呼び出し
Gemini 3 シリーズのモデルでは、構造化出力で関数呼び出しを使用できます。これにより、モデルは特定のスキーマに準拠する関数呼び出しまたは出力を予測できます。そのため、モデルが関数呼び出しを生成しない場合でも、一貫した形式のレスポンスを受信できます。
モデル コンテキスト プロトコル(MCP)
Model Context Protocol(MCP)は、AI アプリケーションを外部のツールやデータに接続するためのオープン スタンダードです。MCP は、関数(ツール)、データソース(リソース)、事前定義されたプロンプトなどのコンテキストにモデルがアクセスするための共通プロトコルを提供します。
Gemini SDK には MCP のサポートが組み込まれているため、ボイラープレート コードが削減され、MCP ツール用の自動ツール呼び出しが提供されます。モデルが MCP ツール呼び出しを生成すると、Python と JavaScript のクライアント SDK は MCP ツールを自動的に実行し、後続のリクエストでレスポンスをモデルに送り返します。このループは、モデルがツール呼び出しを行わなくなるまで続きます。
ここでは、Gemini と mcp SDK でローカル MCP サーバーを使用する方法の例を示します。
Python
選択したプラットフォームに最新バージョンの mcp SDK がインストールされていることを確認します。
pip install mcp
import os
import asyncio
from datetime import datetime
from mcp import ClientSession, StdioServerParameters
from mcp.client.stdio import stdio_client
from google import genai

client = genai.Client()

# Create server parameters for stdio connection
server_params = StdioServerParameters(
    command="npx",  # Executable
    args=["-y", "@philschmid/weather-mcp"],  # MCP Server
    env=None,  # Optional environment variables
)

async def run():
    async with stdio_client(server_params) as (read, write):
        async with ClientSession(read, write) as session:
            # Prompt to get the weather for the current day in London.
            prompt = f"What is the weather in London in {datetime.now().strftime('%Y-%m-%d')}?"

            # Initialize the connection between client and server
            await session.initialize()

            # Send request to the model with MCP function declarations
            response = await client.aio.models.generate_content(
                model="gemini-2.5-flash",
                contents=prompt,
                config=genai.types.GenerateContentConfig(
                    temperature=0,
                    tools=[session],  # uses the session, will automatically call the tool
                    # Uncomment if you **don't** want the SDK to automatically call the tool
                    # automatic_function_calling=genai.types.AutomaticFunctionCallingConfig(
                    #     disable=True
                    # ),
                ),
            )
            print(response.text)

# Start the asyncio event loop and run the main function
asyncio.run(run())
JavaScript
選択したプラットフォームに最新バージョンの mcp SDK がインストールされていることを確認します。
npm install @modelcontextprotocol/sdk
import { GoogleGenAI, FunctionCallingConfigMode , mcpToTool} from '@google/genai';
import { Client } from "@modelcontextprotocol/sdk/client/index.js";
import { StdioClientTransport } from "@modelcontextprotocol/sdk/client/stdio.js";

// Create server parameters for stdio connection
const serverParams = new StdioClientTransport({
  command: "npx", // Executable
  args: ["-y", "@philschmid/weather-mcp"] // MCP Server
});

const client = new Client(
  {
    name: "example-client",
    version: "1.0.0"
  }
);

// Configure the client
const ai = new GoogleGenAI({});

// Initialize the connection between client and server
await client.connect(serverParams);

// Send request to the model with MCP tools
const response = await ai.models.generateContent({
  model: "gemini-2.5-flash",
  contents: `What is the weather in London in ${new Date().toLocaleDateString()}?`,
  config: {
    tools: [mcpToTool(client)],  // uses the session, will automatically call the tool
    // Uncomment if you **don't** want the sdk to automatically call the tool
    // automaticFunctionCalling: {
    //   disable: true,
    // },
  },
});
console.log(response.text)

// Close the connection
await client.close();
組み込みの MCP サポートの制限事項
組み込みの MCP サポートは SDK の試験運用版の機能であり、次の制限があります。
- ツールのみがサポートされ、リソースやプロンプトはサポートされません
- これは、Python と JavaScript/TypeScript の SDK で使用できます。
- 今後のリリースで破壊的変更が発生する可能性があります。
これらの制限によって構築するものが制限される場合は、MCP サーバーの手動統合を常に選択できます。
サポートされているモデル
このセクションでは、モデルとその関数呼び出し機能の一覧を示します。試験運用版のモデルは含まれていません。機能の包括的な概要については、モデルの概要ページをご覧ください。
| モデル | 関数呼び出し | 並列関数呼び出し | コンポジション関数呼び出し |
|---|---|---|---|
| Gemini 3 Pro | ✔️ | ✔️ | ✔️ |
| Gemini 3 Flash | ✔️ | ✔️ | ✔️ |
| Gemini 2.5 Pro | ✔️ | ✔️ | ✔️ |
| Gemini 2.5 Flash | ✔️ | ✔️ | ✔️ |
| Gemini 2.5 Flash-Lite | ✔️ | ✔️ | ✔️ |
| Gemini 2.0 Flash | ✔️ | ✔️ | ✔️ |
| Gemini 2.0 Flash-Lite | X | X | X |
ベスト プラクティス
- 関数とパラメータの説明: 説明は、非常に明確かつ具体的に記述します。モデルは、この説明に基づいて正しい関数を選択し、適切な引数を指定します。
- 命名: わかりやすい関数名を使用します(スペース、ピリオド、ダッシュは使用しません)。
- 強い型指定: パラメータに特定の型(整数、文字列、列挙型)を使用して、エラーを減らします。パラメータの有効な値のセットが限られている場合は、列挙型を使用します。
- ツールの選択: モデルでは任意の数のツールを使用できますが、ツールが多すぎると、誤ったツールや最適でないツールが選択されるリスクが高まる可能性があります。最良の結果を得るには、コンテキストやタスクに関連するツールのみを提供することを目指します。理想的には、アクティブなセットを最大 10 ~ 20 個に保ちます。ツールの合計数が多い場合は、会話のコンテキストに基づく動的なツール選択を検討してください。
- プロンプト エンジニアリング:
- コンテキストを提供する: モデルに役割を伝えます(例: 「あなたは有能な天気アシスタントです。」)。
- 指示を与える: 関数をいつ、どのように使用するかを指定します(例: 「日付を推測しないでください。予測には常に将来の日付を使用してください。」)。
- 明確化を促す: 必要に応じて明確化を求める質問をするようモデルに指示します。
- これらのプロンプトの設計に関するその他の戦略については、エージェント ワークフローをご覧ください。テスト済みのシステム指示の例を次に示します。
温度: 低温(例: 0)に設定して、より確定的で信頼性の高い関数呼び出しを実現します。
検証: 関数呼び出しが重大な結果をもたらす場合(注文など)、それを実行する前にユーザーにその呼び出しの妥当性を確認してください。
終了理由を確認する: モデルのレスポンスで
finishReasonを常に確認し、モデルが有効な関数呼び出しを生成できなかったケースを処理します。エラー処理: 関数で堅牢なエラー処理を実装して、予期しない入力や API の障害を適切に処理します。モデルがユーザーに役立つ回答を生成するために使用できる、有益なエラー メッセージを返します。
セキュリティ: 外部 API を呼び出す際は、セキュリティに注意してください。適切な認証と認可のメカニズムを使用します。関数呼び出しで機密データを公開しないようにします。
トークンの上限: 関数の説明とパラメータは、入力トークンの上限にカウントされます。トークンの上限に達した場合は、関数の数や説明の長さを制限したり、複雑なタスクをより小さな、より集約された関数セットに分割したりすることを検討してください。
注意と制限事項
- OpenAPI スキーマのサブセットのみがサポートされています。
ANYモードの場合、API は非常に大きなスキーマやネストが深いスキーマを拒否することがあります。エラーが発生した場合は、プロパティ名を短くしたり、ネストを減らしたり、関数宣言の数を制限したりして、関数パラメータとレスポンス スキーマを簡素化してみてください。- Python でサポートされているパラメータの型は限られています。
- 自動関数呼び出しは、Python SDK の機能です。