
簡介
哈囉,世界!教學課程使用 MediaPipe Framework 開發 iOS 以便在 iOS 上執行 MediaPipe 圖表。
建構目標
簡易的相機應用程式,可對即時影像進行即時 Sobel 邊緣偵測 透過 iOS 裝置串流播放
設定
邊緣偵測圖形
我們會使用以下圖表:edge_detection_mobile_gpu.pbtxt:
# MediaPipe graph that performs GPU Sobel edge detection on a live video stream.
# Used in the examples
# mediapipe/examples/android/src/java/com/google/mediapipe/apps/basic:helloworld
# and mediapipe/examples/ios/helloworld.

# Images coming into and out of the graph.
input_stream: "input_video"
output_stream: "output_video"

# Converts RGB images into luminance images, still stored in RGB format.
node: {
  calculator: "LuminanceCalculator"
  input_stream: "input_video"
  output_stream: "luma_video"
}

# Applies the Sobel filter to luminance images stored in RGB format.
node: {
  calculator: "SobelEdgesCalculator"
  input_stream: "luma_video"
  output_stream: "output_video"
}
圖表如下圖所示:
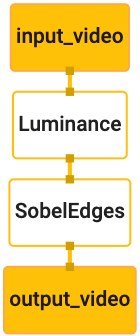
此圖表中,所有傳入的影格都有一個名為 input_video 的單一輸入串流
應用程式相機會提供這項資料
圖中的第一個節點 LuminanceCalculator 採用單一封包 (圖片)
影格),並使用 OpenGL 著色器套用亮度變更。最終產生的
圖片影格傳送至 luma_video 輸出串流。
第二個節點 SobelEdgesCalculator 會將邊緣偵測功能套用至連入
位於 luma_video 資料流並輸出的封包會產生 output_video 的輸出內容
串流。
我們的 iOS 應用程式會顯示 output_video 的輸出影像影格
串流。
最低限度的應用程式設定
首先,我們先從簡單的 iOS 應用程式開始,然後示範如何使用 bazel
建構應用程式
首先,透過「File」(檔案) > 建立 XCode 專案新增 >單一檢視畫面應用程式。
將產品名稱設為「HelloWorld」,並使用適當的機構
識別碼,例如 com.google.mediapipe。機構 ID
以及產品名稱做為應用程式的 bundle_id,例如:
com.google.mediapipe.HelloWorld。
將語言設為 Objective-C。
將專案儲存至適當的位置。我們來稱之為
$PROJECT_TEMPLATE_LOC。因此您的專案會維持在
$PROJECT_TEMPLATE_LOC/HelloWorld 目錄內。這個目錄包含
另一個名為 HelloWorld 的目錄和 HelloWorld.xcodeproj 檔案。
HelloWorld.xcodeproj 對本教學課程沒有幫助,因為我們將使用
bazel 來建立 iOS 應用程式。當內容
$PROJECT_TEMPLATE_LOC/HelloWorld/HelloWorld 目錄如下:
AppDelegate.h和AppDelegate.mViewController.h和ViewController.mmain.mInfo.plistMain.storyboard和Launch.storyboardAssets.xcassets目錄內。
將這些檔案複製到名為 HelloWorld 的目錄,移至有權存取的位置
MediaPipe Framework 原始碼。例如
在本教學課程中,我們將建構的應用程式位於
mediapipe/examples/ios/HelloWorld。我們將這個路徑稱為
在本程式碼研究室的所有 $APPLICATION_PATH 中。
在 $APPLICATION_PATH 中建立 BUILD 檔案,並新增下列版本
規則:
MIN_IOS_VERSION = "11.0"

load(
    "@build_bazel_rules_apple//apple:ios.bzl",
    "ios_application",
)

ios_application(
    name = "HelloWorldApp",
    bundle_id = "com.google.mediapipe.HelloWorld",
    families = [
        "iphone",
        "ipad",
    ],
    infoplists = ["Info.plist"],
    minimum_os_version = MIN_IOS_VERSION,
    provisioning_profile = "//mediapipe/examples/ios:developer_provisioning_profile",
    deps = [":HelloWorldAppLibrary"],
)

objc_library(
    name = "HelloWorldAppLibrary",
    srcs = [
        "AppDelegate.m",
        "ViewController.m",
        "main.m",
    ],
    hdrs = [
        "AppDelegate.h",
        "ViewController.h",
    ],
    data = [
        "Base.lproj/LaunchScreen.storyboard",
        "Base.lproj/Main.storyboard",
    ],
    sdk_frameworks = [
        "UIKit",
    ],
    deps = [],
)
objc_library 規則會為 AppDelegate 新增依附元件,並
ViewController 類別、main.m 和應用程式分鏡腳本。
範本應用程式只依附於 UIKit SDK。
ios_application 規則使用 HelloWorldAppLibrary Objective-C 程式庫
來產生要在 iOS 裝置上安裝的 iOS 應用程式。
如要建構應用程式,請在終端機中使用下列指令:
bazel build -c opt --config=ios_arm64 <$APPLICATION_PATH>:HelloWorldApp'
例如,如要在HelloWorldApp
mediapipe/examples/ios/helloworld,請使用下列指令:
bazel build -c opt --config=ios_arm64 mediapipe/examples/ios/helloworld:HelloWorldApp
接著,返回 XCode,然後開啟 Window >裝置和模擬器,請選取
裝置,並將上述指令產生的 .ipa 檔案新增到您的裝置。
以下文件說明如何設定及編譯 iOS Framework 應用程式。
在裝置上開啟應用程式。由於空白,因此應該會顯示 空白畫面。
使用攝影機查看即時監控畫面
在本教學課程中,我們將使用 MPPCameraInputSource 類別來存取並
從相機擷取畫面這個類別會使用 AVCaptureSession API 來取得
擷取自相機的畫面
但在使用此類別前,請先變更 Info.plist 檔案以支援相機
以及應用程式的使用狀況
在 ViewController.m 中新增以下匯入行:
#import "mediapipe/objc/MPPCameraInputSource.h"
將以下內容新增至其實作區塊以建立物件
_cameraSource:
@implementation ViewController {
  // Handles camera access via AVCaptureSession library.
  MPPCameraInputSource* _cameraSource;
}
在 viewDidLoad() 加入以下程式碼:
-(void)viewDidLoad {
  [super viewDidLoad];

  _cameraSource = [[MPPCameraInputSource alloc] init];
  _cameraSource.sessionPreset = AVCaptureSessionPresetHigh;
  _cameraSource.cameraPosition = AVCaptureDevicePositionBack;
  // The frame's native format is rotated with respect to the portrait orientation.
  _cameraSource.orientation = AVCaptureVideoOrientationPortrait;
}
程式碼會初始化 _cameraSource、設定擷取工作階段預設設定,
相機的使用方式
我們需要將 _cameraSource 中的影格擷取到應用程式中
ViewController 以顯示圖片。MPPCameraInputSource 是以下項目的子類別:
MPPInputSource,為委派代表提供通訊協定,也就是
MPPInputSourceDelegate。所以我們的應用程式 ViewController 可做為委派代表
(共 _cameraSource 個)。
據此更新 ViewController 的介面定義:
@interface ViewController () <MPPInputSourceDelegate>
如要處理相機設定及處理傳入的影格,我們應使用佇列
與主要佇列不同將以下內容新增到
ViewController:
// Process camera frames on this queue.
dispatch_queue_t _videoQueue;
在 viewDidLoad() 中初始化
_cameraSource 物件:
[_cameraSource setDelegate:self queue:_videoQueue];
接著新增下列程式碼來初始化佇列,然後再設定
_cameraSource 物件:
dispatch_queue_attr_t qosAttribute = dispatch_queue_attr_make_with_qos_class(
      DISPATCH_QUEUE_SERIAL, QOS_CLASS_USER_INTERACTIVE, /*relative_priority=*/0);
_videoQueue = dispatch_queue_create(kVideoQueueLabel, qosAttribute);
我們會使用優先順序為 QOS_CLASS_USER_INTERACTIVE 的序列佇列,以供
處理相機影格
在檔案頂端匯入標頭後,於
ViewController 的介面/實作:
static const char* kVideoQueueLabel = "com.google.mediapipe.example.videoQueue";
在透過 MPPInputSourceDelegate 通訊協定實作任何方法之前,我們必須先
第一,設定要顯示相機鏡頭的畫面媒體管道架構提供
另一個名為 MPPLayerRenderer 的公用程式,用來在螢幕上顯示圖片。這個
公用程式可用來顯示 CVPixelBufferRef 物件,也就是
由 MPPCameraInputSource 提供給委派代表的圖片。
在 ViewController.m 中新增以下匯入行:
#import "mediapipe/objc/MPPLayerRenderer.h"
為了顯示螢幕影像,我們必須新增一個 UIView 物件,稱為
_liveView 到 ViewController。
在 ViewController 的實作區塊中新增下列程式碼:
// Display the camera preview frames.
IBOutlet UIView* _liveView;
// Render frames in a layer.
MPPLayerRenderer* _renderer;
前往 Main.storyboard,將 UIView 物件從物件程式庫新增至
ViewController 類別的 View。將這個檢視畫面中參照的插座新增至
您剛才新增至 ViewController 類別的 _liveView 物件。調整
使其置中並覆蓋整個應用程式畫面。
返回 ViewController.m 並將下列程式碼加入 viewDidLoad(),以便:
初始化 _renderer 物件:
_renderer = [[MPPLayerRenderer alloc] init];
_renderer.layer.frame = _liveView.layer.bounds;
[_liveView.layer addSublayer:_renderer.layer];
_renderer.frameScaleMode = MPPFrameScaleModeFillAndCrop;
為了取得相機畫面,我們將實作以下方法:
// Must be invoked on _videoQueue.
-   (void)processVideoFrame:(CVPixelBufferRef)imageBuffer
                timestamp:(CMTime)timestamp
               fromSource:(MPPInputSource*)source {
  if (source != _cameraSource) {
    NSLog(@"Unknown source: %@", source);
    return;
  }
  // Display the captured image on the screen.
  CFRetain(imageBuffer);
  dispatch_async(dispatch_get_main_queue(), ^{
    [_renderer renderPixelBuffer:imageBuffer];
    CFRelease(imageBuffer);
  });
}
這是 MPPInputSource 的委派方法。我們會先檢查
從正確的來源取得影格,例如 _cameraSource。接著會顯示
透過主要佇列上的 _renderer 從相機接收到的影格。
現在,我們需要在檢視畫面顯示影格時,立即啟動相機
。為此,我們會在實作練習中
viewWillAppear:(BOOL)animated 函式:
-(void)viewWillAppear:(BOOL)animated {
  [super viewWillAppear:animated];
}
我們需要使用者授予攝影機存取權,才能開始執行相機。
MPPCameraInputSource 提供函式
requestCameraAccessWithCompletionHandler:(void (^_Nullable)(BOOL
granted))handler
:要求相機存取權,並在使用者執行以下操作時執行某些工作
已回應。在 viewWillAppear:animated 加入以下程式碼:
[_cameraSource requestCameraAccessWithCompletionHandler:^void(BOOL granted) {
  if (granted) {
    dispatch_async(_videoQueue, ^{
      [_cameraSource start];
    });
  }
}];
建構應用程式之前,請將下列依附元件新增至 BUILD
檔案:
sdk_frameworks = [
    "AVFoundation",
    "CoreGraphics",
    "CoreMedia",
],
deps = [
    "//mediapipe/objc:mediapipe_framework_ios",
    "//mediapipe/objc:mediapipe_input_sources_ios",
    "//mediapipe/objc:mediapipe_layer_renderer",
],
現在,請在 iOS 裝置上建構並執行應用程式。您應該會看到 接受相機權限後的攝影機畫面。
現在可以在 MediaPipe 圖表中使用相機影格。
在 iOS 中使用 MediaPipe 圖表
新增相關依附元件
我們已新增 MediaPipe 架構程式碼的依附元件,其中包含
才能使用 MediaPipe 圖表。如要使用 MediaPipe 圖表,我們需加入
依附於應用程式圖表中。新增下列項目
加到 BUILD 檔案的 data 清單中:
"//mediapipe/graphs/edge_detection:mobile_gpu_binary_graph",
現在,請將依附元件新增至這個圖表使用的計算機的 deps 欄位
在 BUILD 檔案中:
"//mediapipe/graphs/edge_detection:mobile_calculators",
最後,將 ViewController.m 檔案重新命名為 ViewController.mm,以便支援
Objective-C++
使用 ViewController 中的圖表
在 ViewController.m 中新增以下匯入行:
#import "mediapipe/objc/MPPGraph.h"
使用圖表名稱、輸入串流和 輸出串流:
static NSString* const kGraphName = @"mobile_gpu";

static const char* kInputStream = "input_video";
static const char* kOutputStream = "output_video";
將下列屬性新增至 ViewController 的介面:
// The MediaPipe graph currently in use. Initialized in viewDidLoad, started in viewWillAppear: and
// sent video frames on _videoQueue.
@property(nonatomic) MPPGraph* mediapipeGraph;
如以上註解所述,我們會在
首viewDidLoad。為此,我們需要從 .pbtxt 檔案載入圖表
使用下列函式:
+   (MPPGraph*)loadGraphFromResource:(NSString*)resource {
  // Load the graph config resource.
  NSError* configLoadError = nil;
  NSBundle* bundle = [NSBundle bundleForClass:[self class]];
  if (!resource || resource.length == 0) {
    return nil;
  }
  NSURL* graphURL = [bundle URLForResource:resource withExtension:@"binarypb"];
  NSData* data = [NSData dataWithContentsOfURL:graphURL options:0 error:&configLoadError];
  if (!data) {
    NSLog(@"Failed to load MediaPipe graph config: %@", configLoadError);
    return nil;
  }

  // Parse the graph config resource into mediapipe::CalculatorGraphConfig proto object.
  mediapipe::CalculatorGraphConfig config;
  config.ParseFromArray(data.bytes, data.length);

  // Create MediaPipe graph with mediapipe::CalculatorGraphConfig proto object.
  MPPGraph* newGraph = [[MPPGraph alloc] initWithGraphConfig:config];
  [newGraph addFrameOutputStream:kOutputStream outputPacketType:MPPPacketTypePixelBuffer];
  return newGraph;
}
使用此函式初始化 viewDidLoad 中的圖表,如下所示:
self.mediapipeGraph = [[self class] loadGraphFromResource:kGraphName];
圖表應會將相機影格的處理結果傳回給
ViewController。初始化圖表後加入下列程式碼,即可設定
ViewController 做為 mediapipeGraph 物件的委派:
self.mediapipeGraph.delegate = self;
為避免在處理即時視訊動態饋給的影格時造成記憶體爭用情形,請加入 加入下列程式碼:
// Set maxFramesInFlight to a small value to avoid memory contention for real-time processing.
self.mediapipeGraph.maxFramesInFlight = 2;
現在,在使用者授予相機存取權後開始圖表。 使用我們的應用程式:
[_cameraSource requestCameraAccessWithCompletionHandler:^void(BOOL granted) {
  if (granted) {
    // Start running self.mediapipeGraph.
    NSError* error;
    if (![self.mediapipeGraph startWithError:&error]) {
      NSLog(@"Failed to start graph: %@", error);
    }
    else if (![self.mediapipeGraph waitUntilIdleWithError:&error]) {
      NSLog(@"Failed to complete graph initial run: %@", error);
    }

    dispatch_async(_videoQueue, ^{
      [_cameraSource start];
    });
  }
}];
先前,是指我們在 processVideoFrame 中收到相機的影格
函式,我們使用 _renderer 在 _liveView 中顯示它們。現在,我們
就必須將這些影格傳送至圖表並改為算繪結果修改
這個函式的實作內容:
-   (void)processVideoFrame:(CVPixelBufferRef)imageBuffer
                timestamp:(CMTime)timestamp
               fromSource:(MPPInputSource*)source {
  if (source != _cameraSource) {
    NSLog(@"Unknown source: %@", source);
    return;
  }
  [self.mediapipeGraph sendPixelBuffer:imageBuffer
                            intoStream:kInputStream
                            packetType:MPPPacketTypePixelBuffer];
}
我們會將 imageBuffer 傳送至 self.mediapipeGraph 做為類型的封包
MPPPacketTypePixelBuffer 傳入輸入串流 kInputStream,即
「input_video」。
圖表將以這個輸入封包執行,並將結果輸出到
kOutputStream,也就是「output_video」。我們可實作下列委派項目
方法接收這個輸出串流的封包,並在螢幕上顯示:
-   (void)mediapipeGraph:(MPPGraph*)graph
   didOutputPixelBuffer:(CVPixelBufferRef)pixelBuffer
             fromStream:(const std::string&)streamName {
  if (streamName == kOutputStream) {
    // Display the captured image on the screen.
    CVPixelBufferRetain(pixelBuffer);
    dispatch_async(dispatch_get_main_queue(), ^{
      [_renderer renderPixelBuffer:pixelBuffer];
      CVPixelBufferRelease(pixelBuffer);
    });
  }
}
使用 MPPGraphDelegate 更新 ViewController 的介面定義:
@interface ViewController () <MPPGraphDelegate, MPPInputSourceDelegate>
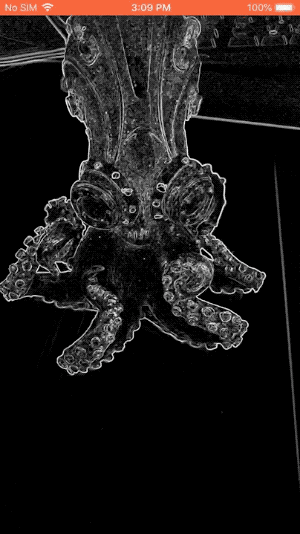
大功告成!在 iOS 裝置上建立並執行應用程式。您應該會看到 對即時影像內容執行邊緣偵測圖表的結果恭喜!
請注意,iOS 範例現已採用 common 範本應用程式。程式碼中的
本教學課程用於 common 範本應用程式。helloworld 應用程式具備
適當的 BUILD 檔案依附元件。