はじめに
この Hello World!このチュートリアルでは、MediaPipe Framework を使用して iOS アプリの iOS で MediaPipe グラフを実行するアプリです。
作業内容
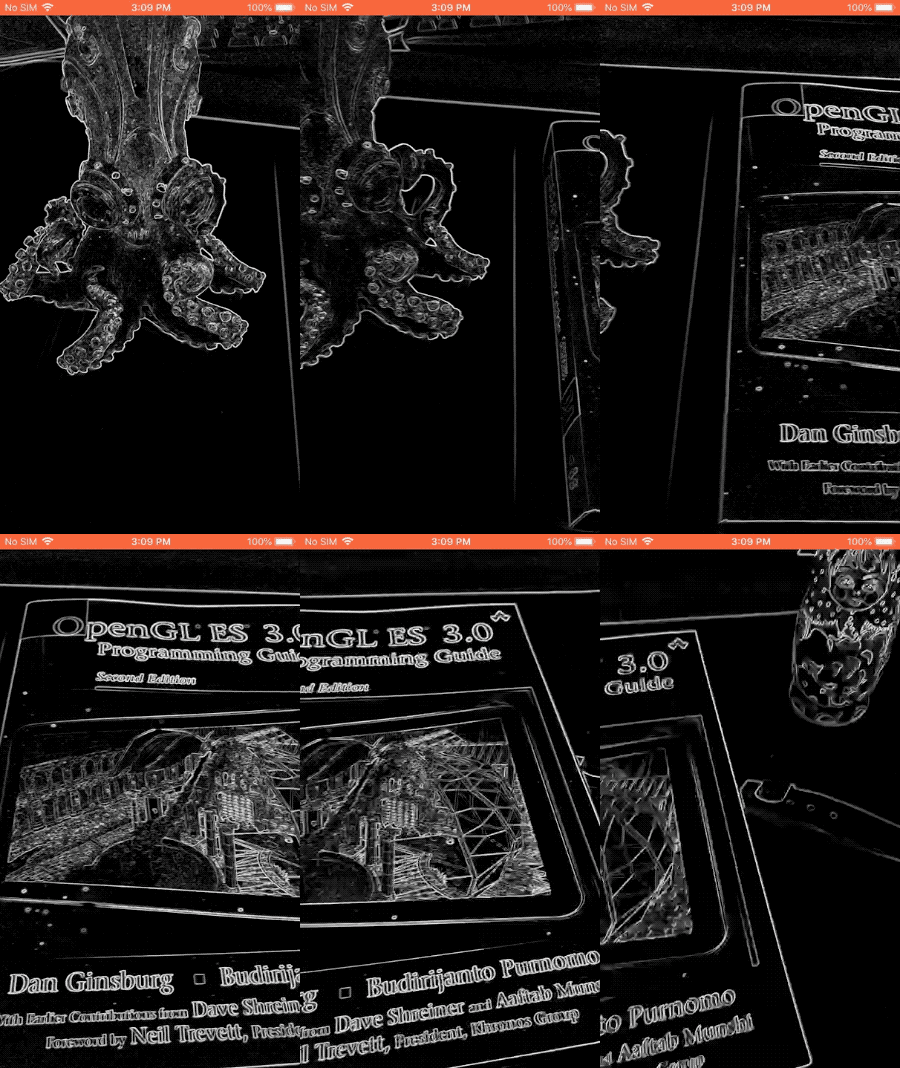
ライブ動画に適用するリアルタイムの Sobel エッジ検出機能を備えたシンプルなカメラアプリ ストリーミングできます

セットアップ
- MediaPipe Framework をシステムにインストールします。詳しくは、フレームワークのインストールをご覧ください。 ガイドをご覧ください。
- 開発用に iOS デバイスを設定します。
- システムで Bazel をセットアップし、iOS アプリをビルドし、デプロイします。
エッジ検出のグラフ
ここでは、グラフ edge_detection_mobile_gpu.pbtxt を使用します。
# MediaPipe graph that performs GPU Sobel edge detection on a live video stream.
# Used in the examples
# mediapipe/examples/android/src/java/com/google/mediapipe/apps/basic:helloworld
# and mediapipe/examples/ios/helloworld.

# Images coming into and out of the graph.
input_stream: "input_video"
output_stream: "output_video"

# Converts RGB images into luminance images, still stored in RGB format.
node: {
  calculator: "LuminanceCalculator"
  input_stream: "input_video"
  output_stream: "luma_video"
}

# Applies the Sobel filter to luminance images stored in RGB format.
node: {
  calculator: "SobelEdgesCalculator"
  input_stream: "luma_video"
  output_stream: "output_video"
}
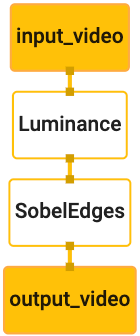
グラフを可視化すると次のようになります。

このグラフには、すべての受信フレームに対して input_video という名前の単一の入力ストリームがあります。
画像データも生成できます。
グラフの最初のノード LuminanceCalculator は、1 つのパケット(画像
フレームなど)を指定し、OpenGL シェーダーを使用して輝度の変化を適用します。結果
画像フレームが luma_video 出力ストリームに送信されます。
2 番目のノード SobelEdgesCalculator は、受信インスタンスにエッジ検出を適用します。
パケットが luma_video ストリームで出力され、結果が output_video 出力に出力されます。
。
iOS アプリに output_video の出力画像フレームが表示されます。
。
最小限のアプリケーションの初期設定
まず、簡単な iOS アプリから、bazel の使用方法をお見せします。
必要があります。
まず、[File] で XCode プロジェクトを作成します >新規 >シングルビュー アプリ。
プロダクト名を「HelloWorld」に設定し、適切な構成を使用する
ID(com.google.mediapipe など)。組織 ID
プロダクト名は、次のようにアプリケーションの bundle_id になります。
com.google.mediapipe.HelloWorld。
言語を Objective-C に設定します。
プロジェクトを適切な場所に保存します。名前は
$PROJECT_TEMPLATE_LOC。そのため、プロジェクトは
$PROJECT_TEMPLATE_LOC/HelloWorld ディレクトリ。このディレクトリには、
HelloWorld という名前の別のディレクトリと HelloWorld.xcodeproj ファイルがあります。
このチュートリアルでは、HelloWorld.xcodeproj は役に立ちません。
使用して iOS アプリをビルドします。内容
$PROJECT_TEMPLATE_LOC/HelloWorld/HelloWorld ディレクトリを以下に示します。
AppDelegate.h、AppDelegate.mViewController.hとViewController.mmain.mInfo.plistMain.storyboard、Launch.storyboard- このディレクトリは、
Assets.xcassetsディレクトリ内に配置してはいけません。
これらのファイルを、アクセス可能なロケーション(HelloWorld)にコピーします。
MediaPipe Framework のソースコードも参照できます。たとえば、Terraform のソースコードは
アプリケーションの次の場所には、
mediapipe/examples/ios/HelloWorld。ここでは、このパスを
この Codelab 全体を通して、$APPLICATION_PATH。
$APPLICATION_PATH に BUILD ファイルを作成し、次のビルドを追加します。
ルール:
MIN_IOS_VERSION = "11.0"

load(
    "@build_bazel_rules_apple//apple:ios.bzl",
    "ios_application",
)

ios_application(
    name = "HelloWorldApp",
    bundle_id = "com.google.mediapipe.HelloWorld",
    families = [
        "iphone",
        "ipad",
    ],
    infoplists = ["Info.plist"],
    minimum_os_version = MIN_IOS_VERSION,
    provisioning_profile = "//mediapipe/examples/ios:developer_provisioning_profile",
    deps = [":HelloWorldAppLibrary"],
)

objc_library(
    name = "HelloWorldAppLibrary",
    srcs = [
        "AppDelegate.m",
        "ViewController.m",
        "main.m",
    ],
    hdrs = [
        "AppDelegate.h",
        "ViewController.h",
    ],
    data = [
        "Base.lproj/LaunchScreen.storyboard",
        "Base.lproj/Main.storyboard",
    ],
    sdk_frameworks = [
        "UIKit",
    ],
    deps = [],
)
objc_library ルールは、AppDelegate と
ViewController クラス、main.m、アプリケーションのストーリーボード。「
テンプレート化されたアプリは、UIKit SDK にのみ依存します。
ios_application ルールは、HelloWorldAppLibrary Objective-C ライブラリを使用する
生成され、iOS デバイスにインストールされる iOS アプリケーションを構築します。
アプリをビルドするには、ターミナルで次のコマンドを使用します。
bazel build -c opt --config=ios_arm64 <$APPLICATION_PATH>:HelloWorldApp'
たとえば、HelloWorldApp アプリケーションを
mediapipe/examples/ios/helloworld の場合は、次のコマンドを使用します。
bazel build -c opt --config=ios_arm64 mediapipe/examples/ios/helloworld:HelloWorldApp
次に、XCode に戻ってウィンドウを開きます >[デバイスとシミュレータ] で、
上記のコマンドで生成された .ipa ファイルをデバイスに追加します。
iOS フレームワーク アプリのセットアップとコンパイルに関するドキュメントをご覧ください。
デバイスでアプリを開きます。空のため、 空白の画面が表示される。
カメラをライブビュー フィードに使用する
このチュートリアルでは、MPPCameraInputSource クラスを使用して
カメラからフレームを取得しますこのクラスは AVCaptureSession API を使用して、
取得します
ただし、このクラスを使用する前に、カメラをサポートするように Info.plist ファイルを変更してください
確認できます。
ViewController.m に次のインポート行を追加します。
#import "mediapipe/objc/MPPCameraInputSource.h"
以下を実装ブロックに追加して、オブジェクトを作成します。
_cameraSource:
@implementation ViewController {
  // Handles camera access via AVCaptureSession library.
  MPPCameraInputSource* _cameraSource;
}
viewDidLoad() に次のコードを追加します。
-(void)viewDidLoad {
  [super viewDidLoad];

  _cameraSource = [[MPPCameraInputSource alloc] init];
  _cameraSource.sessionPreset = AVCaptureSessionPresetHigh;
  _cameraSource.cameraPosition = AVCaptureDevicePositionBack;
  // The frame's native format is rotated with respect to the portrait orientation.
  _cameraSource.orientation = AVCaptureVideoOrientationPortrait;
}
このコードは、_cameraSource を初期化し、キャプチャ セッションのプリセットを設定し、
使用できます。
_cameraSource からアプリケーションにフレームを取得する必要がある
ViewController 表示します。MPPCameraInputSource は次のサブクラスのサブクラスです:
MPPInputSource は、委任のためのプロトコル、つまり
MPPInputSourceDelegate。したがって、アプリケーション ViewController はデリゲートにすることができます。
/_cameraSource。
ViewController のインターフェース定義を適宜更新します。
@interface ViewController () <MPPInputSourceDelegate>
カメラのセットアップや受信フレームの処理を行うには、キューを使用する必要があります。
メインキューとは異なります次の実装ブロックを
ViewController:
// Process camera frames on this queue.
dispatch_queue_t _videoQueue;
viewDidLoad() で、初期化後に次の行を追加します。
_cameraSource オブジェクト:
[_cameraSource setDelegate:self queue:_videoQueue];
次に、以下のコードを追加して、キューを初期化します。
_cameraSource オブジェクト:
dispatch_queue_attr_t qosAttribute = dispatch_queue_attr_make_with_qos_class(
      DISPATCH_QUEUE_SERIAL, QOS_CLASS_USER_INTERACTIVE, /*relative_priority=*/0);
_videoQueue = dispatch_queue_create(kVideoQueueLabel, qosAttribute);
次の VM では優先度 QOS_CLASS_USER_INTERACTIVE のシリアルキューを使用します。
カメラフレーム処理の段階です
ファイルの先頭にあるヘッダー インポートの後、次の行を追加します。
ViewController のインターフェース/実装:
static const char* kVideoQueueLabel = "com.google.mediapipe.example.videoQueue";
MPPInputSourceDelegate プロトコルのメソッドを実装する前に、以下を行う必要があります。
まず、カメラフレームを表示する方法を設定します。Mediapipe Framework では、
MPPLayerRenderer という別のユーティリティを使用して、画面に画像を表示します。この
ユーティリティを使用すると、CVPixelBufferRef オブジェクトを表示できます。
MPPCameraInputSource によって委任された画像。
ViewController.m に、次のインポート行を追加します。
#import "mediapipe/objc/MPPLayerRenderer.h"
画面の画像を表示するには、次の新しい UIView オブジェクトを追加する必要があります。
_liveView を ViewController にマッピング。
ViewController の実装ブロックに次の行を追加します。
// Display the camera preview frames.
IBOutlet UIView* _liveView;
// Render frames in a layer.
MPPLayerRenderer* _renderer;
Main.storyboard に移動し、オブジェクト ライブラリの UIView オブジェクトを
ViewController クラスの View。このビューから参照アウトレットを追加して
先ほど ViewController クラスに追加した _liveView オブジェクト。
アプリの画面全体を覆うように中央に配置する必要があります。
ViewController.m に戻り、次のコードを viewDidLoad() に追加します。
_renderer オブジェクトを初期化します。
_renderer = [[MPPLayerRenderer alloc] init];
_renderer.layer.frame = _liveView.layer.bounds;
[_liveView.layer addSublayer:_renderer.layer];
_renderer.frameScaleMode = MPPFrameScaleModeFillAndCrop;
カメラからフレームを取得するために、次のメソッドを実装します。
// Must be invoked on _videoQueue.
-   (void)processVideoFrame:(CVPixelBufferRef)imageBuffer
                timestamp:(CMTime)timestamp
               fromSource:(MPPInputSource*)source {
  if (source != _cameraSource) {
    NSLog(@"Unknown source: %@", source);
    return;
  }
  // Display the captured image on the screen.
  CFRetain(imageBuffer);
  dispatch_async(dispatch_get_main_queue(), ^{
    [_renderer renderPixelBuffer:imageBuffer];
    CFRelease(imageBuffer);
  });
}
これは MPPInputSource のデリゲート メソッドです。まず、イメージが
フレームを適切なソース(_cameraSource)から取得します。次に
メインキューで _renderer を介してカメラから受信したフレーム。
フレームを表示するビューが表示されたら、すぐにカメラを起動する必要があります。
表示されます。そのために、
viewWillAppear:(BOOL)animated 関数:
-(void)viewWillAppear:(BOOL)animated {
  [super viewWillAppear:animated];
}
カメラの実行を開始する前に、カメラにアクセスするユーザーの許可が必要です。
MPPCameraInputSource は、
requestCameraAccessWithCompletionHandler:(void (^_Nullable)(BOOL
granted))handler
でカメラへのアクセスをリクエストして、ユーザーが
件の回答がありました。以下のコードを viewWillAppear:animated に追加します。
[_cameraSource requestCameraAccessWithCompletionHandler:^void(BOOL granted) {
  if (granted) {
    dispatch_async(_videoQueue, ^{
      [_cameraSource start];
    });
  }
}];
アプリケーションをビルドする前に、BUILD に次の依存関係を追加します。
ファイル:
sdk_frameworks = [
    "AVFoundation",
    "CoreGraphics",
    "CoreMedia",
],
deps = [
    "//mediapipe/objc:mediapipe_framework_ios",
    "//mediapipe/objc:mediapipe_input_sources_ios",
    "//mediapipe/objc:mediapipe_layer_renderer",
],
iOS デバイスでアプリをビルドして実行します。ライブ管理画面が カメラへのアクセスを許可した後のカメラビュー フィード。
これで、MediaPipe グラフでカメラフレームを使用する準備が整いました。
iOS で MediaPipe グラフを使用する
関連する依存関係を追加する
MediaPipe フレームワーク コードの依存関係はすでに追加済みです。
MediaPipe グラフを使用しますMediaPipe グラフを使用するには、
依存関係はアプリケーションで使用する予定のグラフに依存します。以下を追加します。
この行を BUILD ファイルの data リストに追加します。
"//mediapipe/graphs/edge_detection:mobile_gpu_binary_graph",
次に、このグラフで使用されている計算ツールの deps フィールドで、依存関係を追加します。
BUILD ファイルに以下の行を追加します。
"//mediapipe/graphs/edge_detection:mobile_calculators",
最後に、ファイル名を ViewController.m から ViewController.mm に変更します。
Objective-C++。
ViewController のグラフを使用する
ViewController.m に、次のインポート行を追加します。
#import "mediapipe/objc/MPPGraph.h"
静的定数を宣言して、グラフの名前、入力ストリーム、 出力ストリーム:
static NSString* const kGraphName = @"mobile_gpu";

static const char* kInputStream = "input_video";
static const char* kOutputStream = "output_video";
ViewController のインターフェースに次のプロパティを追加します。
// The MediaPipe graph currently in use. Initialized in viewDidLoad, started in viewWillAppear: and
// sent video frames on _videoQueue.
@property(nonatomic) MPPGraph* mediapipeGraph;
前のコメントで説明したように、このグラフは
最初に viewDidLoad。そのためには、.pbtxt ファイルからグラフを読み込む必要があります。
次の関数を使用します。
+   (MPPGraph*)loadGraphFromResource:(NSString*)resource {
  // Load the graph config resource.
  NSError* configLoadError = nil;
  NSBundle* bundle = [NSBundle bundleForClass:[self class]];
  if (!resource || resource.length == 0) {
    return nil;
  }
  NSURL* graphURL = [bundle URLForResource:resource withExtension:@"binarypb"];
  NSData* data = [NSData dataWithContentsOfURL:graphURL options:0 error:&configLoadError];
  if (!data) {
    NSLog(@"Failed to load MediaPipe graph config: %@", configLoadError);
    return nil;
  }

  // Parse the graph config resource into mediapipe::CalculatorGraphConfig proto object.
  mediapipe::CalculatorGraphConfig config;
  config.ParseFromArray(data.bytes, data.length);

  // Create MediaPipe graph with mediapipe::CalculatorGraphConfig proto object.
  MPPGraph* newGraph = [[MPPGraph alloc] initWithGraphConfig:config];
  [newGraph addFrameOutputStream:kOutputStream outputPacketType:MPPPacketTypePixelBuffer];
  return newGraph;
}
この関数を使用して、次のように viewDidLoad のグラフを初期化します。
self.mediapipeGraph = [[self class] loadGraphFromResource:kGraphName];
グラフから、カメラフレームの処理結果が
ViewController。グラフの初期化後に次の行を追加して、
mediapipeGraph オブジェクトのデリゲートとしての ViewController:
self.mediapipeGraph.delegate = self;
ライブ動画フィードのフレーム処理時のメモリ競合を回避するには、 次の行を使用します。
// Set maxFramesInFlight to a small value to avoid memory contention for real-time processing.
self.mediapipeGraph.maxFramesInFlight = 2;
ユーザーがカメラの使用権限を付与したらグラフを開始します。 アプリ内:
[_cameraSource requestCameraAccessWithCompletionHandler:^void(BOOL granted) {
  if (granted) {
    // Start running self.mediapipeGraph.
    NSError* error;
    if (![self.mediapipeGraph startWithError:&error]) {
      NSLog(@"Failed to start graph: %@", error);
    }
    else if (![self.mediapipeGraph waitUntilIdleWithError:&error]) {
      NSLog(@"Failed to complete graph initial run: %@", error);
    }

    dispatch_async(_videoQueue, ^{
      [_cameraSource start];
    });
  }
}];
以前、processVideoFrame でカメラからフレームを受信したとき
関数と同様に、_renderer を使用して _liveView に表示しました。では、
それらのフレームをグラフに送信して結果をレンダリングする必要があります書き換え
次の処理を行います。
-   (void)processVideoFrame:(CVPixelBufferRef)imageBuffer
                timestamp:(CMTime)timestamp
               fromSource:(MPPInputSource*)source {
  if (source != _cameraSource) {
    NSLog(@"Unknown source: %@", source);
    return;
  }
  [self.mediapipeGraph sendPixelBuffer:imageBuffer
                            intoStream:kInputStream
                            packetType:MPPPacketTypePixelBuffer];
}
imageBuffer をタイプのパケットとして self.mediapipeGraph に送信します。
MPPPacketTypePixelBuffer を入力ストリーム kInputStream に変換する。つまり、
「input_video」を指定します。
グラフはこの入力パケットで実行され、結果が
kOutputStream(「output_video」)。次のデリゲートを実装できます。
メソッドを使用して、この出力ストリームでパケットを受信し、画面に表示します。
-   (void)mediapipeGraph:(MPPGraph*)graph
   didOutputPixelBuffer:(CVPixelBufferRef)pixelBuffer
             fromStream:(const std::string&)streamName {
  if (streamName == kOutputStream) {
    // Display the captured image on the screen.
    CVPixelBufferRetain(pixelBuffer);
    dispatch_async(dispatch_get_main_queue(), ^{
      [_renderer renderPixelBuffer:pixelBuffer];
      CVPixelBufferRelease(pixelBuffer);
    });
  }
}
ViewController のインターフェース定義を MPPGraphDelegate で更新します。
@interface ViewController () <MPPGraphDelegate, MPPInputSourceDelegate>
これで完了です。iOS デバイスでアプリをビルドして実行します。[ ライブ動画フィードでエッジ検出グラフを実行した結果。おめでとうございます!

iOS のサンプルでは、一般的なテンプレート アプリが使用されるようになっています。コードの
このチュートリアルは、一般的なテンプレート アプリで使用されます。helloworld アプリは
エッジ検出グラフに適した BUILD ファイル依存関係。
