Gemini models are built to be multimodal from the ground up, unlocking a wide range of image processing and computer vision tasks including but not limited to image captioning, classification, and visual question answering without having to train specialized ML models.
In addition to their general multimodal capabilities, Gemini models offer enhanced accuracy for specific use cases like object detection and segmentation, through additional training.
Passing images to Gemini
You can provide images as input to Gemini using several methods:
- Passing image using URL: Ideal for publicly accessible images.
- Passing inline image data: For base64-encoded image data.
- Uploading images using the File API: Recommended for larger files or for reusing images across multiple requests.
Passing image using URL
You can upload an image using the Files API and pass it in the request:
Python
from google import genai

client = genai.Client()

uploaded_file = client.files.upload(file="path/to/organ.jpg")

interaction = client.interactions.create(
    model="gemini-3.5-flash",
    input=[
        {"type": "text", "text": "Caption this image."},
        {
            "type": "image",
            "uri": uploaded_file.uri,
            "mime_type": uploaded_file.mime_type
        }
    ]
)
print(interaction.output_text)
JavaScript
import { GoogleGenAI } from "@google/genai";

const client = new GoogleGenAI({});

const uploadedFile = await client.files.upload({
    file: "path/to/organ.jpg",
    config: { mime_type: "image/jpeg" }
});

const interaction = await client.interactions.create({
    model: "gemini-3.5-flash",
    input: [
        {type: "text", text: "Caption this image."},
        {
            type: "image",
            uri: uploadedFile.uri,
            mime_type: uploadedFile.mimeType
        }
    ]
});
console.log(interaction.output_text);
REST
# First upload the file using the Files API, then use the URI:
curl -X POST "https://generativelanguage.googleapis.com/v1beta/interactions" \
  -H "x-goog-api-key: $GEMINI_API_KEY" \
  -H 'Content-Type: application/json' \
  -d '{
    "model": "gemini-3.5-flash",
    "input": [
      {"type": "text", "text": "Caption this image."},
      {
        "type": "image",
        "uri": "YOUR_FILE_URI",
        "mime_type": "image/jpeg"
      }
    ]
  }'
Passing inline image data
You can provide image data as base64-encoded strings:
Python
import base64
from google import genai

with open('path/to/small-sample.jpg', 'rb') as f:
    image_bytes = f.read()

client = genai.Client()

interaction = client.interactions.create(
    model="gemini-3.5-flash",
    input=[
        {"type": "text", "text": "Caption this image."},
        {
            "type": "image",
            "data": base64.b64encode(image_bytes).decode('utf-8'),
            "mime_type": "image/jpeg"
        }
    ]
)
print(interaction.output_text)
JavaScript
import { GoogleGenAI } from "@google/genai";
import * as fs from "node:fs";

const client = new GoogleGenAI({});
const base64ImageFile = fs.readFileSync("path/to/small-sample.jpg", {
  encoding: "base64",
});

const interaction = await client.interactions.create({
    model: "gemini-3.5-flash",
    input: [
        {type: "text", text: "Caption this image."},
        {
            type: "image",
            data: base64ImageFile,
            mime_type: "image/jpeg"
        }
    ]
});
console.log(interaction.output_text);
REST
IMG_PATH="/path/to/your/image1.jpg"

if [[ "$(base64 --version 2>&1)" = *"FreeBSD"* ]]; then
  B64FLAGS="--input"
else
  B64FLAGS="-w0"
fi

curl -X POST "https://generativelanguage.googleapis.com/v1beta/interactions" \
  -H "x-goog-api-key: $GEMINI_API_KEY" \
  -H 'Content-Type: application/json' \
  -d '{
    "model": "gemini-3.5-flash",
    "input": [
      {"type": "text", "text": "Caption this image."},
      {
        "type": "image",
        "data": "'"$(base64 $B64FLAGS $IMG_PATH)"'",
        "mime_type": "image/jpeg"
      }
    ]
  }'
Uploading images using the File API
For large files or to be able to use the same image file repeatedly, use the Files API. See the Files API guide.
Python
from google import genai

client = genai.Client()

my_file = client.files.upload(file="path/to/sample.jpg")

interaction = client.interactions.create(
    model="gemini-3.5-flash",
    input=[
        {"type": "text", "text": "Caption this image."},
        {
            "type": "image",
            "uri": my_file.uri,
            "mime_type": my_file.mime_type
        }
    ]
)
print(interaction.output_text)
JavaScript
import { GoogleGenAI } from "@google/genai";

const client = new GoogleGenAI({});

const myfile = await client.files.upload({
    file: "path/to/sample.jpg",
    config: { mimeType: "image/jpeg" },
});

const interaction = await client.interactions.create({
    model: "gemini-3.5-flash",
    input: [
        {type: "text", text: "Caption this image."},
        {
            type: "image",
            uri: myfile.uri,
            mime_type: myfile.mimeType
        }
    ]
});
console.log(interaction.output_text);
REST
# First upload the file (see Files API guide for details)
# Then use the file URI in the request:

curl -X POST "https://generativelanguage.googleapis.com/v1beta/interactions" \
  -H "x-goog-api-key: $GEMINI_API_KEY" \
  -H 'Content-Type: application/json' \
  -d '{
    "model": "gemini-3.5-flash",
    "input": [
      {"type": "text", "text": "Caption this image."},
      {
        "type": "image",
        "uri": "YOUR_FILE_URI",
        "mime_type": "image/jpeg"
      }
    ]
  }'
Prompting with multiple images
You can provide multiple images in a single prompt by including multiple image
objects in the input array:
Python
from google import genai

client = genai.Client()

interaction = client.interactions.create(
    model="gemini-3.5-flash",
    input=[
        {"type": "text", "text": "What is different between these two images?"},
        {
            "type": "image",
            "uri": "https://example.com/image1.jpg",
            "mime_type": "image/jpeg"
        },
        {
            "type": "image",
            "uri": "https://example.com/image2.jpg",
            "mime_type": "image/jpeg"
        }
    ]
)
print(interaction.output_text)
JavaScript
import { GoogleGenAI } from "@google/genai";

const client = new GoogleGenAI({});

const interaction = await client.interactions.create({
    model: "gemini-3.5-flash",
    input: [
        {type: "text", text: "What is different between these two images?"},
        {
            type: "image",
            uri: "https://example.com/image1.jpg",
            mime_type: "image/jpeg"
        },
        {
            type: "image",
            uri: "https://example.com/image2.jpg",
            mime_type: "image/jpeg"
        }
    ]
});
console.log(interaction.output_text);
REST
curl -X POST "https://generativelanguage.googleapis.com/v1beta/interactions" \
  -H "x-goog-api-key: $GEMINI_API_KEY" \
  -H 'Content-Type: application/json' \
  -d '{
    "model": "gemini-3.5-flash",
    "input": [
      {"type": "text", "text": "What is different between these two images?"},
      {
        "type": "image",
        "uri": "https://example.com/image1.jpg",
        "mime_type": "image/jpeg"
      },
      {
        "type": "image",
        "uri": "https://example.com/image2.jpg",
        "mime_type": "image/jpeg"
      }
    ]
  }'
Object detection
Models are trained to detect objects in an image and get their bounding box coordinates. The coordinates, relative to image dimensions, scale to [0, 1000]. You need to descale these coordinates based on your original image size.
Python
from google import genai
from pydantic import BaseModel, Field
from typing import List
import json

client = genai.Client()
prompt = "Detect the all of the prominent items in the image. The box_2d should be [ymin, xmin, ymax, xmax] normalized to 0-1000."

class BoundingBox(BaseModel):
    box_2d: List[int] = Field(description="The 2D bounding box of the item as [ymin, xmin, ymax, xmax] normalized to 0-1000.")
    mask: List[List[int]] = Field(description="The segmentation mask of the item as a polygon of [x,y] coordinates, normalized to 0-1000.")
    label: str = Field(description="A descriptive label for the item.")

class BoundingBoxes(BaseModel):
    boxes: List[BoundingBox]

interaction = client.interactions.create(
    model="gemini-3.5-flash",
    input=[
        {"type": "text", "text": prompt},
        {
            "type": "image",
            "uri": "https://example.com/image.png",
            "mime_type": "image/png"
        }
    ],
    response_format={
        "type": "text",
        "mime_type": "application/json",
        "schema": BoundingBoxes.model_json_schema()
    }
)

bounding_boxes = BoundingBoxes.model_validate_json(interaction.output_text)
print(bounding_boxes)
JavaScript
import { GoogleGenAI } from "@google/genai";
import * as z from "zod";

const client = new GoogleGenAI({});
const prompt = "Detect the all of the prominent items in the image. The box_2d should be [ymin, xmin, ymax, xmax] normalized to 0-1000.";

const boundingBoxesSchema = z.object({
  boxes: z.array(z.object({
    box_2d: z.array(z.number()),
    mask: z.array(z.array(z.number())),
    label: z.string()
  }))
});

const interaction = await client.interactions.create({
  model: "gemini-3.5-flash",
  input: [
    { type: "text", text: prompt },
    {
      type: "image",
      uri: "https://example.com/image.png",
      mime_type: "image/png"
    }
  ],
  response_format: {
    type: 'text',
    mime_type: 'application/json',
    schema: z.toJSONSchema(boundingBoxesSchema)
  },
});

const result = boundingBoxesSchema.parse(JSON.parse(interaction.output_text));
console.log(result);
REST
curl -X POST "https://generativelanguage.googleapis.com/v1beta/interactions" \
  -H "x-goog-api-key: $GEMINI_API_KEY" \
  -H 'Content-Type: application/json' \
  -d '{
    "model": "gemini-3.5-flash",
    "input": [
      {"type": "text", "text": "Detect the all of the prominent items in the image. The box_2d should be [ymin, xmin, ymax, xmax] normalized to 0-1000."},
      {
        "type": "image",
        "uri": "https://example.com/image.png",
        "mime_type": "image/png"
      }
    ],
    "response_format": {
      "type": "text",
      "mime_type": "application/json",
      "schema": {
        "type": "object",
        "properties": {
          "boxes": {
            "type": "array",
            "items": {
              "type": "object",
              "properties": {
                "box_2d": { "type": "array", "items": { "type": "integer" } },
                "mask": { "type": "array", "items": { "type": "array", "items": { "type": "integer" } } },
                "label": { "type": "string" }
              },
              "required": ["box_2d", "mask", "label"]
            }
          }
        },
        "required": ["boxes"]
      }
    }
  }'
For more examples, check following notebooks in the Gemini Cookbook:
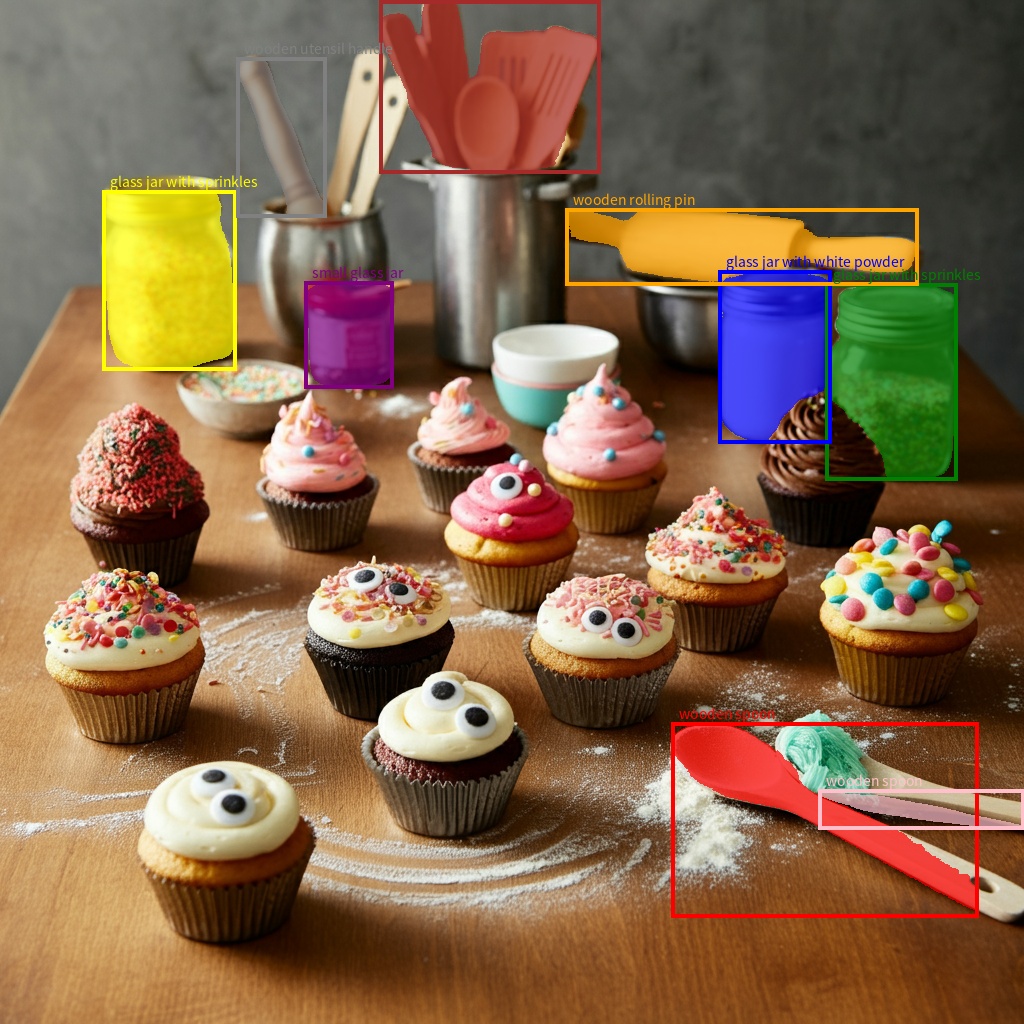
Segmentation
Starting with Gemini 2.5, models not only detect items but also segment them and provide their contour masks.
The model predicts a JSON list, where each item represents a segmentation mask.
Each item has a bounding box ("box_2d") in the format [y0, x0, y1, x1] with
normalized coordinates between 0 and 1000, a label ("label") that identifies
the object, and finally the segmentation mask inside the bounding box, as base64
encoded png that is a probability map with values between 0 and 255.
Python
from google import genai
from pydantic import BaseModel, Field
from typing import List
import json

client = genai.Client()

prompt = """
Give the segmentation masks for the wooden and glass items.
Output a JSON list of segmentation masks where each entry contains the 2D
bounding box in the key "box_2d", the segmentation mask in key "mask", and
the text label in the key "label". Use descriptive labels.
"""

class BoundingBox(BaseModel):
    box_2d: List[int] = Field(description="The 2D bounding box of the item as [ymin, xmin, ymax, xmax] normalized to 0-1000.")
    mask: List[List[int]] = Field(description="The segmentation mask of the item as a polygon of [x,y] coordinates, normalized to 0-1000.")
    label: str = Field(description="A descriptive label for the item.")

class BoundingBoxes(BaseModel):
    boxes: List[BoundingBox]

interaction = client.interactions.create(
    model="gemini-3.5-flash",
    input=[
        {"type": "text", "text": prompt},
        {
            "type": "image",
            "uri": "https://example.com/image.png",
            "mime_type": "image/png"
        }
    ],
    response_format={
        "type": "text",
        "mime_type": "application/json",
        "schema": BoundingBoxes.model_json_schema()
    },
    generation_config={
        "thinking_level": "minimal"
    }
)

items = BoundingBoxes.model_validate_json(interaction.output_text)
print("Segmentation results:", items)
JavaScript
import { GoogleGenAI } from "@google/genai";
import * as z from "zod";

const client = new GoogleGenAI({});
const prompt = `
Give the segmentation masks for the wooden and glass items.
Output a JSON list of segmentation masks where each entry contains the 2D
bounding box in the key "box_2d", the segmentation mask in key "mask", and
the text label in the key "label". Use descriptive labels.
`;

const boundingBoxesSchema = z.object({
  boxes: z.array(z.object({
    box_2d: z.array(z.number()),
    mask: z.array(z.array(z.number())),
    label: z.string()
  }))
});

const interaction = await client.interactions.create({
  model: "gemini-3.5-flash",
  input: [
    { type: "text", text: prompt },
    {
      type: "image",
      uri: "https://example.com/image.png",
      mime_type: "image/png"
    }
  ],
  response_format: {
    type: 'text',
    mime_type: 'application/json',
    schema: z.toJSONSchema(boundingBoxesSchema)
  },
  generation_config: {
    thinking_level: "minimal"
  }
});

const result = boundingBoxesSchema.parse(JSON.parse(interaction.output_text));
console.log(result);
REST
curl -X POST "https://generativelanguage.googleapis.com/v1beta/interactions" \
  -H "x-goog-api-key: $GEMINI_API_KEY" \
  -H 'Content-Type: application/json' \
  -d '{
    "model": "gemini-3.5-flash",
    "input": [
      {"type": "text", "text": "Give the segmentation masks for the wooden and glass items.\nOutput a JSON list of segmentation masks where each entry contains the 2D\nbounding box in the key \"box_2d\", the segmentation mask in key \"mask\", and\nthe text label in the key \"label\". Use descriptive labels."},
      {
        "type": "image",
        "uri": "https://example.com/image.png",
        "mime_type": "image/png"
      }
    ],
    "response_format": {
      "type": "text",
      "mime_type": "application/json",
      "schema": {
        "type": "object",
        "properties": {
          "boxes": {
            "type": "array",
            "items": {
              "type": "object",
              "properties": {
                "box_2d": { "type": "array", "items": { "type": "integer" } },
                "mask": { "type": "array", "items": { "type": "array", "items": { "type": "integer" } } },
                "label": { "type": "string" }
              },
              "required": ["box_2d", "mask", "label"]
            }
          }
        },
        "required": ["boxes"]
      }
    },
    "generation_config": {
      "thinking_level": "minimal"
    }
  }'
Supported image formats
Gemini supports the following image format MIME types:
- PNG -
image/png - JPEG -
image/jpeg - WEBP -
image/webp - HEIC -
image/heic - HEIF -
image/heif
To learn about other file input methods, see the File input methods guide.
Capabilities
All Gemini model versions are multimodal and can be utilized in a wide range of image processing and computer vision tasks including but not limited to image captioning, visual question and answering, image classification, object detection and segmentation.
Gemini can reduce the need to use specialized ML models depending on your quality and performance requirements.
The latest model versions are specifically trained improve accuracy of specialized tasks in addition to generic capabilities, like enhanced object detection and segmentation.
Limitations and key technical information
File limit
Gemini models support a maximum of 3,600 image files per request.
Token calculation
- 258 tokens if both dimensions <= 384 pixels. Larger images are tiled into 768x768 pixel tiles, each costing 258 tokens.
A rough formula for calculating the number of tiles is as follows:
- Calculate the crop unit size which is roughly:
floor(min(width, height)/ 1.5). - Divide each dimension by the crop unit size and multiply together to get the number of tiles.
For example, for an image of dimensions 960x540 would have a crop unit size of 360. Divide each dimension by 360 and the number of tile is 3 * 2 = 6.
Media resolution
Gemini 3 introduces granular control over multimodal vision processing with the
media_resolution parameter. The media_resolution parameter determines the
maximum number of tokens allocated per input image or video frame.
Higher resolutions improve the model's ability to
read fine text or identify small details, but increase token usage and latency.
Tips and best practices
- Verify that images are correctly rotated.
- Use clear, non-blurry images.
- When using a single image with text, place the text prompt before the image in the
inputarray.
What's next
This guide shows you how to upload image files and generate text outputs from image inputs. To learn more, see the following resources:
- Files API: Learn more about uploading and managing files for use with Gemini.
- System instructions: System instructions let you steer the behavior of the model based on your specific needs and use cases.
- File prompting strategies: The Gemini API supports prompting with text, image, audio, and video data, also known as multimodal prompting.
- Safety guidance: Sometimes generative AI models produce unexpected outputs, such as outputs that are inaccurate, biased, or offensive. Post-processing and human evaluation are essential to limit the risk of harm from such outputs.