
MediaPipe Face Landmarker टास्क की मदद से, इमेज और वीडियो में चेहरे के लैंडमार्क और चेहरे के भावों का पता लगाया जा सकता है. इस टास्क का इस्तेमाल करके, इंसान के चेहरे के भावों की पहचान की जा सकती है. साथ ही, चेहरे पर फ़िल्टर और इफ़ेक्ट लागू किए जा सकते हैं और वर्चुअल अवतार बनाए जा सकते हैं. इस टास्क में, मशीन लर्निंग (एमएल) मॉडल का इस्तेमाल किया जाता है. ये मॉडल, एक इमेज, वीडियो या इमेज की लगातार स्ट्रीम के साथ काम कर सकते हैं. यह टास्क, रीयल-टाइम में चेहरे की ज़्यादा जानकारी वाली सतहों का अनुमान लगाने के लिए, चेहरे के तीन डाइमेंशन वाले लैंडमार्क, ब्लेंडशैप स्कोर (चेहरे के भाव दिखाने वाले गुणांक) और इफ़ेक्ट रेंडर करने के लिए ज़रूरी बदलाव करने के लिए ट्रांसफ़ॉर्मेशन मैट्रिक दिखाता है.
इन निर्देशों में बताया गया कोड सैंपल, GitHub पर उपलब्ध है. इस टास्क को काम करते हुए देखने के लिए, यह वेब डेमो देखें. इस टास्क की सुविधाओं, मॉडल, और कॉन्फ़िगरेशन के विकल्पों के बारे में ज़्यादा जानने के लिए, खास जानकारी देखें.
कोड का उदाहरण
MediaPipe Tasks का उदाहरण कोड, iOS के लिए Face Landmarker ऐप्लिकेशन को लागू करने का बुनियादी तरीका है. इस उदाहरण में, लगातार चल रही वीडियो स्ट्रीम में चेहरे के लैंडमार्क का पता लगाने के लिए, किसी iOS डिवाइस के कैमरे का इस्तेमाल किया गया है. यह ऐप्लिकेशन, डिवाइस की गैलरी में मौजूद इमेज और वीडियो में, चेहरे के लैंडमार्क का पता लगा सकता है.
इस ऐप्लिकेशन का इस्तेमाल, अपने iOS ऐप्लिकेशन के लिए शुरुआती बिंदु के तौर पर किया जा सकता है. इसके अलावा, किसी मौजूदा ऐप्लिकेशन में बदलाव करते समय, इसका इस्तेमाल किया जा सकता है. फ़ेस लैंडमार्कर के उदाहरण के तौर पर दिया गया कोड, GitHub पर होस्ट किया गया है.
कोड डाउनलोड करना
यहां दिए गए निर्देशों में, git कमांड-लाइन टूल का इस्तेमाल करके, उदाहरण के कोड की लोकल कॉपी बनाने का तरीका बताया गया है.
उदाहरण के तौर पर दिया गया कोड डाउनलोड करने के लिए:
यहां दिए गए कमांड का इस्तेमाल करके, Git डेटा स्टोर करने की जगह को क्लोन करें:
git clone https://github.com/google-ai-edge/mediapipe-samplesइसके अलावा, अपने git इंस्टेंस को स्पैर्स चेकआउट का इस्तेमाल करने के लिए कॉन्फ़िगर करें, ताकि आपके पास सिर्फ़ Face Landmarker के उदाहरण वाले ऐप्लिकेशन की फ़ाइलें हों:
cd mediapipe-samples
git sparse-checkout init --cone
git sparse-checkout set examples/face_landmarker/ios
उदाहरण के तौर पर दिए गए कोड का लोकल वर्शन बनाने के बाद, MediaPipe टास्क लाइब्रेरी इंस्टॉल की जा सकती है. इसके बाद, Xcode का इस्तेमाल करके प्रोजेक्ट खोलें और ऐप्लिकेशन चलाएं. निर्देशों के लिए, iOS के लिए सेटअप गाइड देखें.
मुख्य कॉम्पोनेंट
नीचे दी गई फ़ाइलों में, फ़ेस लैंडमार्कर के उदाहरण के ऐप्लिकेशन के लिए अहम कोड शामिल है:
- FaceLandmarkerService.swift: यह फ़ेस लैंडमार्कर को शुरू करता है, मॉडल चुनने की प्रोसेस को मैनेज करता है, और इनपुट डेटा पर अनुमान लगाता है.
- CameraViewController.swift: यह लाइव कैमरा फ़ीड इनपुट मोड के लिए यूज़र इंटरफ़ेस (यूआई) लागू करता है और नतीजों को विज़ुअलाइज़ करता है.
- MediaLibraryViewController.swift: यह स्टिल इमेज और वीडियो फ़ाइल के इनपुट मोड के लिए यूज़र इंटरफ़ेस (यूआई) लागू करता है और नतीजों को विज़ुअलाइज़ करता है.
सेटअप
इस सेक्शन में, डेवलपमेंट एनवायरमेंट सेट अप करने और 'चेहरे की पहचान करने वाले टूल' का इस्तेमाल करने के लिए, प्रोजेक्ट को कोड करने के मुख्य चरणों के बारे में बताया गया है. MediaPipe Tasks का इस्तेमाल करने के लिए, डेवलपमेंट एनवायरमेंट सेट अप करने के बारे में सामान्य जानकारी पाने के लिए, iOS के लिए सेटअप गाइड देखें. इसमें, प्लैटफ़ॉर्म के वर्शन से जुड़ी ज़रूरी शर्तें भी शामिल हैं.
डिपेंडेंसी
Face Landmarker, MediaPipeTasksVision लाइब्रेरी का इस्तेमाल करता है. इसे CocoaPods का इस्तेमाल करके इंस्टॉल करना ज़रूरी है. यह लाइब्रेरी, Swift और Objective-C, दोनों तरह के ऐप्लिकेशन के साथ काम करती है. साथ ही, इसके लिए भाषा के हिसाब से किसी अन्य सेटअप की ज़रूरत नहीं होती.
macOS पर CocoaPods इंस्टॉल करने के निर्देशों के लिए, CocoaPods को इंस्टॉल करने की गाइड देखें.
अपने ऐप्लिकेशन के लिए ज़रूरी पॉड के साथ Podfile बनाने का तरीका जानने के लिए, CocoaPods का इस्तेमाल करना लेख पढ़ें.
नीचे दिए गए कोड का इस्तेमाल करके, Podfile में MediaPipeTasksVision पॉड जोड़ें:
target 'MyFaceLandmarkerApp' do
  use_frameworks!
  pod 'MediaPipeTasksVision'
end
अगर आपके ऐप्लिकेशन में यूनिट टेस्ट टारगेट शामिल हैं, तो Podfile को सेट अप करने के बारे में ज़्यादा जानकारी के लिए, iOS के लिए सेट अप करने की गाइड देखें.
मॉडल
MediaPipe के फ़ेस लैंडमार्कर टास्क के लिए, ट्रेन किए गए मॉडल के ऐसे बंडल की ज़रूरत होती है जो इस टास्क के साथ काम करता हो. फ़ेस लैंडमार्कर के लिए, पहले से ट्रेन किए गए मॉडल के बारे में ज़्यादा जानने के लिए, टास्क की खास जानकारी वाला मॉडल सेक्शन देखें.
कोई मॉडल चुनें और डाउनलोड करें. इसके बाद, Xcode का इस्तेमाल करके उसे अपनी प्रोजेक्ट डायरेक्ट्री में जोड़ें. अपने Xcode प्रोजेक्ट में फ़ाइलें जोड़ने का तरीका जानने के लिए, अपने Xcode प्रोजेक्ट में फ़ाइलों और फ़ोल्डर को मैनेज करना लेख पढ़ें.
अपने ऐप्लिकेशन बंडल में मॉडल का पाथ बताने के लिए, BaseOptions.modelAssetPath प्रॉपर्टी का इस्तेमाल करें. कोड का उदाहरण देखने के लिए, अगला सेक्शन देखें.
टास्क बनाना
फ़ेस लैंडमार्कर टास्क बनाने के लिए, उसके किसी एक इनिशलाइज़र को कॉल करें. FaceLandmarker(options:) initializer, कॉन्फ़िगरेशन के विकल्पों के लिए वैल्यू स्वीकार करता है.
अगर आपको पसंद के मुताबिक कॉन्फ़िगरेशन के विकल्पों के साथ शुरू किए गए फ़ेस लैंडमार्कर की ज़रूरत नहीं है, तो डिफ़ॉल्ट विकल्पों के साथ फ़ेस लैंडमार्कर बनाने के लिए, FaceLandmarker(modelPath:) आइनिलाइज़र का इस्तेमाल किया जा सकता है. कॉन्फ़िगरेशन के विकल्पों के बारे में ज़्यादा जानने के लिए, कॉन्फ़िगरेशन की खास जानकारी देखें.
फ़ेस लैंडमार्कर टास्क, इनपुट डेटा के तीन टाइप के साथ काम करता है: स्टिल इमेज, वीडियो फ़ाइलें, और लाइव वीडियो स्ट्रीम. डिफ़ॉल्ट रूप से, FaceLandmarker(modelPath:) स्टिल इमेज के लिए एक टास्क शुरू करता है. अगर आपको वीडियो फ़ाइलों या लाइव वीडियो स्ट्रीम को प्रोसेस करने के लिए, अपना टास्क शुरू करना है, तो वीडियो या लाइव स्ट्रीम के चलने के मोड की जानकारी देने के लिए FaceLandmarker(options:) का इस्तेमाल करें. लाइव स्ट्रीम मोड के लिए, faceLandmarkerLiveStreamDelegate कॉन्फ़िगरेशन के एक और विकल्प की ज़रूरत होती है. इससे, डिलीगेट को चेहरे के लेंडमार्क के नतीजे, अलग-अलग समय पर डिलीवर किए जा सकते हैं.
टास्क बनाने और अनुमान लगाने का तरीका जानने के लिए, अपने रनिंग मोड से जुड़ा टैब चुनें.
Swift
इमेज
import MediaPipeTasksVision

let modelPath = Bundle.main.path(
  forResource: "face_landmarker",
  ofType: "task")

let options = FaceLandmarkerOptions()
options.baseOptions.modelAssetPath = modelPath
options.runningMode = .image
options.minFaceDetectionConfidence = minFaceDetectionConfidence
options.minFacePresenceConfidence = minFacePresenceConfidence
options.minTrackingConfidence = minTrackingConfidence
options.numFaces = numFaces

let faceLandmarker = try FaceLandmarker(options: options)
वीडियो
import MediaPipeTasksVision

let modelPath = Bundle.main.path(
  forResource: "face_landmarker",
  ofType: "task")

let options = FaceLandmarkerOptions()
options.baseOptions.modelAssetPath = modelPath
options.runningMode = .video
options.minFaceDetectionConfidence = minFaceDetectionConfidence
options.minFacePresenceConfidence = minFacePresenceConfidence
options.minTrackingConfidence = minTrackingConfidence
options.numFaces = numFaces

let faceLandmarker = try FaceLandmarker(options: options)
लाइवस्ट्रीम
import MediaPipeTasksVision

// Class that conforms to the `FaceLandmarkerLiveStreamDelegate` protocol and
// implements the method that the face landmarker calls once it finishes
// performing face landmark detection in each input frame.
class FaceLandmarkerResultProcessor: NSObject, FaceLandmarkerLiveStreamDelegate {

  func faceLandmarker(
    _ faceLandmarker: FaceLandmarker,
    didFinishDetection result: FaceLandmarkerResult?,
    timestampInMilliseconds: Int,
    error: Error?) {

    // Process the face landmarker result or errors here.

  }
}

let modelPath = Bundle.main.path(
  forResource: "face_landmarker",
  ofType: "task")

let options = FaceLandmarkerOptions()
options.baseOptions.modelAssetPath = modelPath
options.runningMode = .liveStream
options.minFaceDetectionConfidence = minFaceDetectionConfidence
options.minFacePresenceConfidence = minFacePresenceConfidence
options.minTrackingConfidence = minTrackingConfidence
options.numFaces = numFaces

// Assign an object of the class to the `faceLandmarkerLiveStreamDelegate`
// property.
let processor = FaceLandmarkerResultProcessor()
options.faceLandmarkerLiveStreamDelegate = processor

let faceLandmarker = try FaceLandmarker(options: options)
Objective-C
इमेज
@import MediaPipeTasksVision;

NSString *modelPath = [[NSBundle mainBundle] pathForResource:@"face_landmarker"
                                                      ofType:@"task"];

MPPFaceLandmarkerOptions *options = [[MPPFaceLandmarkerOptions alloc] init];
options.baseOptions.modelAssetPath = modelPath;
options.runningMode = MPPRunningModeImage;
options.minFaceDetectionConfidence = minFaceDetectionConfidence;
options.minFacePresenceConfidence = minFacePresenceConfidence;
options.minTrackingConfidence = minTrackingConfidence;
options.numFaces = numFaces;

MPPFaceLandmarker *faceLandmarker =
  [[MPPFaceLandmarker alloc] initWithOptions:options error:nil];
वीडियो
@import MediaPipeTasksVision;

NSString *modelPath = [[NSBundle mainBundle] pathForResource:@"face_landmarker"
                                                      ofType:@"task"];

MPPFaceLandmarkerOptions *options = [[MPPFaceLandmarkerOptions alloc] init];
options.baseOptions.modelAssetPath = modelPath;
options.runningMode = MPPRunningModeVideo;
options.minFaceDetectionConfidence = minFaceDetectionConfidence;
options.minFacePresenceConfidence = minFacePresenceConfidence;
options.minTrackingConfidence = minTrackingConfidence;
options.numFaces = numFaces;

MPPFaceLandmarker *faceLandmarker =
  [[MPPFaceLandmarker alloc] initWithOptions:options error:nil];
लाइवस्ट्रीम
@import MediaPipeTasksVision; // Class that conforms to the `MPPFaceLandmarkerLiveStreamDelegate` protocol // and implements the method that the face landmarker calls once it finishes // performing face landmark detection in each input frame. @interface APPFaceLandmarkerResultProcessor : NSObject@end @implementation APPFaceLandmarkerResultProcessor - (void)faceLandmarker:(MPPFaceLandmarker *)faceLandmarker didFinishDetectionWithResult:(MPPFaceLandmarkerResult *)faceLandmarkerResult timestampInMilliseconds:(NSInteger)timestampInMilliseconds error:(NSError *)error { // Process the face landmarker result or errors here. } @end NSString *modelPath = [[NSBundle mainBundle] pathForResource:@"face_landmarker" ofType:@"task"]; MPPFaceLandmarkerOptions *options = [[MPPFaceLandmarkerOptions alloc] init]; options.baseOptions.modelAssetPath = modelPath; options.runningMode = MPPRunningModeLiveStream; options.minFaceDetectionConfidence = minFaceDetectionConfidence; options.minFacePresenceConfidence = minFacePresenceConfidence; options.minTrackingConfidence = minTrackingConfidence; options.numFaces = numFaces; // Assign an object of the class to the `faceLandmarkerLiveStreamDelegate` // property. APPFaceLandmarkerResultProcessor *processor = [APPFaceLandmarkerResultProcessor new]; options.faceLandmarkerLiveStreamDelegate = processor; MPPFaceLandmarker *faceLandmarker = [[MPPFaceLandmarker alloc] initWithOptions:options error:nil];
ध्यान दें: वीडियो मोड या लाइव स्ट्रीम मोड का इस्तेमाल करने पर, फ़ेस लैंडमार्कर हर फ़्रेम पर पहचान करने वाले मॉडल को ट्रिगर करने से बचने के लिए, ट्रैकिंग का इस्तेमाल करता है. इससे, इंतज़ार का समय कम करने में मदद मिलती है.
कॉन्फ़िगरेशन विकल्प
इस टास्क में, iOS ऐप्लिकेशन के लिए ये कॉन्फ़िगरेशन विकल्प हैं:
| विकल्प का नाम | ब्यौरा | वैल्यू की रेंज | डिफ़ॉल्ट मान |
|---|---|---|---|
runningMode |
टास्क के लिए रनिंग मोड सेट करता है. फ़ेस लैंडमार्कर के तीन मोड हैं:
इमेज: एक इमेज इनपुट के लिए मोड. वीडियो: किसी वीडियो के डिकोड किए गए फ़्रेम के लिए मोड. LIVE_STREAM: कैमरे से मिलने वाले इनपुट डेटा की लाइव स्ट्रीम का मोड. इस मोड में, `faceLandmarkerLiveStreamDelegate` को किसी ऐसी क्लास के इंस्टेंस पर सेट किया जाना चाहिए जो `FaceLandmarkerLiveStreamDelegate` को लागू करती हो. इससे, चेहरे के लैंडमार्क की पहचान करने की प्रोसेस के नतीजे, एक साथ मिलने के बजाय अलग-अलग समय पर मिलते हैं. |
{RunningMode.image, RunningMode.video, RunningMode.liveStream} | {RunningMode.image} |
numFaces |
ज़्यादा से ज़्यादा कितने चेहरों की पहचान, फ़ेस लैंडमार्कर की मदद से की जा सकती है. फ़ोटो को सिर्फ़ तब स्मूद किया जाता है, जब numFaces को 1 पर सेट किया गया हो. | पूर्णांक > 0 | 1 |
minFaceDetectionConfidence |
चेहरे का पता लगाने के लिए, कम से कम इतना कॉन्फ़िडेंस स्कोर होना चाहिए. | फ़्लोट [0.0,1.0] | 0.5 |
minFacePresenceConfidence |
चेहरे के लैंडमार्क का पता लगाने की सुविधा में, चेहरे की मौजूदगी के स्कोर का कम से कम कॉन्फ़िडेंस स्कोर. | फ़्लोट [0.0,1.0] | 0.5 |
minTrackingConfidence |
चेहरे की पहचान करने की प्रोसेस को पूरा होने के लिए, कम से कम यह कॉन्फ़िडेंस स्कोर होना चाहिए. | फ़्लोट [0.0,1.0] | 0.5 |
outputFaceBlendshapes |
FaceLandmarker, चेहरे के ब्लेंडशैप आउटपुट करता है या नहीं. चेहरे के ब्लेंडशैप का इस्तेमाल, 3D चेहरे के मॉडल को रेंडर करने के लिए किया जाता है. | बूल | गलत |
outputFacialTransformationMatrixes |
FaceLandmarker, चेहरे के ट्रांसफ़ॉर्मेशन मैट्रिक्स को आउटपुट करता है या नहीं. FaceLandmarker, मैट्रिक का इस्तेमाल करके चेहरे के लैंडमार्क को, कैननिकल चेहरे के मॉडल से, पहचाने गए चेहरे में बदलता है. इससे उपयोगकर्ता, पहचाने गए लैंडमार्क पर इफ़ेक्ट लागू कर सकते हैं. | बूल | गलत |
जब रनिंग मोड को LIVE_STREAM पर सेट किया जाता है, तो फ़ेस लैंडमार्कर को faceLandmarkerLiveStreamDelegate कॉन्फ़िगरेशन के अतिरिक्त विकल्प की ज़रूरत होती है. इससे फ़ेस लैंडमार्कर, चेहरे के लैंडमार्क का पता लगाने के नतीजे, अलग-अलग समय पर डिलीवर कर पाता है. डेलिगेट को faceLandmarker(_:didFinishDetection:timestampInMilliseconds:error:) तरीका लागू करना होगा. हर फ़्रेम पर चेहरे के लैंडमार्क का पता लगाने के नतीजों को प्रोसेस करने के बाद, Face Landmarker इस तरीके को कॉल करता है.
| विकल्प का नाम | ब्यौरा | वैल्यू की रेंज | डिफ़ॉल्ट मान |
|---|---|---|---|
faceLandmarkerLiveStreamDelegate |
इससे, फ़ेस लैंडमार्कर को लाइव स्ट्रीम मोड में, चेहरे के लैंडमार्क का पता लगाने की प्रोसेस के नतीजे एसिंक्रोनस तरीके से मिलते हैं. जिस क्लास का
इंस्टेंस इस प्रॉपर्टी पर सेट है उसे
faceLandmarker(_:didFinishDetection:timestampInMilliseconds:error:)
तरीका लागू करना होगा. |
लागू नहीं | सेट नहीं है |
डेटा तैयार करना
इनपुट इमेज या फ़्रेम को फ़ेस लैंडमार्कर में भेजने से पहले, आपको उसे MPImage ऑब्जेक्ट में बदलना होगा. MPImage, iOS इमेज के अलग-अलग फ़ॉर्मैट के साथ काम करता है. साथ ही, इनका इस्तेमाल अनुमान लगाने के लिए, किसी भी रनिंग मोड में किया जा सकता है. MPImage के बारे में ज़्यादा जानकारी के लिए, MPImage API देखें.
अपने इस्तेमाल के उदाहरण और ऐप्लिकेशन के लिए ज़रूरी रनिंग मोड के आधार पर, iOS इमेज फ़ॉर्मैट चुनें.MPImage, UIImage, CVPixelBuffer, और
CMSampleBuffer iOS इमेज फ़ॉर्मैट स्वीकार करता है.
UIImage
UIImage फ़ॉर्मैट, इन रनिंग मोड के लिए सबसे सही है:
इमेज: ऐप्लिकेशन बंडल, उपयोगकर्ता की गैलरी या फ़ाइल सिस्टम में मौजूद इमेज को
MPImageऑब्जेक्ट में बदला जा सकता है. हालांकि, इसके लिए ज़रूरी है कि इमेज कोUIImageफ़ॉर्मैट में फ़ॉर्मैट किया गया हो.वीडियो: AVAssetImageGenerator का इस्तेमाल करके, वीडियो फ़्रेम को CGImage फ़ॉर्मैट में निकालें. इसके बाद, उन्हें
UIImageइमेज में बदलें.
Swift
// Load an image on the user's device as an iOS `UIImage` object.

// Convert the `UIImage` object to a MediaPipe's Image object having the default
// orientation `UIImage.Orientation.up`.
let image = try MPImage(uiImage: image)
Objective-C
// Load an image on the user's device as an iOS `UIImage` object.

// Convert the `UIImage` object to a MediaPipe's Image object having the default
// orientation `UIImageOrientationUp`.
MPImage *image = [[MPPImage alloc] initWithUIImage:image error:nil];
इस उदाहरण में, डिफ़ॉल्ट UIImage.Orientation.Up ओरिएंटेशन के साथ MPImage को शुरू किया गया है. MPImage को इस्तेमाल की जा सकने वाली किसी भी UIImage.Orientation वैल्यू के साथ शुरू किया जा सकता है. फ़ेस लैंडमार्कर, .upMirrored,
.downMirrored, .leftMirrored, .rightMirrored जैसे मिरर किए गए ओरिएंटेशन के साथ काम नहीं करता.
UIImage के बारे में ज़्यादा जानकारी के लिए, UIImage Apple Developer के दस्तावेज़ देखें.
CVPixelBuffer
CVPixelBuffer फ़ॉर्मैट, उन ऐप्लिकेशन के लिए सबसे सही है जो फ़्रेम जनरेट करते हैं और प्रोसेसिंग के लिए iOS CoreImage फ़्रेमवर्क का इस्तेमाल करते हैं.
CVPixelBuffer फ़ॉर्मैट, इन रनिंग मोड के लिए सबसे सही है:
इमेज: iOS के
CoreImageफ़्रेमवर्क का इस्तेमाल करके, कुछ प्रोसेसिंग के बादCVPixelBufferइमेज जनरेट करने वाले ऐप्लिकेशन, इमेज रनिंग मोड में फ़ेस लैंडमार्कर को भेजे जा सकते हैं.वीडियो: वीडियो फ़्रेम को प्रोसेस करने के लिए,
CVPixelBufferफ़ॉर्मैट में बदला जा सकता है. इसके बाद, उन्हें वीडियो मोड में फ़ेस लैंडमार्कर को भेजा जा सकता है.लाइव स्ट्रीम: फ़्रेम जनरेट करने के लिए iOS कैमरे का इस्तेमाल करने वाले ऐप्लिकेशन, प्रोसेसिंग के लिए
CVPixelBufferफ़ॉर्मैट में बदले जा सकते हैं. इसके बाद, उन्हें लाइव स्ट्रीम मोड में, फ़ेस लैंडमार्कर को भेजा जा सकता है.
Swift
// Obtain a CVPixelBuffer.

// Convert the `CVPixelBuffer` object to a MediaPipe's Image object having the default
// orientation `UIImage.Orientation.up`.
let image = try MPImage(pixelBuffer: pixelBuffer)
Objective-C
// Obtain a CVPixelBuffer.

// Convert the `CVPixelBuffer` object to a MediaPipe's Image object having the
// default orientation `UIImageOrientationUp`.
MPImage *image = [[MPPImage alloc] initWithUIImage:image error:nil];
CVPixelBuffer के बारे में ज़्यादा जानकारी के लिए, CVPixelBuffer Apple Developer दस्तावेज़ देखें.
CMSampleBuffer
CMSampleBuffer फ़ॉर्मैट, एक जैसे मीडिया टाइप के मीडिया सैंपल को सेव करता है. साथ ही, यह लाइव स्ट्रीम के रनिंग मोड के लिए काफ़ी सही है. iOS कैमरों से लाइव फ़्रेम, iOS AVCaptureVideoDataOutput की मदद से, CMSampleBuffer फ़ॉर्मैट में अलग-अलग डिलीवर किए जाते हैं.
Swift
// Obtain a CMSampleBuffer.

// Convert the `CMSampleBuffer` object to a MediaPipe's Image object having the default
// orientation `UIImage.Orientation.up`.
let image = try MPImage(sampleBuffer: sampleBuffer)
Objective-C
// Obtain a `CMSampleBuffer`.

// Convert the `CMSampleBuffer` object to a MediaPipe's Image object having the
// default orientation `UIImageOrientationUp`.
MPImage *image = [[MPPImage alloc] initWithSampleBuffer:sampleBuffer error:nil];
CMSampleBuffer के बारे में ज़्यादा जानकारी के लिए, CMSampleBuffer Apple के डेवलपर के दस्तावेज़ देखें.
टास्क चलाना
फ़ेस लैंडमार्कर को चलाने के लिए, असाइन किए गए रनिंग मोड के हिसाब से detect() तरीके का इस्तेमाल करें:
- स्टिल इमेज:
detect(image:) - वीडियो:
detect(videoFrame:timestampInMilliseconds:) - लाइवस्ट्रीम:
detectAsync(image:timestampInMilliseconds:)
नीचे दिए गए कोड सैंपल में, इन अलग-अलग मोड में फ़ेस लैंडमार्कर को चलाने के बुनियादी उदाहरण दिए गए हैं:
Swift
इमेज
let result = try faceLandmarker.detect(image: image)
वीडियो
let result = try faceLandmarker.detect(
  videoFrame: image,
  timestampInMilliseconds: timestamp)
लाइव स्ट्रीम
try faceLandmarker.detectAsync(
  image: image,
  timestampInMilliseconds: timestamp)
Objective-C
इमेज
MPPFaceLandmarkerResult *result =
  [faceLandmarker detectImage:image error:nil];
वीडियो
MPPFaceLandmarkerResult *result =
  [faceLandmarker detectVideoFrame:image
           timestampInMilliseconds:timestamp
                             error:nil];
लाइवस्ट्रीम
BOOL success =
  [faceLandmarker detectAsyncImage:image
           timestampInMilliseconds:timestamp
                             error:nil];
फ़ेस लैंडमार्कर कोड के उदाहरण में, detect(image:), detect(videoFrame:timestampInMilliseconds:), और detectAsync(image:timestampInMilliseconds:) मोड को लागू करने के बारे में ज़्यादा जानकारी दी गई है. उदाहरण के तौर पर दिए गए कोड की मदद से, उपयोगकर्ता प्रोसेसिंग मोड के बीच स्विच कर सकता है. हालांकि, ऐसा आपके इस्तेमाल के उदाहरण के लिए ज़रूरी नहीं है.
निम्न पर ध्यान दें:
वीडियो मोड या लाइव स्ट्रीम मोड में चलाने पर, आपको फ़ेस लैंडमार्कर टास्क के लिए, इनपुट फ़्रेम का टाइमस्टैंप भी देना होगा.
इमेज या वीडियो मोड में चलने पर, चेहरे के लैंडमार्क का पता लगाने वाला टास्क, मौजूदा थ्रेड को तब तक ब्लॉक करता है, जब तक वह इनपुट इमेज या फ़्रेम को प्रोसेस नहीं कर लेता. मौजूदा थ्रेड को ब्लॉक होने से बचाने के लिए, iOS के Dispatch या NSOperation फ़्रेमवर्क का इस्तेमाल करके, बैकग्राउंड थ्रेड में प्रोसेसिंग को पूरा करें. अगर आपका ऐप्लिकेशन Swift का इस्तेमाल करके बनाया गया है, तो बैकग्राउंड थ्रेड को चलाने के लिए, Swift के एक साथ कई काम करने की सुविधा का भी इस्तेमाल किया जा सकता है.
लाइव स्ट्रीम मोड में चलने पर, फ़ेस लैंडमार्कर टास्क तुरंत रिटर्न करता है और मौजूदा थ्रेड को ब्लॉक नहीं करता. यह हर इनपुट फ़्रेम को प्रोसेस करने के बाद,
faceLandmarker(_:didFinishDetection:timestampInMilliseconds:error:)तरीके को चेहरे के लैंडमार्क की पहचान करने के नतीजे के साथ शुरू करता है. फ़ेस लैंडमार्कर, इस तरीके को एक खास सीरियल डिस्पैच कतार पर, असींक्रोनस तरीके से लागू करता है. यूज़र इंटरफ़ेस पर नतीजे दिखाने के लिए, नतीजों को प्रोसेस करने के बाद, उन्हें मुख्य सूची में भेजें.
नतीजों को मैनेज और दिखाना
अनुमान लगाने के बाद, फ़ेस लैंडमार्कर एक FaceLandmarkerResult दिखाता है. इसमें, पहचानी गई हर फ़ेस के लिए एक फ़ेस मेश होता है. साथ ही, हर फ़ेस लैंडमार्क के लिए कोऑर्डिनेट भी होते हैं. इसके अलावा, नतीजे वाले ऑब्जेक्ट में ब्लेंडशेप भी हो सकते हैं. ये चेहरे के भावों को दिखाते हैं. साथ ही, लैंडमार्क पर चेहरे के असर लागू करने के लिए, चेहरे के ट्रांसफ़ॉर्मेशन मैट्रिक भी हो सकते हैं.
यहां इस टास्क के आउटपुट डेटा का उदाहरण दिया गया है:
FaceLandmarkerResult:
  face_landmarks:
    NormalizedLandmark #0:
      x: 0.5971359014511108
      y: 0.485361784696579
      z: -0.038440968841314316
    NormalizedLandmark #1:
      x: 0.3302789330482483
      y: 0.29289937019348145
      z: -0.09489090740680695
    ... (478 landmarks for each face)
  face_blendshapes:
    browDownLeft: 0.8296722769737244
    browDownRight: 0.8096957206726074
    browInnerUp: 0.00035583582939580083
    browOuterUpLeft: 0.00035752105759456754
    ... (52 blendshapes for each face)
  facial_transformation_matrixes:
    [9.99158978e-01, -1.23036895e-02, 3.91213447e-02, -3.70770246e-01]
    [1.66496094e-02,  9.93480563e-01, -1.12779640e-01, 2.27719707e+01]
    ...
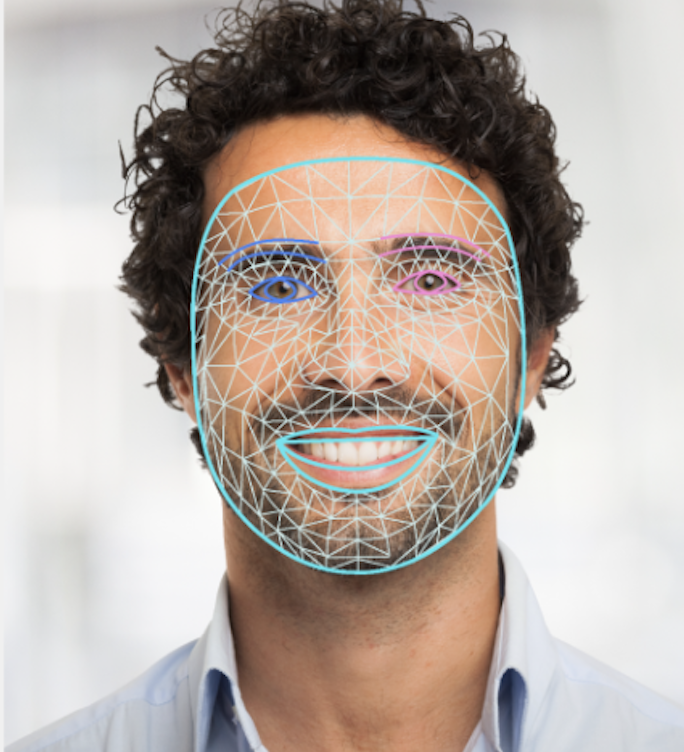
नीचे दी गई इमेज में, टास्क के आउटपुट को विज़ुअलाइज़ किया गया है:
फ़ेस लैंडमार्कर के उदाहरण वाले कोड में, टास्क से मिले नतीजों को दिखाने का तरीका बताया गया है. ज़्यादा जानकारी के लिए, FaceOverlay.swift देखें.