Gemini Robotics-ER 1.6, विज़न-लैंग्वेज मॉडल (वीएलएम) है. यह रोबोटिक्स में Gemini की एजेंट के तौर पर काम करने की क्षमताओं को शामिल करता है. इसे असल दुनिया में बेहतर तरीके से काम करने के लिए डिज़ाइन किया गया है. इससे रोबोट, मुश्किल विज़ुअल डेटा को समझ पाते हैं, जगह के हिसाब से तर्क कर पाते हैं, और नैचुरल लैंग्वेज में दिए गए निर्देशों के हिसाब से काम कर पाते हैं.
ध्यान दें कि अगर Gemini Robotics-ER 1.5 का इस्तेमाल किया जा रहा था, तो एपीआई कॉल में मॉडल के नाम को model="gemini-robotics-er-1.5-preview" से बदलकर model="gemini-robotics-er-1.6-preview" करके, 1.6 मॉडल का इस्तेमाल शुरू किया जा सकता है.
मुख्य सुविधाएं और फ़ायदे:
- बेहतर स्वायत्तता: रोबोट, ओपन-एंडेड एनवायरमेंट में बदलावों के हिसाब से काम कर सकते हैं, उनमें बदलाव कर सकते हैं, और उनके हिसाब से जवाब दे सकते हैं.
- नैचुरल लैंग्वेज इंटरैक्शन: इससे रोबोट का इस्तेमाल करना आसान हो जाता है. साथ ही, नैचुरल लैंग्वेज का इस्तेमाल करके मुश्किल टास्क असाइन किए जा सकते हैं.
- टास्क ऑर्केस्ट्रेशन: यह सुविधा, आम बोलचाल वाली भाषा में दिए गए निर्देशों को उप-टास्क में बांटती है. साथ ही, लंबे समय तक चलने वाले टास्क को पूरा करने के लिए, मौजूदा रोबोट कंट्रोलर और व्यवहारों के साथ इंटिग्रेट होती है.
- कई तरह की सुविधाएं: यह ऑब्जेक्ट का पता लगाता है और उनकी पहचान करता है. साथ ही, ऑब्जेक्ट के बीच के संबंध को समझता है, पकड़ने और चलने के तरीके को समझता है, और डाइनैमिक सीन को समझता है.
इस दस्तावेज़ में बताया गया है कि मॉडल क्या करता है. साथ ही, इसमें कई उदाहरण दिए गए हैं, जिनसे मॉडल की एजेंट के तौर पर काम करने की क्षमताओं के बारे में पता चलता है.
अगर आपको तुरंत इस मॉडल का इस्तेमाल शुरू करना है, तो Google AI Studio में जाकर इसे आज़माएं.
सुरक्षा
Gemini Robotics-ER 1.6 को सुरक्षा को ध्यान में रखकर बनाया गया है. हालांकि, यह आपकी ज़िम्मेदारी है कि आप रोबोट के आस-पास सुरक्षित माहौल बनाए रखें. जनरेटिव एआई मॉडल से गलतियां हो सकती हैं. साथ ही, फ़िज़िकल रोबोट से नुकसान हो सकता है. सुरक्षा हमारी प्राथमिकता है. साथ ही, असल दुनिया के रोबोटिक्स के साथ जनरेटिव एआई मॉडल का इस्तेमाल करते समय, उन्हें सुरक्षित बनाना हमारी रिसर्च का एक अहम हिस्सा है. ज़्यादा जानने के लिए, Google DeepMind के रोबोटिक्स की सुरक्षा से जुड़ा पेज पर जाएं.
शुरू करना: किसी सीन में ऑब्जेक्ट ढूंढना
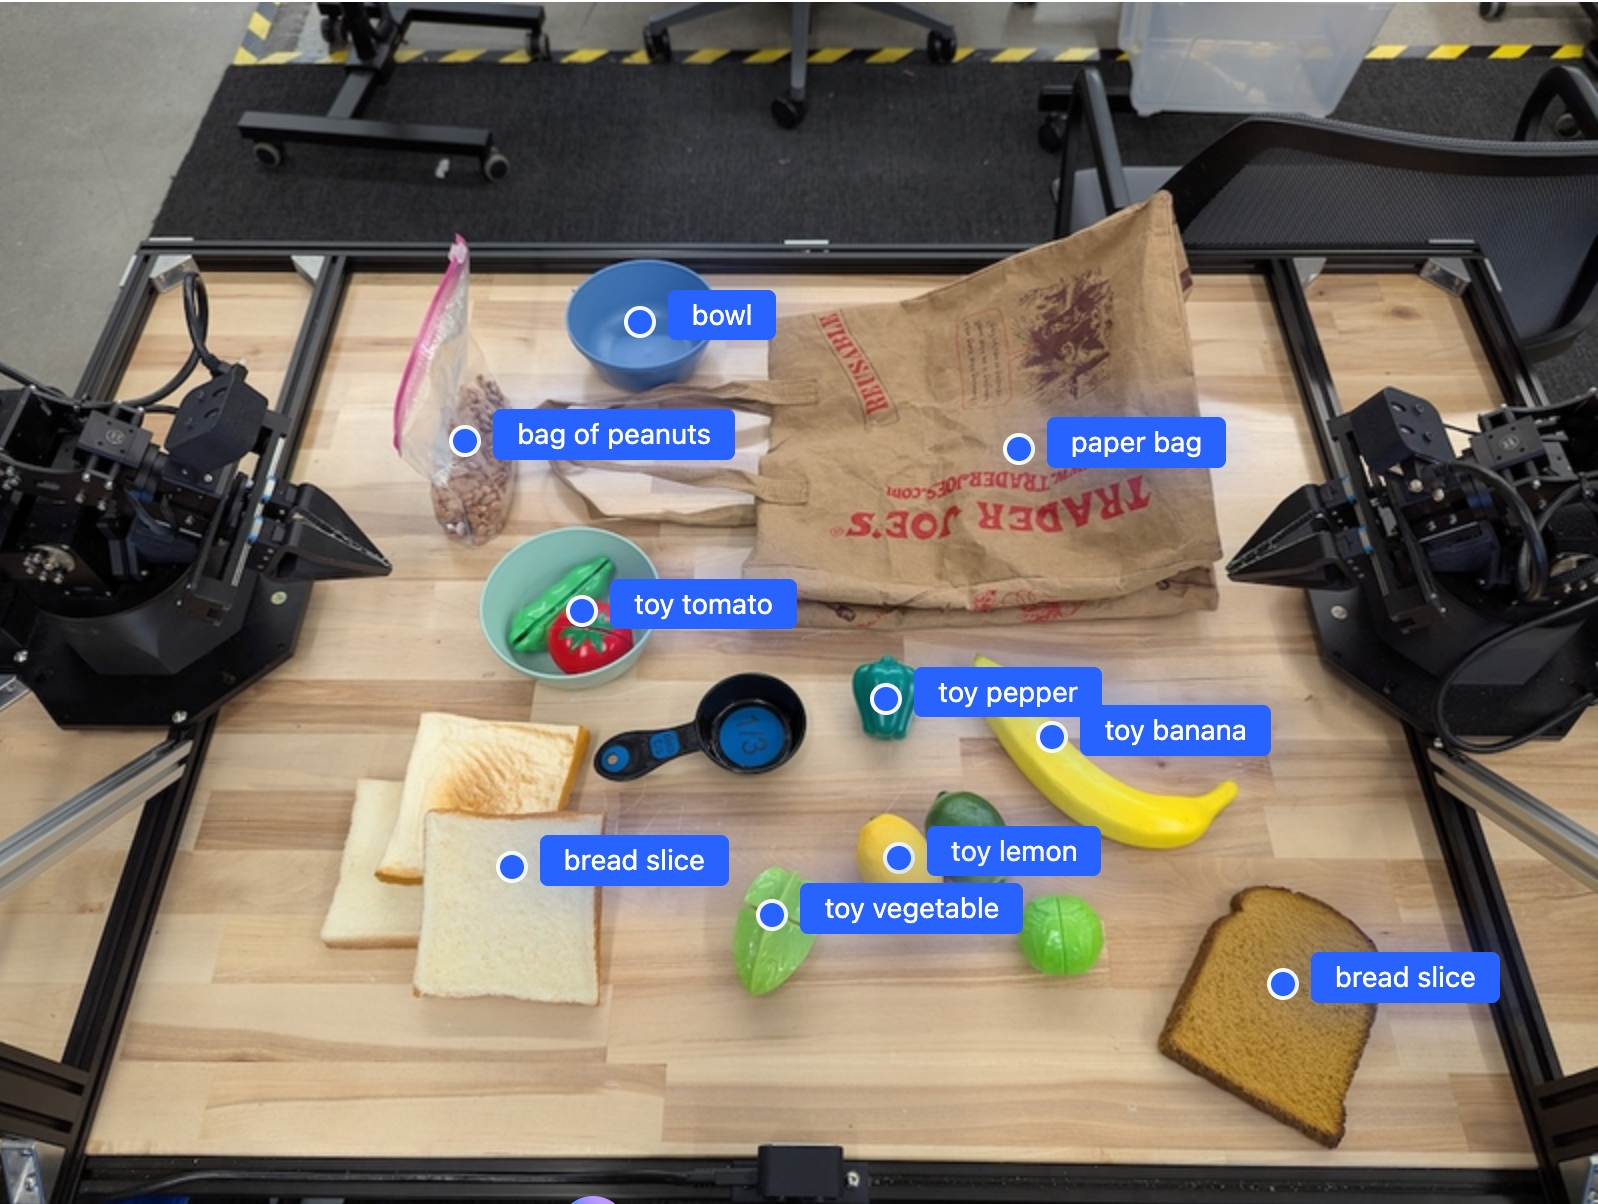
इस उदाहरण में, रोबोटिक्स के इस्तेमाल का एक सामान्य उदाहरण दिखाया गया है. इसमें, generateContent तरीके का इस्तेमाल करके, मॉडल को इमेज और टेक्स्ट प्रॉम्प्ट पास करने का तरीका बताया गया है. इससे, पहचाने गए ऑब्जेक्ट की सूची और उनके 2D पॉइंट मिलते हैं.
मॉडल, इमेज में पहचाने गए आइटम के लिए पॉइंट दिखाता है. साथ ही, उनके सामान्य किए गए 2D कोऑर्डिनेट और लेबल दिखाता है.
इस आउटपुट का इस्तेमाल, रोबोटिक्स एपीआई के साथ किया जा सकता है. इसके अलावा, विज़न-लैंग्वेज-ऐक्शन (वीएलए) मॉडल या तीसरे पक्ष के किसी अन्य उपयोगकर्ता-परिभाषित फ़ंक्शन को कॉल करके, रोबोट के लिए कार्रवाइयां जनरेट की जा सकती हैं.
Python
from google import genai
from google.genai import types

PROMPT = """
          Point to no more than 10 items in the image. The label returned
          should be an identifying name for the object detected.
          The answer should follow the json format: [{"point": <point>,
          "label": <label1>}, ...]. The points are in [y, x] format
          normalized to 0-1000.
        """
client = genai.Client()

# Load your image
with open("my-image.png", 'rb') as f:
    image_bytes = f.read()

image_response = client.models.generate_content(
    model="gemini-robotics-er-1.6-preview",
    contents=[
        types.Part.from_bytes(
            data=image_bytes,
            mime_type='image/png',
        ),
        PROMPT
    ],
    config = types.GenerateContentConfig(
        temperature=1.0,
        thinking_config=types.ThinkingConfig(thinking_budget=0)
    )
)

print(image_response.text)
REST
# First, ensure you have the image file locally.
# Encode the image to base64
IMAGE_BASE64=$(base64 -w 0 my-image.png)

curl -X POST \
  "https://generativelanguage.googleapis.com/v1beta/models/gemini-robotics-er-1.6-preview:generateContent \
  -H "x-goog-api-key: $GEMINI_API_KEY" \
  -H "Content-Type: application/json" \
  -d '{
    "contents": [
      {
        "parts": [
          {
            "inlineData": {
              "mimeType": "image/png",
              "data": "'"${IMAGE_BASE64}"'"
            }
          },
          {
            "text": "Point to no more than 10 items in the image. The label returned should be an identifying name for the object detected. The answer should follow the json format: [{\"point\": [y, x], \"label\": <label1>}, ...]. The points are in [y, x] format normalized to 0-1000."
          }
        ]
      }
    ],
    "generationConfig": {
      "temperature": 0.5,
      "thinkingConfig": {
        "thinkingBudget": 0
      }
    }
  }'
आउटपुट के तौर पर एक JSON कलेक्शन मिलेगा. इसमें ऑब्जेक्ट शामिल होंगे. हर ऑब्जेक्ट में point (सामान्य किए गए [y, x] कोऑर्डिनेट) और ऑब्जेक्ट की पहचान करने वाला label होगा.
JSON
[
  {"point": [376, 508], "label": "small banana"},
  {"point": [287, 609], "label": "larger banana"},
  {"point": [223, 303], "label": "pink starfruit"},
  {"point": [435, 172], "label": "paper bag"},
  {"point": [270, 786], "label": "green plastic bowl"},
  {"point": [488, 775], "label": "metal measuring cup"},
  {"point": [673, 580], "label": "dark blue bowl"},
  {"point": [471, 353], "label": "light blue bowl"},
  {"point": [492, 497], "label": "bread"},
  {"point": [525, 429], "label": "lime"}
]
नीचे दी गई इमेज में, इन पॉइंट को दिखाने का तरीका बताया गया है:
यह कैसे काम करता है
Gemini Robotics-ER 1.6 की मदद से, आपके रोबोट को कॉन्टेक्स्ट के हिसाब से काम करने और स्पेशल अंडरस्टैंडिंग का इस्तेमाल करके, फ़िज़िकल दुनिया में काम करने की अनुमति मिलती है. यह इमेज/वीडियो/ऑडियो इनपुट और नैचुरल लैंग्वेज वाले प्रॉम्प्ट लेता है, ताकि:
- ऑब्जेक्ट और सीन के कॉन्टेक्स्ट को समझना: ऑब्जेक्ट की पहचान करता है और सीन के साथ उनके संबंध के बारे में बताता है. इसमें उनके अफ़ोर्डेंस भी शामिल हैं.
- टास्क के निर्देशों को समझना: बोलचाल की भाषा में दिए गए टास्क को समझना, जैसे कि "केला ढूंढो".
- स्पेशल और टेम्परल रीज़निंग: कार्रवाइयों के क्रम और समय के साथ किसी सीन में ऑब्जेक्ट किस तरह इंटरैक्ट करते हैं, यह समझना.
- स्ट्रक्चर्ड आउटपुट उपलब्ध कराना: इससे ऑब्जेक्ट की जगहों को दिखाने वाले निर्देशांक (पॉइंट या बाउंडिंग बॉक्स) मिलते हैं.
इससे रोबोट, प्रोग्राम के हिसाब से अपने आस-पास के माहौल को "देख" और "समझ" पाते हैं.
Gemini Robotics-ER 1.6 भी एजेंटिक है. इसका मतलब है कि यह मुश्किल टास्क (जैसे, "सेब को कटोरे में रखो") को उप-टास्क में बांट सकता है, ताकि लंबे समय तक चलने वाले टास्क को मैनेज किया जा सके:
- उपटास्क को क्रम से लगाना: यह कमांड को चरणों के लॉजिकल सीक्वेंस में बांटता है.
- फ़ंक्शन कॉल/कोड एक्ज़ीक्यूशन: यह आपके मौजूदा रोबोट फ़ंक्शन/टूल को कॉल करके या जनरेट किए गए कोड को लागू करके चरणों को पूरा करता है.
फ़ंक्शन कॉलिंग पेज पर जाकर, इस बारे में ज़्यादा जानें कि Gemini के साथ फ़ंक्शन कॉलिंग की सुविधा कैसे काम करती है.
Gemini Robotics-ER 1.6 के साथ थिंकिंग बजट का इस्तेमाल करना
Gemini Robotics-ER 1.6 में, थिंकिंग बजट की सुविधा उपलब्ध है. इससे आपको यह तय करने में मदद मिलती है कि आपको कम समय में जवाब चाहिए या सटीक जवाब चाहिए. स्पेशल अंडरस्टैंडिंग वाले टास्क, जैसे कि ऑब्जेक्ट का पता लगाने के लिए, मॉडल कम थिंकिंग बजट के साथ अच्छी परफ़ॉर्मेंस दे सकता है. गिनती करने और वज़न का अनुमान लगाने जैसे मुश्किल कामों के लिए, ज़्यादा थिंकिंग बजट का इस्तेमाल किया जाता है. इससे आपको ज़्यादा मुश्किल टास्क के लिए, कम समय में मिलने वाले जवाबों और ज़्यादा सटीक नतीजों के बीच संतुलन बनाने में मदद मिलती है.
सोचने के बजट के बारे में ज़्यादा जानने के लिए, सोचने की मुख्य क्षमताओं वाला पेज देखें.
स्पैशियल रीज़निंग की स्टैंडर्ड सुविधा
यहां दिए गए उदाहरणों में, नैचुरल लैंग्वेज प्रॉम्प्ट का इस्तेमाल करके रोबोटिक परसेप्शन और स्पेशल रीज़निंग से जुड़े टास्क दिखाए गए हैं. इनमें इमेज में ऑब्जेक्ट ढूंढने और उन्हें पॉइंट करने से लेकर, ट्रैजेक्ट्री प्लान करने तक के टास्क शामिल हैं. आसानी से समझने के लिए, इन उदाहरणों में दिए गए कोड स्निपेट को छोटा कर दिया गया है. इनमें सिर्फ़ प्रॉम्प्ट और generate_content एपीआई को कॉल करने की जानकारी दिखाई गई है.
पूरा कोड और अन्य उदाहरण, रोबोटिक्स कुकबुक में देखे जा सकते हैं.
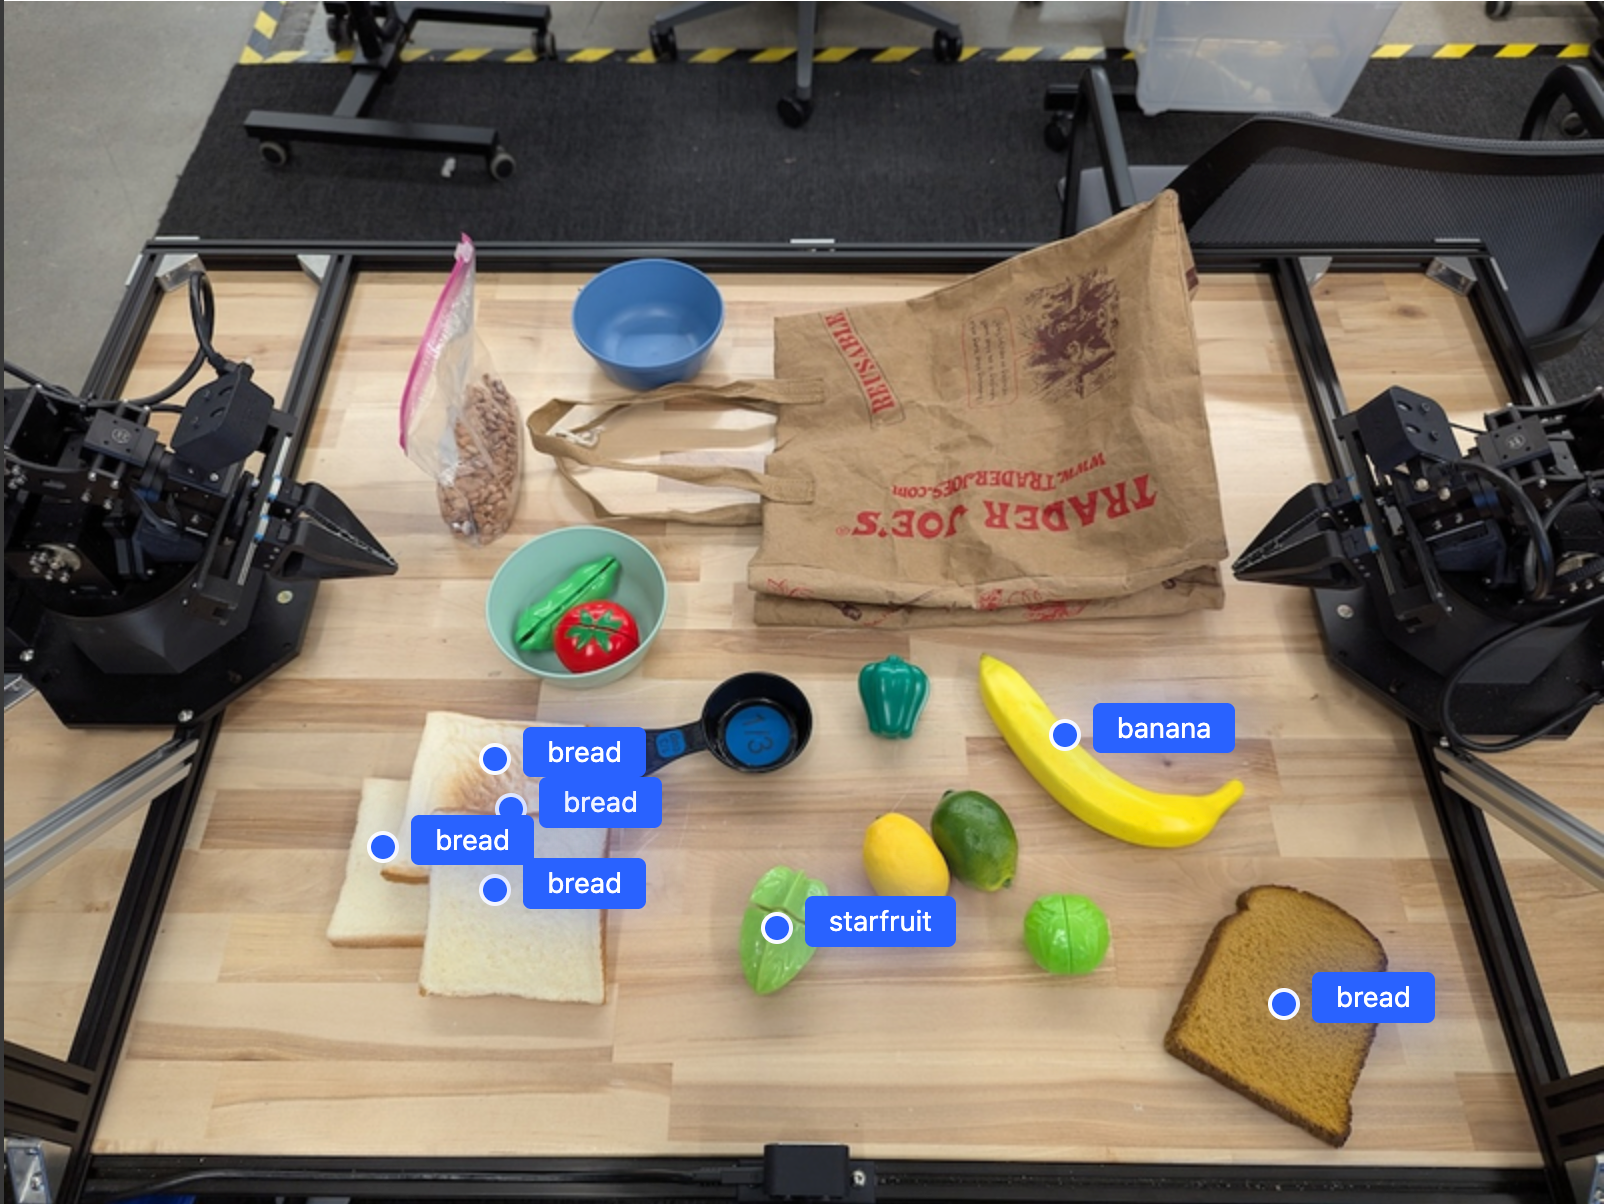
ऑब्जेक्ट की ओर इशारा करना
रोबोटिक्स में, विज़न-एंड-लैंग्वेज मॉडल (वीएलएम) का इस्तेमाल आम तौर पर इमेज या वीडियो फ़्रेम में मौजूद चीज़ों की पहचान करने के लिए किया जाता है. इस उदाहरण में, मॉडल से किसी इमेज में मौजूद ऑब्जेक्ट का पता लगाने और उनके कोऑर्डिनेट देने के लिए कहा गया है.
Python
from google import genai
from google.genai import types

client = genai.Client()

# Load your image and set up your prompt
with open('path/to/image-with-objects.jpg', 'rb') as f:
    image_bytes = f.read()

queries = [
    "bread",
    "starfruit",
    "banana",
]

prompt = f"""
    Get all points matching the following objects: {', '.join(queries)}. The
    label returned should be an identifying name for the object detected.
    The answer should follow the json format:

    [{{"point": , "label": }}, ...]. The points are in

    [y, x] format normalized to 0-1000.
    """

image_response = client.models.generate_content(
  model="gemini-robotics-er-1.6-preview",
  contents=[
    types.Part.from_bytes(
      data=image_bytes,
      mime_type='image/jpeg',
    ),
    prompt
  ],
  config = types.GenerateContentConfig(
      temperature=1.0,
      thinking_config=types.ThinkingConfig(thinking_budget=0)
  )
)

print(image_response.text)
आउटपुट, 'शुरू करें' सेक्शन में दिए गए उदाहरण की तरह होगा. यह एक JSON होगा, जिसमें ऑब्जेक्ट के कोऑर्डिनेट और उनके लेबल शामिल होंगे.
[
  {"point": [671, 317], "label": "bread"},
  {"point": [738, 307], "label": "bread"},
  {"point": [702, 237], "label": "bread"},
  {"point": [629, 307], "label": "bread"},
  {"point": [833, 800], "label": "bread"},
  {"point": [609, 663], "label": "banana"},
  {"point": [770, 483], "label": "starfruit"}
]
मॉडल से किसी इमेज में मौजूद सभी चीज़ों की पहचान करने और उन्हें "फल" जैसी सामान्य कैटगरी में रखने का अनुरोध करने के लिए, यहां दिया गया प्रॉम्प्ट इस्तेमाल करें.
Python
prompt = f"""
        Get all points for fruit. The label returned should be an identifying
        name for the object detected.
        """ + """The answer should follow the json format:
        [{"point": <point>, "label": <label1>}, ...]. The points are in
        [y, x] format normalized to 0-1000."""
इमेज प्रोसेसिंग की अन्य तकनीकों के बारे में जानने के लिए, इमेज की बारीक़ी से पहचान पेज पर जाएं.
वीडियो में ऑब्जेक्ट ट्रैक करना
Gemini Robotics-ER 1.6, वीडियो फ़्रेम का विश्लेषण करके, समय के साथ-साथ ऑब्जेक्ट को ट्रैक भी कर सकता है. काम करने वाले वीडियो फ़ॉर्मैट की सूची देखने के लिए, वीडियो इनपुट देखें.
मॉडल जिस हर फ़्रेम का विश्लेषण करता है उसमें मौजूद खास ऑब्जेक्ट ढूंढने के लिए, इस प्रॉम्प्ट का इस्तेमाल किया जाता है:
Python
# Define the objects to find
queries = [
    "pen (on desk)",
    "pen (in robot hand)",
    "laptop (opened)",
    "laptop (closed)",
]

base_prompt = f"""
  Point to the following objects in the provided image: {', '.join(queries)}.
  The answer should follow the json format:

  [{{"point": , "label": }}, ...].

  The points are in [y, x] format normalized to 0-1000.
  If no objects are found, return an empty JSON list [].
  """
इस इमेज में, वीडियो फ़्रेम में पेन और लैपटॉप को ट्रैक करते हुए दिखाया गया है.
![]()
पूरे रन करने लायक कोड के लिए, रोबोटिक्स कुकबुक देखें.
ऑब्जेक्ट का पता लगाने की सुविधा और बाउंडिंग बॉक्स
मॉडल, सिंगल पॉइंट के अलावा 2D बाउंडिंग बॉक्स भी दिखा सकता है. इससे किसी ऑब्जेक्ट के चारों ओर आयताकार क्षेत्र दिखता है.
इस उदाहरण में, टेबल पर मौजूद पहचाने जा सकने वाले ऑब्जेक्ट के लिए 2D बाउंडिंग बॉक्स का अनुरोध किया गया है. मॉडल को यह निर्देश दिया गया है कि वह जवाब में ज़्यादा से ज़्यादा 25 ऑब्जेक्ट शामिल करे. साथ ही, एक से ज़्यादा इंस्टेंस को यूनीक नाम दे.
Python
from google import genai
from google.genai import types

client = genai.Client()

# Load your image and set up your prompt
with open('path/to/image-with-objects.jpg', 'rb') as f:
    image_bytes = f.read()

prompt = """
      Return bounding boxes as a JSON array with labels. Never return masks
      or code fencing. Limit to 25 objects. Include as many objects as you
      can identify on the table.
      If an object is present multiple times, name them according to their
      unique characteristic (colors, size, position, unique characteristics, etc..).
      The format should be as follows: [{"box_2d": [ymin, xmin, ymax, xmax],
      "label": <label for the object>}] normalized to 0-1000. The values in
      box_2d must only be integers
      """

image_response = client.models.generate_content(
  model="gemini-robotics-er-1.6-preview",
  contents=[
    types.Part.from_bytes(
      data=image_bytes,
      mime_type='image/jpeg',
    ),
    prompt
  ],
  config = types.GenerateContentConfig(
      temperature=1.0,
      thinking_config=types.ThinkingConfig(thinking_budget=0)
  )
)

print(image_response.text)
यहां मॉडल से मिले बॉक्स दिखाए गए हैं.

पूरा कोड देखने के लिए, Robotics cookbook देखें. इमेज को समझना पेज पर, विज़ुअल टास्क के अन्य उदाहरण भी दिए गए हैं. जैसे, ऑब्जेक्ट का पता लगाना और बाउंडिंग बॉक्स के उदाहरण.
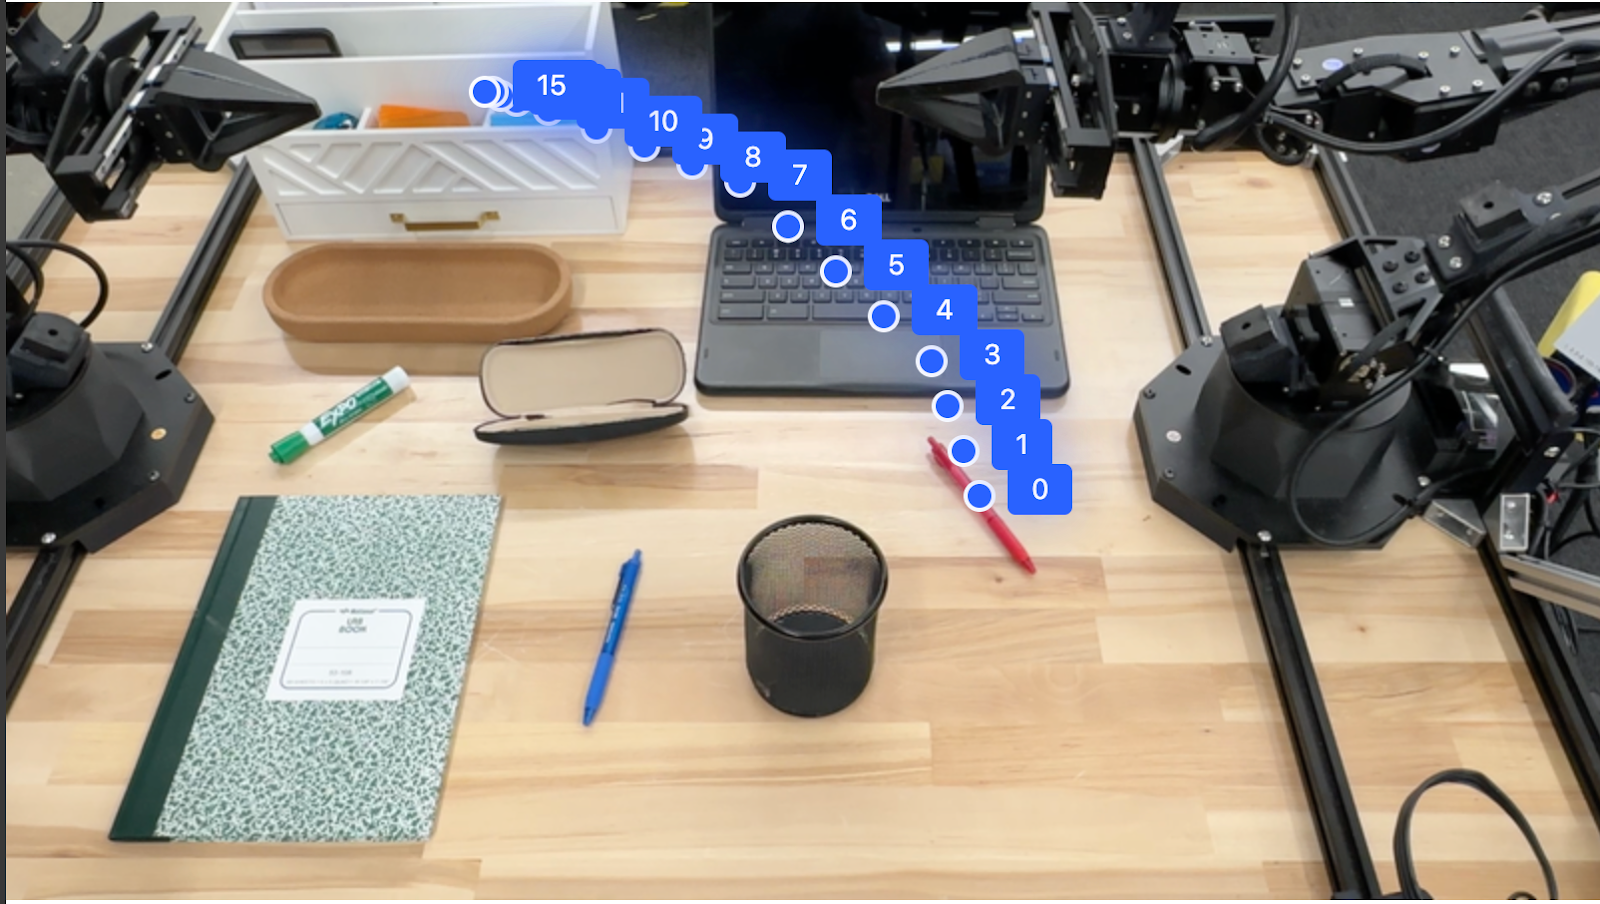
ट्रैजेक्ट्री
Gemini Robotics-ER 1.6, ऐसे पॉइंट के सीक्वेंस जनरेट कर सकता है जो किसी ट्रैजेक्ट्री को तय करते हैं. ये पॉइंट, रोबोट को मूव करने के लिए गाइड करने में मददगार होते हैं.
इस उदाहरण में, लाल पेन को किसी ऑर्गेनाइज़र पर ले जाने के लिए, ट्रैजेक्ट्री का अनुरोध किया गया है. इसमें शुरुआती पॉइंट और इंटरमीडिएट पॉइंट की सीरीज़ शामिल है.
Python
from google import genai
from google.genai import types

client = genai.Client()

# Load your image and set up your prompt
with open('path/to/image-with-objects.jpg', 'rb') as f:
    image_bytes = f.read()

points_data = []
prompt = """
        Place a point on the red pen, then 15 points for the trajectory of
        moving the red pen to the top of the organizer on the left.
        The points should be labeled by order of the trajectory, from '0'
        (start point at left hand) to <n> (final point)
        The answer should follow the json format:
        [{"point": <point>, "label": <label1>}, ...].
        The points are in [y, x] format normalized to 0-1000.
        """

image_response = client.models.generate_content(
  model="gemini-robotics-er-1.6-preview",
  contents=[
    types.Part.from_bytes(
      data=image_bytes,
      mime_type='image/jpeg',
    ),
    prompt
  ],
  config = types.GenerateContentConfig(
      temperature=1.0,
  )
)

print(image_response.text)
जवाब में कोऑर्डिनेट का एक सेट दिया गया है. इससे उस पाथ की जानकारी मिलती है जिस पर लाल पेन को चलना चाहिए, ताकि उसे ऑर्गेनाइज़र के ऊपर ले जाने का काम पूरा किया जा सके:
[
  {"point": [550, 610], "label": "0"},
  {"point": [500, 600], "label": "1"},
  {"point": [450, 590], "label": "2"},
  {"point": [400, 580], "label": "3"},
  {"point": [350, 550], "label": "4"},
  {"point": [300, 520], "label": "5"},
  {"point": [250, 490], "label": "6"},
  {"point": [200, 460], "label": "7"},
  {"point": [180, 430], "label": "8"},
  {"point": [160, 400], "label": "9"},
  {"point": [140, 370], "label": "10"},
  {"point": [120, 340], "label": "11"},
  {"point": [110, 320], "label": "12"},
  {"point": [105, 310], "label": "13"},
  {"point": [100, 305], "label": "14"},
  {"point": [100, 300], "label": "15"}
]
एजेंटिक एआई की सुविधाएँ
यहां दिए गए उदाहरणों में, मॉडल की एजेंटिक क्षमताओं का इस्तेमाल करके, ऐडवांस रोबोटिक रीज़निंग के बारे में बताया गया है. खास तौर पर, कोड एक्ज़ीक्यूशन के बारे में. इन स्थितियों में, मॉडल इमेज में बदलाव करने के लिए Python कोड लिख सकता है और उसे एक्ज़ीक्यूट कर सकता है. जैसे, ज़ूम इन करना, काटना या घुमाना. इससे जवाब देने से पहले, मॉडल को इमेज से जुड़ी अस्पष्टता को दूर करने या सटीक जानकारी देने में मदद मिलती है.
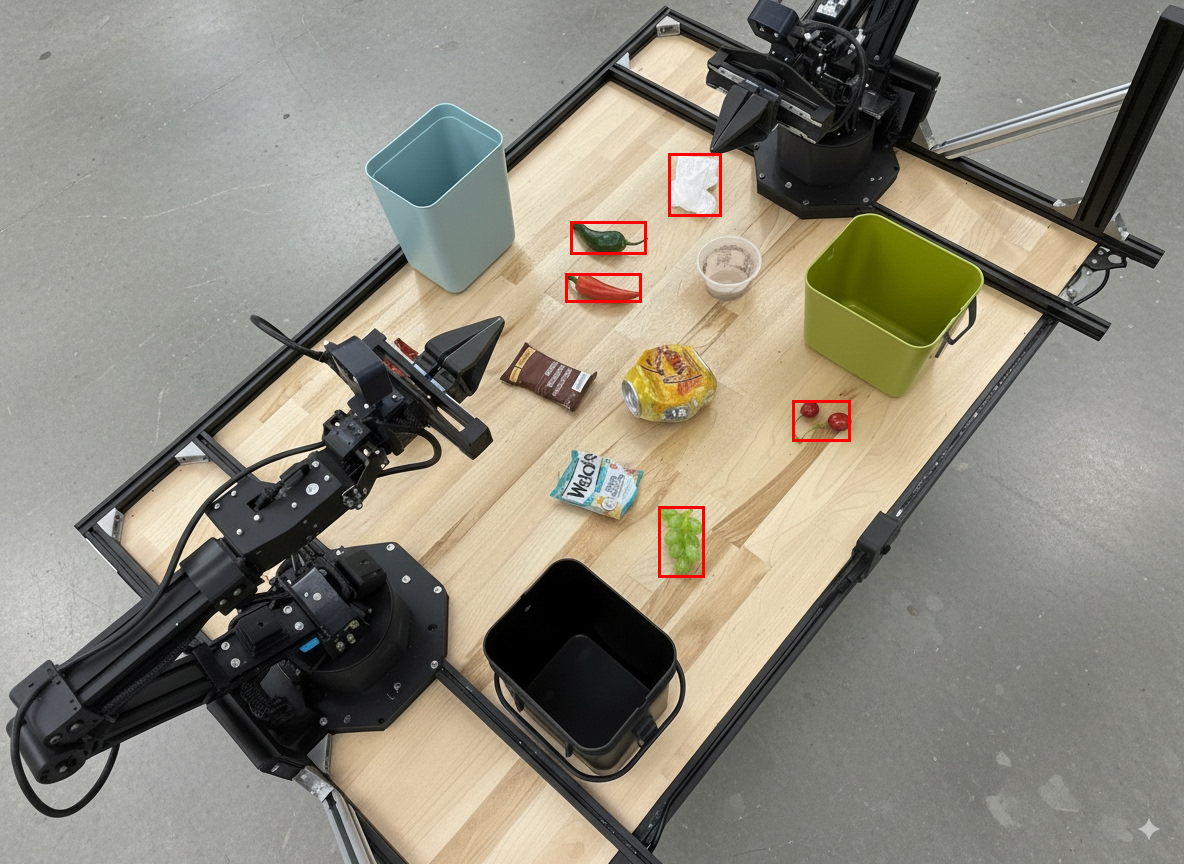
ऑब्जेक्ट का पता लगाने की सुविधा (ज़ूम और काटें)
यहां दिए गए उदाहरण में बताया गया है कि कोड एक्ज़ीक्यूशन का इस्तेमाल करके, किसी इमेज को ज़ूम और क्रॉप कैसे किया जाता है. इससे ऑब्जेक्ट का पता लगाने और बाउंडिंग बॉक्स दिखाने के दौरान, इमेज को ज़्यादा साफ़ तौर पर देखा जा सकता है.
Python
from google import genai
from google.genai import types

client = genai.Client()

# Load your image
with open('sorting.jpeg', 'rb') as f:
    image_bytes = f.read()

prompt = """
Return JSON in the format {label: val, y: val, x: val, y2: val, x2: val} for
the compostable objects in this scene. Please Zoom and crop the image for a
clearer view. Return an annotated image of the final result with the bounding
boxes drawn on it to the API caller as a part of your process.
"""

response = client.models.generate_content(
    model="gemini-robotics-er-1.6-preview",
    contents=[
        types.Part.from_bytes(
            data=image_bytes,
            mime_type='image/jpeg',
        ),
        prompt
    ],
    config = types.GenerateContentConfig(
        temperature=1.0,
        tools=[types.Tool(code_execution=types.ToolCodeExecution)],
    )
)

print(response.text)
मॉडल का आउटपुट इस तरह का होगा:
[
  {"label": "compostable", "y": 256, "x": 482, "y2": 295, "x2": 546},
  {"label": "compostable", "y": 317, "x": 478, "y2": 350, "x2": 542},
  {"label": "compostable", "y": 586, "x": 556, "y2": 668, "x2": 595},
  {"label": "compostable", "y": 463, "x": 669, "y2": 511, "x2": 718},
  {"label": "compostable", "y": 178, "x": 565, "y2": 250, "x2": 609}
]
यहां मॉडल से मिले बॉक्स दिखाए गए हैं.
एनालॉग गेज को पढ़ना और लॉजिक लागू करना
यहां दिए गए उदाहरण में, मॉडल का इस्तेमाल करके ऐनलॉग गेज को पढ़ने और समय की गणना करने का तरीका बताया गया है. यह JSON आउटपुट को लागू करने के लिए, सिस्टम के निर्देश का इस्तेमाल करता है.
Python
from google import genai
from google.genai import types

client = genai.Client()

# Load your image
with open('clock.jpg', 'rb') as f:
    image_bytes = f.read()

q_time = """
Tell me what the value is. Please respond in the following JSON format:\n {\n "hours": X,\n  "minutes": Y,\n}. Zoom in or crop as necessary to confirm location of the clock hands.
"""

system_instruction = "Be precise. When JSON is requested, reply with ONLY that JSON (no preface, no code block)."

response = client.models.generate_content(
    model="gemini-robotics-er-1.6-preview",
    contents=[
        types.Part.from_bytes(
            data=image_bytes,
            mime_type='image/jpeg',
        ),
        system_instruction + " " + q_time
    ],
    config = types.GenerateContentConfig(
        temperature=1.0,
    )
)

print(response.text)
इमेज के तौर पर दिए गए इनपुट का एक उदाहरण यहां दिया गया है.
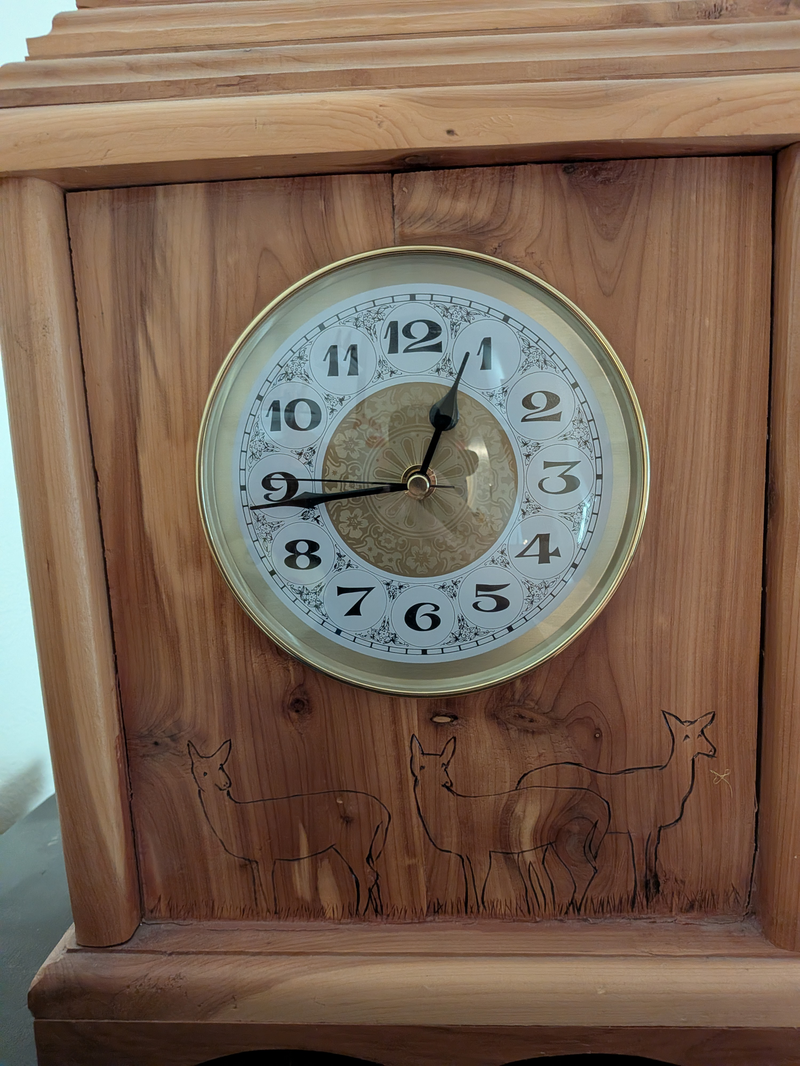
मॉडल का आउटपुट इस तरह का होगा:
Time Response:  {
  "hours": 12,
  "minutes": 44
 }
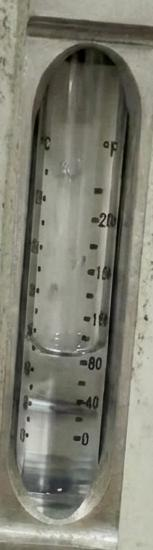
किसी कंटेनर में मौजूद तरल पदार्थ को मापना
नीचे दिए गए उदाहरण में, कोड को लागू करके मीटर को पढ़ने और लिक्विड के लेवल को प्रतिशत के तौर पर कैलकुलेट करने का तरीका बताया गया है.
Python
from google import genai
from google.genai import types

client = genai.Client()

# Load your image
with open('meter.jpeg', 'rb') as f:
    image_bytes = f.read()

prompt = """
How full is the meter of liquid?
To read it,
1) Find the points for the top of the sight window, bottom of the sight window and the liquid level, formatted as [y, x] with values ranging from 0-1000;
2) Use math to determine the liquid level as a percentage;
3) Output "Answer: ??" on a separate line, where ?? is a number without % or unit.
"""

response = client.models.generate_content(
    model="gemini-robotics-er-1.6-preview",
    contents=[
        types.Part.from_bytes(
            data=image_bytes,
            mime_type='image/jpeg',
        ),
        prompt
    ],
    config = types.GenerateContentConfig(
        temperature=1.0,
        tools=[types.Tool(code_execution=types.ToolCodeExecution)],
    )
)

print(response.text)
यहां इनपुट इमेज को ज़ूम इन करके दिखाया गया है.
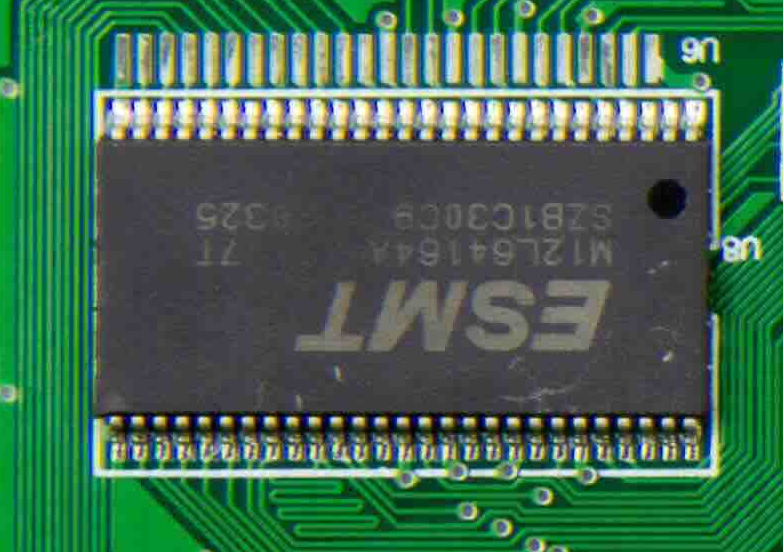
सर्किट बोर्ड पर मौजूद निशान पढ़ना
यहां दिए गए उदाहरण में, कोड एक्ज़ीक्यूशन का इस्तेमाल करके सर्किट बोर्ड चिप पर मौजूद टेक्स्ट को पढ़ने का तरीका बताया गया है. इससे मॉडल, इमेज को ज़रूरत के हिसाब से ज़ूम, कांट-छांट, और घुमा सकता है.
Python
from google import genai
from google.genai import types

client = genai.Client()

# Load your image
with open('circuit_board.jpeg', 'rb') as f:
    image_bytes = f.read()

prompt = "What is the number on the ESMT chip? Zoom, crop, and rotate if needed."

response = client.models.generate_content(
    model="gemini-robotics-er-1.6-preview",
    contents=[
        types.Part.from_bytes(
            data=image_bytes,
            mime_type='image/jpeg',
        ),
        prompt
    ],
    config = types.GenerateContentConfig(
        temperature=1.0,
        tools=[types.Tool(code_execution=types.ToolCodeExecution)],
    )
)

print(response.text)
यहां इनपुट इमेज को ज़ूम इन करके दिखाया गया है.
इमेज एनोटेशन
नीचे दिए गए उदाहरण में बताया गया है कि कोड एक्ज़ीक्यूशन की सुविधा का इस्तेमाल करके, किसी इमेज में एनोटेशन कैसे जोड़ा जाता है. उदाहरण के लिए, डिस्पोज़ल के निर्देशों के लिए ऐरो बनाना और बदली गई इमेज को वापस पाना.
Python
from google import genai
from google.genai import types

client = genai.Client()

# Load your image
with open('sorting.jpeg', 'rb') as f:
    image_bytes = f.read()

prompt = """
Look at this image and return it as an annotated version using arrows of
different colors to represent which items should go in which bins for
disposal. You must return the final image to the API caller.
"""

response = client.models.generate_content(
    model="gemini-robotics-er-1.6-preview",
    contents=[
        types.Part.from_bytes(
            data=image_bytes,
            mime_type='image/jpeg',
        ),
        prompt
    ],
    config = types.GenerateContentConfig(
        temperature=1.0,
        tools=[types.Tool(code_execution=types.ToolCodeExecution)],
    )
)

print(response.text)
इमेज के तौर पर दिए गए इनपुट का एक उदाहरण यहां दिया गया है.
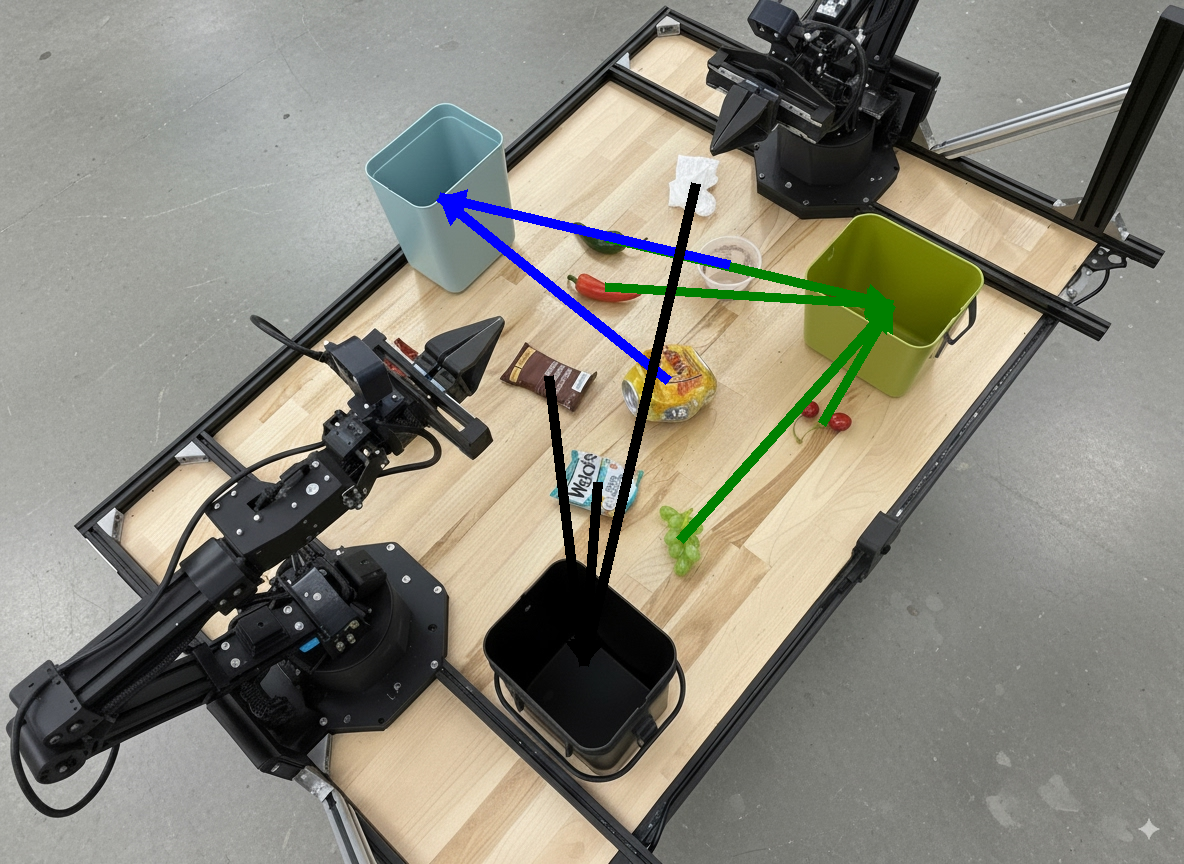
मॉडल का आउटपुट इस तरह का होगा:
The annotated image shows the suggested disposal locations for the items on the table:
- **Green bin (Compost/Organic)**: Green chili, red chili, grapes, and cherries.
- **Blue bin (Recycling)**: Yellow crushed can and plastic container.
- **Black bin (Trash)**: Chocolate bar wrapper, Welch's packet, and white tissue.
आयोजन सेवाएं
Gemini Robotics-ER 1.6, टास्क प्लान कर सकता है. साथ ही, यह किसी जगह के बारे में बेहतर तरीके से सोच-समझ सकता है. यह कॉन्टेक्स्ट को समझकर, टास्क पूरे करने के लिए सही जगह चुन सकता है या ज़रूरी कार्रवाइयां कर सकता है. इससे लंबे समय तक चलने वाले टास्क को मैनेज करने में मदद मिलती है.
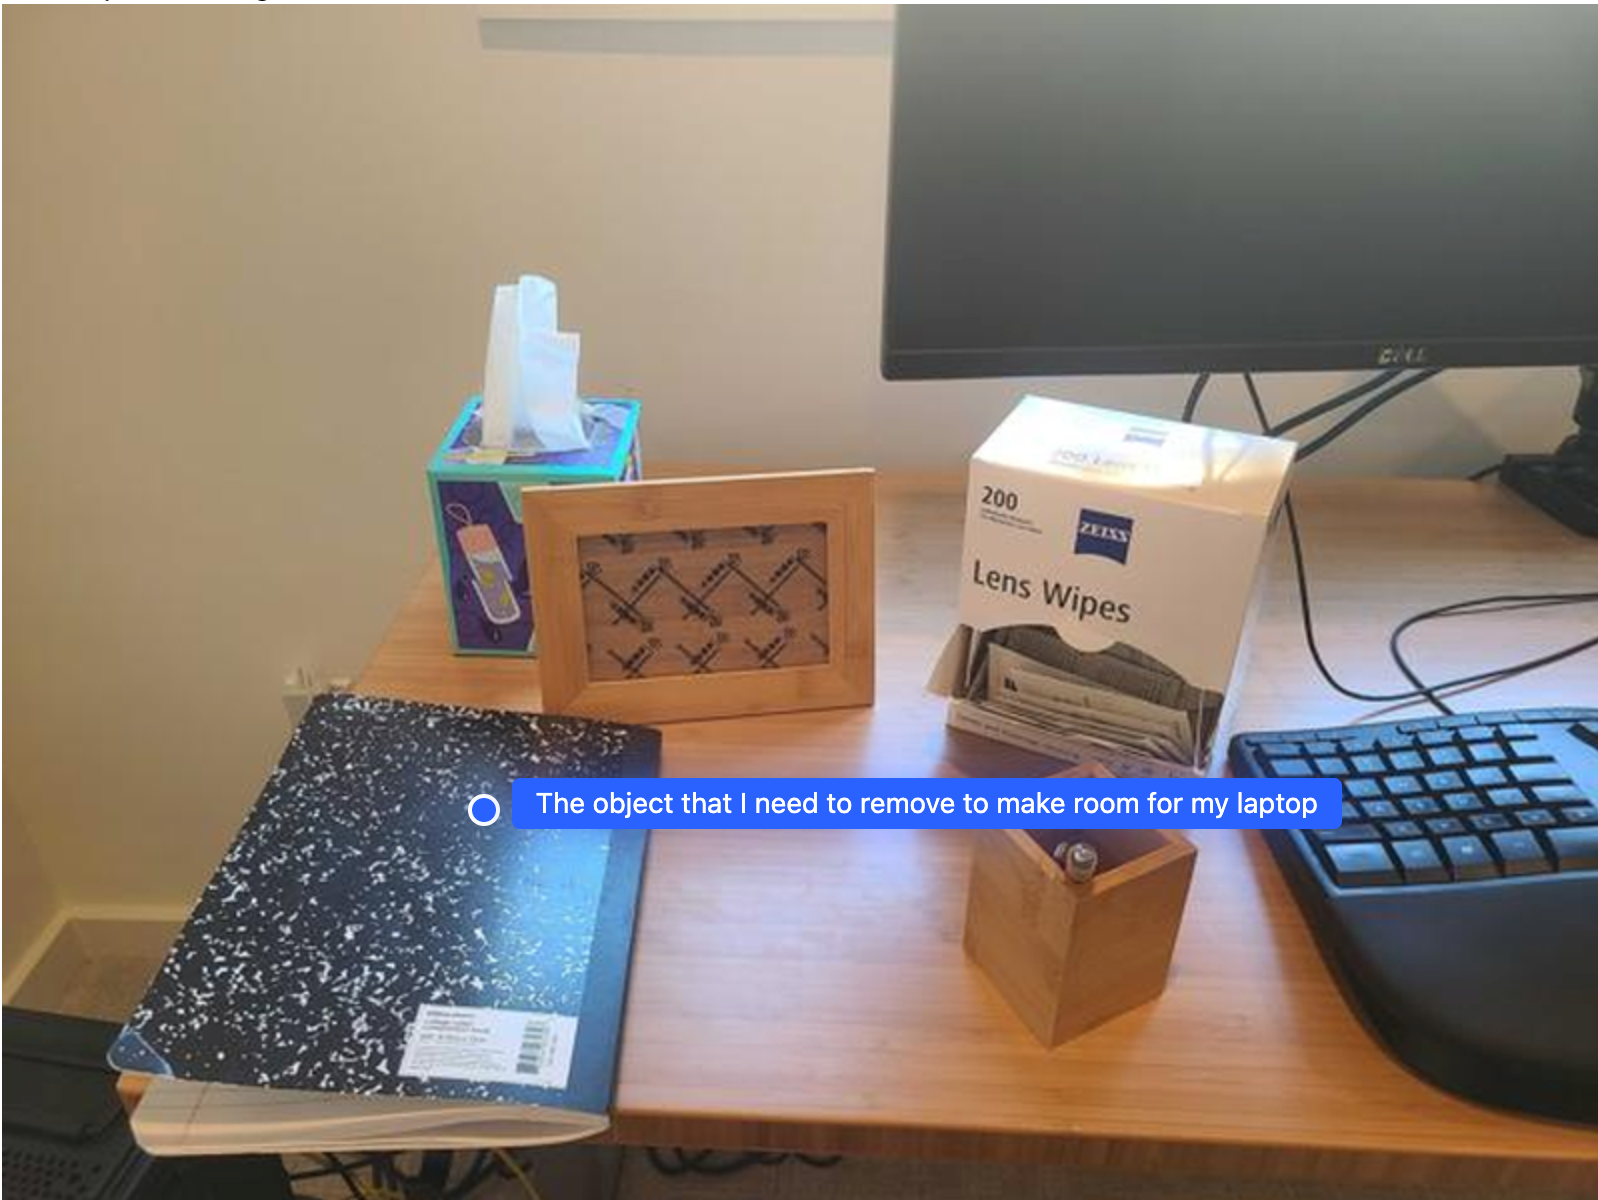
लैपटॉप रखने के लिए जगह बनाना
इस उदाहरण में दिखाया गया है कि Gemini Robotics-ER, किसी जगह के बारे में कैसे सोच-विचार कर सकता है. प्रॉम्प्ट में मॉडल से यह पूछा गया है कि किस ऑब्जेक्ट को हटाकर, दूसरी चीज़ के लिए जगह बनानी है.
Python
from google import genai
from google.genai import types

client = genai.Client()

# Load your image and set up your prompt
with open('path/to/image-with-objects.jpg', 'rb') as f:
    image_bytes = f.read()

prompt = """
          Point to the object that I need to remove to make room for my laptop
          The answer should follow the json format: [{"point": <point>,
          "label": <label1>}, ...]. The points are in [y, x] format normalized to 0-1000.
        """

image_response = client.models.generate_content(
  model="gemini-robotics-er-1.6-preview",
  contents=[
    types.Part.from_bytes(
      data=image_bytes,
      mime_type='image/jpeg',
    ),
    prompt
  ],
  config = types.GenerateContentConfig(
      temperature=1.0,
      thinking_config=types.ThinkingConfig(thinking_budget=0)
  )
)

print(image_response.text)
जवाब में, उस ऑब्जेक्ट का 2D कोऑर्डिनेट होता है जो उपयोगकर्ता के सवाल का जवाब देता है. इस मामले में, वह ऑब्जेक्ट जो लैपटॉप के लिए जगह बनाने के लिए हिलना चाहिए.
[
  {"point": [672, 301], "label": "The object that I need to remove to make room for my laptop"}
]
लंच पैक करना
मॉडल, एक से ज़्यादा चरणों वाले टास्क के लिए निर्देश भी दे सकता है. साथ ही, हर चरण के लिए काम की चीज़ों की ओर इशारा कर सकता है. इस उदाहरण में दिखाया गया है कि मॉडल, लंच बैग पैक करने के लिए कई चरणों की योजना कैसे बनाता है.
Python
from google import genai
from google.genai import types

client = genai.Client()

# Load your image and set up your prompt
with open('path/to/image-of-lunch.jpg', 'rb') as f:
    image_bytes = f.read()

prompt = """
          Explain how to pack the lunch box and lunch bag. Point to each
          object that you refer to. Each point should be in the format:
          [{"point": [y, x], "label": }], where the coordinates are
          normalized between 0-1000.
        """

image_response = client.models.generate_content(
  model="gemini-robotics-er-1.6-preview",
  contents=[
    types.Part.from_bytes(
      data=image_bytes,
      mime_type='image/jpeg',
    ),
    prompt
  ],
  config = types.GenerateContentConfig(
      temperature=1.0,
      thinking_config=types.ThinkingConfig(thinking_budget=0)
  )
)

print(image_response.text)
इस प्रॉम्प्ट के जवाब में, इमेज इनपुट से लंच बैग पैक करने के बारे में सिलसिलेवार निर्देश दिए गए हैं.
इनपुट इमेज
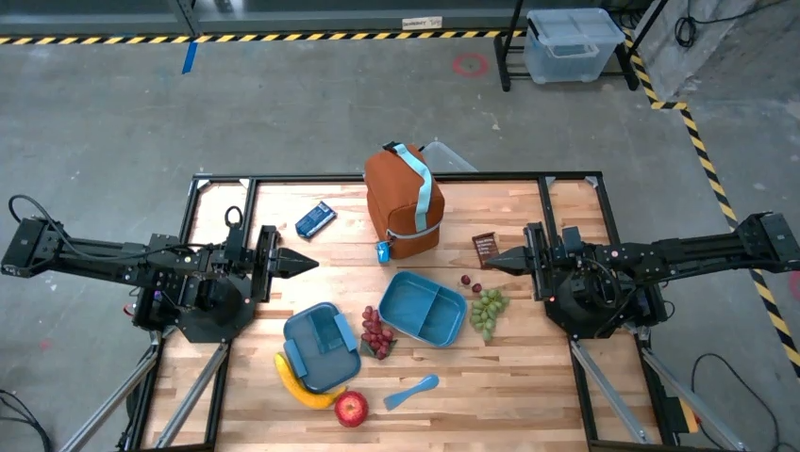
मॉडल आउटपुट
Based on the image, here is a plan to pack the lunch box and lunch bag:

1.  **Pack the fruit into the lunch box.** Place the [apple](apple), [banana](banana), [red grapes](red grapes), and [green grapes](green grapes) into the [blue lunch box](blue lunch box).
2.  **Add the spoon to the lunch box.** Put the [blue spoon](blue spoon) inside the lunch box as well.
3.  **Close the lunch box.** Secure the lid on the [blue lunch box](blue lunch box).
4.  **Place the lunch box inside the lunch bag.** Put the closed [blue lunch box](blue lunch box) into the [brown lunch bag](brown lunch bag).
5.  **Pack the remaining items into the lunch bag.** Place the [blue snack bar](blue snack bar) and the [brown snack bar](brown snack bar) into the [brown lunch bag](brown lunch bag).

Here is the list of objects and their locations:
*   [{"point": [899, 440], "label": "apple"}]
*   [{"point": [814, 363], "label": "banana"}]
*   [{"point": [727, 470], "label": "red grapes"}]
*   [{"point": [675, 608], "label": "green grapes"}]
*   [{"point": [706, 529], "label": "blue lunch box"}]
*   [{"point": [864, 517], "label": "blue spoon"}]
*   [{"point": [499, 401], "label": "blue snack bar"}]
*   [{"point": [614, 705], "label": "brown snack bar"}]
*   [{"point": [448, 501], "label": "brown lunch bag"}]
कस्टम रोबोट एपीआई को कॉल करना
इस उदाहरण में, कस्टम रोबोट एपीआई की मदद से टास्क ऑर्केस्ट्रेशन के बारे में बताया गया है. इसमें पिक-एंड-प्लेस ऑपरेशन के लिए डिज़ाइन किया गया मॉक एपीआई शामिल है. टास्क में, नीले रंग के ब्लॉक को उठाकर नारंगी रंग के कटोरे में रखना है:

इस पेज पर दिए गए अन्य उदाहरणों की तरह, पूरा कोड Robotics cookbook में उपलब्ध है.
पहला चरण यह है कि इन दोनों आइटम का पता लगाया जाए. इसके लिए, यह प्रॉम्प्ट इस्तेमाल करें:
Python
prompt = """
            Locate and point to the blue block and the orange bowl. The label
            returned should be an identifying name for the object detected.
            The answer should follow the json format: [{"point": <point>, "label": <label1>}, ...].
            The points are in [y, x] format normalized to 0-1000.
          """
मॉडल के जवाब में, ब्लॉक और कटोरे के सामान्य किए गए कोऑर्डिनेट शामिल हैं:
[
  {"point": [389, 252], "label": "orange bowl"},
  {"point": [727, 659], "label": "blue block"}
]
इस उदाहरण में, रोबोट के एपीआई के इस मॉक का इस्तेमाल किया गया है:
Python
def move(x, y, high):
  print(f"moving to coordinates: {x}, {y}, {15 if high else 5}")

def setGripperState(opened):
  print("Opening gripper" if opened else "Closing gripper")

def returnToOrigin():
  print("Returning to origin pose")
अगला चरण, कार्रवाई को पूरा करने के लिए ज़रूरी लॉजिक के साथ एपीआई फ़ंक्शन के क्रम को कॉल करना है. इस प्रॉम्प्ट में, रोबोट एपीआई के बारे में जानकारी दी गई है. मॉडल को इस टास्क को पूरा करने के लिए, इस एपीआई का इस्तेमाल करना चाहिए.
Python
prompt = f"""
    You are a robotic arm with six degrees-of-freedom. You have the
    following functions available to you:

    def move(x, y, high):
      # moves the arm to the given coordinates. The boolean value 'high' set
      to True means the robot arm should be lifted above the scene for
      avoiding obstacles during motion. 'high' set to False means the robot
      arm should have the gripper placed on the surface for interacting with
      objects.

    def setGripperState(opened):
      # Opens the gripper if opened set to true, otherwise closes the gripper

    def returnToOrigin():
      # Returns the robot to an initial state. Should be called as a cleanup
      operation.

    The origin point for calculating the moves is at normalized point
    y={robot_origin_y}, x={robot_origin_x}. Use this as the new (0,0) for
    calculating moves, allowing x and y to be negative.
    Perform a pick and place operation where you pick up the blue block at
    normalized coordinates ({block_x}, {block_y}) (relative coordinates:
    {block_relative_x}, {block_relative_y}) and place it into the orange
    bowl at normalized coordinates ({bowl_x}, {bowl_y})
    (relative coordinates: {bowl_relative_x}, {bowl_relative_y}).
    Provide the sequence of function calls as a JSON list of objects, where
    each object has a "function" key (the function name) and an "args" key
    (a list of arguments for the function).
    Also, include your reasoning before the JSON output.
    For example:
    Reasoning: To pick up the block, I will first move the arm to a high
    position above the block, open the gripper, move down to the block,
    close the gripper, lift the arm, move to a high position above the bowl,
    move down to the bowl, open the gripper, and then lift the arm back to
    a high position.
"""
यहां प्रॉम्प्ट और मॉक रोबोट एपीआई के आधार पर, मॉडल से मिलने वाला संभावित आउटपुट दिखाया गया है. आउटपुट में, मॉडल की सोचने की प्रोसेस और उन टास्क के बारे में जानकारी शामिल होती है जिन्हें मॉडल ने प्लान किया है. इसमें, रोबोट के फ़ंक्शन कॉल का आउटपुट भी दिखता है. मॉडल ने इन फ़ंक्शन कॉल को एक साथ क्रम से लगाया है.
Reasoning: To perform the pick and place operation, I will first move the
robotic arm to a high position above the blue block to ensure clearance. Then, I
will open the gripper in preparation for grasping. Next, I will lower the arm to
the surface level to position the gripper around the block and close the gripper
to secure it. After picking up the block, I will lift the arm to clear the
surface and move towards the orange bowl, maintaining a high position to avoid
collisions. Once positioned above the bowl, I will lower the arm to place the
block inside. I will then open the gripper to release the block. Finally, I will
lift the arm out of the bowl and call `returnToOrigin` to reset the robot's
state.

[
  {
    "function": "move",
    "args": [
      163,
      427,
      true
    ]
  },
  {
    "function": "setGripperState",
    "args": [
      true
    ]
  },
  {
    "function": "move",
    "args": [
      163,
      427,
      false
    ]
  },
  {
    "function": "setGripperState",
    "args": [
      false
    ]
  },
  {
    "function": "move",
    "args": [
      163,
      427,
      true
    ]
  },
  {
    "function": "move",
    "args": [
      -247,
      90,
      true
    ]
  },
  {
    "function": "move",
    "args": [
      -247,
      90,
      false
    ]
  },
  {
    "function": "setGripperState",
    "args": [
      true
    ]
  },
  {
    "function": "move",
    "args": [
      -247,
      90,
      true
    ]
  },
  {
    "function": "returnToOrigin",
    "args": []
  }
]

Executing Function Calls:
moving to coordinates: 163, 427, 15
Opening gripper
moving to coordinates: 163, 427, 5
Closing gripper
moving to coordinates: 163, 427, 15
moving to coordinates: -247, 90, 15
moving to coordinates: -247, 90, 5
Opening gripper
moving to coordinates: -247, 90, 15
Returning to origin pose
सबसे सही तरीके
अपने रोबोटिक्स ऐप्लिकेशन की परफ़ॉर्मेंस और सटीकता को ऑप्टिमाइज़ करने के लिए, Gemini मॉडल के साथ असरदार तरीके से इंटरैक्ट करने का तरीका समझना ज़रूरी है. इस सेक्शन में, प्रॉम्प्ट बनाने, विज़ुअल डेटा को मैनेज करने, और टास्क को स्ट्रक्चर करने के सबसे सही तरीकों और अहम रणनीतियों के बारे में बताया गया है, ताकि सबसे भरोसेमंद नतीजे मिल सकें.
आसान और साफ़ भाषा का इस्तेमाल करें.
नैचुरल लैंग्वेज का इस्तेमाल करें: Gemini मॉडल को, नैचुरल लैंग्वेज को समझने के लिए डिज़ाइन किया गया है. अपने प्रॉम्प्ट को इस तरह से स्ट्रक्चर करें कि वे सिमैंटिक तौर पर साफ़ हों. साथ ही, वे इस तरह से लिखे गए हों जैसे कोई व्यक्ति स्वाभाविक रूप से निर्देश देता है.
रोज़मर्रा के शब्दों का इस्तेमाल करें: तकनीकी या खास शब्दों के बजाय, रोज़मर्रा की सामान्य भाषा का इस्तेमाल करें. अगर मॉडल किसी शब्द का जवाब आपकी उम्मीद के मुताबिक नहीं दे रहा है, तो उस शब्द को किसी आम बोलचाल वाले शब्द से बदलें.
विज़ुअल इनपुट को ऑप्टिमाइज़ करें.
ज़्यादा जानकारी के लिए ज़ूम इन करें: जब छोटे ऑब्जेक्ट या वाइड शॉट में पहचान करने में मुश्किल होने वाले ऑब्जेक्ट के साथ काम किया जा रहा हो, तो बाउंडिंग बॉक्स फ़ंक्शन का इस्तेमाल करके, काम के ऑब्जेक्ट को अलग करें. इसके बाद, इमेज को इस हिस्से के हिसाब से क्रॉप किया जा सकता है. साथ ही, मॉडल को नई और फ़ोकस की गई इमेज भेजी जा सकती है, ताकि वह ज़्यादा बारीकी से विश्लेषण कर सके.
रोशनी और रंग के साथ एक्सपेरिमेंट करें: रोशनी की मुश्किल स्थितियों और खराब कलर कंट्रास्ट की वजह से, मॉडल की परफ़ॉर्मेंस पर असर पड़ सकता है.
मुश्किल समस्याओं को छोटे-छोटे चरणों में बांट लें. हर छोटे चरण को अलग-अलग तरीके से हल करके, मॉडल को ज़्यादा सटीक और बेहतर नतीजे पाने में मदद की जा सकती है.
सहमति के आधार पर, जवाब को ज़्यादा सटीक बनाना. ऐसे टास्क जिनके लिए सटीक जवाब की ज़रूरत होती है उनके लिए, एक ही प्रॉम्प्ट का इस्तेमाल करके मॉडल से कई बार क्वेरी की जा सकती है. जवाबों का औसत निकालकर, एक "सहमति" पर पहुंचा जा सकता है. यह अक्सर ज़्यादा सटीक और भरोसेमंद होती है.
सीमाएं
Gemini Robotics-ER 1.6 का इस्तेमाल करके डेवलपमेंट करते समय, इन सीमाओं का ध्यान रखें:
- झलक की स्थिति: मॉडल फ़िलहाल झलक में है. एपीआई और सुविधाओं में बदलाव हो सकता है. साथ ही, बिना पूरी तरह से जांच किए, यह प्रोडक्शन-क्रिटिकल ऐप्लिकेशन के लिए सही नहीं हो सकता.
- लेटेंसी: मुश्किल क्वेरी, हाई रिज़ॉल्यूशन वाले इनपुट या बड़े पैमाने पर
thinking_budgetकी वजह से, प्रोसेस होने में ज़्यादा समय लग सकता है. - गलत जानकारी: सभी लार्ज लैंग्वेज मॉडल की तरह, Gemini Robotics-ER 1.6 कभी-कभी "गलत जानकारी" दे सकता है. यह खास तौर पर, ऐसे प्रॉम्प्ट के लिए होता है जिनमें साफ़ तौर पर जानकारी नहीं दी गई होती या जो इनपुट के दायरे से बाहर होते हैं.
- प्रॉम्प्ट की क्वालिटी पर निर्भरता: मॉडल के आउटपुट की क्वालिटी, इनपुट प्रॉम्प्ट की क्लैरिटी और स्पेसिफ़िसिटी पर काफ़ी हद तक निर्भर करती है. अस्पष्ट या खराब तरीके से स्ट्रक्चर किए गए प्रॉम्प्ट से, सही नतीजे नहीं मिलते.
- कैलकुलेशन में लगने वाला समय: मॉडल को चलाने में, खास तौर पर वीडियो इनपुट या ज़्यादा
thinking_budgetके साथ, कैलकुलेशन के संसाधनों का इस्तेमाल होता है और इसके लिए शुल्क लगता है. ज़्यादा जानकारी के लिए, सोचना पेज देखें. - इनपुट टाइप: हर मोड के लिए तय की गई सीमाओं के बारे में जानने के लिए, यहां दिए गए विषय देखें.
निजता नोटिस
आप स्वीकार करते हैं कि इस दस्तावेज़ में बताए गए मॉडल ("रोबोटिक्स मॉडल") को चलाने और आपके निर्देशों के मुताबिक हार्डवेयर को मूव करने के लिए, वीडियो और ऑडियो डेटा का इस्तेमाल किया जाता है. इसलिए, आपके पास रोबोटिक्स मॉडल को इस तरह से चलाने का विकल्प होता है कि वे पहचान ज़ाहिर करने वाली जानकारी इकट्ठा कर सकें. जैसे, आवाज़, इमेज, और मिलती-जुलती जानकारी ("निजी डेटा"). अगर आपने Robotics Models को इस तरह से इस्तेमाल करने का विकल्प चुना है कि वह निजी डेटा इकट्ठा करता है, तो इसका मतलब है कि आपने इस बात पर सहमति दी है कि आप किसी भी ऐसे व्यक्ति को Robotics Models के साथ इंटरैक्ट करने या उसके आस-पास मौजूद रहने की अनुमति नहीं देंगे जिसकी पहचान की जा सकती है. ऐसा तब तक नहीं किया जा सकेगा, जब तक ऐसे व्यक्ति को यह सूचना न दे दी जाए कि उसका निजी डेटा, Gemini API की सेवा की अतिरिक्त शर्तों में बताए गए तरीके से Google को दिया जा सकता है और Google उसका इस्तेमाल कर सकता है. Gemini API की सेवा की अतिरिक्त शर्तें, https://ai.google.dev/gemini-api/terms पर उपलब्ध हैं. इन्हें "शर्तें" कहा जाता है. इसमें "Google आपके डेटा का इस्तेमाल कैसे करता है" सेक्शन में दी गई जानकारी भी शामिल है. आपको यह पक्का करना होगा कि इस तरह की सूचना में, शर्तों में बताए गए तरीके से निजी डेटा को इकट्ठा करने और इस्तेमाल करने की अनुमति दी गई हो. साथ ही, आपको कारोबार के नज़रिए से सही प्रयास करने होंगे, ताकि निजी डेटा को कम से कम इकट्ठा किया जा सके और उसे कम से कम डिस्ट्रिब्यूट किया जा सके. इसके लिए, आपको चेहरे को धुंधला करने जैसी तकनीकों का इस्तेमाल करना होगा. साथ ही, रोबोटिक्स मॉडल को ऐसे इलाकों में चलाना होगा जहां लोगों की पहचान ज़ाहिर न हो.
कीमत
शुल्क और उपलब्धता वाले देशों के बारे में ज़्यादा जानकारी के लिए, शुल्क पेज पर जाएं.
मॉडल के वर्शन
Robotics-ER 1.6 की झलक
| प्रॉपर्टी | ब्यौरा |
|---|---|
| मॉडल कोड | gemini-robotics-er-1.6-preview |
| के साथ इस्तेमाल किए जा सकने वाले डेटा टाइप |
इनपुट टेक्स्ट, इमेज, वीडियो, ऑडियो आउटपुट टेक्स्ट |
| टोकन की सीमाएं[*] |
इनपुट टोकन की सीमा 131,072 आउटपुट टोकन की सीमा 65,536 |
| सुविधाएँ | काम नहीं करता है काम करता है काम करता है काम करता है काम करता है काम करता है Google Maps की मदद से जवाब तैयार करना काम करता है काम नहीं करता है काम नहीं करता है भरोसेमंद स्रोतों से जानकारी लेना काम करता है काम करता है काम करता है काम करता है |
| कॉन्टेंट देखने के विकल्प |
काम करता है काम करता है काम करता है |
| वर्शन |
|
| नया अपडेट | दिसंबर 2025 |
| नॉलेज कटऑफ़ | जनवरी 2025 |
अगले चरण
- Gemini Robotics-ER 1.6 की अन्य क्षमताओं के बारे में जानें. साथ ही, अलग-अलग प्रॉम्प्ट और इनपुट का इस्तेमाल करके एक्सपेरिमेंट जारी रखें, ताकि आपको इसके अन्य इस्तेमाल के बारे में पता चल सके. ज़्यादा उदाहरणों के लिए, Robotics getting started colab देखें.
- जानें कि Gemini Robotics मॉडल को सुरक्षा को ध्यान में रखकर कैसे बनाया गया है. इसके लिए, Google DeepMind Robotics Safety पेज पर जाएं.
- Gemini Robotics के लैंडिंग पेज पर जाकर, Gemini Robotics के मॉडल से जुड़े नए अपडेट के बारे में पढ़ें.