Gemini Robotics-ER 1.6 は、Gemini のエージェント機能をロボット工学に導入する視覚言語モデル(VLM)です。物理世界での高度な推論用に設計されており、ロボットが複雑な視覚データを解釈し、空間推論を実行し、自然言語コマンドからアクションを計画できます。
Gemini Robotics-ER 1.5 を使用していた場合は、API 呼び出しでモデル名を model="gemini-robotics-er-1.5-preview" から model="gemini-robotics-er-1.6-preview" に置き換えることで、1.6 モデルの使用を開始できます。
主な機能と特典:
- 自律性の向上: ロボットは、オープンエンドの環境の変化を推論、適応、応答できます。
- 自然言語によるインタラクション: 自然言語を使用して複雑なタスクを割り当てることができるため、ロボットを簡単に使用できます。
- タスク オーケストレーション: 自然言語コマンドをサブタスクに分解し、既存のロボット コントローラと動作を統合して、長期的なタスクを完了します。
- 多用途の機能: オブジェクトの位置を特定して識別し、オブジェクトの関係を理解し、把握と軌道を計画し、動的なシーンを解釈します。
このドキュメントでは、モデルの機能について説明し、モデルのエージェント機能を強調するいくつかの例を紹介します。
すぐに始めたい場合は、Google AI Studio でモデルを試すことができます。
安全性
Gemini Robotics-ER 1.6 は安全性を考慮して構築されていますが、ロボットの周囲の安全な環境を維持するのはお客様の責任です。生成 AI モデルは間違えることがあり、物理的なロボットは損傷を引き起こす可能性があります。安全性は優先事項であり、現実世界のロボット工学で使用される生成 AI モデルを安全にすることは、Google の研究の活発かつ重要な分野です。詳しくは、Google DeepMind のロボット工学の安全性に関するページをご覧ください。
スタートガイド: シーン内のオブジェクトを見つける
次の例は、一般的なロボット工学のユースケースを示しています。このサンプルでは、generateContent メソッドを使用して画像とテキスト プロンプトをモデルに渡し、識別されたオブジェクトとその対応する 2D ポイントのリストを取得する方法を示します。モデルは、画像内で識別したアイテムのポイントを返し、正規化された 2D 座標とラベルを返します。
この出力は、ロボット工学 API で使用したり、ビジョン言語アクション(VLA)モデルや他のサードパーティのユーザー定義関数を呼び出して、ロボットが実行するアクションを生成したりできます。
Python
from google import genai
from google.genai import types

PROMPT = """
          Point to no more than 10 items in the image. The label returned
          should be an identifying name for the object detected.
          The answer should follow the json format: [{"point": <point>,
          "label": <label1>}, ...]. The points are in [y, x] format
          normalized to 0-1000.
        """
client = genai.Client()

# Load your image
with open("my-image.png", 'rb') as f:
    image_bytes = f.read()

image_response = client.models.generate_content(
    model="gemini-robotics-er-1.6-preview",
    contents=[
        types.Part.from_bytes(
            data=image_bytes,
            mime_type='image/png',
        ),
        PROMPT
    ],
    config = types.GenerateContentConfig(
        temperature=1.0,
        thinking_config=types.ThinkingConfig(thinking_budget=0)
    )
)

print(image_response.text)
REST
# First, ensure you have the image file locally.
# Encode the image to base64
IMAGE_BASE64=$(base64 -w 0 my-image.png)

curl -X POST \
  "https://generativelanguage.googleapis.com/v1beta/models/gemini-robotics-er-1.6-preview:generateContent \
  -H "x-goog-api-key: $GEMINI_API_KEY" \
  -H "Content-Type: application/json" \
  -d '{
    "contents": [
      {
        "parts": [
          {
            "inlineData": {
              "mimeType": "image/png",
              "data": "'"${IMAGE_BASE64}"'"
            }
          },
          {
            "text": "Point to no more than 10 items in the image. The label returned should be an identifying name for the object detected. The answer should follow the json format: [{\"point\": [y, x], \"label\": <label1>}, ...]. The points are in [y, x] format normalized to 0-1000."
          }
        ]
      }
    ],
    "generationConfig": {
      "temperature": 0.5,
      "thinkingConfig": {
        "thinkingBudget": 0
      }
    }
  }'
出力は、オブジェクトを含む JSON 配列になります。各オブジェクトには、オブジェクトを識別する point(正規化された [y, x] 座標)と label が含まれます。
JSON
[
  {"point": [376, 508], "label": "small banana"},
  {"point": [287, 609], "label": "larger banana"},
  {"point": [223, 303], "label": "pink starfruit"},
  {"point": [435, 172], "label": "paper bag"},
  {"point": [270, 786], "label": "green plastic bowl"},
  {"point": [488, 775], "label": "metal measuring cup"},
  {"point": [673, 580], "label": "dark blue bowl"},
  {"point": [471, 353], "label": "light blue bowl"},
  {"point": [492, 497], "label": "bread"},
  {"point": [525, 429], "label": "lime"}
]
次の図は、これらのポイントを表示する方法の例です。
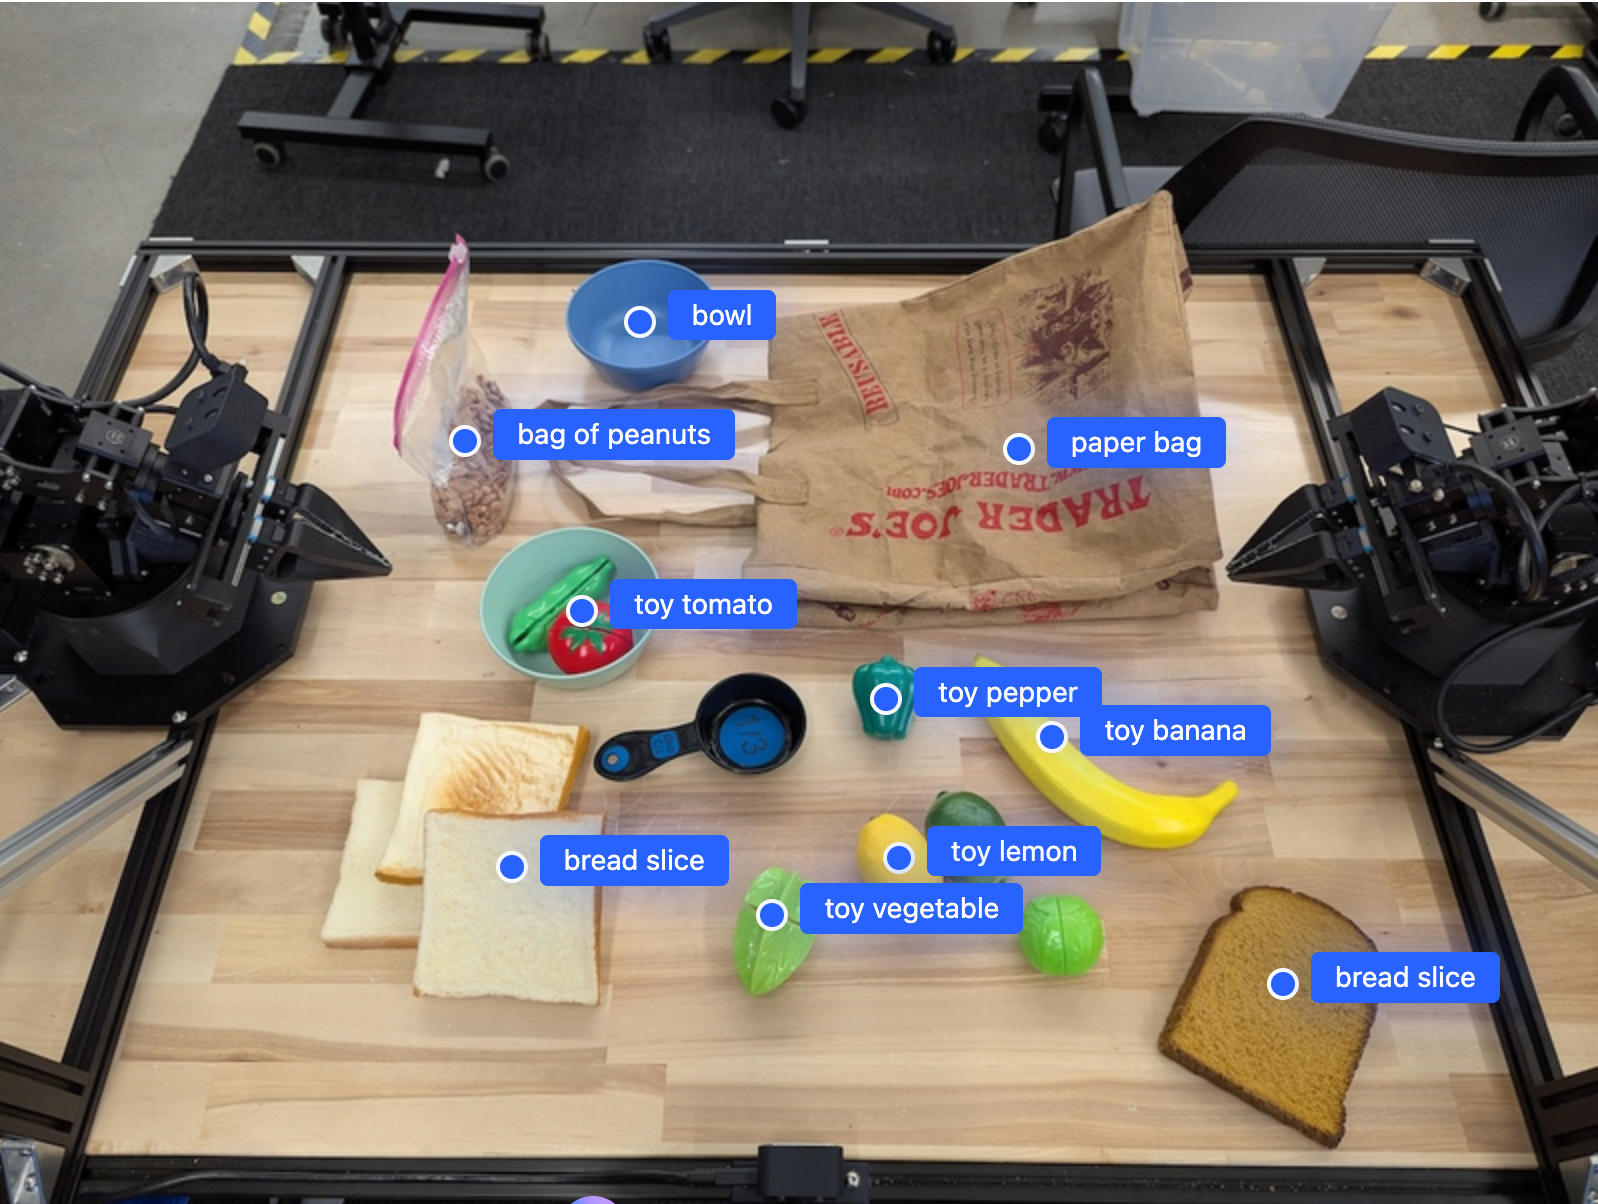
仕組み
Gemini Robotics-ER 1.6 を使用すると、ロボットは空間認識を使用して物理世界をコンテキスト化し、作業を行うことができます。画像、動画、音声の入力と自然言語プロンプトを受け取り、次の処理を行います。
- オブジェクトとシーンのコンテキストを理解する: オブジェクトを特定し、アフォーダンスなど、オブジェクトとシーンの関係について推論します。
- タスクの指示を理解する: 「バナナを探して」などの自然言語で指定されたタスクを解釈します。
- 空間的、時間的に推論する: 一連のアクションと、オブジェクトが時間とともにシーンとどのようにやり取りするかを理解します。
- 構造化された出力を提供する: オブジェクトの位置を表す座標(点または境界ボックス)を返します。
これにより、ロボットが環境をプログラムで「認識」し、「理解」できるようになります。
Gemini Robotics-ER 1.6 はエージェント機能も備えています。つまり、「リンゴをボウルに入れる」などの複雑なタスクをサブタスクに分解し、長期的なタスクを調整できます。
- サブタスクの順序付け: コマンドを論理的な手順のシーケンスに分解します。
- 関数呼び出し/コード実行: 既存のロボット関数/ツールを呼び出すか、生成されたコードを実行して手順を実行します。
Gemini の関数呼び出しの仕組みについては、関数呼び出しのページをご覧ください。
Gemini Robotics-ER 1.6 で思考予算を使用する
Gemini Robotics-ER 1.6 には、レイテンシと精度のトレードオフを制御できる柔軟な思考予算があります。オブジェクト検出などの空間認識タスクの場合、モデルは少ない思考予算で高いパフォーマンスを実現できます。カウントや重み推定などのより複雑な推論タスクでは、思考予算が大きいほどメリットがあります。これにより、低レイテンシの回答の必要性と、より困難なタスクに対する高精度の結果のバランスを取ることができます。
思考予算の詳細については、思考のコア機能ページをご覧ください。
標準の空間推論
次の例は、自然言語プロンプトを使用したロボット認識と空間推論のタスクを示しています。画像内のオブジェクトのポイントと検出結果から、軌道の計画まで、さまざまなタスクがあります。わかりやすくするために、これらの例のコード スニペットは、プロンプトと generate_content API の呼び出しのみを示すように簡略化されています。
実行可能な完全なコードと追加の例は、ロボット工学のクックブックで確認できます。
オブジェクトを指す
画像や動画フレーム内のオブジェクトを指して見つけることは、ロボット工学におけるビジョン言語モデル(VLM)の一般的なユースケースです。次の例では、画像内の特定のオブジェクトを見つけて座標を返すようにモデルに指示しています。
Python
from google import genai
from google.genai import types

client = genai.Client()

# Load your image and set up your prompt
with open('path/to/image-with-objects.jpg', 'rb') as f:
    image_bytes = f.read()

queries = [
    "bread",
    "starfruit",
    "banana",
]

prompt = f"""
    Get all points matching the following objects: {', '.join(queries)}. The
    label returned should be an identifying name for the object detected.
    The answer should follow the json format:

    [{{"point": , "label": }}, ...]. The points are in

    [y, x] format normalized to 0-1000.
    """

image_response = client.models.generate_content(
  model="gemini-robotics-er-1.6-preview",
  contents=[
    types.Part.from_bytes(
      data=image_bytes,
      mime_type='image/jpeg',
    ),
    prompt
  ],
  config = types.GenerateContentConfig(
      temperature=1.0,
      thinking_config=types.ThinkingConfig(thinking_budget=0)
  )
)

print(image_response.text)
出力は、スタートガイドの例と同様に、検出されたオブジェクトの座標とそのラベルを含む JSON になります。
[
  {"point": [671, 317], "label": "bread"},
  {"point": [738, 307], "label": "bread"},
  {"point": [702, 237], "label": "bread"},
  {"point": [629, 307], "label": "bread"},
  {"point": [833, 800], "label": "bread"},
  {"point": [609, 663], "label": "banana"},
  {"point": [770, 483], "label": "starfruit"}
]

次のプロンプトを使用して、特定のオブジェクトではなく「果物」などの抽象的なカテゴリを解釈し、画像内のすべてのインスタンスを特定するようにモデルにリクエストします。
Python
prompt = f"""
        Get all points for fruit. The label returned should be an identifying
        name for the object detected.
        """ + """The answer should follow the json format:
        [{"point": <point>, "label": <label1>}, ...]. The points are in
        [y, x] format normalized to 0-1000."""
他の画像処理手法については、画像理解のページをご覧ください。
動画内のオブジェクトのトラッキング
Gemini Robotics-ER 1.6 は、動画フレームを分析して、オブジェクトを時間経過とともに追跡することもできます。サポートされている動画形式の一覧については、動画入力をご覧ください。
モデルが分析する各フレーム内の特定のオブジェクトを見つけるために使用される基本プロンプトは次のとおりです。
Python
# Define the objects to find
queries = [
    "pen (on desk)",
    "pen (in robot hand)",
    "laptop (opened)",
    "laptop (closed)",
]

base_prompt = f"""
  Point to the following objects in the provided image: {', '.join(queries)}.
  The answer should follow the json format:

  [{{"point": , "label": }}, ...].

  The points are in [y, x] format normalized to 0-1000.
  If no objects are found, return an empty JSON list [].
  """
出力には、動画フレーム全体でペンとノートパソコンが追跡されている様子が表示されます。
![]()
実行可能なコードの完全版については、ロボティクス クックブックをご覧ください。
オブジェクト検出と境界ボックス
単一のポイントだけでなく、モデルは 2D 境界ボックスを返すこともできます。これは、オブジェクトを囲む長方形の領域です。
この例では、テーブル上の識別可能なオブジェクトの 2D 境界ボックスをリクエストしています。モデルは、出力を 25 個のオブジェクトに制限し、複数のインスタンスに一意の名前を付けるように指示されています。
Python
from google import genai
from google.genai import types

client = genai.Client()

# Load your image and set up your prompt
with open('path/to/image-with-objects.jpg', 'rb') as f:
    image_bytes = f.read()

prompt = """
      Return bounding boxes as a JSON array with labels. Never return masks
      or code fencing. Limit to 25 objects. Include as many objects as you
      can identify on the table.
      If an object is present multiple times, name them according to their
      unique characteristic (colors, size, position, unique characteristics, etc..).
      The format should be as follows: [{"box_2d": [ymin, xmin, ymax, xmax],
      "label": <label for the object>}] normalized to 0-1000. The values in
      box_2d must only be integers
      """

image_response = client.models.generate_content(
  model="gemini-robotics-er-1.6-preview",
  contents=[
    types.Part.from_bytes(
      data=image_bytes,
      mime_type='image/jpeg',
    ),
    prompt
  ],
  config = types.GenerateContentConfig(
      temperature=1.0,
      thinking_config=types.ThinkingConfig(thinking_budget=0)
  )
)

print(image_response.text)
モデルから返されたボックスを次に示します。
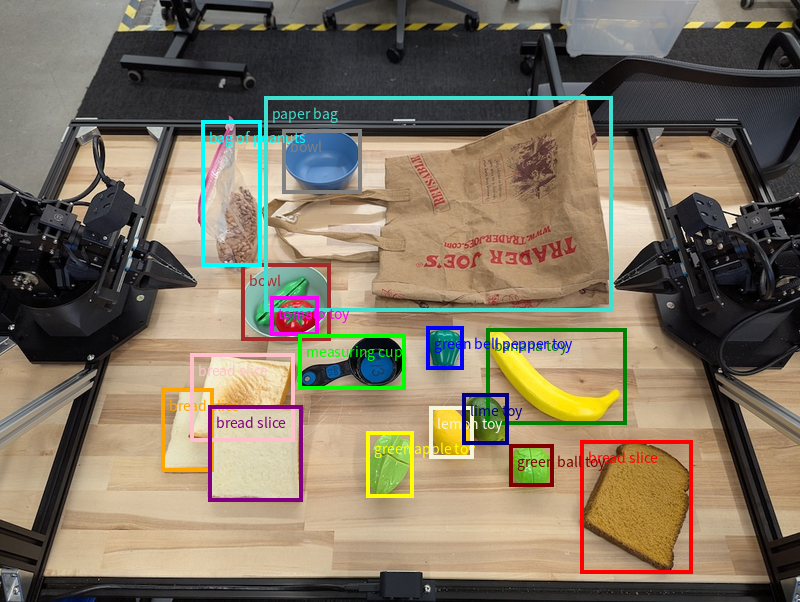
実行可能なコードの全文については、ロボティクス クックブックをご覧ください。画像理解のページには、オブジェクト検出や境界ボックスの例など、視覚タスクの追加の例も記載されています。
軌跡
Gemini Robotics-ER 1.6 は、軌道を定義する一連のポイントを生成できます。これは、ロボットの動きをガイドするのに役立ちます。
この例では、赤いペンをオーガナイザーに移動する軌跡をリクエストしています。これには、開始点と一連の中間点が含まれます。
Python
from google import genai
from google.genai import types

client = genai.Client()

# Load your image and set up your prompt
with open('path/to/image-with-objects.jpg', 'rb') as f:
    image_bytes = f.read()

points_data = []
prompt = """
        Place a point on the red pen, then 15 points for the trajectory of
        moving the red pen to the top of the organizer on the left.
        The points should be labeled by order of the trajectory, from '0'
        (start point at left hand) to <n> (final point)
        The answer should follow the json format:
        [{"point": <point>, "label": <label1>}, ...].
        The points are in [y, x] format normalized to 0-1000.
        """

image_response = client.models.generate_content(
  model="gemini-robotics-er-1.6-preview",
  contents=[
    types.Part.from_bytes(
      data=image_bytes,
      mime_type='image/jpeg',
    ),
    prompt
  ],
  config = types.GenerateContentConfig(
      temperature=1.0,
  )
)

print(image_response.text)
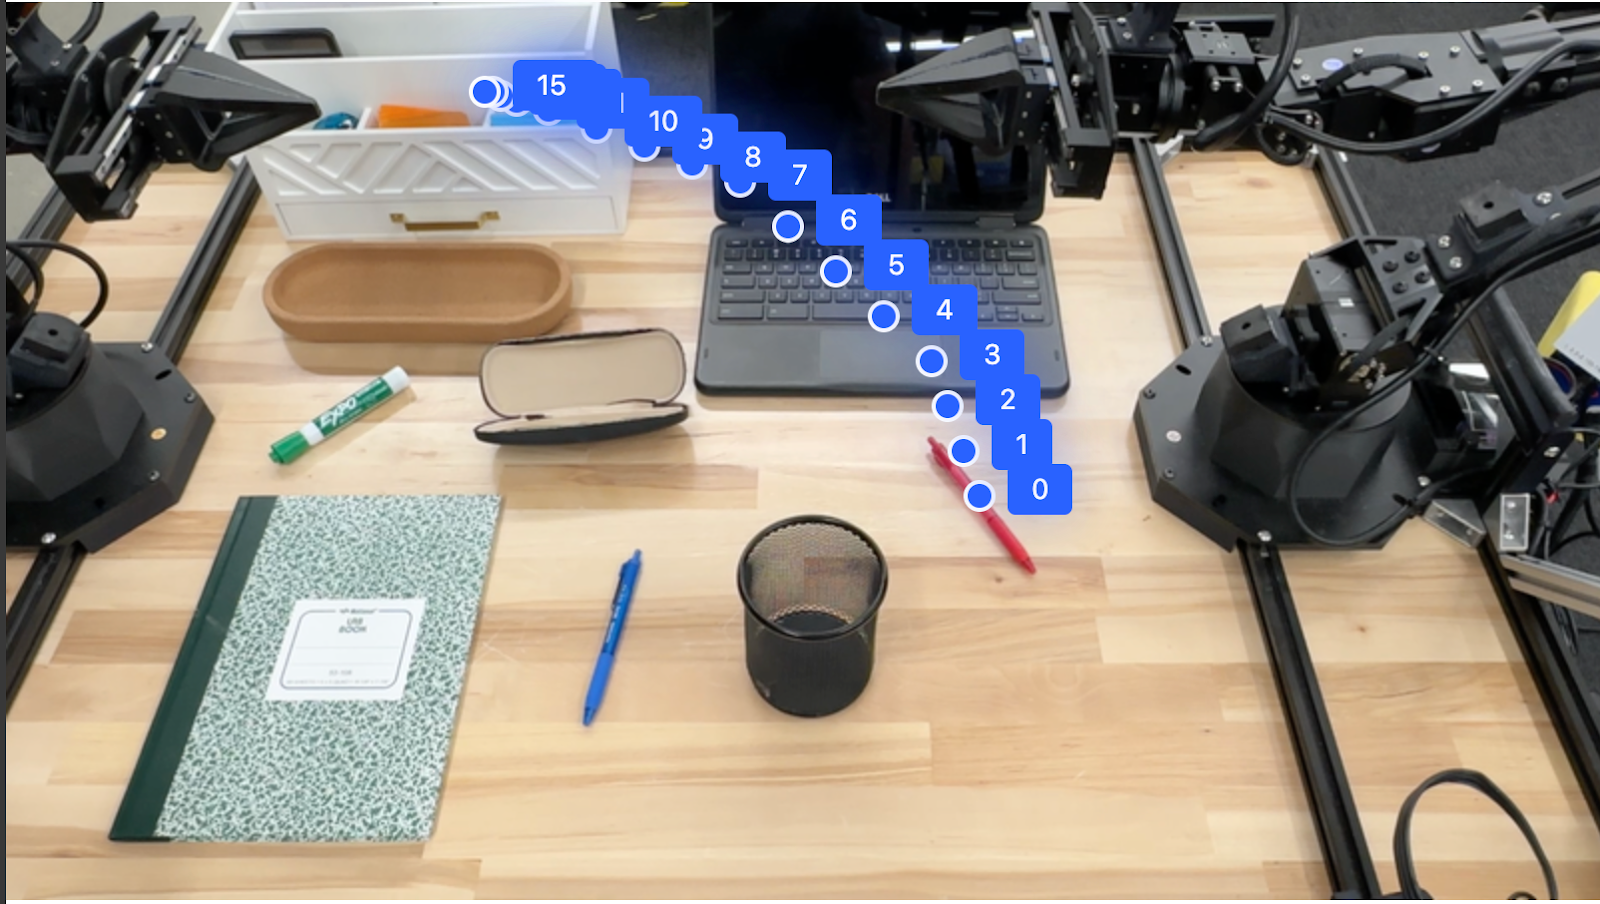
レスポンスは、赤いペンがオーガナイザーの上に移動するタスクを完了するためにたどるパスの軌跡を表す一連の座標です。
[
  {"point": [550, 610], "label": "0"},
  {"point": [500, 600], "label": "1"},
  {"point": [450, 590], "label": "2"},
  {"point": [400, 580], "label": "3"},
  {"point": [350, 550], "label": "4"},
  {"point": [300, 520], "label": "5"},
  {"point": [250, 490], "label": "6"},
  {"point": [200, 460], "label": "7"},
  {"point": [180, 430], "label": "8"},
  {"point": [160, 400], "label": "9"},
  {"point": [140, 370], "label": "10"},
  {"point": [120, 340], "label": "11"},
  {"point": [110, 320], "label": "12"},
  {"point": [105, 310], "label": "13"},
  {"point": [100, 305], "label": "14"},
  {"point": [100, 300], "label": "15"}
]
エージェント機能
次の例は、モデルのエージェント機能(特にコード実行)を使用した高度なロボット推論を示しています。このようなシナリオでは、モデルは Python コードを記述して実行し、画像を操作(ズームイン、切り抜き、回転など)して、回答前に曖昧さを解消したり、精度を高めたりすることができます。
オブジェクト検出(ズームと切り抜き)
次の例は、コード実行を使用して、オブジェクトを検出してバウンディング ボックスを返すときに、画像を拡大して切り抜き、より鮮明なビューを表示する方法を示しています。
Python
from google import genai
from google.genai import types

client = genai.Client()

# Load your image
with open('sorting.jpeg', 'rb') as f:
    image_bytes = f.read()

prompt = """
Return JSON in the format {label: val, y: val, x: val, y2: val, x2: val} for
the compostable objects in this scene. Please Zoom and crop the image for a
clearer view. Return an annotated image of the final result with the bounding
boxes drawn on it to the API caller as a part of your process.
"""

response = client.models.generate_content(
    model="gemini-robotics-er-1.6-preview",
    contents=[
        types.Part.from_bytes(
            data=image_bytes,
            mime_type='image/jpeg',
        ),
        prompt
    ],
    config = types.GenerateContentConfig(
        temperature=1.0,
        tools=[types.Tool(code_execution=types.ToolCodeExecution)],
    )
)

print(response.text)
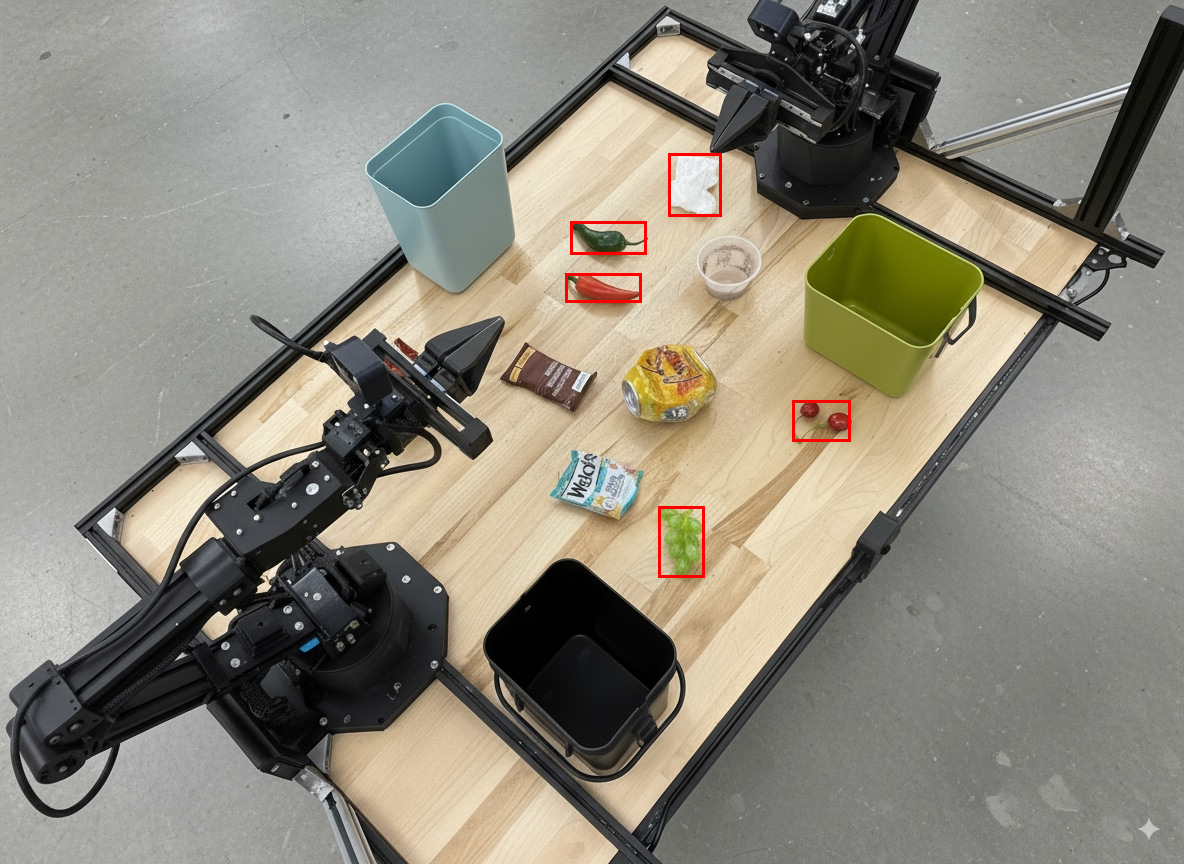
モデルの出力は次のようになります。
[
  {"label": "compostable", "y": 256, "x": 482, "y2": 295, "x2": 546},
  {"label": "compostable", "y": 317, "x": 478, "y2": 350, "x2": 542},
  {"label": "compostable", "y": 586, "x": 556, "y2": 668, "x2": 595},
  {"label": "compostable", "y": 463, "x": 669, "y2": 511, "x2": 718},
  {"label": "compostable", "y": 178, "x": 565, "y2": 250, "x2": 609}
]
モデルから返されたボックスを次に示します。
アナログ ゲージを読み取り、ロジックを適用する
次の例では、モデルを使用してアナログ メーターを読み取り、時間計算を行う方法を示します。システム指示を使用して JSON 出力を強制します。
Python
from google import genai
from google.genai import types

client = genai.Client()

# Load your image
with open('clock.jpg', 'rb') as f:
    image_bytes = f.read()

q_time = """
Tell me what the value is. Please respond in the following JSON format:\n {\n "hours": X,\n  "minutes": Y,\n}. Zoom in or crop as necessary to confirm location of the clock hands.
"""

system_instruction = "Be precise. When JSON is requested, reply with ONLY that JSON (no preface, no code block)."

response = client.models.generate_content(
    model="gemini-robotics-er-1.6-preview",
    contents=[
        types.Part.from_bytes(
            data=image_bytes,
            mime_type='image/jpeg',
        ),
        system_instruction + " " + q_time
    ],
    config = types.GenerateContentConfig(
        temperature=1.0,
    )
)

print(response.text)
次の画像は入力例です。
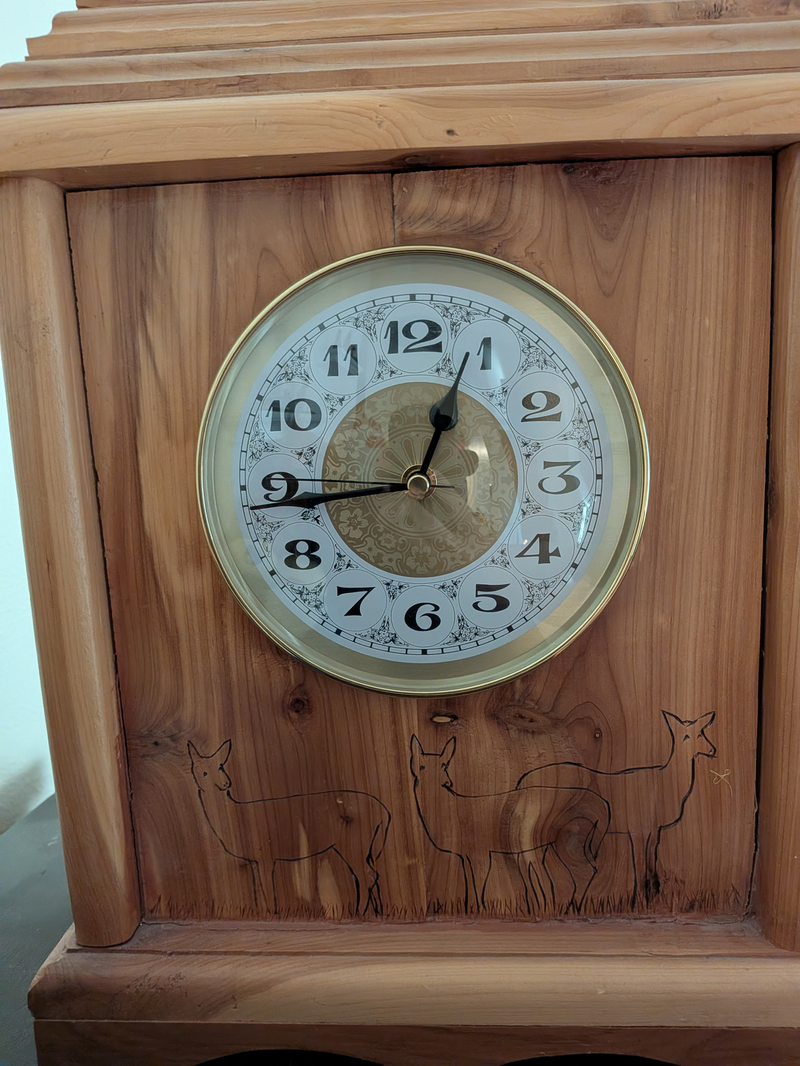
モデルの出力は次のようになります。
Time Response:  {
  "hours": 12,
  "minutes": 44
 }
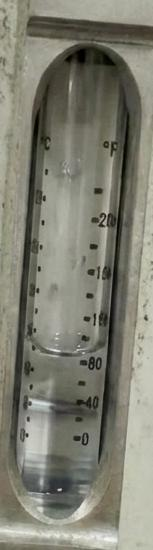
コンテナ内の液体を測定する
次の例は、コード実行を使用してメーターを読み取り、液面をパーセンテージで計算する方法を示しています。
Python
from google import genai
from google.genai import types

client = genai.Client()

# Load your image
with open('meter.jpeg', 'rb') as f:
    image_bytes = f.read()

prompt = """
How full is the meter of liquid?
To read it,
1) Find the points for the top of the sight window, bottom of the sight window and the liquid level, formatted as [y, x] with values ranging from 0-1000;
2) Use math to determine the liquid level as a percentage;
3) Output "Answer: ??" on a separate line, where ?? is a number without % or unit.
"""

response = client.models.generate_content(
    model="gemini-robotics-er-1.6-preview",
    contents=[
        types.Part.from_bytes(
            data=image_bytes,
            mime_type='image/jpeg',
        ),
        prompt
    ],
    config = types.GenerateContentConfig(
        temperature=1.0,
        tools=[types.Tool(code_execution=types.ToolCodeExecution)],
    )
)

print(response.text)
以下は、入力の拡大画像です。
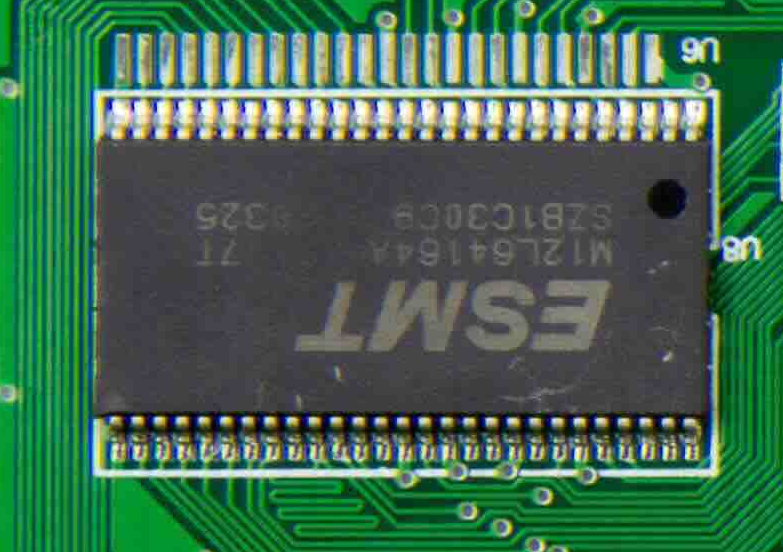
回路基板のマーキングを読む
次の例は、コード実行を使用して回路基板チップのテキストを読み取り、モデルが必要に応じて画像をズーム、切り抜き、回転できるようにする方法を示しています。
Python
from google import genai
from google.genai import types

client = genai.Client()

# Load your image
with open('circuit_board.jpeg', 'rb') as f:
    image_bytes = f.read()

prompt = "What is the number on the ESMT chip? Zoom, crop, and rotate if needed."

response = client.models.generate_content(
    model="gemini-robotics-er-1.6-preview",
    contents=[
        types.Part.from_bytes(
            data=image_bytes,
            mime_type='image/jpeg',
        ),
        prompt
    ],
    config = types.GenerateContentConfig(
        temperature=1.0,
        tools=[types.Tool(code_execution=types.ToolCodeExecution)],
    )
)

print(response.text)
以下は、入力の拡大画像です。
画像アノテーション
次の例は、コード実行を使用して画像にアノテーションを付け(廃棄手順を示す矢印を描画するなど)、変更された画像を返す方法を示しています。
Python
from google import genai
from google.genai import types

client = genai.Client()

# Load your image
with open('sorting.jpeg', 'rb') as f:
    image_bytes = f.read()

prompt = """
Look at this image and return it as an annotated version using arrows of
different colors to represent which items should go in which bins for
disposal. You must return the final image to the API caller.
"""

response = client.models.generate_content(
    model="gemini-robotics-er-1.6-preview",
    contents=[
        types.Part.from_bytes(
            data=image_bytes,
            mime_type='image/jpeg',
        ),
        prompt
    ],
    config = types.GenerateContentConfig(
        temperature=1.0,
        tools=[types.Tool(code_execution=types.ToolCodeExecution)],
    )
)

print(response.text)
次の画像は入力例です。
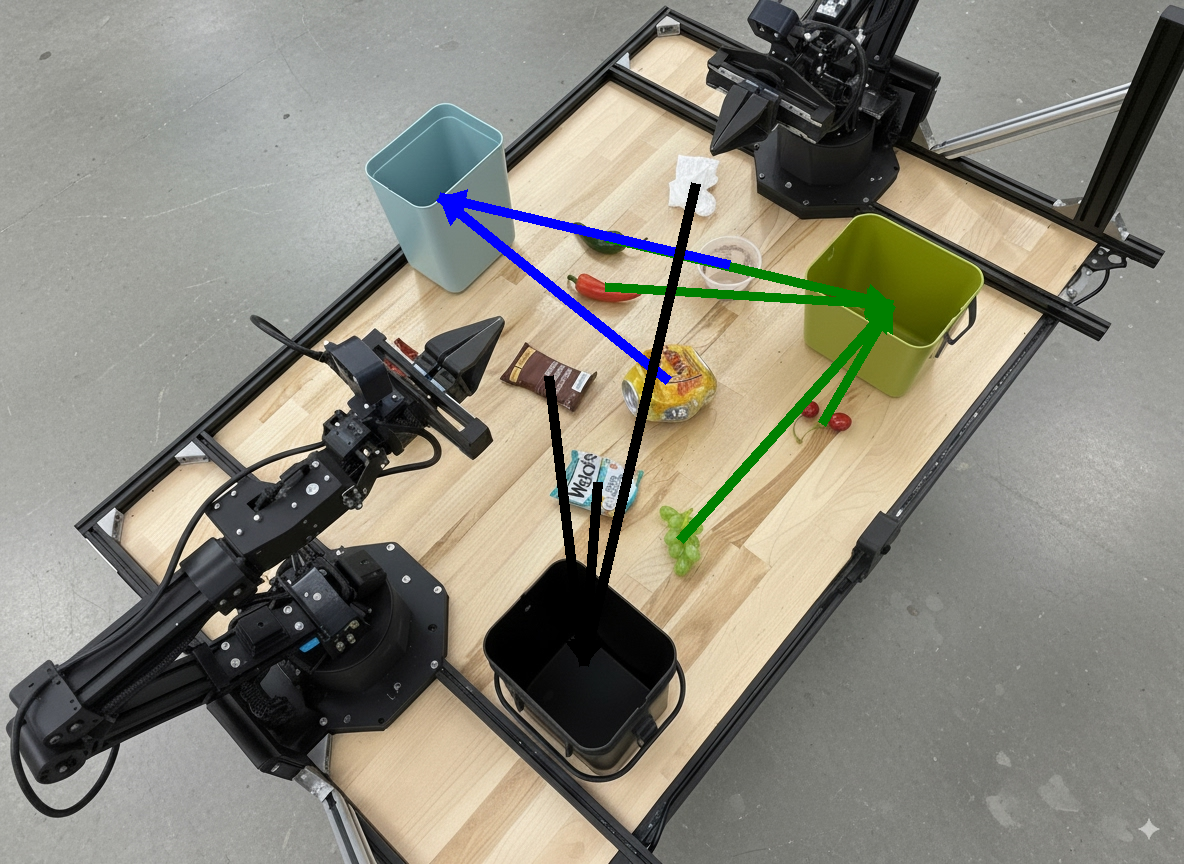
モデルの出力は次のようになります。
The annotated image shows the suggested disposal locations for the items on the table:
- **Green bin (Compost/Organic)**: Green chili, red chili, grapes, and cherries.
- **Blue bin (Recycling)**: Yellow crushed can and plastic container.
- **Black bin (Trash)**: Chocolate bar wrapper, Welch's packet, and white tissue.
オーケストレーション
Gemini Robotics-ER 1.6 は、タスク プランニングと高レベルの空間推論を実行できます。コンテキストの理解に基づいてアクションを推論したり、最適な場所を特定したりして、長期的なタスクをオーケストレートします。
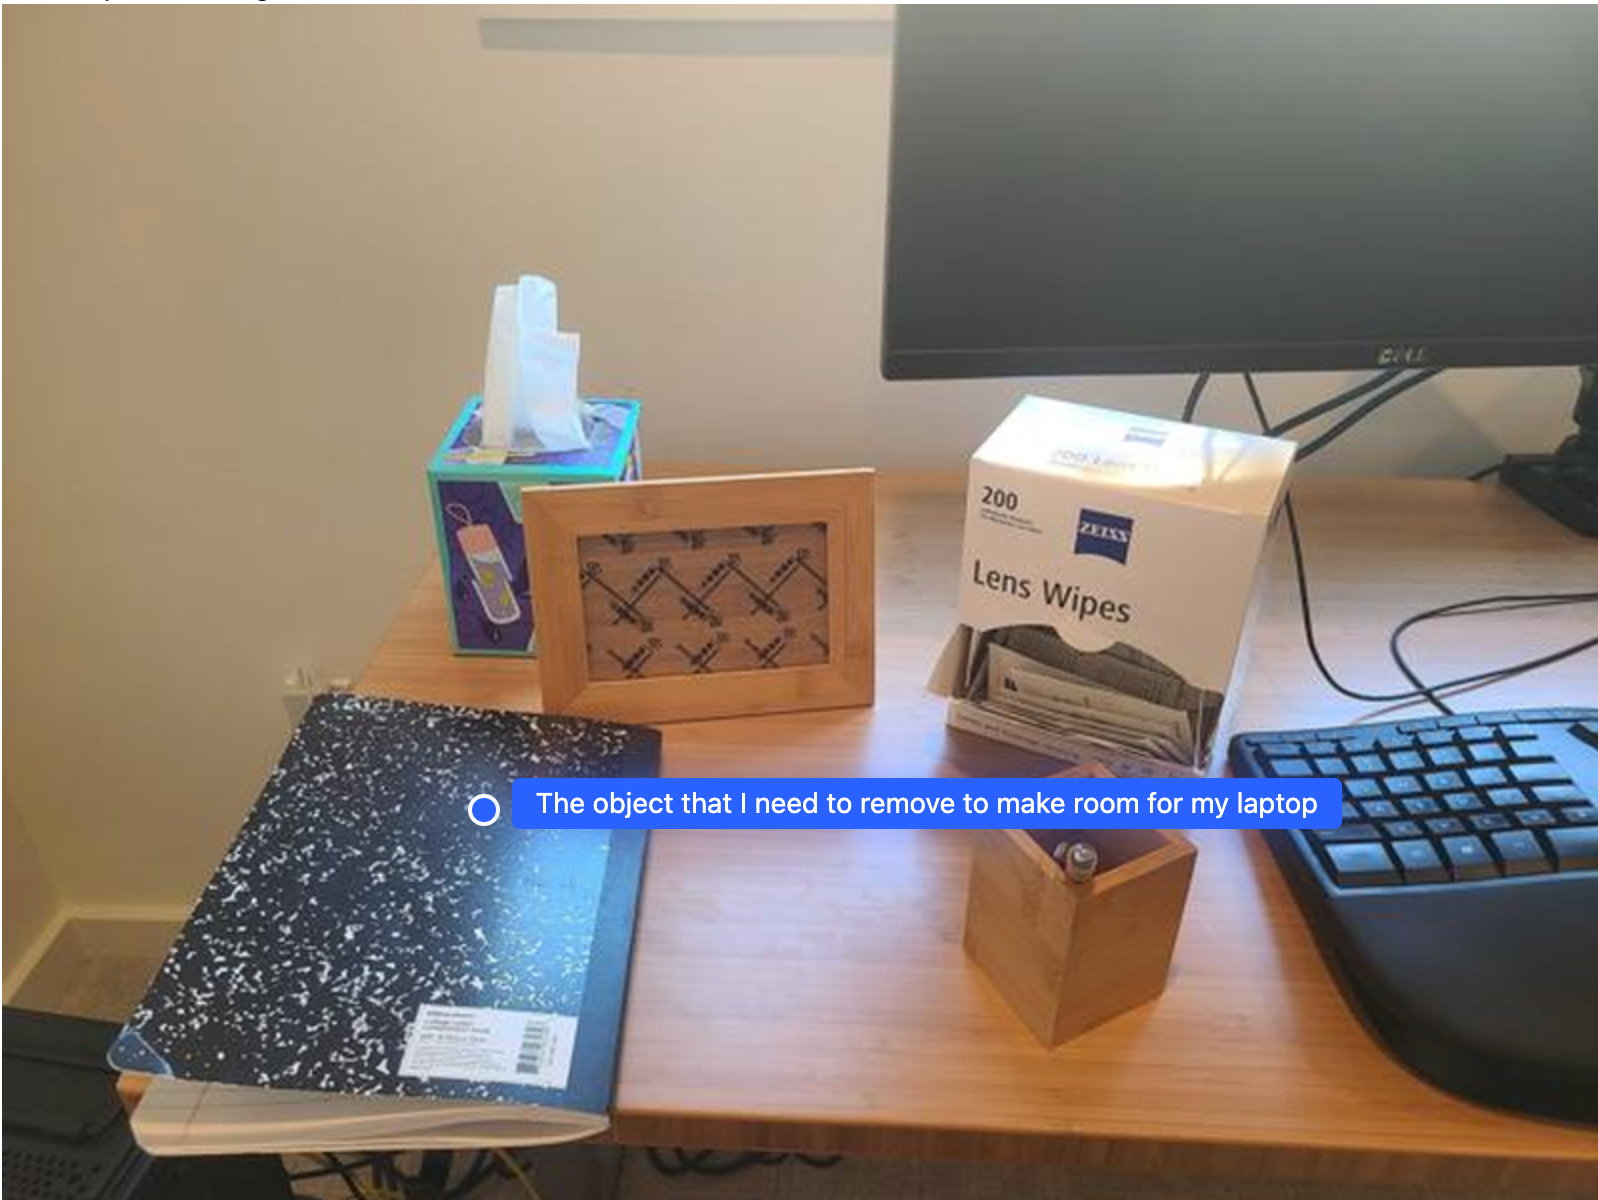
ノートパソコンを置くスペースを確保する
この例では、Gemini Robotics-ER が空間について推論する方法を示します。プロンプトは、別のアイテムのスペースを確保するために移動する必要があるオブジェクトを特定するようにモデルに指示します。
Python
from google import genai
from google.genai import types

client = genai.Client()

# Load your image and set up your prompt
with open('path/to/image-with-objects.jpg', 'rb') as f:
    image_bytes = f.read()

prompt = """
          Point to the object that I need to remove to make room for my laptop
          The answer should follow the json format: [{"point": <point>,
          "label": <label1>}, ...]. The points are in [y, x] format normalized to 0-1000.
        """

image_response = client.models.generate_content(
  model="gemini-robotics-er-1.6-preview",
  contents=[
    types.Part.from_bytes(
      data=image_bytes,
      mime_type='image/jpeg',
    ),
    prompt
  ],
  config = types.GenerateContentConfig(
      temperature=1.0,
      thinking_config=types.ThinkingConfig(thinking_budget=0)
  )
)

print(image_response.text)
レスポンスには、ユーザーの質問に答えるオブジェクトの 2D 座標が含まれています。この場合、ノートパソコンを置くために移動する必要があるオブジェクトです。
[
  {"point": [672, 301], "label": "The object that I need to remove to make room for my laptop"}
]
お弁当の準備
モデルは、複数ステップのタスクの手順を提供し、各ステップに関連するオブジェクトを指すこともできます。この例では、モデルがランチバッグを詰める一連の手順を計画する方法を示します。
Python
from google import genai
from google.genai import types

client = genai.Client()

# Load your image and set up your prompt
with open('path/to/image-of-lunch.jpg', 'rb') as f:
    image_bytes = f.read()

prompt = """
          Explain how to pack the lunch box and lunch bag. Point to each
          object that you refer to. Each point should be in the format:
          [{"point": [y, x], "label": }], where the coordinates are
          normalized between 0-1000.
        """

image_response = client.models.generate_content(
  model="gemini-robotics-er-1.6-preview",
  contents=[
    types.Part.from_bytes(
      data=image_bytes,
      mime_type='image/jpeg',
    ),
    prompt
  ],
  config = types.GenerateContentConfig(
      temperature=1.0,
      thinking_config=types.ThinkingConfig(thinking_budget=0)
  )
)

print(image_response.text)
このプロンプトのレスポンスは、画像入力からランチバッグを詰める方法に関する手順のセットです。
入力画像

モデル出力
Based on the image, here is a plan to pack the lunch box and lunch bag:

1.  **Pack the fruit into the lunch box.** Place the [apple](apple), [banana](banana), [red grapes](red grapes), and [green grapes](green grapes) into the [blue lunch box](blue lunch box).
2.  **Add the spoon to the lunch box.** Put the [blue spoon](blue spoon) inside the lunch box as well.
3.  **Close the lunch box.** Secure the lid on the [blue lunch box](blue lunch box).
4.  **Place the lunch box inside the lunch bag.** Put the closed [blue lunch box](blue lunch box) into the [brown lunch bag](brown lunch bag).
5.  **Pack the remaining items into the lunch bag.** Place the [blue snack bar](blue snack bar) and the [brown snack bar](brown snack bar) into the [brown lunch bag](brown lunch bag).

Here is the list of objects and their locations:
*   [{"point": [899, 440], "label": "apple"}]
*   [{"point": [814, 363], "label": "banana"}]
*   [{"point": [727, 470], "label": "red grapes"}]
*   [{"point": [675, 608], "label": "green grapes"}]
*   [{"point": [706, 529], "label": "blue lunch box"}]
*   [{"point": [864, 517], "label": "blue spoon"}]
*   [{"point": [499, 401], "label": "blue snack bar"}]
*   [{"point": [614, 705], "label": "brown snack bar"}]
*   [{"point": [448, 501], "label": "brown lunch bag"}]
カスタムロボット API の呼び出し
この例では、カスタム ロボット API を使用したタスク オーケストレーションを示します。このチュートリアルでは、ピッキングと配置のオペレーション用に設計されたモック API を紹介します。青いブロックを拾ってオレンジ色のボウルに入れるタスクです。
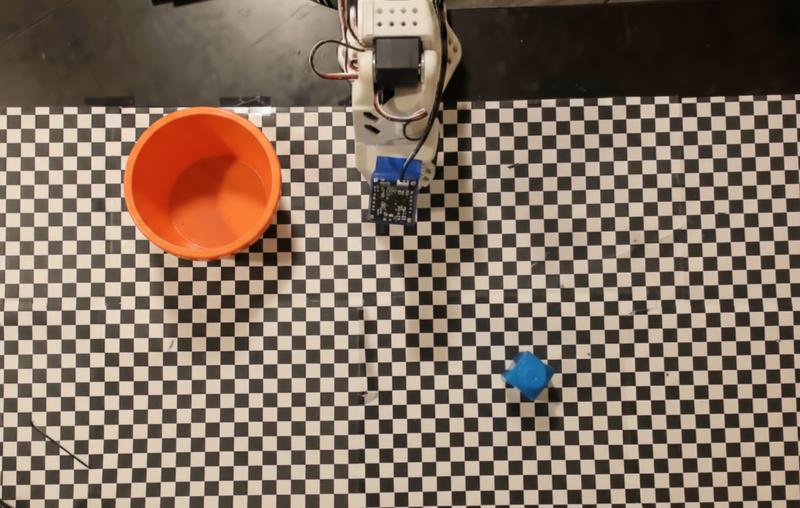
このページの他の例と同様に、実行可能なコードの全文は Robotics cookbook で確認できます。
最初の手順は、次のプロンプトを使用して両方のアイテムを見つけることです。
Python
prompt = """
            Locate and point to the blue block and the orange bowl. The label
            returned should be an identifying name for the object detected.
            The answer should follow the json format: [{"point": <point>, "label": <label1>}, ...].
            The points are in [y, x] format normalized to 0-1000.
          """
モデルのレスポンスには、ブロックとボウルの正規化された座標が含まれます。
[
  {"point": [389, 252], "label": "orange bowl"},
  {"point": [727, 659], "label": "blue block"}
]
この例では、次のモックロボット API を使用します。
Python
def move(x, y, high):
  print(f"moving to coordinates: {x}, {y}, {15 if high else 5}")

def setGripperState(opened):
  print("Opening gripper" if opened else "Closing gripper")

def returnToOrigin():
  print("Returning to origin pose")
次のステップでは、アクションを実行するために必要なロジックを使用して、API 関数のシーケンスを呼び出します。次のプロンプトには、このタスクをオーケストレートするときにモデルが使用するロボット API の説明が含まれています。
Python
prompt = f"""
    You are a robotic arm with six degrees-of-freedom. You have the
    following functions available to you:

    def move(x, y, high):
      # moves the arm to the given coordinates. The boolean value 'high' set
      to True means the robot arm should be lifted above the scene for
      avoiding obstacles during motion. 'high' set to False means the robot
      arm should have the gripper placed on the surface for interacting with
      objects.

    def setGripperState(opened):
      # Opens the gripper if opened set to true, otherwise closes the gripper

    def returnToOrigin():
      # Returns the robot to an initial state. Should be called as a cleanup
      operation.

    The origin point for calculating the moves is at normalized point
    y={robot_origin_y}, x={robot_origin_x}. Use this as the new (0,0) for
    calculating moves, allowing x and y to be negative.
    Perform a pick and place operation where you pick up the blue block at
    normalized coordinates ({block_x}, {block_y}) (relative coordinates:
    {block_relative_x}, {block_relative_y}) and place it into the orange
    bowl at normalized coordinates ({bowl_x}, {bowl_y})
    (relative coordinates: {bowl_relative_x}, {bowl_relative_y}).
    Provide the sequence of function calls as a JSON list of objects, where
    each object has a "function" key (the function name) and an "args" key
    (a list of arguments for the function).
    Also, include your reasoning before the JSON output.
    For example:
    Reasoning: To pick up the block, I will first move the arm to a high
    position above the block, open the gripper, move down to the block,
    close the gripper, lift the arm, move to a high position above the bowl,
    move down to the bowl, open the gripper, and then lift the arm back to
    a high position.
"""
プロンプトとモックロボット API に基づくモデルの出力例を次に示します。出力には、モデルの思考プロセスと、その結果として計画されたタスクが含まれます。また、モデルが順序付けたロボット関数呼び出しの出力も示します。
Reasoning: To perform the pick and place operation, I will first move the
robotic arm to a high position above the blue block to ensure clearance. Then, I
will open the gripper in preparation for grasping. Next, I will lower the arm to
the surface level to position the gripper around the block and close the gripper
to secure it. After picking up the block, I will lift the arm to clear the
surface and move towards the orange bowl, maintaining a high position to avoid
collisions. Once positioned above the bowl, I will lower the arm to place the
block inside. I will then open the gripper to release the block. Finally, I will
lift the arm out of the bowl and call `returnToOrigin` to reset the robot's
state.

[
  {
    "function": "move",
    "args": [
      163,
      427,
      true
    ]
  },
  {
    "function": "setGripperState",
    "args": [
      true
    ]
  },
  {
    "function": "move",
    "args": [
      163,
      427,
      false
    ]
  },
  {
    "function": "setGripperState",
    "args": [
      false
    ]
  },
  {
    "function": "move",
    "args": [
      163,
      427,
      true
    ]
  },
  {
    "function": "move",
    "args": [
      -247,
      90,
      true
    ]
  },
  {
    "function": "move",
    "args": [
      -247,
      90,
      false
    ]
  },
  {
    "function": "setGripperState",
    "args": [
      true
    ]
  },
  {
    "function": "move",
    "args": [
      -247,
      90,
      true
    ]
  },
  {
    "function": "returnToOrigin",
    "args": []
  }
]

Executing Function Calls:
moving to coordinates: 163, 427, 15
Opening gripper
moving to coordinates: 163, 427, 5
Closing gripper
moving to coordinates: 163, 427, 15
moving to coordinates: -247, 90, 15
moving to coordinates: -247, 90, 5
Opening gripper
moving to coordinates: -247, 90, 15
Returning to origin pose
ベスト プラクティス
ロボット アプリケーションのパフォーマンスと精度を最適化するには、Gemini モデルを効果的に操作する方法を理解することが重要です。このセクションでは、最も信頼性の高い結果を得るために、プロンプトの作成、視覚データの処理、タスクの構造化に関するベスト プラクティスと主要な戦略について説明します。
明確でわかりやすい言葉を使いましょう。
自然言語を活用する: Gemini モデルは、自然な会話言語を理解するように設計されています。プロンプトは、意味的に明確で、人が自然に指示を出す方法を反映した構造にします。
日常的な用語を使用する: 専門用語や特殊な専門用語ではなく、日常的な一般的な言葉を選びます。特定の用語に対してモデルが期待どおりに応答しない場合は、より一般的な同義語で言い換えてみてください。
視覚的な入力を最適化します。
ズームインして詳細を確認する: 小さなオブジェクトや、広角ショットでは判別しにくいオブジェクトを扱う場合は、境界ボックス関数を使用して、対象のオブジェクトを分離します。その後、画像をこの選択範囲に切り抜き、新しいフォーカスされた画像をモデルに送信して、より詳細な分析を行うことができます。
照明と色を試す: モデルの認識は、照明条件が厳しい場合や色のコントラストが低い場合に影響を受ける可能性があります。
複雑な問題を小さなステップに分解します。各ステップを個別に処理することで、モデルをより正確で成功につながる結果に導くことができます。
コンセンサスを通じて精度を高めます。高い精度が求められるタスクでは、同じプロンプトを使用してモデルに複数回クエリを実行できます。返された結果を平均することで、多くの場合、より正確で信頼性の高い「コンセンサス」が得られます。
制限事項
Gemini Robotics-ER 1.6 で開発する際は、次の制限事項を考慮してください。
- プレビュー ステータス: 現在、このモデルはプレビュー版です。API と機能は変更される可能性があり、徹底的なテストを行わないと、本番環境で重要なアプリケーションには適さない可能性があります。
- レイテンシ: 複雑なクエリ、高解像度の入力、広範な
thinking_budgetは、処理時間の増加につながる可能性があります。 - ハルシネーション: すべての大規模言語モデルと同様に、Gemini Robotics-ER 1.6 は、特に曖昧なプロンプトや分布外の入力に対して、ハルシネーションを起こしたり、誤った情報を提供したりすることがあります。
- プロンプトの品質に依存: モデルの出力の品質は、入力プロンプトの明確さと具体性に大きく依存します。曖昧なプロンプトや構造化されていないプロンプトは、最適でない結果につながる可能性があります。
- 計算コスト: モデルを実行すると、特に動画入力や高い
thinking_budgetを使用すると、コンピューティング リソースが消費され、費用が発生します。詳細については、思考のページをご覧ください。 - 入力タイプ: 各モードの制限事項について詳しくは、以下のトピックをご覧ください。
プライバシーに関するお知らせ
お客様は、このドキュメントで言及されているモデル(「ロボティクス モデル」)が、お客様の指示に従ってハードウェアを操作し、移動するために動画データと音声データを活用することを認めます。そのため、音声、画像、肖像データなどの個人を特定できる人物のデータ(「個人データ」)がロボット モデルによって収集されるように、ロボット モデルを操作することがあります。個人データを収集する形でロボット モデルを運用することを選択した場合、Gemini API の追加利用規約(https://ai.google.dev/gemini-api/terms)に記載されているとおり、Google に個人データが提供され、Google がそれを使用する可能性があることを、識別可能な人物に十分に通知し、その人物が同意するまで、その人物がロボット モデルとやり取りしたり、ロボット モデルの周囲に立ち入ったりすることを許可しないことに同意するものとします。これには、「Google によるデータの使用方法」というセクションに記載されている内容も含まれます。お客様は、かかる通知が本規約に記載されているとおりの個人データの収集と使用を許可することを保証し、顔のぼかしなどの技術を使用したり、識別可能な人物が含まれないエリアでロボティクス モデルを運用したりするなど、商業上合理的な努力をもって、個人データの収集と配布を可能な限り最小限に抑えます。
料金
料金と利用可能なリージョンの詳細については、料金ページをご覧ください。
モデル バージョン
Robotics-ER 1.6 プレビュー版
| プロパティ | 説明 |
|---|---|
| モデルコード | gemini-robotics-er-1.6-preview |
| でサポートされるデータ型 |
入力 テキスト、画像、動画、音声 出力 テキスト |
| トークンの上限[*] |
入力トークンの上限 131,072 出力トークンの上限 65,536 |
| 機能 | サポート対象外 サポート対象 サポート対象 サポート対象 サポート対象 サポート対象 サポート対象 サポート対象外 サポート対象外 サポート対象 サポート対象 サポート対象 サポート対象 |
| 使用オプション |
サポート対象 サポート対象 サポート対象 |
| バージョン |
|
| 最終更新日 | 2025 年 12 月 |
| ナレッジ カットオフ | 2025 年 1 月 |
次のステップ
- 他の機能も試し、さまざまなプロンプトや入力を試して、Gemini Robotics-ER 1.6 の他の用途を見つけてください。他の例については、ロボティクスのスタートガイドの Colab をご覧ください。
- Gemini Robotics モデルが安全性を考慮して構築された方法については、Google DeepMind のロボット工学の安全性に関するページをご覧ください。
- Gemini Robotics モデルの最新情報については、Gemini Robotics のランディング ページをご覧ください。