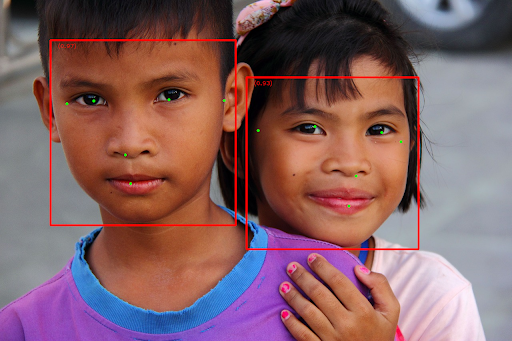
借助人脸检测器任务,您可以检测图片或视频中的人脸。您可以使用此任务在画面中定位人脸和面部特征。此任务使用可处理单张图片或连续图片流的机器学习 (ML) 模型。该任务会输出脸部位置以及以下面部关键点:左眼、右眼、鼻尖、嘴巴、左眼眉角和右眼眉角。
这些说明中介绍的代码示例可在 GitHub 上找到。您可以查看此Web 演示,了解此任务的实际运作方式。如需详细了解此任务的功能、模型和配置选项,请参阅概览。
代码示例
MediaPipe Tasks 示例代码是对适用于 iOS 的人脸检测器应用的简单实现。该示例使用实体 Android 设备上的摄像头检测连续视频流中的人脸。该应用还可以检测设备图库中的图片和视频中的面孔。
您可以将该应用用作您自己的 iOS 应用的起点,也可以在修改现有应用时参考该应用。人脸检测器示例代码托管在 GitHub 上。
下载代码
以下说明介绍了如何使用 git 命令行工具创建示例代码的本地副本。
如需下载示例代码,请执行以下操作:
使用以下命令克隆 Git 代码库:
git clone https://github.com/google-ai-edge/mediapipe-samples(可选)将您的 Git 实例配置为使用稀疏检出,以便您只保留 Face Detector 示例应用的文件:
cd mediapipe-samples
git sparse-checkout init --cone
git sparse-checkout set examples/face_detector/ios/
创建示例代码的本地版本后,您可以安装 MediaPipe 任务库,使用 Xcode 打开项目并运行应用。如需了解相关说明,请参阅 适用于 iOS 的设置指南。
关键组件
以下文件包含 Face Detector 示例应用的重要代码:
- FaceDetectorService.swift:初始化检测器、处理模型选择,并对输入数据运行推理。
- CameraViewController:为实时摄像头画面输入模式实现界面,并直观呈现检测结果。
- MediaLibraryViewController.swift:实现静态图片和视频文件输入模式的界面,并直观呈现检测结果。
设置
本部分介绍了设置开发环境和代码项目以使用人脸检测器的关键步骤。如需了解如何设置开发环境以使用 MediaPipe 任务(包括平台版本要求)的一般信息,请参阅 适用于 iOS 的设置指南。
依赖项
人脸检测器使用 MediaPipeTasksVision 库,该库必须使用 CocoaPods 安装。该库与 Swift 和 Objective-C 应用兼容,并且无需任何额外的语言专用设置。
如需了解如何在 macOS 上安装 CocoaPods,请参阅 CocoaPods 安装指南。如需了解如何创建包含应用所需 pod 的 Podfile,请参阅使用 CocoaPods。
使用以下代码在 Podfile 中添加 MediaPipeTasksVision pod:
target 'MyFaceDetectorApp' do
  use_frameworks!
  pod 'MediaPipeTasksVision'
end
如果您的应用包含单元测试目标,请参阅 iOS 设置指南,详细了解如何设置 Podfile。
型号
MediaPipe 人脸检测器任务需要与此任务兼容的训练模型。如需详细了解面部检测器的可用训练模型,请参阅任务概览的“模型”部分。
选择并下载模型,然后使用 Xcode 将其添加到项目目录中。 如需了解如何向 Xcode 项目添加文件,请参阅管理 Xcode 项目中的文件和文件夹。
使用 BaseOptions.modelAssetPath 属性指定 app bundle 中的模型路径。如需查看代码示例,请参阅下一部分。
创建任务
您可以通过调用其某个初始化程序来创建人脸检测器任务。FaceDetector(options:) 初始化程序接受配置选项的值。
如果您不需要使用自定义配置选项初始化人脸检测器,可以使用 FaceDetector(modelPath:) 初始化程序使用默认选项创建人脸检测器。如需详细了解配置选项,请参阅配置概览。
人脸检测器任务支持 3 种输入数据类型:静态图片、视频文件和实时视频流。默认情况下,FaceDetector(modelPath:) 会为静态图片初始化任务。如果您希望任务初始化以处理视频文件或实时视频串流,请使用 FaceDetector(options:) 指定视频或直播运行模式。直播模式还需要额外的 faceDetectorLiveStreamDelegate 配置选项,以便人脸检测器能够异步将人脸检测结果传递给代理。
选择与您的运行模式对应的标签页,了解如何创建任务并运行推理。
Swift
Image
import MediaPipeTasksVision

let modelPath = Bundle.main.path(forResource: "model",
                                      ofType: "tflite")

let options = FaceDetectorOptions()
options.baseOptions.modelAssetPath = modelPath
options.runningMode = .image

let faceDetector = try FaceDetector(options: options)
视频
import MediaPipeTasksVision

let modelPath = Bundle.main.path(forResource: "model",
                                      ofType: "tflite")

let options = FaceDetectorOptions()
options.baseOptions.modelAssetPath = modelPath
options.runningMode = .video

let faceDetector = try FaceDetector(options: options)
直播
import MediaPipeTasksVision

// Class that conforms to the `FaceDetectorLiveStreamDelegate` protocol and
// implements the method that the face detector calls once it finishes
// detecting faces in each input frame.
class FaceDetectorResultProcessor: NSObject, FaceDetectorLiveStreamDelegate {

  func faceDetector(
    _ faceDetector: FaceDetector,
    didFinishDetection result: FaceDetectorResult?,
    timestampInMilliseconds: Int,
    error: Error?) {

    // Process the face detection result or errors here.

  }
}

let modelPath = Bundle.main.path(
  forResource: "model",
  ofType: "tflite")

let options = FaceDetectorOptions()
options.baseOptions.modelAssetPath = modelPath
options.runningMode = .liveStream

// Assign an object of the class to the `faceDetectorLiveStreamDelegate`
// property.
let processor = FaceDetectorResultProcessor()
options.faceDetectorLiveStreamDelegate = processor

let faceDetector = try FaceDetector(options: options)
Objective-C
Image
@import MediaPipeTasksVision;

NSString *modelPath = [[NSBundle mainBundle] pathForResource:@"model"
                                                      ofType:@"tflite"];

MPPFaceDetectorOptions *options = [[MPPFaceDetectorOptions alloc] init];
options.baseOptions.modelAssetPath = modelPath;
options.runningMode = MPPRunningModeImage;

MPPFaceDetector *faceDetector =
      [[MPPFaceDetector alloc] initWithOptions:options error:nil];
视频
@import MediaPipeTasksVision;

NSString *modelPath = [[NSBundle mainBundle] pathForResource:@"model"
                                                      ofType:@"tflite"];

MPPFaceDetectorOptions *options = [[MPPFaceDetectorOptions alloc] init];
options.baseOptions.modelAssetPath = modelPath;
options.runningMode = MPPRunningModeVideo;

MPPFaceDetector *faceDetector =
      [[MPPFaceDetector alloc] initWithOptions:options error:nil];
直播
@import MediaPipeTasksVision; // Class that conforms to the `MPPFaceDetectorLiveStreamDelegate` protocol // and implements the method that the face detector calls once it finishes // detecting faces in each input frame. @interface APPFaceDetectorResultProcessor : NSObject@end @implementation APPFaceDetectorResultProcessor - (void)faceDetector:(MPPFaceDetector *)faceDetector didFinishDetectionWithResult:(MPPFaceDetectorResult *)faceDetectorResult timestampInMilliseconds:(NSInteger)timestampInMilliseconds error:(NSError *)error { // Process the face detector result or errors here. } @end NSString *modelPath = [[NSBundle mainBundle] pathForResource:@"model" ofType:@"tflite"]; MPPFaceDetectorOptions *options = [[MPPFaceDetectorOptions alloc] init]; options.baseOptions.modelAssetPath = modelPath; options.runningMode = MPPRunningModeLiveStream; // Assign an object of the class to the `faceDetectorLiveStreamDelegate` // property. APPFaceDetectorResultProcessor *processor = [APPFaceDetectorResultProcessor new]; options.faceDetectorLiveStreamDelegate = processor; MPPFaceDetector *faceDetector = [[MPPFaceDetector alloc] initWithOptions:options error:nil];
注意:如果您使用的是视频模式或直播模式,人脸检测器会使用跟踪功能,以避免在每个帧上触发检测模型,从而缩短延迟时间。
配置选项
此任务针对 iOS 应用提供了以下配置选项:
| 选项名称 | 说明 | 值范围 | 默认值 |
|---|---|---|---|
runningMode |
设置任务的运行模式。共有三种模式: IMAGE:适用于单张图片输入的模式。 视频:视频的解码帧的模式。 LIVE_STREAM:输入数据(例如来自摄像头)的直播模式。在此模式下,必须调用 resultListener 以设置监听器以异步接收结果。 |
{RunningMode.image, RunningMode.video, RunningMode.liveStream} |
RunningMode.image |
minDetectionConfidence |
人脸检测被视为成功所需的最低置信度得分。 | Float [0,1] |
0.5 |
minSuppressionThreshold |
人脸检测被视为重叠的最小非最大抑制阈值。 | Float [0,1] |
0.3 |
直播配置
将运行模式设置为直播时,人脸检测器需要额外的 faceDetectorLiveStreamDelegate 配置选项,以便人脸检测器异步提供检测结果。代理会实现 faceDetector(_:didFinishDetection:timestampInMilliseconds:error:) 方法,人脸检测器会在处理每个帧的人脸检测结果后调用该方法。
| 选项名称 | 说明 | 值范围 | 默认值 |
|---|---|---|---|
faceDetectorLiveStreamDelegate |
让人脸检测器能够在直播模式下异步接收人脸检测结果。将实例设置为此属性的类必须实现 faceDetector(_:didFinishDetection:timestampInMilliseconds:error:) 方法。 |
不适用 | 未设置 |
准备数据
您需要先将输入图片或帧转换为 MPImage 对象,然后才能将其传递给人脸检测器。MPImage 支持不同类型的 iOS 图片格式,并且可以在任何运行模式下使用这些格式进行推理。如需详细了解 MPImage,请参阅 MPImage API。
根据您的用例和应用所需的运行模式选择 iOS 图片格式。MPImage 接受 UIImage、CVPixelBuffer 和 CMSampleBuffer iOS 图片格式。
UIImage
UIImage 格式非常适合以下运行模式:
图片:应用 bundle、用户图库或文件系统中格式为
UIImage图片的图片可以转换为MPImage对象。视频:使用 AVAssetImageGenerator 将视频帧提取为 CGImage 格式,然后将其转换为
UIImage图片。
Swift
// Load an image on the user's device as an iOS `UIImage` object.

// Convert the `UIImage` object to a MediaPipe's Image object having the default
// orientation `UIImage.Orientation.up`.
let image = try MPImage(uiImage: image)
Objective-C
// Load an image on the user's device as an iOS `UIImage` object.

// Convert the `UIImage` object to a MediaPipe's Image object having the default
// orientation `UIImageOrientationUp`.
MPImage *image = [[MPPImage alloc] initWithUIImage:image error:nil];
该示例使用默认的 UIImage.Orientation.Up 方向初始化 MPImage。您可以使用任何受支持的 UIImage.Orientation 值初始化 MPImage。人脸检测器不支持镜像屏幕方向,例如 .upMirrored、.downMirrored、.leftMirrored、.rightMirrored。
如需详细了解 UIImage,请参阅 UIImage Apple 开发者文档。
CVPixelBuffer
CVPixelBuffer 格式非常适合生成帧并使用 iOS CoreImage 框架进行处理的应用。
CVPixelBuffer 格式非常适合以下运行模式:
图片:在图片运行模式下,使用 iOS 的
CoreImage框架进行一些处理后生成CVPixelBuffer图片的应用可以发送到人脸检测器。视频:视频帧可以转换为
CVPixelBuffer格式以进行处理,然后以视频模式发送到人脸检测器。直播:使用 iOS 相机生成帧的应用可能会先转换为
CVPixelBuffer格式进行处理,然后再以直播模式发送到人脸检测器。
Swift
// Obtain a CVPixelBuffer.

// Convert the `CVPixelBuffer` object to a MediaPipe's Image object having the default
// orientation `UIImage.Orientation.up`.
let image = try MPImage(pixelBuffer: pixelBuffer)
Objective-C
// Obtain a CVPixelBuffer.

// Convert the `CVPixelBuffer` object to a MediaPipe's Image object having the
// default orientation `UIImageOrientationUp`.
MPImage *image = [[MPPImage alloc] initWithUIImage:image error:nil];
如需详细了解 CVPixelBuffer,请参阅 CVPixelBuffer Apple 开发者文档。
CMSampleBuffer
CMSampleBuffer 格式用于存储统一媒体类型的媒体样本,非常适合直播运行模式。iOS 摄像头的实时帧由 iOS AVCaptureVideoDataOutput 以 CMSampleBuffer 格式异步传送。
Swift
// Obtain a CMSampleBuffer.

// Convert the `CMSampleBuffer` object to a MediaPipe's Image object having the default
// orientation `UIImage.Orientation.up`.
let image = try MPImage(sampleBuffer: sampleBuffer)
Objective-C
// Obtain a `CMSampleBuffer`.

// Convert the `CMSampleBuffer` object to a MediaPipe's Image object having the
// default orientation `UIImageOrientationUp`.
MPImage *image = [[MPPImage alloc] initWithSampleBuffer:sampleBuffer error:nil];
如需详细了解 CMSampleBuffer,请参阅 CMSampleBuffer Apple 开发者文档。
运行任务
如需运行人脸检测器,请使用特定于分配的运行模式的 detect() 方法:
- 静态图片:
detect(image:) - 视频:
detect(videoFrame:timestampInMilliseconds:) - 直播:
detectAsync(image:timestampInMilliseconds:)
人脸检测器会返回输入图片或帧中检测到的人脸。
以下代码示例展示了如何在这些不同的运行模式下运行人脸检测器的简单示例:
Swift
Image
let result = try faceDetector.detect(image: image)
视频
let result = try faceDetector.detect(
  videoFrame: image,
  timestampInMilliseconds: timestamp)
直播
try faceDetector.detectAsync(
  image: image,
  timestampInMilliseconds: timestamp)
Objective-C
Image
MPPFaceDetectorResult *result = [faceDetector detectInImage:image
                                                      error:nil];
视频
MPPFaceDetectorResult *result = [faceDetector detectInVideoFrame:image
                                         timestampInMilliseconds:timestamp
                                                           error:nil];
直播
BOOL success = [faceDetector detectAsyncInImage:image
                        timestampInMilliseconds:timestamp
                                          error:nil];
人脸检测器代码示例更详细地展示了 detect(image:)、detect(videoFrame:timestampInMilliseconds:) 和 detectAsync(image:timestampInMilliseconds:) 这三种模式的实现。示例代码允许用户在处理模式之间切换,但您的用例可能不需要这样做。
请注意以下几点:
在视频模式或直播模式下运行时,您还必须向人脸检测器任务提供输入帧的时间戳。
在图片或视频模式下运行时,人脸检测器任务会阻塞当前线程,直到其处理完输入图片或帧。为避免阻塞当前线程,请使用 iOS Dispatch 或 NSOperation 框架在后台线程中执行处理。
在直播模式下运行时,人脸检测器任务会立即返回,并且不会阻塞当前线程。它会在处理每个输入帧后,使用人脸检测结果调用
faceDetector(_:didFinishDetection:timestampInMilliseconds:error:)方法。人脸检测器会在专用串行调度队列上异步调用此方法。如需在界面上显示结果,请在处理结果后将结果分派到主队列。如果在人脸检测器任务忙于处理其他帧时调用detectAsync函数,人脸检测器会忽略新的输入帧。
处理和显示结果
运行推理后,人脸检测器任务会返回一个 FaceDetectorResult 对象,其中包含检测到的人脸的边界框以及每个检测到的人脸的置信度得分。
以下是此任务的输出数据示例:
FaceDetectionResult:
  Detections:
    Detection #0:
      BoundingBox:
        origin_x: 126
        origin_y: 100
        width: 463
        height: 463
      Categories:
        Category #0:
          index: 0
          score: 0.9729152917861938
      NormalizedKeypoints:
        NormalizedKeypoint #0:
          x: 0.18298381567001343
          y: 0.2961040139198303
        NormalizedKeypoint #1:
          x: 0.3302789330482483
          y: 0.29289937019348145
        ... (6 keypoints for each face)
    Detection #1:
      BoundingBox:
        origin_x: 616
        origin_y: 193
        width: 430
        height: 430
      Categories:
        Category #0:
          index: 0
          score: 0.9251380562782288
      NormalizedKeypoints:
        NormalizedKeypoint #0:
          x: 0.6151331663131714
          y: 0.3713381886482239
        NormalizedKeypoint #1:
          x: 0.7460576295852661
          y: 0.38825345039367676
        ... (6 keypoints for each face)
下图显示了任务输出的可视化结果:

如需查看没有边界框的图片,请参阅原始图片。
人脸检测器示例代码演示了如何显示结果。如需了解详情,请参阅代码示例。
