
MediaPipe Face Detector タスクを使用すると、画像や動画内の顔を検出できます。このタスクを使用すると、フレーム内の顔と顔の特徴を検出できます。このタスクでは、単一の画像または連続した画像ストリームを処理する ML モデルを使用します。このタスクは、顔の位置と、左目、右目、鼻先、口、左目の耳珠点、右目の耳珠点の顔のキーポイントを出力します。
これらの手順で説明するコードサンプルは GitHub で入手できます。このタスクの機能、モデル、構成オプションの詳細については、概要をご覧ください。
サンプルコード
顔検出器のサンプルコードには、このタスクの Python での完全な実装が示されています。このコードは、このタスクをテストし、独自の顔検出機能の作成を開始するのに役立ちます。ウェブブラウザのみを使用して、顔検出器のサンプルコードを表示、実行、編集できます。
Raspberry Pi 用に顔検出器を実装する場合は、Raspberry Pi の例アプリをご覧ください。
セットアップ
このセクションでは、Face Detector を使用するように開発環境とコード プロジェクトを設定する主な手順について説明します。プラットフォーム バージョンの要件など、MediaPipe タスクを使用する開発環境の設定に関する一般的な情報については、Python の設定ガイドをご覧ください。
パッケージ
MediaPipe Face Detector タスクには、mediapipe PyPI パッケージが必要です。これらの依存関係は、次のコマンドを使用してインストールしてインポートできます。
$ python -m pip install mediapipe
インポート
次のクラスをインポートして、Face Detector タスク関数にアクセスします。
import mediapipe as mp
from mediapipe.tasks import python
from mediapipe.tasks.python import vision
モデル
MediaPipe フェイス検出タスクには、このタスクに対応したトレーニング済みモデルが必要です。Face Detector で使用可能なトレーニング済みモデルの詳細については、タスクの概要のモデルのセクションをご覧ください。
モデルを選択してダウンロードし、ローカル ディレクトリに保存します。
model_path = '/absolute/path/to/face_detector.task'
BaseOptions オブジェクトの model_asset_path パラメータを使用して、使用するモデルのパスを指定します。コード例については、次のセクションをご覧ください。
タスクを作成する
MediaPipe Face Detector タスクは、create_from_options 関数を使用してタスクを設定します。create_from_options 関数は、処理する構成オプションの値を受け入れます。構成オプションの詳細については、構成オプションをご覧ください。
次のコードは、このタスクをビルドして構成する方法を示しています。
これらのサンプルでは、画像、動画ファイル、ライブ配信のタスクの作成方法の違いも示しています。
画像
import mediapipe as mp

BaseOptions = mp.tasks.BaseOptions
FaceDetector = mp.tasks.vision.FaceDetector
FaceDetectorOptions = mp.tasks.vision.FaceDetectorOptions
VisionRunningMode = mp.tasks.vision.RunningMode

# Create a face detector instance with the image mode:
options = FaceDetectorOptions(
    base_options=BaseOptions(model_asset_path='/path/to/model.task'),
    running_mode=VisionRunningMode.IMAGE)
with FaceDetector.create_from_options(options) as detector:
  # The detector is initialized. Use it here.
  # ...
動画
import mediapipe as mp

BaseOptions = mp.tasks.BaseOptions
FaceDetector = mp.tasks.vision.FaceDetector
FaceDetectorOptions = mp.tasks.vision.FaceDetectorOptions
VisionRunningMode = mp.tasks.vision.RunningMode

# Create a face detector instance with the video mode:
options = FaceDetectorOptions(
    base_options=BaseOptions(model_asset_path='/path/to/model.task'),
    running_mode=VisionRunningMode.VIDEO)
with FaceDetector.create_from_options(options) as detector:
  # The detector is initialized. Use it here.
  # ...
ライブ配信
import mediapipe as mp

BaseOptions = mp.tasks.BaseOptions
FaceDetector = mp.tasks.vision.FaceDetector
FaceDetectorOptions = mp.tasks.vision.FaceDetectorOptions
FaceDetectorResult = mp.tasks.vision.FaceDetectorResult
VisionRunningMode = mp.tasks.vision.RunningMode

# Create a face detector instance with the live stream mode:
def print_result(result: FaceDetectorResult, output_image: mp.Image, timestamp_ms: int):
    print('face detector result: {}'.format(result))

options = FaceDetectorOptions(
    base_options=BaseOptions(model_asset_path='/path/to/model.task'),
    running_mode=VisionRunningMode.LIVE_STREAM,
    result_callback=print_result)
with FaceDetector.create_from_options(options) as detector:
  # The detector is initialized. Use it here.
  # ...
画像で使用する顔検出ツールを作成する完全な例については、コード例をご覧ください。
設定オプション
このタスクには、Python アプリケーション用の次の構成オプションがあります。
| オプション名 | 説明 | 値の範囲 | デフォルト値 |
|---|---|---|---|
running_mode |
タスクの実行モードを設定します。モードは次の 3 つです。 IMAGE: 単一画像入力のモード。 動画: 動画のデコードされたフレームのモード。 LIVE_STREAM: カメラなどからの入力データのライブ配信モード。このモードでは、resultListener を呼び出して、結果を非同期で受信するリスナーを設定する必要があります。 |
{IMAGE, VIDEO, LIVE_STREAM} |
IMAGE |
min_detection_confidence |
顔検出が成功とみなされるための最小信頼スコア。 | Float [0,1] |
0.5 |
min_suppression_threshold |
顔検出が重複と見なされる最小の非最大抑制しきい値。 | Float [0,1] |
0.3 |
result_callback |
顔検出器がライブ配信モードの場合に、検出結果を非同期で受信するように結果リスナーを設定します。実行モードが LIVE_STREAM に設定されている場合にのみ使用できます。 |
N/A |
Not set |
データの準備
入力を画像ファイルまたは NumPy 配列として準備し、mediapipe.Image オブジェクトに変換します。入力が動画ファイルまたはウェブカメラからのライブ配信の場合は、OpenCV などの外部ライブラリを使用して、入力フレームを numpy 配列として読み込むことができます。
画像
import mediapipe as mp

# Load the input image from an image file.
mp_image = mp.Image.create_from_file('/path/to/image')

# Load the input image from a numpy array.
mp_image = mp.Image(image_format=mp.ImageFormat.SRGB, data=numpy_image)
動画
import mediapipe as mp

# Use OpenCV’s VideoCapture to load the input video.

# Load the frame rate of the video using OpenCV’s CV_CAP_PROP_FPS
# You’ll need it to calculate the timestamp for each frame.

# Loop through each frame in the video using VideoCapture#read()

# Convert the frame received from OpenCV to a MediaPipe’s Image object.
mp_image = mp.Image(image_format=mp.ImageFormat.SRGB, data=numpy_frame_from_opencv)
ライブ配信
import mediapipe as mp

# Use OpenCV’s VideoCapture to start capturing from the webcam.

# Create a loop to read the latest frame from the camera using VideoCapture#read()

# Convert the frame received from OpenCV to a MediaPipe’s Image object.
mp_image = mp.Image(image_format=mp.ImageFormat.SRGB, data=numpy_frame_from_opencv)
タスクを実行する
フェイス検出機能は、detect、detect_for_video、detect_async 関数を使用して推論をトリガーします。顔検出の場合、これは入力データの前処理と画像内の顔の検出を伴います。
次のコードは、タスクモデルを使用して処理を実行する方法を示しています。
画像
# Perform face detection on the provided single image.
# The face detector must be created with the image mode.
face_detector_result = detector.detect(mp_image)
動画
# Perform face detection on the provided single image.
# The face detector must be created with the video mode.
face_detector_result = detector.detect_for_video(mp_image, frame_timestamp_ms)
ライブ配信
# Send live image data to perform face detection.
# The results are accessible via the `result_callback` provided in
# the `FaceDetectorOptions` object.
# The face detector must be created with the live stream mode.
detector.detect_async(mp_image, frame_timestamp_ms)
次の点にご注意ください。
- 動画モードまたはライブ配信モードで実行する場合は、Face Detector タスクに入力フレームのタイムスタンプも指定します。
- 画像モデルまたは動画モデルで実行する場合、顔検出タスクは、入力画像またはフレームの処理が完了するまで現在のスレッドをブロックします。
- ライブ配信モードで実行すると、顔検出タスクはすぐに返され、現在のスレッドはブロックされません。入力フレームの処理が完了するたびに、検出結果とともに結果リスナーが呼び出されます。顔検出タスクが別のフレームの処理でビジー状態になっているときに検出関数が呼び出されると、タスクは新しい入力フレームを無視します。
画像で Face Detector を実行する完全な例については、コードサンプルをご覧ください。
結果を処理して表示する
Face Detector は、検出の実行ごとに FaceDetectorResult オブジェクトを返します。結果オブジェクトには、検出された顔の境界ボックスと、検出された各顔の信頼スコアが含まれます。
このタスクの出力データの例を次に示します。
FaceDetectionResult:
  Detections:
    Detection #0:
      BoundingBox:
        origin_x: 126
        origin_y: 100
        width: 463
        height: 463
      Categories:
        Category #0:
          index: 0
          score: 0.9729152917861938
      NormalizedKeypoints:
        NormalizedKeypoint #0:
          x: 0.18298381567001343
          y: 0.2961040139198303
        NormalizedKeypoint #1:
          x: 0.3302789330482483
          y: 0.29289937019348145
        ... (6 keypoints for each face)
    Detection #1:
      BoundingBox:
        origin_x: 616
        origin_y: 193
        width: 430
        height: 430
      Categories:
        Category #0:
          index: 0
          score: 0.9251380562782288
      NormalizedKeypoints:
        NormalizedKeypoint #0:
          x: 0.6151331663131714
          y: 0.3713381886482239
        NormalizedKeypoint #1:
          x: 0.7460576295852661
          y: 0.38825345039367676
        ... (6 keypoints for each face)
次の図は、タスク出力の可視化を示しています。
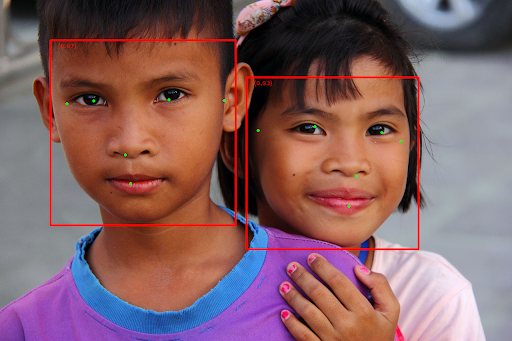
境界ボックスのない画像については、元の画像をご覧ください。
顔検出のサンプルコードは、タスクから返された結果を表示する方法を示しています。詳細については、コードサンプルをご覧ください。