ফাংশন কলিং আপনাকে মডেলকে বাহ্যিক টুল এবং এপিআই-এর সাথে সংযুক্ত করতে দেয়। টেক্সট রেসপন্স তৈরি করার পরিবর্তে, মডেলই নির্ধারণ করে কখন নির্দিষ্ট ফাংশন কল করতে হবে এবং বাস্তব জগতের কাজ সম্পাদনের জন্য প্রয়োজনীয় প্যারামিটার সরবরাহ করে। এটি মডেলকে স্বাভাবিক ভাষা এবং বাস্তব জগতের কাজ ও ডেটার মধ্যে একটি সেতু হিসেবে কাজ করতে সক্ষম করে। ফাংশন কলিংয়ের ৩টি প্রধান ব্যবহার রয়েছে:
- পদক্ষেপ নিন: এপিআই (API) ব্যবহার করে বাহ্যিক সিস্টেমের সাথে যোগাযোগ করুন, যেমন—অ্যাপয়েন্টমেন্ট নির্ধারণ করা, ইনভয়েস তৈরি করা, ইমেল পাঠানো বা স্মার্ট হোম ডিভাইস নিয়ন্ত্রণ করা।
- জ্ঞান বৃদ্ধি করুন: ডেটাবেস, এপিআই এবং নলেজ বেসের মতো বাহ্যিক উৎস থেকে তথ্য সংগ্রহ করুন।
- কার্যক্ষমতা বৃদ্ধি করুন: গণনা সম্পাদন করতে এবং মডেলের সীমাবদ্ধতা বাড়াতে বাহ্যিক সরঞ্জাম ব্যবহার করুন, যেমন ক্যালকুলেটর ব্যবহার করা বা চার্ট তৈরি করা।
আপনি নিচে এই ব্যবহারগুলোর উদাহরণ দেখতে পারেন:
মিটিংয়ের সময়সূচী নির্ধারণ করুন
এই উদাহরণটি দেখায় কিভাবে এমন একটি ফাংশন সংজ্ঞায়িত করতে হয় যা একটি নির্দিষ্ট সময়ে অংশগ্রহণকারীদের সাথে একটি মিটিং নির্ধারণ করে, এবং যা মডেলটিকে ব্যবহারকারীর অনুরোধ পার্স করতে ও বাহ্যিক সিস্টেমে অ্যাকশন ট্রিগার করার জন্য স্ট্রাকচার্ড আর্গুমেন্ট ফেরত দিতে সক্ষম করে।
পাইথন
from google import genai

schedule_meeting_function = {
    "type": "function",
    "name": "schedule_meeting",
    "description": "Schedules a meeting with specified attendees at a given time and date.",
    "parameters": {
        "type": "object",
        "properties": {
            "attendees": {"type": "array", "items": {"type": "string"}},
            "date": {"type": "string", "description": "Date (e.g., '2024-07-29')"},
            "time": {"type": "string", "description": "Time (e.g., '15:00')"},
            "topic": {"type": "string", "description": "The meeting topic."},
        },
        "required": ["attendees", "date", "time", "topic"],
    },
}

client = genai.Client()

interaction = client.interactions.create(
    model="gemini-3.5-flash",
    input="Schedule a meeting with Bob and Alice for 03/14/2025 at 10:00 AM about Q3 planning.",
    tools=[{"type": "function", **schedule_meeting_function}],
)

for step in interaction.steps:
    if step.type == "function_call":
        print(f"Function to call: {step.name}")
        print(f"Arguments: {step.arguments}")
জাভাস্ক্রিপ্ট
import { GoogleGenAI } from '@google/genai';

const client = new GoogleGenAI({});

const scheduleMeetingFunction = {
  type: 'function',
  name: 'schedule_meeting',
  description: 'Schedules a meeting with specified attendees at a given time and date.',
  parameters: {
    type: 'object',
    properties: {
      attendees: { type: 'array', items: { type: 'string' } },
      date: { type: 'string', description: 'Date (e.g., "2024-07-29")' },
      time: { type: 'string', description: 'Time (e.g., "15:00")' },
      topic: { type: 'string', description: 'The meeting topic.' },
    },
    required: ['attendees', 'date', 'time', 'topic'],
  },
};

const interaction = await client.interactions.create({
  model: 'gemini-3.5-flash',
  input: 'Schedule a meeting with Bob and Alice for 03/27/2025 at 10:00 AM about Q3 planning.',
  tools: [scheduleMeetingFunction],
});

for (const step of interaction.steps) {
  if (step.type === 'function_call') {
    console.log(`Function to call: ${step.name}`);
    console.log(`Arguments: ${JSON.stringify(step.arguments)}`);
  }
}
বিশ্রাম
curl -X POST "https://generativelanguage.googleapis.com/v1beta/interactions" \
  -H "x-goog-api-key: $GEMINI_API_KEY" \
  -H 'Content-Type: application/json' \
  -d '{
    "model": "gemini-3.5-flash",
    "input": "Schedule a meeting with Bob and Alice for 03/27/2025 at 10:00 AM about Q3 planning.",
    "tools": [{
        "type": "function",
        "name": "schedule_meeting",
        "description": "Schedules a meeting with specified attendees at a given time and date.",
        "parameters": {
          "type": "object",
          "properties": {
            "attendees": {"type": "array", "items": {"type": "string"}},
            "date": {"type": "string"},
            "time": {"type": "string"},
            "topic": {"type": "string"}
          },
          "required": ["attendees", "date", "time", "topic"]
        }
    }]
  }'
আবহাওয়া পান
এই উদাহরণটি দেখায় কিভাবে কোনো একটি স্থানের তাপমাত্রার ডেটা সংগ্রহ করার জন্য একটি ফাংশন সংজ্ঞায়িত করতে হয়, যা মডেলটিকে রিয়েল-টাইম বা বাহ্যিক তথ্যের প্রয়োজন এমন কোয়েরির উত্তর দেওয়ার জন্য এক্সটার্নাল এপিআই কল করতে সক্ষম করে।
পাইথন
from google import genai

weather_function = {
    "type": "function",
    "name": "get_current_temperature",
    "description": "Gets the current temperature for a given location.",
    "parameters": {
        "type": "object",
        "properties": {
            "location": {
                "type": "string",
                "description": "The city name, e.g. San Francisco",
            },
        },
        "required": ["location"],
    },
}

client = genai.Client()

interaction = client.interactions.create(
    model="gemini-3.5-flash",
    input="What's the temperature in London?",
    tools=[weather_function],
)

for step in interaction.steps:
    if step.type == "function_call":
        print(f"Function to call: {step.name}")
        print(f"Arguments: {step.arguments}")
জাভাস্ক্রিপ্ট
import { GoogleGenAI } from '@google/genai';

const client = new GoogleGenAI({});

const weatherFunctionDeclaration = {
  type: 'function',
  name: 'get_current_temperature',
  description: 'Gets the current temperature for a given location.',
  parameters: {
    type: 'object',
    properties: {
      location: {
        type: 'string',
        description: 'The city name, e.g. San Francisco',
      },
    },
    required: ['location'],
  },
};

const interaction = await client.interactions.create({
  model: 'gemini-3.5-flash',
  input: "What's the temperature in London?",
  tools: [weatherFunctionDeclaration],
});

for (const step of interaction.steps) {
  if (step.type === 'function_call') {
    console.log(`Function to call: ${step.name}`);
    console.log(`Arguments: ${JSON.stringify(step.arguments)}`);
  }
}
বিশ্রাম
curl -X POST "https://generativelanguage.googleapis.com/v1beta/interactions" \
  -H "x-goog-api-key: $GEMINI_API_KEY" \
  -H 'Content-Type: application/json' \
  -d '{
    "model": "gemini-3.5-flash",
    "input": "What'\''s the temperature in London?",
    "tools": [{
      "type": "function",
      "name": "get_current_temperature",
      "description": "Gets the current temperature for a given location.",
      "parameters": {
        "type": "object",
        "properties": {
          "location": {"type": "string", "description": "The city name"}
        },
        "required": ["location"]
      }
    }]
  }'
চার্ট তৈরি করুন
এই উদাহরণটি দেখায় কিভাবে স্ট্রাকচার্ড ডেটা থেকে একটি বার চার্ট তৈরি করার জন্য একটি ফাংশন সংজ্ঞায়িত করতে হয় এবং এটি প্রদর্শন করে যে, মডেলটি কীভাবে গণনা সম্পাদন করতে বা ভিজ্যুয়াল অ্যাসেট তৈরি করতে বাহ্যিক টুল ব্যবহার করতে পারে:
পাইথন
from google import genai

create_chart_function = {
    "type": "function",
    "name": "create_bar_chart",
    "description": "Creates a bar chart given a title, labels, and values.",
    "parameters": {
        "type": "object",
        "properties": {
            "title": {"type": "string", "description": "The title for the chart."},
            "labels": {"type": "array", "items": {"type": "string"}},
            "values": {"type": "array", "items": {"type": "number"}},
        },
        "required": ["title", "labels", "values"],
    },
}

client = genai.Client()

interaction = client.interactions.create(
    model="gemini-3.5-flash",
    input="Create a bar chart titled 'Quarterly Sales' with Q1: 50000, Q2: 75000, Q3: 60000.",
    tools=[create_chart_function],
)

for step in interaction.steps:
    if step.type == "function_call":
        print(f"Function to call: {step.name}")
        print(f"Arguments: {step.arguments}")
জাভাস্ক্রিপ্ট
import { GoogleGenAI } from '@google/genai';

const client = new GoogleGenAI({});

const createChartFunctionDeclaration = {
  type: 'function',
  name: 'create_bar_chart',
  description: 'Creates a bar chart given a title, labels, and values.',
  parameters: {
    type: 'object',
    properties: {
      title: { type: 'string', description: 'The title for the chart.' },
      labels: { type: 'array', items: { type: 'string' } },
      values: { type: 'array', items: { type: 'number' } },
    },
    required: ['title', 'labels', 'values'],
  },
};

const interaction = await client.interactions.create({
  model: 'gemini-3.5-flash',
  input: "Create a bar chart titled 'Quarterly Sales' with Q1: 50000, Q2: 75000, Q3: 60000.",
  tools: [createChartFunctionDeclaration],
});

for (const step of interaction.steps) {
  if (step.type === 'function_call') {
    console.log(`${step.name}(${JSON.stringify(step.arguments)})`);
  }
}
বিশ্রাম
curl -X POST "https://generativelanguage.googleapis.com/v1beta/interactions" \
  -H "x-goog-api-key: $GEMINI_API_KEY" \
  -H 'Content-Type: application/json' \
  -d '{
    "model": "gemini-3.5-flash",
    "input": "Create a bar chart titled '\''Quarterly Sales'\'' with Q1: 50000, Q2: 75000, Q3: 60000.",
    "tools": [{
        "type": "function",
        "name": "create_bar_chart",
        "description": "Creates a bar chart given a title, labels, and values.",
        "parameters": {
          "type": "object",
          "properties": {
            "title": {"type": "string"},
            "labels": {"type": "array", "items": {"type": "string"}},
            "values": {"type": "array", "items": {"type": "number"}}
          },
          "required": ["title", "labels", "values"]
        }
    }]
  }'
ফাংশন কলিং কীভাবে কাজ করে
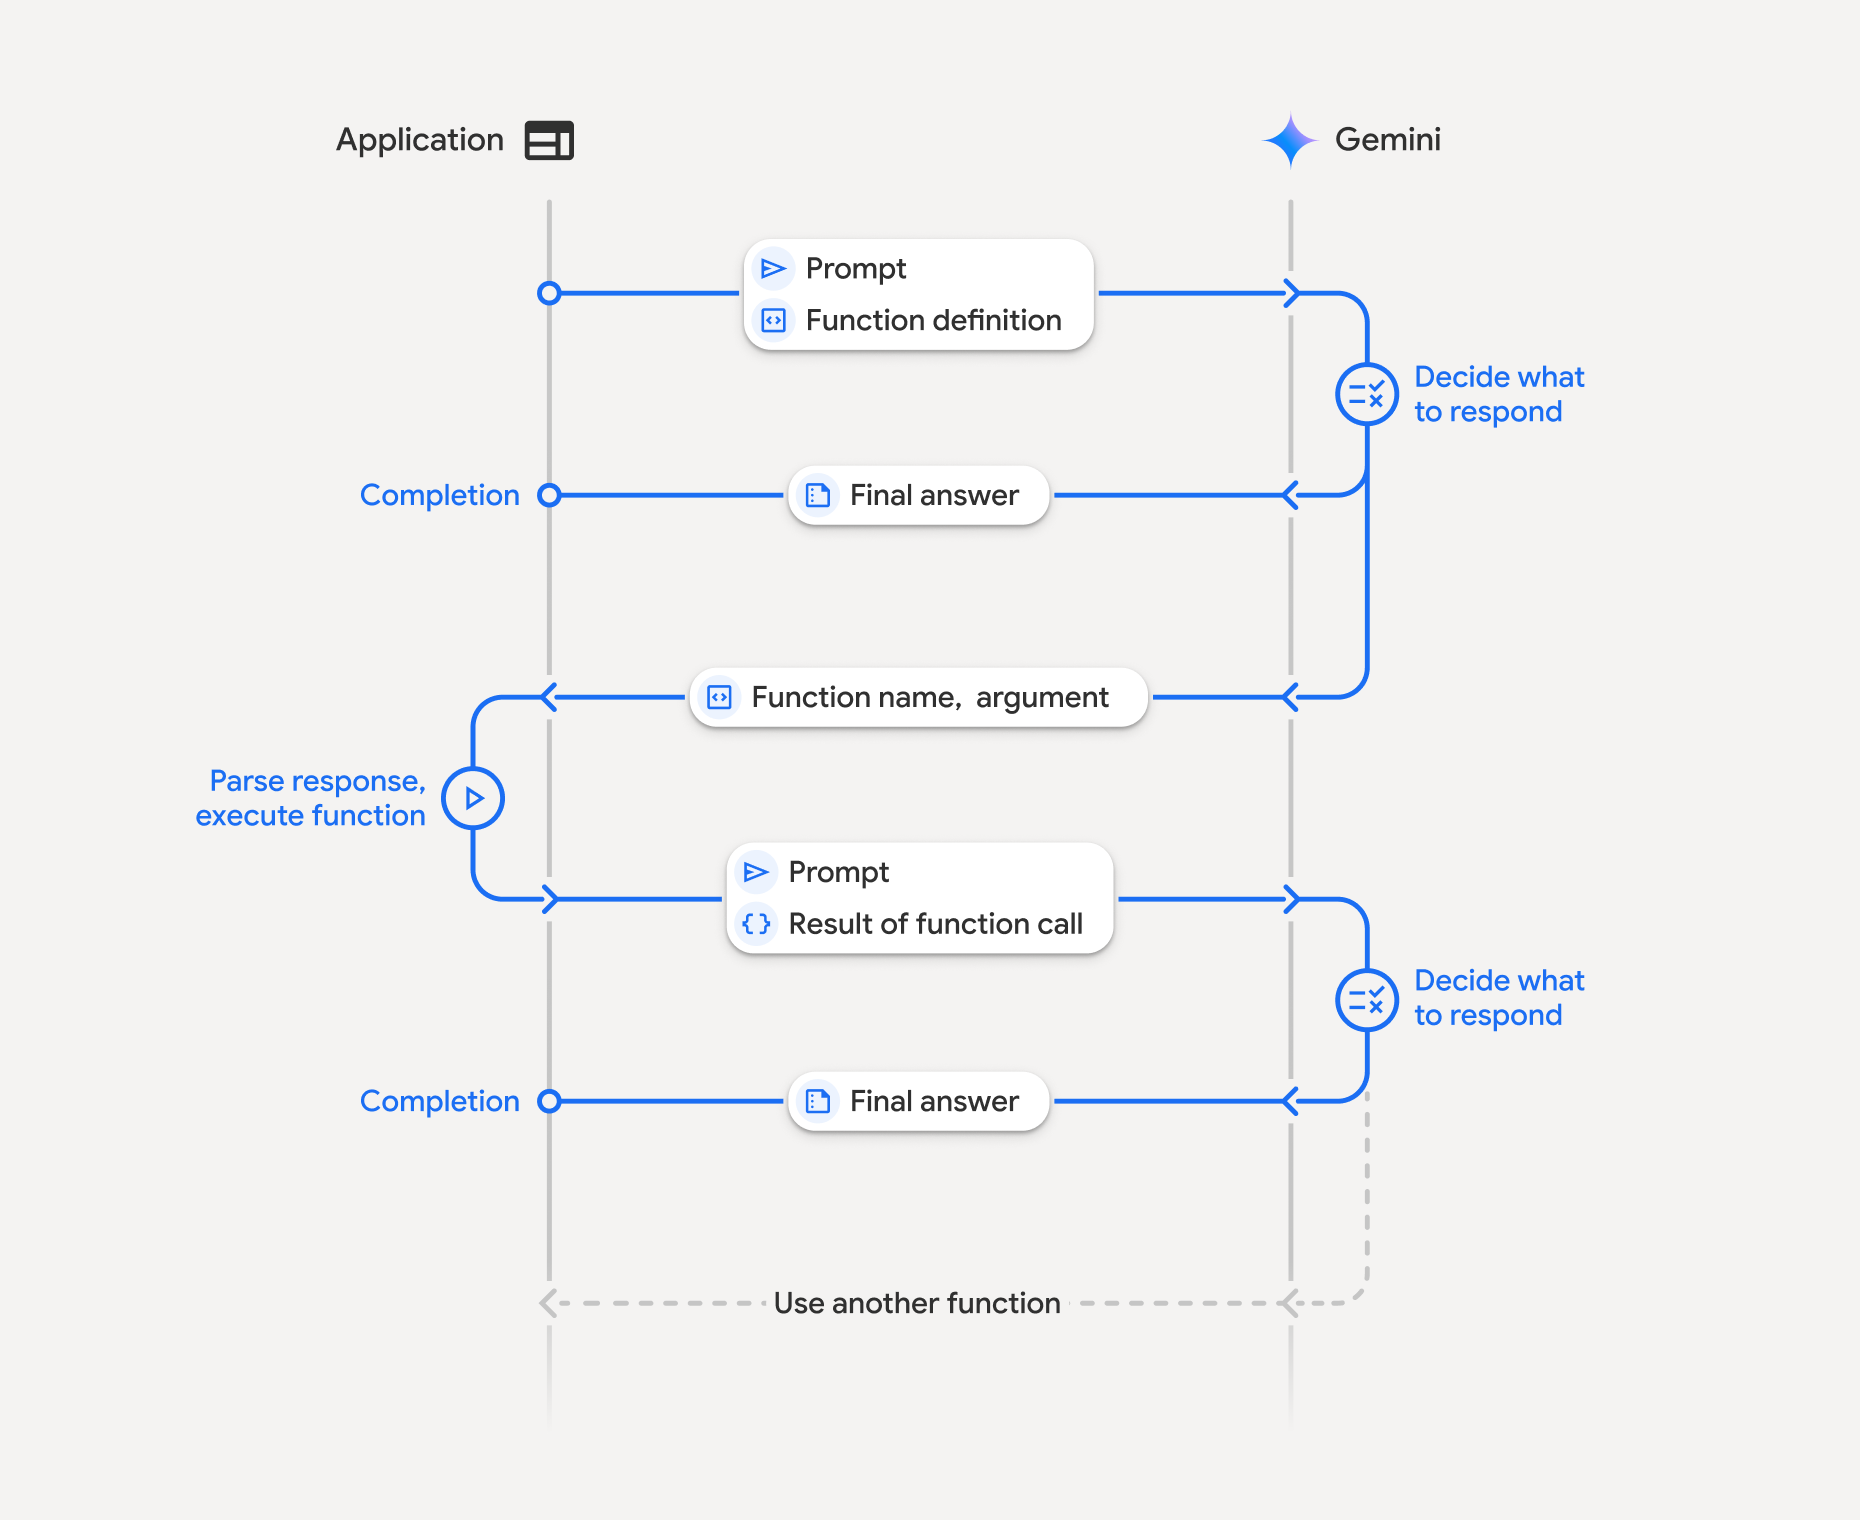
ফাংশন কলিং-এর সাথে আপনার অ্যাপ্লিকেশন, মডেল এবং বাহ্যিক ফাংশনগুলোর মধ্যে একটি কাঠামোগত মিথস্ক্রিয়া জড়িত থাকে:
- ফাংশন ঘোষণা নির্ধারণ: মডেলে ফাংশনের নাম, প্যারামিটার এবং উদ্দেশ্য নির্ধারণ করুন।
- ফাংশন ডিক্লারেশন সহ LLM কল করুন: ব্যবহারকারীর প্রম্পট সহ ফাংশন ডিক্লারেশন(গুলি) মডেলে পাঠান।
- ফাংশন কোড নির্বাহ করা (আপনার দায়িত্ব): মডেলটি নিজে ফাংশনটি নির্বাহ করে না । এর নাম এবং আর্গুমেন্টগুলো বের করে আপনার অ্যাপ্লিকেশনে নির্বাহ করুন।
- ব্যবহারকারী-বান্ধব প্রতিক্রিয়া তৈরি করুন: একটি চূড়ান্ত ও ব্যবহারকারী-বান্ধব প্রতিক্রিয়ার জন্য ফলাফলটি মডেলে ফেরত পাঠান।
এই প্রক্রিয়াটি একাধিক টার্নে পুনরাবৃত্তি করা যেতে পারে। মডেলটি একটি টার্নে একাধিক ফাংশন কল করা ( প্যারালাল ফাংশন কলিং ) এবং ক্রমানুসারে ( কম্পোজিশনাল ফাংশন কলিং ) সমর্থন করে।
ধাপ ১: একটি ফাংশন ডিক্লারেশন সংজ্ঞায়িত করুন।
পাইথন
set_light_values_declaration = {
    "type": "function",
    "name": "set_light_values",
    "description": "Sets the brightness and color temperature of a light.",
    "parameters": {
        "type": "object",
        "properties": {
            "brightness": {
                "type": "integer",
                "description": "Light level from 0 to 100",
            },
            "color_temp": {
                "type": "string",
                "enum": ["daylight", "cool", "warm"],
                "description": "Color temperature",
            },
        },
        "required": ["brightness", "color_temp"],
    },
}

def set_light_values(brightness: int, color_temp: str) -> dict:
    """Set the brightness and color temperature of a room light."""
    return {"brightness": brightness, "colorTemperature": color_temp}
জাভাস্ক্রিপ্ট
const setLightValuesTool = {
  type: 'function',
  name: 'set_light_values',
  description: 'Sets the brightness and color temperature of a light.',
  parameters: {
    type: 'object',
    properties: {
      brightness: { type: 'number', description: 'Light level from 0 to 100' },
      color_temp: { type: 'string', enum: ['daylight', 'cool', 'warm'] },
    },
    required: ['brightness', 'color_temp'],
  },
};

function setLightValues(brightness, color_temp) {
  return { brightness: brightness, colorTemperature: color_temp };
}
ধাপ ২: ফাংশন ডিক্লারেশনের মাধ্যমে মডেলটিকে কল করুন
পাইথন
from google import genai

client = genai.Client()

interaction = client.interactions.create(
    model="gemini-3.5-flash",
    input="Turn the lights down to a romantic level",
    tools=[set_light_values_declaration],
)

fc_step = next(s for s in interaction.steps if s.type == "function_call")
print(fc_step)
জাভাস্ক্রিপ্ট
import { GoogleGenAI } from '@google/genai';

const client = new GoogleGenAI({});

const interaction = await client.interactions.create({
  model: 'gemini-3.5-flash',
  input: 'Turn the lights down to a romantic level',
  tools: [setLightValuesTool],
});

const fcStep = interaction.steps.find(s => s.type === 'function_call');
console.log(fcStep);
মডেলটি type , name , এবং arguments সহ একটি function_call ধাপ ফেরত দেয়:
type='function_call'
name='set_light_values'
arguments={'color_temp': 'warm', 'brightness': 25}
ধাপ ৩: ফাংশনটি সম্পাদন করুন
পাইথন
fc_step = next(s for s in interaction.steps if s.type == "function_call")

if fc_step.name == "set_light_values":
    result = set_light_values(**fc_step.arguments)
    print(f"Function execution result: {result}")
জাভাস্ক্রিপ্ট
const fcStep = interaction.steps.find(s => s.type === 'function_call');

let result;
if (fcStep.name === 'set_light_values') {
  result = setLightValues(fcStep.arguments.brightness, fcStep.arguments.color_temp);
  console.log(`Function execution result: ${JSON.stringify(result)}`);
}
ধাপ ৪: ফলাফল মডেলে ফেরত পাঠান
পাইথন
final_interaction = client.interactions.create(
    model="gemini-3.5-flash",
    input=[
        {
            "type": "function_result",
            "name": fc_step.name,
            "call_id": fc_step.id,
            "result": [{"type": "text", "text": json.dumps(result)}],
        }
    ],
    tools=[set_light_values_declaration],
    previous_interaction_id=interaction.id,
)

print(final_interaction.output_text)
জাভাস্ক্রিপ্ট
const finalInteraction = await client.interactions.create({
  model: 'gemini-3.5-flash',
  input: [{
    type: 'function_result',
    name: fcStep.name,
    call_id: fcStep.id,
    result: [{ type: 'text', text: JSON.stringify(result) }]
  }],
  tools: [setLightValuesTool],
  previous_interaction_id: interaction.id,
});

console.log(finalInteraction.output_text);
স্টেটলেস ফাংশন কলিং
আপনি ক্লায়েন্ট সাইডে কথোপকথনের ইতিহাস পরিচালনা করে এবং store=false সেট করার মাধ্যমেও স্টেটলেস মোডে ফাংশন কলিং ব্যবহার করতে পারেন।
স্টেটলেস মোডে, আপনাকে প্রতিটি পরবর্তী অনুরোধের input ফিল্ডে কথোপকথনের সম্পূর্ণ ইতিহাস অবশ্যই প্রদান করতে হবে। এই ইতিহাসে অবশ্যই অন্তর্ভুক্ত থাকতে হবে: ১. প্রাথমিক user_input ধাপ। ২. টার্ন ১-এ ফেরত আসা মডেল-জেনারেটেড সমস্ত ধাপ ( thought এবং function_call ধাপ সহ), ঠিক যেভাবে গ্রহণ করা হয়েছে সেভাবেই। ৩. function_result ধাপ, যেখানে আপনার সম্পাদিত ফাংশনের আউটপুট থাকবে।
পাইথন
from google import genai
import json

client = genai.Client()

history = [
    {
        "type": "user_input",
        "content": [{"type": "text", "text": "Turn the lights down to a romantic level"}]
    }
]

interaction = client.interactions.create(
    model="gemini-3.5-flash",
    store=False,
    input=history,
    tools=[set_light_values_declaration],
)

for step in interaction.steps:
    history.append(step.model_dump())

fc_step = next(s for s in interaction.steps if s.type == "function_call")
if fc_step.name == "set_light_values":
    result = set_light_values(**fc_step.arguments)

history.append({
    "type": "function_result",
    "name": fc_step.name,
    "call_id": fc_step.id,
    "result": [{"type": "text", "text": json.dumps(result)}],
})

final_interaction = client.interactions.create(
    model="gemini-3.5-flash",
    store=False,
    input=history,
    tools=[set_light_values_declaration],
)

print(final_interaction.output_text)
জাভাস্ক্রিপ্ট
import { GoogleGenAI } from "@google/genai";

const client = new GoogleGenAI({});

async function main() {
  const history = [
    {
      type: "user_input",
      content: [{ type: "text", text: "Turn the lights down to a romantic level" }]
    }
  ];

  const interaction = await client.interactions.create({
    model: "gemini-3.5-flash",
    store: false,
    input: history,
    tools: [setLightValuesTool],
  });

  history.push(...interaction.steps);

  const fcStep = interaction.steps.find(s => s.type === 'function_call');
  let result;
  if (fcStep.name === 'set_light_values') {
    result = setLightValues(fcStep.arguments.brightness, fcStep.arguments.color_temp);
  }

  history.push({
    type: 'function_result',
    name: fcStep.name,
    call_id: fcStep.id,
    result: [{ type: 'text', text: JSON.stringify(result) }]
  });

  const finalInteraction = await client.interactions.create({
    model: 'gemini-3.5-flash',
    store: false,
    input: history,
    tools: [setLightValuesTool],
  });

  console.log(finalInteraction.output_text);
}

await main();
বিশ্রাম
# Turn 1: Send request with tools and store: false
RESPONSE1=$(curl -s -X POST "https://generativelanguage.googleapis.com/v1beta/interactions" \
  -H "x-goog-api-key: $GEMINI_API_KEY" \
  -H 'Content-Type: application/json' \
  -d '{
    "model": "gemini-3.5-flash",
    "store": false,
    "input": [
      {
        "type": "user_input",
        "content": "Turn the lights down to a romantic level"
      }
    ],
    "tools": [{
      "type": "function",
      "name": "set_light_values",
      "description": "Sets the brightness and color temperature of a light.",
      "parameters": {
        "type": "object",
        "properties": {
          "brightness": {"type": "integer", "description": "Light level from 0 to 100"},
          "color_temp": {"type": "string", "enum": ["daylight", "cool", "warm"]}
        },
        "required": ["brightness", "color_temp"]
      }
    }]
  }')

# Extract model steps (thought, function_call)
MODEL_STEPS=$(echo "$RESPONSE1" | jq '.steps')

# Extract function call details to execute
FC_NAME=$(echo "$RESPONSE1" | jq -r '.steps[] | select(.type=="function_call") | .name')
FC_ID=$(echo "$RESPONSE1" | jq -r '.steps[] | select(.type=="function_call") | .id')

# Assume local execution returns: {"brightness": 25, "colorTemperature": "warm"}
RESULT="{\"brightness\": 25, \"colorTemperature\": \"warm\"}"

# Reconstruct history for Turn 2
HISTORY=$(jq -n \
  --argjson first_input '[{"type": "user_input", "content": "Turn the lights down to a romantic level"}]' \
  --argjson model_steps "$MODEL_STEPS" \
  --arg fc_name "$FC_NAME" \
  --arg fc_id "$FC_ID" \
  --arg result "$RESULT" \
  '$first_input + $model_steps + [{"type": "function_result", "name": $fc_name, "call_id": $fc_id, "result": [{"type": "text", "text": $result}]}]')

# Turn 2: Send the full history
curl -X POST "https://generativelanguage.googleapis.com/v1beta/interactions" \
  -H "x-goog-api-key: $GEMINI_API_KEY" \
  -H 'Content-Type: application/json' \
  -d "{
    \"model\": \"gemini-3.5-flash\",
    \"store\": false,
    \"input\": $HISTORY,
    \"tools\": [{
      \"type\": \"function\",
      \"name\": \"set_light_values\",
      \"description\": \"Sets the brightness and color temperature of a light.\",
      \"parameters\": {
        \"type\": \"object\",
        \"properties\": {
          \"brightness\": {\"type\": \"integer\"},
          \"color_temp\": {\"type\": \"string\"}
        },
        \"required\": [\"brightness\", \"color_temp\"]
      }
    }]
  }"
ফাংশন ঘোষণা
একটি ফাংশন ডিক্লারেশন একটি টুল হিসেবে পাস করা হয় এবং এতে অন্তর্ভুক্ত থাকে:
-
type(স্ট্রিং): কাস্টম ফাংশনের জন্য অবশ্যই"function"হতে হবে। -
name(স্ট্রিং): ফাংশনের অনন্য নাম (আন্ডারস্কোর বা ক্যামেলকেস ব্যবহার করুন)। -
description(string): ফাংশনটির উদ্দেশ্যের সুস্পষ্ট ব্যাখ্যা। -
parameters(অবজেক্ট): ফাংশনটি যে ইনপুট প্যারামিটারগুলো প্রত্যাশা করে।-
type(string): সামগ্রিক ডেটা টাইপ, যেমনobject। -
properties(অবজেক্ট): টাইপ এবং বিবরণ সহ স্বতন্ত্র প্যারামিটারসমূহ। -
required(array): আবশ্যিক প্যারামিটার নামসমূহ।
-
চিন্তাশীল মডেল ব্যবহার করে ফাংশন কলিং
জেমিনি ৩ সিরিজের মডেলগুলো একটি অভ্যন্তরীণ "চিন্তন" প্রক্রিয়া ব্যবহার করে যা ফাংশন কলিং উন্নত করে। এসডিকেগুলো স্বয়ংক্রিয়ভাবে আপনার জন্য থট সিগনেচার পরিচালনা করে।
সমান্তরাল ফাংশন কলিং
একাধিক ফাংশনকে একবারে কল করুন যখন তারা স্বাধীন:
পাইথন
power_disco_ball = {"type": "function", "name": "power_disco_ball", "description": "Powers the disco ball.",
    "parameters": {"type": "object", "properties": {"power": {"type": "boolean"}}, "required": ["power"]}}
start_music = {"type": "function", "name": "start_music", "description": "Play music.",
    "parameters": {"type": "object", "properties": {"energetic": {"type": "boolean"}, "loud": {"type": "boolean"}}, "required": ["energetic", "loud"]}}
dim_lights = {"type": "function", "name": "dim_lights", "description": "Dim the lights.",
    "parameters": {"type": "object", "properties": {"brightness": {"type": "number"}}, "required": ["brightness"]}}

client = genai.Client()

interaction = client.interactions.create(
    model="gemini-3.5-flash",
    input="Turn this place into a party!",
    tools=[power_disco_ball, start_music, dim_lights],
    generation_config={"tool_choice": "any"},
)

for step in interaction.steps:
    if step.type == "function_call":
        args = ", ".join(f"{key}={val}" for key, val in step.arguments.items())
        print(f"{step.name}({args})")
জাভাস্ক্রিপ্ট
const powerDiscoBall = { type: 'function', name: 'power_disco_ball', description: 'Powers the disco ball.',
  parameters: { type: 'object', properties: { power: { type: 'boolean' } }, required: ['power'] } };
const startMusic = { type: 'function', name: 'start_music', description: 'Play music.',
  parameters: { type: 'object', properties: { energetic: { type: 'boolean' }, loud: { type: 'boolean' } }, required: ['energetic', 'loud'] } };
const dimLights = { type: 'function', name: 'dim_lights', description: 'Dim the lights.',
  parameters: { type: 'object', properties: { brightness: { type: 'number' } }, required: ['brightness'] } };

const interaction = await client.interactions.create({
  model: 'gemini-3.5-flash',
  input: 'Turn this place into a party!',
  tools: [powerDiscoBall, startMusic, dimLights],
  generation_config: { tool_choice: 'any' },
});

for (const step of interaction.steps) {
  if (step.type === 'function_call') {
    console.log(`${step.name}(${JSON.stringify(step.arguments)})`);
  }
}
বিশ্রাম
curl -X POST "https://generativelanguage.googleapis.com/v1beta/interactions" \
  -H "x-goog-api-key: $GEMINI_API_KEY" \
  -H 'Content-Type: application/json' \
  -d '{
    "model": "gemini-3.5-flash",
    "input": "Turn this place into a party!",
    "tools": [
      {
        "type": "function",
        "name": "power_disco_ball",
        "description": "Powers the disco ball.",
        "parameters": {
          "type": "object",
          "properties": {
            "power": {"type": "boolean"}
          },
          "required": ["power"]
        }
      },
      {
        "type": "function",
        "name": "start_music",
        "description": "Play music.",
        "parameters": {
          "type": "object",
          "properties": {
            "energetic": {"type": "boolean"},
            "loud": {"type": "boolean"}
          },
          "required": ["energetic", "loud"]
        }
      },
      {
        "type": "function",
        "name": "dim_lights",
        "description": "Dim the lights.",
        "parameters": {
          "type": "object",
          "properties": {
            "brightness": {"type": "number"}
          },
          "required": ["brightness"]
        }
      }
    ]
  }'
গঠনমূলক ফাংশন কলিং
জটিল অনুরোধের জন্য একাধিক ফাংশন কল একসাথে সংযুক্ত করুন (যেমন, প্রথমে অবস্থান জানুন, তারপর সেই অবস্থানের আবহাওয়া জানুন)।
পাইথন
get_weather_forecast_declaration = {
    "type": "function",
    "name": "get_weather_forecast",
    "description": "Gets the current weather temperature for a given location.",
    "parameters": {
        "type": "object",
        "properties": {
            "location": {"type": "string", "description": "The location"},
        },
        "required": ["location"],
    },
}

set_thermostat_temperature_declaration = {
    "type": "function",
    "name": "set_thermostat_temperature",
    "description": "Sets the thermostat to a desired temperature.",
    "parameters": {
        "type": "object",
        "properties": {
            "temperature": {
                "type": "integer",
                "description": "The temperature in Celsius",
            },
        },
        "required": ["temperature"],
    },
}

client = genai.Client()

interaction = client.interactions.create(
    model="gemini-3.5-flash",
    input="If it's warmer than 20°C in London, set the thermostat to 20°C, otherwise 18°C.",
    tools=[
        get_weather_forecast_declaration,
        set_thermostat_temperature_declaration,
    ],
)

for step in interaction.steps:
    if step.type == "function_call":
        print(f"Function to call: {step.name}")
        print(f"Arguments: {step.arguments}")
    elif hasattr(step, "content") and step.content:
         for part in step.content:
             if hasattr(part, "text"):
                 print(part.text)
জাভাস্ক্রিপ্ট
import { GoogleGenAI } from '@google/genai';

const client = new GoogleGenAI({});

const getWeatherForecastTool = {
  type: 'function',
  name: 'get_weather_forecast',
  description: 'Gets the current weather temperature for a given location.',
  parameters: {
    type: 'object',
    properties: {
      location: { type: 'string', description: 'The location' },
    },
    required: ['location'],
  },
};

const setThermostatTemperatureTool = {
  type: 'function',
  name: 'set_thermostat_temperature',
  description: 'Sets the thermostat to a desired temperature.',
  parameters: {
    type: 'object',
    properties: {
      temperature: {
        type: 'integer',
        description: 'The temperature in Celsius',
      },
    },
    required: ['temperature'],
  },
};

const interaction = await client.interactions.create({
  model: 'gemini-3.5-flash',
  input: "If it's warmer than 20°C in London, set the thermostat to 20°C, otherwise 18°C.",
  tools: [
    getWeatherForecastTool,
    setThermostatTemperatureTool,
  ],
});

for (const step of interaction.steps) {
  if (step.type === 'function_call') {
    console.log(`Function to call: ${step.name}`);
    console.log(`Arguments: ${JSON.stringify(step.arguments)}`);
  } else if (step.content) {
    for (const part of step.content) {
      if (part.text) {
        console.log(part.text);
      }
    }
  }
}
বিশ্রাম
curl -X POST "https://generativelanguage.googleapis.com/v1beta/interactions" \
  -H "x-goog-api-key: $GEMINI_API_KEY" \
  -H 'Content-Type: application/json' \
  -d '{
    "model": "gemini-3.5-flash",
    "input": "If it'\''s warmer than 20°C in London, set the thermostat to 20°C, otherwise 18°C.",
    "tools": [
      {
        "type": "function",
        "name": "get_weather_forecast",
        "description": "Gets the current weather temperature for a given location.",
        "parameters": {
          "type": "object",
          "properties": {
            "location": {"type": "string"}
          },
          "required": ["location"]
        }
      },
      {
        "type": "function",
        "name": "set_thermostat_temperature",
        "description": "Sets the thermostat to a desired temperature.",
        "parameters": {
          "type": "object",
          "properties": {
            "temperature": {"type": "integer"}
          },
          "required": ["temperature"]
        }
      }
    ]
  }'
ফাংশন কলিং মোড
generation_config এ tool_choice ব্যবহার করে মডেলটি কীভাবে টুল ব্যবহার করবে তা নিয়ন্ত্রণ করুন:
-
auto(ডিফল্ট): মডেল কোনো ফাংশন কল করবে নাকি সরাসরি সাড়া দেবে, তা সে নিজেই সিদ্ধান্ত নেয়। -
any: মডেলটি সর্বদা একটি ফাংশন কল প্রেডিক্ট করতে সীমাবদ্ধ। -
none: মডেলটির ফাংশন কল করা নিষিদ্ধ। validated(প্রিভিউ): মডেলটি ফাংশন স্কিমার প্রতিপালন নিশ্চিত করে।
পাইথন
generation_config = {
    "tool_choice": {
        "allowed_tools": {
            "mode": "any",
            "tools": ["get_current_temperature"]
        }
    }
}
জাভাস্ক্রিপ্ট
const generation_config = {
  tool_choice: {
    allowed_tools: {
      mode: 'any',
      tools: ['get_current_temperature']
    }
  }
};
বিশ্রাম
curl -X POST "https://generativelanguage.googleapis.com/v1beta/interactions" \
  -H "x-goog-api-key: $GEMINI_API_KEY" \
  -H 'Content-Type: application/json' \
  -d '{
    "model": "gemini-3.5-flash",
    "input": "What is the temperature in Boston?",
    "tools": [{
      "type": "function",
      "name": "get_current_temperature",
      "description": "Gets the current temperature for a given location.",
      "parameters": {
        "type": "object",
        "properties": {
          "location": {"type": "string"}
        },
        "required": ["location"]
      }
    }],
    "generation_config": {
      "tool_choice": {
        "allowed_tools": {
          "mode": "any",
          "tools": ["get_current_temperature"]
        }
      }
    }
  }'
মাল্টি-টুল ব্যবহার
আপনি একই অনুরোধে বিল্ট-ইন টুল এবং ফাংশন কলিং একত্রিত করে একাধিক টুল সক্রিয় করতে পারেন। জেমিনি ৩ মডেলগুলো ইন্টারঅ্যাকশন-এ বিল্ট-ইন টুল এবং ফাংশন কলিং স্বয়ংক্রিয়ভাবে একত্রিত করতে পারে। previous_interaction_id পাস করলে বিল্ট-ইন টুলের কনটেক্সট স্বয়ংক্রিয়ভাবে আবর্তিত হয়।
পাইথন
from google import genai
import json

client = genai.Client()

get_weather = {
    "type": "function",
    "name": "get_weather",
    "description": "Gets the weather for a requested city.",
    "parameters": {
        "type": "object",
        "properties": {
            "city": {
                "type": "string",
                "description": "The city and state, e.g. Utqiaġvik, Alaska",
            },
        },
        "required": ["city"],
    },
}

tools = [
    {"type": "google_search"},
    get_weather
]

interaction = client.interactions.create(
    model="gemini-3.5-flash",
    input="What is the northernmost city in the United States? What's the weather like there today?",
    tools=tools
)

for step in interaction.steps:
    if step.type == "function_call":
        print(f"Function call: {step.name} (ID: {step.id})")
        result = {"response": "Very cold. 22 degrees Fahrenheit."}
        interaction_2 = client.interactions.create(
            model="gemini-3.5-flash",
            previous_interaction_id=interaction.id,
            tools=tools,
            input=[{
                "type": "function_result",
                "name": step.name,
                "call_id": step.id,
                "result": [{"type": "text", "text": json.dumps(result)}]
            }]
        )

        print(interaction_2.output_text)
জাভাস্ক্রিপ্ট
import { GoogleGenAI } from '@google/genai';

const client = new GoogleGenAI({});

const weatherTool = {
    type: 'function',
    name: 'get_weather',
    description: 'Gets the weather for a given location.',
    parameters: {
        type: 'object',
        properties: {
            location: { type: 'string', description: 'The city and state, e.g. San Francisco, CA' }
        },
        required: ['location']
    }
};

const tools = [
    {type: 'google_search'}, // Built-in tool
    weatherTool
];

let interaction = await client.interactions.create({
    model: 'gemini-3.5-flash',
    input: "What is the northernmost city in the United States? What's the weather like there today?",
    tools: tools
});

for (const step of interaction.steps) {
    if (step.type === 'function_call') {
        console.log(`Function call: ${step.name} (ID: ${step.id})`);
        const result = {response: "Very cold. 22 degrees Fahrenheit."};
        const interaction_2 = await client.interactions.create({
            model: 'gemini-3.5-flash',
            previous_interaction_id: interaction.id,
            tools: tools,
            input: [{
                type: 'function_result',
                name: step.name,
                call_id: step.id,
                result: [{ type: 'text', text: JSON.stringify(result) }]
            }]
        });

        console.log(interaction_2.output_text);
    }
}
বিশ্রাম
# Turn 1: Send request with built-in google_search tool and custom weather tool
curl -X POST "https://generativelanguage.googleapis.com/v1beta/interactions" \
  -H "x-goog-api-key: $GEMINI_API_KEY" \
  -H 'Content-Type: application/json' \
  -d '{
    "model": "gemini-3.5-flash",
    "input": "What is the northernmost city in the United States? What'\''s the weather like there today?",
    "tools": [
      {"type": "google_search"},
      {
        "type": "function",
        "name": "get_weather",
        "description": "Gets the weather for a given location.",
        "parameters": {
          "type": "object",
          "properties": {
            "location": {"type": "string", "description": "The city and state, e.g. San Francisco, CA"}
          },
          "required": ["location"]
        }
      }
    ]
  }'

# Turn 2: Provide function result and pass previous_interaction_id
curl -X POST "https://generativelanguage.googleapis.com/v1beta/interactions" \
  -H "x-goog-api-key: $GEMINI_API_KEY" \
  -H 'Content-Type: application/json' \
  -d '{
    "model": "gemini-3.5-flash",
    "previous_interaction_id": "INTERACTION_ID",
    "tools": [
      {"type": "google_search"},
      {
        "type": "function",
        "name": "get_weather",
        "description": "Gets the weather for a given location.",
        "parameters": {
          "type": "object",
          "properties": {
            "location": {"type": "string", "description": "The city and state, e.g. San Francisco, CA"}
          },
          "required": ["location"]
        }
      }
    ],
    "input": [
      {
        "type": "function_result",
        "name": "get_weather",
        "call_id": "call_123",
        "result": [{"type": "text", "text": "{\"response\": \"Very cold. 22 degrees Fahrenheit.\"}"}]
      }
    ]
  }'
মাল্টিমোডাল ফাংশন প্রতিক্রিয়া
জেমিনি ৩ সিরিজের মডেলগুলোর ক্ষেত্রে, আপনি মডেলে পাঠানো ফাংশন রেসপন্স অংশে মাল্টিমোডাল কন্টেন্ট অন্তর্ভুক্ত করতে পারেন। মডেলটি তার পরবর্তী ধাপে এই মাল্টিমোডাল কন্টেন্টটি প্রসেস করে আরও তথ্যসমৃদ্ধ একটি প্রতিক্রিয়া তৈরি করতে পারে।
ফাংশন রেসপন্সে মাল্টিমোডাল ডেটা অন্তর্ভুক্ত করতে, ` function_result স্টেপের ` result ফিল্ডে এটিকে এক বা একাধিক কন্টেন্ট ব্লক হিসেবে যোগ করুন। প্রতিটি কন্টেন্ট ব্লকে অবশ্যই এর type (যেমন, "text" , "image" ) উল্লেখ করতে হবে।
নিম্নলিখিত উদাহরণটি দেখায় কিভাবে একটি ইন্টারঅ্যাকশনের সময় ছবির ডেটা সম্বলিত একটি ফাংশন প্রতিক্রিয়া মডেলে ফেরত পাঠাতে হয়:
পাইথন
import base64
from google import genai
import requests

client = genai.Client()

tool_call = next(s for s in interaction.steps if s.type == "function_call")

image_path = "https://goo.gle/instrument-img"
image_bytes = requests.get(image_path).content

base64_image_data = base64.b64encode(image_bytes).decode("utf-8")

final_interaction = client.interactions.create(
    model="gemini-3.5-flash",
    previous_interaction_id=interaction.id,
    input=[
        {
            "type": "function_result",
            "name": tool_call.name,
            "call_id": tool_call.id,
            "result": [
                {"type": "text", "text": "instrument.jpg"},
                {
                    "type": "image",
                    "mime_type": "image/jpeg",
                    "data": base64_image_data,
                },
            ],
        }
    ],
)

print(final_interaction.output_text)
জাভাস্ক্রিপ্ট
import { GoogleGenAI } from "@google/genai";

const client = new GoogleGenAI({});

const toolCall = interaction.steps.find(s => s.type === 'function_call');

const base64ImageData = "BASE64_IMAGE_DATA";

const finalInteraction = await client.interactions.create({
    model: 'gemini-3.5-flash',
    previous_interaction_id: interaction.id,
    input: [{
        type: 'function_result',
        name: toolCall.name,
        call_id: toolCall.id,
        result: [
            { type: 'text', text: 'instrument.jpg' },
            {
                type: 'image',
                mime_type: 'image/jpeg',
                data: base64ImageData,
            }
        ]
    }]
});

console.log(finalInteraction.output_text);
বিশ্রাম
curl -X POST "https://generativelanguage.googleapis.com/v1beta/interactions" \
  -H "x-goog-api-key: $GEMINI_API_KEY" \
  -H 'Content-Type: application/json' \
  -d '{
    "model": "gemini-3.5-flash",
    "previous_interaction_id": "INTERACTION_ID",
    "input": [
      {
        "type": "function_result",
        "name": "get_image",
        "call_id": "call_123",
        "result": [
          {"type": "text", "text": "instrument.jpg"},
          {
            "type": "image",
            "mime_type": "image/jpeg",
            "data": "BASE64_IMAGE_DATA"
          }
        ]
      }
    ]
  }'
স্ট্রাকচার্ড আউটপুট সহ ফাংশন কলিং
জেমিনি ৩ সিরিজের মডেলগুলোর ক্ষেত্রে, সামঞ্জস্যপূর্ণ বিন্যাসের প্রতিক্রিয়া পেতে ফাংশন কলিংয়ের সাথে স্ট্রাকচার্ড আউটপুটকে একত্রিত করুন।
রিমোট এমসিপি (মডেল কনটেক্সট প্রোটোকল)
মডেলটিকে বাহ্যিক টুল ও পরিষেবা ব্যবহারের সুযোগ দেওয়ার জন্য ইন্টারঅ্যাকশনস এপিআই দূরবর্তী এমসিপি সার্ভারের সাথে সংযোগ স্থাপন সমর্থন করে। আপনি টুলস কনফিগারেশনে সার্ভারের name এবং url প্রদান করেন।
রিমোট এমসিপি ব্যবহার করার সময় নিম্নলিখিত সীমাবদ্ধতাগুলো সম্পর্কে সচেতন থাকুন:
- সার্ভারের প্রকারভেদ : রিমোট এমসিপি শুধুমাত্র স্ট্রিমেবল এইচটিটিপি সার্ভারের সাথে কাজ করে। এসএসই (সার্ভার-সেন্ট ইভেন্টস) সার্ভার সমর্থিত নয়।
- নামকরণ : MCP সার্ভারের নামে
-অক্ষরটি অন্তর্ভুক্ত করা উচিত নয়। এর পরিবর্তেsnake_caseসার্ভারের নাম ব্যবহার করুন।
| মাঠ | প্রকার | প্রয়োজনীয় | বর্ণনা |
|---|---|---|---|
type | string | হ্যাঁ | অবশ্যই "mcp_server" হতে হবে। |
name | string | না | এমসিপি সার্ভারের জন্য একটি প্রদর্শিত নাম। |
url | string | না | এমসিপি সার্ভার এন্ডপয়েন্টের সম্পূর্ণ ইউআরএল। |
headers | object | না | সার্ভারে প্রতিটি অনুরোধের সাথে HTTP হেডার হিসেবে পাঠানো কী-ভ্যালু পেয়ার (উদাহরণস্বরূপ, অথেনটিকেশন টোকেন)। |
allowed_tools | array | না | এজেন্ট সার্ভার থেকে কোন কোন টুল কল করতে পারবে তা সীমাবদ্ধ করুন। |
উদাহরণ
পাইথন
from google import genai

client = genai.Client()

interaction = client.interactions.create(
    model="gemini-3.5-flash",
    input="Check the weather in San Francisco.",
    tools=[
        {
            "type": "mcp_server",
            "name": "weather",
            "url": "https://gemini-api-demos.uc.r.appspot.com/mcp",
        }
    ]
)
জাভাস্ক্রিপ্ট
import { GoogleGenAI } from '@google/genai';

const client = new GoogleGenAI({});

const interaction = await client.interactions.create({
    model: 'gemini-3.5-flash',
    input: 'Check the weather in San Francisco.',
    tools: [
        {
            type: 'mcp_server',
            name: 'weather',
            url: 'https://gemini-api-demos.uc.r.appspot.com/mcp'
        }
    ]
});
বিশ্রাম
curl -X POST "https://generativelanguage.googleapis.com/v1beta/interactions" \
  -H "Content-Type: application/json" \
  -H "x-goog-api-key: $GEMINI_API_KEY" \
-d '{
    "model": "gemini-3.5-flash",
    "input": "Check the weather in San Francisco.",
    "tools": [
        {
            "type": "mcp_server",
            "name": "weather",
            "url": "https://gemini-api-demos.uc.r.appspot.com/mcp"
        }
    ]
}'
স্ট্রিম টুল কল
স্ট্রিমিং সহ টুল ব্যবহার করার সময়, মডেলটি স্ট্রিমে step.delta ইভেন্টের একটি ক্রম হিসাবে ফাংশন কল তৈরি করে। টুল আর্গুমেন্টগুলিকে arguments ব্যবহার করে আংশিক আর্গুমেন্ট হিসাবে স্ট্রিম করা যেতে পারে। টুল কলগুলি কার্যকর করার আগে, সম্পূর্ণ কলগুলি পুনর্গঠন করতে আপনাকে অবশ্যই এই ডেল্টাগুলিকে একত্রিত করতে হবে।
পাইথন
import json
from google import genai

client = genai.Client()

weather_tool = {
    "type": "function",
    "name": "get_weather",
    "description": "Gets the weather for a given location.",
    "parameters": {
        "type": "object",
        "properties": {
            "location": {"type": "string", "description": "The city and state"}
        },
        "required": ["location"]
    }
}

stream = client.interactions.create(
    model="gemini-3.5-flash",
    input="What is the weather in Paris?",
    tools=[weather_tool],
    stream=True
)

current_calls = {}
tool_calls = []

for event in stream:
    if event.event_type == "step.start":
        if event.step.type == "function_call":
            current_calls[event.index] = {
                "id": event.step.id,
                "name": event.step.name,
                "arguments": ""
            }
            if hasattr(event.step, "arguments") and event.step.arguments:
                if isinstance(event.step.arguments, dict):
                    current_calls[event.index]["arguments"] = json.dumps(event.step.arguments)
                else:
                    current_calls[event.index]["arguments"] = event.step.arguments
    elif event.event_type == "step.delta":
        if event.delta.type == "arguments":
            if event.index in current_calls:
                current_calls[event.index]["arguments"] += event.delta.partial_arguments
        elif event.delta.type == "text":
            print(event.delta.text, end="", flush=True)

    elif event.event_type == "interaction.completed":
        for index, call in current_calls.items():
            args = call["arguments"]
            if args:
                args = json.loads(args)
            else:
                args = {}

            tool_calls.append({
                "type": "function_call",
                "id": call["id"],
                "name": call["name"],
                "arguments": args
            })

        print(f"\nFinal tool calls ready to execute:")
        print(json.dumps(tool_calls, indent=2))
জাভাস্ক্রিপ্ট
import { GoogleGenAI } from '@google/genai';

const client = new GoogleGenAI({});

const weatherTool = {
    type: 'function',
    name: 'get_weather',
    description: 'Gets the weather for a given location.',
    parameters: {
        type: 'object',
        properties: {
            location: { type: 'string', description: 'The city and state' }
        },
        required: ['location']
    }
};

const stream = await client.interactions.create({
    model: 'gemini-3.5-flash',
    input: 'What is the weather in Paris?',
    tools: [weatherTool],
    stream: true,
});

const currentCalls = new Map();
let toolCalls = [];

for await (const event of stream) {
    const evType = event.event_type;
    if (evType === 'step.start') {
        if (event.step.type === 'function_call') {
            currentCalls.set(event.index, {
                id: event.step.id,
                name: event.step.name,
                arguments: ''
            });
            if (event.step.arguments) {
                if (typeof event.step.arguments === 'object') {
                    currentCalls.get(event.index).arguments = JSON.stringify(event.step.arguments);
                } else {
                    currentCalls.get(event.index).arguments = event.step.arguments;
                }
            }
        }
    } else if (evType === 'step.delta') {
        if (event.delta.type === 'arguments') {
            if (currentCalls.has(event.index)) {
                currentCalls.get(event.index).arguments += event.delta.partial_arguments;
            }
        } else if (event.delta.type === 'text') {
            process.stdout.write(event.delta.text);
        }
    } else if (evType === 'interaction.completed' || evType === 'interaction.complete') {
        toolCalls = Array.from(currentCalls.values()).map(call => ({
            type: 'function_call',
            id: call.id,
            name: call.name,
            arguments: call.arguments ? JSON.parse(call.arguments) : {}
        }));
        console.log('\nFinal tool calls ready to execute:');
        console.log(JSON.stringify(toolCalls, null, 2));
    }
}
বিশ্রাম
curl -X POST "https://generativelanguage.googleapis.com/v1beta/interactions?alt=sse" \
  -H "Content-Type: application/json" \
  -H "x-goog-api-key: $GEMINI_API_KEY" \
-d '{
    "model": "gemini-3.5-flash",
    "input": "What is the weather in Paris?",
    "tools": [{
        "type": "function",
        "name": "get_weather",
        "description": "Gets the weather for a given location.",
        "parameters": {
            "type": "object",
            "properties": {
                "location": {"type": "string", "description": "The city and state"}
            },
            "required": ["location"]
        }
    }],
    "stream": true
}'
সর্বোত্তম অনুশীলন
- ফাংশন ও প্যারামিটারের বিবরণ: স্পষ্ট ও সুনির্দিষ্ট হোন।
- নামকরণ: কোনো স্পেস বা বিশেষ অক্ষর ছাড়া বর্ণনামূলক নাম ব্যবহার করুন।
- স্ট্রং টাইপিং: নির্দিষ্ট টাইপ (পূর্ণসংখ্যা, স্ট্রিং, এনাম) ব্যবহার করুন।
- টুল নির্বাচন: সর্বোচ্চ ১০-২০টি টুল সক্রিয় রাখুন।
- প্রম্পট ইঞ্জিনিয়ারিং: প্রাসঙ্গিক তথ্য ও নির্দেশনা প্রদান করুন।
- যাচাইকরণ: ফাংশন কলগুলো কার্যকর করার আগে যাচাই করুন।
- ত্রুটি ব্যবস্থাপনা: শক্তিশালী ত্রুটি ব্যবস্থাপনা বাস্তবায়ন করুন।
- নিরাপত্তা: বাহ্যিক এপিআইগুলোর জন্য যথাযথ প্রমাণীকরণ ব্যবহার করুন।
নোট এবং সীমাবদ্ধতা
- ওপেনএপিআই স্কিমার শুধুমাত্র একটি উপসেট সমর্থিত।
-
anyমোডের ক্ষেত্রে, এপিআই খুব বড় বা গভীরভাবে নেস্টেড স্কিমা প্রত্যাখ্যান করতে পারে। - পাইথনে সমর্থিত প্যারামিটার টাইপ সীমিত।