LangGraph هو إطار عمل لإنشاء تطبيقات ذات حالة للنماذج اللغوية الكبيرة، ما يجعله خيارًا جيدًا لإنشاء وكلاء الاستدلال واتخاذ الإجراءات (ReAct).
يجمع وكلاء الاستدلال واتخاذ الإجراءات بين استدلال النموذج اللغوي الكبير وتنفيذ الإجراءات. ويفكرون بشكل متكرر ويستخدمون الأدوات ويتخذون إجراءات بناءً على الملاحظات لتحقيق أهداف المستخدمين، مع تكييف طريقتهم بشكل ديناميكي. تم تقديم هذا النمط في "الاستدلال واتخاذ الإجراءات: الجمع بين الاستدلال واتخاذ الإجراءات في النماذج اللغوية" (2023)، ويحاول هذا النمط محاكاة حلّ المشاكل المرن الذي يشبه الطريقة البشرية بدلاً من سير العمل الصارم.
تقدّم LangGraph وكيلاً للاستدلال واتخاذ الإجراءات تم إنشاؤه مسبقًا (
create_react_agent)،
وهو مفيد عندما تحتاج إلى مزيد من التحكّم والتخصيص لعمليات تنفيذ الاستدلال واتخاذ الإجراءات. سيعرض لك هذا الدليل إصدارًا مبسطًا.
تُصنّف LangGraph الوكلاء على أنّهم رسوم بيانية باستخدام ثلاثة مكوّنات رئيسية:
State: بنية بيانات مشترَكة (عادةًTypedDictأوPydantic BaseModel) تمثّل اللقطة الحالية للتطبيق.-
Nodes: ترمّز منطق الوكلاء. وتتلقّى هذه العُقد الحالة الحالية كإدخال، وتُجري بعض العمليات الحسابية أو الآثار الجانبية، وتعرض حالة معدَّلة، مثل طلبات النموذج اللغوي الكبير أو طلبات الأدوات. Edges: تحدّدNodeالتالية التي سيتم تنفيذها استنادًا إلىStateالحالية، ما يسمح بالمنطق الشرطي والانتقالات الثابتة.
إذا لم يكن لديك مفتاح واجهة برمجة تطبيقات بعد، يمكنك الحصول عليه من Google AI Studio.
pip install langgraph langchain-google-genai geopy requests
اضبط مفتاح واجهة برمجة التطبيقات في متغيّر البيئة GEMINI_API_KEY.
import os

# Read your API key from the environment variable or set it manually
api_key = os.getenv("GEMINI_API_KEY")
لفهم كيفية تنفيذ وكيل الاستدلال واتخاذ الإجراءات باستخدام LangGraph بشكل أفضل، سيوضّح هذا الدليل مثالاً عمليًا. ستنشئ وكيلاً يهدف إلى استخدام أداة للعثور على حالة الطقس الحالية لموقع جغرافي محدّد.
بالنسبة إلى وكيل الطقس هذا، ستحتفظ State بسجلّ المحادثة الجارية (كقائمة من الرسائل) وعداد (كرقم صحيح) لعدد الخطوات المتّخذة، لأغراض توضيحية.
توفّر LangGraph دالة مساعِدة، هي add_messages، لتعديل قوائم رسائل الحالة. وتعمل هذه الدالة كدالة اختزال،
حيث تأخذ القائمة الحالية، بالإضافة إلى الرسائل الجديدة، وتعرض قائمة مدمَجة. وتتعامل مع التعديلات حسب رقم تعريف الرسالة، وتكون تلقائيًا "إضافة فقط" للرسائل الجديدة التي لم تتم رؤيتها.
from typing import Annotated,Sequence, TypedDict

from langchain_core.messages import BaseMessage
from langgraph.graph.message import add_messages  # helper function to add messages to the state

class AgentState(TypedDict):
    """The state of the agent."""
    messages: Annotated[Sequence[BaseMessage], add_messages]
    number_of_steps: int
بعد ذلك، حدّد أداة الطقس.
from langchain_core.tools import tool
from geopy.geocoders import Nominatim
from pydantic import BaseModel, Field
import requests

geolocator = Nominatim(user_agent="weather-app")

class SearchInput(BaseModel):
    location:str = Field(description="The city and state, e.g., San Francisco")
    date:str = Field(description="the forecasting date for when to get the weather format (yyyy-mm-dd)")

@tool("get_weather_forecast", args_schema=SearchInput, return_direct=True)
def get_weather_forecast(location: str, date: str):
    """Retrieves the weather using Open-Meteo API.

    Takes a given location (city) and a date (yyyy-mm-dd).

    Returns:
        A dict with the time and temperature for each hour.
    """
    # Note that Colab may experience rate limiting on this service. If this
    # happens, use a machine to which you have exclusive access.
    location = geolocator.geocode(location)
    if location:
        try:
            response = requests.get(f"https://api.open-meteo.com/v1/forecast?latitude={location.latitude}&longitude={location.longitude}&hourly=temperature_2m&start_date={date}&end_date={date}")
            data = response.json()
            return dict(zip(data["hourly"]["time"], data["hourly"]["temperature_2m"]))
        except Exception as e:
            return {"error": str(e)}
    else:
        return {"error": "Location not found"}

tools = [get_weather_forecast]
الآن، ابدأ النموذج واربط الأدوات بالنموذج.
from datetime import datetime
from langchain_google_genai import ChatGoogleGenerativeAI

# Create LLM class
llm = ChatGoogleGenerativeAI(
    model= "gemini-3.5-flash",
    temperature=1.0,
    max_retries=2,
    google_api_key=api_key,
)

# Bind tools to the model
model = llm.bind_tools([get_weather_forecast])

# Test the model with tools
res=model.invoke(f"What is the weather in Berlin on {datetime.today()}?")

print(res)
الخطوة الأخيرة قبل أن تتمكّن من تشغيل وكيلك هي تحديد العُقد والحواف. في هذا المثال، لديك عُقدتان وحافة واحدة.
- عُقدة
call_toolالتي تنفّذ طريقة الأداة. لدى LangGraph عُقدة تم إنشاؤها مسبقًا لهذا الغرض تُسمى ToolNode. - عُقدة
call_modelالتي تستخدمmodel_with_toolsلاستدعاء النموذج. - حافة
should_continueالتي تحدّد ما إذا كان يجب استدعاء الأداة أو النموذج.
عدد العُقد والحواف ليس ثابتًا. يمكنك إضافة أي عدد تريده من العُقد والحواف إلى الرسم البياني. على سبيل المثال، يمكنك إضافة عُقدة لإضافة ناتج منظَّم أو عُقدة للتحقّق الذاتي أو التفكير للتحقّق من ناتج النموذج قبل استدعاء الأداة أو النموذج.
from langchain_core.messages import ToolMessage
from langchain_core.runnables import RunnableConfig

tools_by_name = {tool.name: tool for tool in tools}

# Define our tool node
def call_tool(state: AgentState):
    outputs = []
    # Iterate over the tool calls in the last message
    for tool_call in state["messages"][-1].tool_calls:
        # Get the tool by name
        tool_result = tools_by_name[tool_call["name"]].invoke(tool_call["args"])
        outputs.append(
            ToolMessage(
                content=tool_result,
                name=tool_call["name"],
                tool_call_id=tool_call["id"],
            )
        )
    return {"messages": outputs}

def call_model(
    state: AgentState,
    config: RunnableConfig,
):
    # Invoke the model with the system prompt and the messages
    response = model.invoke(state["messages"], config)
    # This returns a list, which combines with the existing messages state
    # using the add_messages reducer.
    return {"messages": [response]}

# Define the conditional edge that determines whether to continue or not
def should_continue(state: AgentState):
    messages = state["messages"]
    # If the last message is not a tool call, then finish
    if not messages[-1].tool_calls:
        return "end"
    # default to continue
    return "continue"
بعد أن تصبح جميع مكوّنات الوكيل جاهزة، يمكنك الآن تجميعها.
from langgraph.graph import StateGraph, END

# Define a new graph with our state
workflow = StateGraph(AgentState)

# 1. Add the nodes
workflow.add_node("llm", call_model)
workflow.add_node("tools",  call_tool)
# 2. Set the entrypoint as `agent`, this is the first node called
workflow.set_entry_point("llm")
# 3. Add a conditional edge after the `llm` node is called.
workflow.add_conditional_edges(
    # Edge is used after the `llm` node is called.
    "llm",
    # The function that will determine which node is called next.
    should_continue,
    # Mapping for where to go next, keys are strings from the function return,
    # and the values are other nodes.
    # END is a special node marking that the graph is finish.
    {
        # If `tools`, then we call the tool node.
        "continue": "tools",
        # Otherwise we finish.
        "end": END,
    },
)
# 4. Add a normal edge after `tools` is called, `llm` node is called next.
workflow.add_edge("tools", "llm")

# Now we can compile and visualize our graph
graph = workflow.compile()
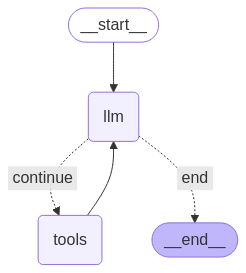
يمكنك تصوّر الرسم البياني باستخدام طريقة draw_mermaid_png.
from IPython.display import Image, display

display(Image(graph.get_graph().draw_mermaid_png()))
الآن، شغِّل الوكيل.
from datetime import datetime
# Create our initial message dictionary
inputs = {"messages": [("user", f"What is the weather in Berlin on {datetime.today()}?")]}

# call our graph with streaming to see the steps
for state in graph.stream(inputs, stream_mode="values"):
    last_message = state["messages"][-1]
    last_message.pretty_print()
يمكنك الآن مواصلة المحادثة أو طلب حالة الطقس في مدينة أخرى أو طلب إجراء مقارنة.
state["messages"].append(("user", "Would it be warmer in Munich?"))

for state in graph.stream(state, stream_mode="values"):
    last_message = state["messages"][-1]
    last_message.pretty_print()