LangGraph è un framework per la creazione di applicazioni LLM stateful, il che lo rende una buona scelta per la creazione di agenti ReAct (Reasoning and Acting).
Gli agenti ReAct combinano il ragionamento LLM con l'esecuzione delle azioni. Pensano, utilizzano strumenti e agiscono in base alle osservazioni per raggiungere gli obiettivi degli utenti, adattando dinamicamente il loro approccio. Introdotto in "ReAct: Synergizing Reasoning and Acting in Language Models" (2023), questo pattern cerca di imitare la risoluzione di problemi flessibile e simile a quella umana rispetto a flussi di lavoro rigidi.
LangGraph offre un agente ReAct predefinito (
create_react_agent),
ideale quando hai bisogno di maggiore controllo e personalizzazione per le implementazioni ReAct. Questa guida ti mostrerà una versione semplificata.
LangGraph modella gli agenti come grafici utilizzando tre componenti chiave:
State: struttura dati condivisa (in genereTypedDictoPydantic BaseModel) che rappresenta lo snapshot attuale dell'applicazione.Nodes: codifica la logica degli agenti. Ricevono lo stato attuale come input, eseguono alcuni calcoli o effetti collaterali e restituiscono uno stato aggiornato, ad esempio chiamate LLM o chiamate di strumenti.Edges: definisci il successivoNodeda eseguire in base all'Statecorrente, consentendo la logica condizionale e le transizioni fisse.
Se non hai ancora una chiave API, puoi ottenerla da Google AI Studio.
pip install langgraph langchain-google-genai geopy requests
Imposta la chiave API nella variabile di ambiente GEMINI_API_KEY.
import os

# Read your API key from the environment variable or set it manually
api_key = os.getenv("GEMINI_API_KEY")
Per capire meglio come implementare un agente ReAct utilizzando LangGraph, questa guida illustra un esempio pratico. Creerai un agente il cui obiettivo è utilizzare uno strumento per trovare il meteo attuale per una località specificata.
Per questo agente meteo, State manterrà la cronologia della conversazione in corso (come elenco di messaggi) e un contatore (come numero intero) del numero di passi eseguiti, a scopo illustrativo.
LangGraph fornisce una funzione helper, add_messages, per l'aggiornamento degli elenchi di messaggi di stato. Funziona come un riduttore,
che prende l'elenco attuale, più i nuovi messaggi, e restituisce un elenco combinato. Gestisce gli aggiornamenti in base all'ID messaggio e per impostazione predefinita adotta un comportamento di "aggiunta" per i nuovi messaggi non letti.
from typing import Annotated,Sequence, TypedDict

from langchain_core.messages import BaseMessage
from langgraph.graph.message import add_messages  # helper function to add messages to the state

class AgentState(TypedDict):
    """The state of the agent."""
    messages: Annotated[Sequence[BaseMessage], add_messages]
    number_of_steps: int
Poi, definisci lo strumento meteo.
from langchain_core.tools import tool
from geopy.geocoders import Nominatim
from pydantic import BaseModel, Field
import requests

geolocator = Nominatim(user_agent="weather-app")

class SearchInput(BaseModel):
    location:str = Field(description="The city and state, e.g., San Francisco")
    date:str = Field(description="the forecasting date for when to get the weather format (yyyy-mm-dd)")

@tool("get_weather_forecast", args_schema=SearchInput, return_direct=True)
def get_weather_forecast(location: str, date: str):
    """Retrieves the weather using Open-Meteo API.

    Takes a given location (city) and a date (yyyy-mm-dd).

    Returns:
        A dict with the time and temperature for each hour.
    """
    # Note that Colab may experience rate limiting on this service. If this
    # happens, use a machine to which you have exclusive access.
    location = geolocator.geocode(location)
    if location:
        try:
            response = requests.get(f"https://api.open-meteo.com/v1/forecast?latitude={location.latitude}&longitude={location.longitude}&hourly=temperature_2m&start_date={date}&end_date={date}")
            data = response.json()
            return dict(zip(data["hourly"]["time"], data["hourly"]["temperature_2m"]))
        except Exception as e:
            return {"error": str(e)}
    else:
        return {"error": "Location not found"}

tools = [get_weather_forecast]
Ora inizializza il modello e associa gli strumenti al modello.
from datetime import datetime
from langchain_google_genai import ChatGoogleGenerativeAI

# Create LLM class
llm = ChatGoogleGenerativeAI(
    model= "gemini-3.5-flash",
    temperature=1.0,
    max_retries=2,
    google_api_key=api_key,
)

# Bind tools to the model
model = llm.bind_tools([get_weather_forecast])

# Test the model with tools
res=model.invoke(f"What is the weather in Berlin on {datetime.today()}?")

print(res)
L'ultimo passaggio prima di poter eseguire l'agente è definire i nodi e gli archi. In questo esempio, hai due nodi e un arco.
call_toolche esegue il metodo dello strumento. LangGraph ha un nodo predefinito per questo chiamato ToolNode.- nodo
call_modelche utilizzamodel_with_toolsper chiamare il modello. should_continueche decide se chiamare lo strumento o il modello.
Il numero di nodi e archi non è fisso. Puoi aggiungere tutti i nodi e gli archi che vuoi al grafico. Ad esempio, puoi aggiungere un nodo per aggiungere un output strutturato o un nodo di autoverifica/riflessione per controllare l'output del modello prima di chiamare lo strumento o il modello.
from langchain_core.messages import ToolMessage
from langchain_core.runnables import RunnableConfig

tools_by_name = {tool.name: tool for tool in tools}

# Define our tool node
def call_tool(state: AgentState):
    outputs = []
    # Iterate over the tool calls in the last message
    for tool_call in state["messages"][-1].tool_calls:
        # Get the tool by name
        tool_result = tools_by_name[tool_call["name"]].invoke(tool_call["args"])
        outputs.append(
            ToolMessage(
                content=tool_result,
                name=tool_call["name"],
                tool_call_id=tool_call["id"],
            )
        )
    return {"messages": outputs}

def call_model(
    state: AgentState,
    config: RunnableConfig,
):
    # Invoke the model with the system prompt and the messages
    response = model.invoke(state["messages"], config)
    # This returns a list, which combines with the existing messages state
    # using the add_messages reducer.
    return {"messages": [response]}

# Define the conditional edge that determines whether to continue or not
def should_continue(state: AgentState):
    messages = state["messages"]
    # If the last message is not a tool call, then finish
    if not messages[-1].tool_calls:
        return "end"
    # default to continue
    return "continue"
Ora che tutti i componenti dell'agente sono pronti, puoi assemblarli.
from langgraph.graph import StateGraph, END

# Define a new graph with our state
workflow = StateGraph(AgentState)

# 1. Add the nodes
workflow.add_node("llm", call_model)
workflow.add_node("tools",  call_tool)
# 2. Set the entrypoint as `agent`, this is the first node called
workflow.set_entry_point("llm")
# 3. Add a conditional edge after the `llm` node is called.
workflow.add_conditional_edges(
    # Edge is used after the `llm` node is called.
    "llm",
    # The function that will determine which node is called next.
    should_continue,
    # Mapping for where to go next, keys are strings from the function return,
    # and the values are other nodes.
    # END is a special node marking that the graph is finish.
    {
        # If `tools`, then we call the tool node.
        "continue": "tools",
        # Otherwise we finish.
        "end": END,
    },
)
# 4. Add a normal edge after `tools` is called, `llm` node is called next.
workflow.add_edge("tools", "llm")

# Now we can compile and visualize our graph
graph = workflow.compile()
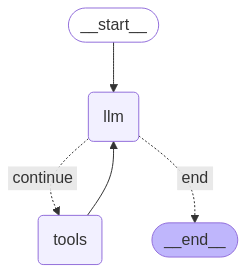
Puoi visualizzare il grafico utilizzando il metodo draw_mermaid_png.
from IPython.display import Image, display

display(Image(graph.get_graph().draw_mermaid_png()))
Ora esegui l'agente.
from datetime import datetime
# Create our initial message dictionary
inputs = {"messages": [("user", f"What is the weather in Berlin on {datetime.today()}?")]}

# call our graph with streaming to see the steps
for state in graph.stream(inputs, stream_mode="values"):
    last_message = state["messages"][-1]
    last_message.pretty_print()
Ora puoi continuare la conversazione, chiedere informazioni sul meteo in un'altra città o richiedere un confronto.
state["messages"].append(("user", "Would it be warmer in Munich?"))

for state in graph.stream(state, stream_mode="values"):
    last_message = state["messages"][-1]
    last_message.pretty_print()