O LangGraph é um framework para criar aplicativos de LLM com estado, o que o torna uma boa opção para construir agentes ReAct (raciocínio e ação).
Os agentes ReAct combinam o raciocínio do LLM com a execução de ações. Eles pensam, usam ferramentas e agem de forma iterativa com base em observações para alcançar as metas do usuário, adaptando a abordagem de maneira dinâmica. Introduzido em "ReAct: Synergizing Reasoning and Acting in Language Models" (2023), esse padrão tenta espelhar a solução de problemas flexível e semelhante à humana em fluxos de trabalho rígidos.
O LangGraph oferece um agente ReAct pré-criado (
create_react_agent),
que é útil quando você precisa de mais controle e personalização para suas implementações do ReAct. Este guia mostra uma versão simplificada.
Os agentes de modelos do LangGraph são gráficos que usam três componentes principais:
State: estrutura de dados compartilhada (normalmenteTypedDictouPydantic BaseModel) que representa o snapshot atual do aplicativo.Nodes: codifica a lógica dos agentes. Eles recebem o estado atual como entrada, realizam algum cálculo ou efeito colateral e retornam um estado atualizado, como chamadas de LLM ou de ferramentas.Edges: define o próximoNodea ser executado com base noStateatual, permitindo lógica condicional e transições fixas.
Se você ainda não tiver uma chave de API, acesse o Google AI Studio.
pip install langgraph langchain-google-genai geopy requests
Defina sua chave de API na variável de ambiente GEMINI_API_KEY.
import os

# Read your API key from the environment variable or set it manually
api_key = os.getenv("GEMINI_API_KEY")
Para entender melhor como implementar um agente ReAct usando o LangGraph, este guia mostra um exemplo prático. Você vai criar um agente cujo objetivo é usar uma ferramenta para encontrar o clima atual de um local especificado.
Para esse agente de clima, o State vai manter o histórico de conversas em andamento (como uma lista de mensagens) e um contador (como um número inteiro) para o número de etapas realizadas, para fins ilustrativos.
O LangGraph fornece uma função auxiliar, add_messages, para atualizar listas de mensagens de estado. Ela funciona como um redutor,
recebendo a lista atual, além das novas mensagens, e retorna uma lista combinada. Ela processa atualizações por ID de mensagem e usa um comportamento "somente anexar" para mensagens novas e não vistas.
from typing import Annotated,Sequence, TypedDict

from langchain_core.messages import BaseMessage
from langgraph.graph.message import add_messages  # helper function to add messages to the state

class AgentState(TypedDict):
    """The state of the agent."""
    messages: Annotated[Sequence[BaseMessage], add_messages]
    number_of_steps: int
Em seguida, defina sua ferramenta de clima.
from langchain_core.tools import tool
from geopy.geocoders import Nominatim
from pydantic import BaseModel, Field
import requests

geolocator = Nominatim(user_agent="weather-app")

class SearchInput(BaseModel):
    location:str = Field(description="The city and state, e.g., San Francisco")
    date:str = Field(description="the forecasting date for when to get the weather format (yyyy-mm-dd)")

@tool("get_weather_forecast", args_schema=SearchInput, return_direct=True)
def get_weather_forecast(location: str, date: str):
    """Retrieves the weather using Open-Meteo API.

    Takes a given location (city) and a date (yyyy-mm-dd).

    Returns:
        A dict with the time and temperature for each hour.
    """
    # Note that Colab may experience rate limiting on this service. If this
    # happens, use a machine to which you have exclusive access.
    location = geolocator.geocode(location)
    if location:
        try:
            response = requests.get(f"https://api.open-meteo.com/v1/forecast?latitude={location.latitude}&longitude={location.longitude}&hourly=temperature_2m&start_date={date}&end_date={date}")
            data = response.json()
            return dict(zip(data["hourly"]["time"], data["hourly"]["temperature_2m"]))
        except Exception as e:
            return {"error": str(e)}
    else:
        return {"error": "Location not found"}

tools = [get_weather_forecast]
Agora inicialize o modelo e vincule as ferramentas a ele.
from datetime import datetime
from langchain_google_genai import ChatGoogleGenerativeAI

# Create LLM class
llm = ChatGoogleGenerativeAI(
    model= "gemini-3.5-flash",
    temperature=1.0,
    max_retries=2,
    google_api_key=api_key,
)

# Bind tools to the model
model = llm.bind_tools([get_weather_forecast])

# Test the model with tools
res=model.invoke(f"What is the weather in Berlin on {datetime.today()}?")

print(res)
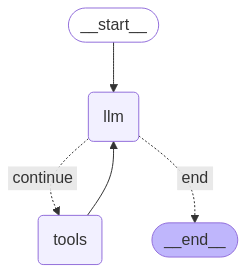
A última etapa antes de executar o agente é definir os nós e as bordas. Neste exemplo, você tem dois nós e uma borda.
- Nó
call_toolque executa o método da ferramenta. O LangGraph tem um nó pré-criado para isso chamado ToolNode. - Nó
call_modelque usa omodel_with_toolspara chamar o modelo. - Borda
should_continueque decide se a ferramenta ou o modelo será chamado.
O número de nós e bordas não é fixo. Você pode adicionar quantos nós e bordas quiser ao gráfico. Por exemplo, é possível adicionar um nó para adicionar saída estruturada ou um nó de auto-verificação/reflexão para verificar a saída do modelo antes de chamar a ferramenta ou o modelo.
from langchain_core.messages import ToolMessage
from langchain_core.runnables import RunnableConfig

tools_by_name = {tool.name: tool for tool in tools}

# Define our tool node
def call_tool(state: AgentState):
    outputs = []
    # Iterate over the tool calls in the last message
    for tool_call in state["messages"][-1].tool_calls:
        # Get the tool by name
        tool_result = tools_by_name[tool_call["name"]].invoke(tool_call["args"])
        outputs.append(
            ToolMessage(
                content=tool_result,
                name=tool_call["name"],
                tool_call_id=tool_call["id"],
            )
        )
    return {"messages": outputs}

def call_model(
    state: AgentState,
    config: RunnableConfig,
):
    # Invoke the model with the system prompt and the messages
    response = model.invoke(state["messages"], config)
    # This returns a list, which combines with the existing messages state
    # using the add_messages reducer.
    return {"messages": [response]}

# Define the conditional edge that determines whether to continue or not
def should_continue(state: AgentState):
    messages = state["messages"]
    # If the last message is not a tool call, then finish
    if not messages[-1].tool_calls:
        return "end"
    # default to continue
    return "continue"
Com todos os componentes do agente prontos, agora é possível montá-los.
from langgraph.graph import StateGraph, END

# Define a new graph with our state
workflow = StateGraph(AgentState)

# 1. Add the nodes
workflow.add_node("llm", call_model)
workflow.add_node("tools",  call_tool)
# 2. Set the entrypoint as `agent`, this is the first node called
workflow.set_entry_point("llm")
# 3. Add a conditional edge after the `llm` node is called.
workflow.add_conditional_edges(
    # Edge is used after the `llm` node is called.
    "llm",
    # The function that will determine which node is called next.
    should_continue,
    # Mapping for where to go next, keys are strings from the function return,
    # and the values are other nodes.
    # END is a special node marking that the graph is finish.
    {
        # If `tools`, then we call the tool node.
        "continue": "tools",
        # Otherwise we finish.
        "end": END,
    },
)
# 4. Add a normal edge after `tools` is called, `llm` node is called next.
workflow.add_edge("tools", "llm")

# Now we can compile and visualize our graph
graph = workflow.compile()
Você pode visualizar o gráfico usando o método draw_mermaid_png.
from IPython.display import Image, display

display(Image(graph.get_graph().draw_mermaid_png()))
Agora, execute o agente.
from datetime import datetime
# Create our initial message dictionary
inputs = {"messages": [("user", f"What is the weather in Berlin on {datetime.today()}?")]}

# call our graph with streaming to see the steps
for state in graph.stream(inputs, stream_mode="values"):
    last_message = state["messages"][-1]
    last_message.pretty_print()
Agora você pode continuar a conversa, perguntar sobre o clima em outra cidade ou solicitar uma comparação.
state["messages"].append(("user", "Would it be warmer in Munich?"))

for state in graph.stream(state, stream_mode="values"):
    last_message = state["messages"][-1]
    last_message.pretty_print()