LangGraph, durum bilgisi olan LLM uygulamaları oluşturmaya yönelik bir çerçeve olduğundan ReAct (Reasoning and Acting) aracıları oluşturmak için iyi bir seçimdir.
ReAct aracıları, LLM muhakemesini işlem yürütmeyle birleştirir. Kullanıcı hedeflerine ulaşmak için yinelemeli olarak düşünür, araçları kullanır ve gözlemlerden yararlanarak hareket eder. Yaklaşımını dinamik olarak uyarlar. "ReAct: Synergizing Reasoning and Acting<0x0x0A>in Language Models" (2023) adlı makalede tanıtılan bu kalıp, katı iş akışları yerine insan benzeri, esnek problem çözme yöntemlerini yansıtmaya çalışır.
LangGraph, ReAct uygulamalarınızda daha fazla kontrol ve özelleştirme istediğinizde öne çıkan, önceden oluşturulmuş bir ReAct aracısı (
create_react_agent) sunar. Bu kılavuzda basitleştirilmiş bir sürüm gösterilmektedir.
LangGraph, üç temel bileşeni kullanarak aracıları grafik olarak modeller:
State: Uygulamanın mevcut anlık görüntüsünü temsil eden paylaşılan veri yapısı (genellikleTypedDictveyaPydantic BaseModel).Nodes: Temsilcilerinizin mantığını kodlar. Mevcut durumu giriş olarak alırlar, bazı hesaplamalar veya yan etkiler gerçekleştirirler ve LLM çağrıları ya da araç çağrıları gibi güncellenmiş bir durumu döndürürler.Edges: MevcutState'ye göre yürütülecek bir sonrakiNode'yi tanımlayın. Bu sayede koşullu mantık ve sabit geçişler sağlanır.
Henüz bir API anahtarınız yoksa Google AI Studio'dan edinebilirsiniz.
pip install langgraph langchain-google-genai geopy requests
API anahtarınızı GEMINI_API_KEY ortam değişkeninde ayarlayın.
import os

# Read your API key from the environment variable or set it manually
api_key = os.getenv("GEMINI_API_KEY")
LangGraph kullanarak ReAct aracısını nasıl uygulayacağınızı daha iyi anlamak için bu kılavuzda pratik bir örnek açıklanmaktadır. Amacı, belirli bir konumun güncel hava durumunu bulmak için bir araç kullanmak olan bir ajan oluşturacaksınız.
Bu hava durumu aracısı için State, devam eden görüşme geçmişini (mesaj listesi olarak) ve örnekleme amacıyla atılan adım sayısını (tam sayı olarak) tutar.
LangGraph, durum mesajı listelerini güncellemek için add_messages yardımcı işlevini sağlar. Mevcut listeyi ve yeni mesajları alıp birleştirilmiş bir liste döndüren bir indirgeyici olarak işlev görür. Güncellemeleri mesaj kimliğine göre işler ve yeni, görülmemiş mesajlar için varsayılan olarak "yalnızca ekleme" davranışını kullanır.
from typing import Annotated,Sequence, TypedDict

from langchain_core.messages import BaseMessage
from langgraph.graph.message import add_messages  # helper function to add messages to the state

class AgentState(TypedDict):
    """The state of the agent."""
    messages: Annotated[Sequence[BaseMessage], add_messages]
    number_of_steps: int
Ardından, hava durumu aracınızı tanımlayın.
from langchain_core.tools import tool
from geopy.geocoders import Nominatim
from pydantic import BaseModel, Field
import requests

geolocator = Nominatim(user_agent="weather-app")

class SearchInput(BaseModel):
    location:str = Field(description="The city and state, e.g., San Francisco")
    date:str = Field(description="the forecasting date for when to get the weather format (yyyy-mm-dd)")

@tool("get_weather_forecast", args_schema=SearchInput, return_direct=True)
def get_weather_forecast(location: str, date: str):
    """Retrieves the weather using Open-Meteo API.

    Takes a given location (city) and a date (yyyy-mm-dd).

    Returns:
        A dict with the time and temperature for each hour.
    """
    # Note that Colab may experience rate limiting on this service. If this
    # happens, use a machine to which you have exclusive access.
    location = geolocator.geocode(location)
    if location:
        try:
            response = requests.get(f"https://api.open-meteo.com/v1/forecast?latitude={location.latitude}&longitude={location.longitude}&hourly=temperature_2m&start_date={date}&end_date={date}")
            data = response.json()
            return dict(zip(data["hourly"]["time"], data["hourly"]["temperature_2m"]))
        except Exception as e:
            return {"error": str(e)}
    else:
        return {"error": "Location not found"}

tools = [get_weather_forecast]
Şimdi modeli başlatın ve araçları modele bağlayın.
from datetime import datetime
from langchain_google_genai import ChatGoogleGenerativeAI

# Create LLM class
llm = ChatGoogleGenerativeAI(
    model= "gemini-3.5-flash",
    temperature=1.0,
    max_retries=2,
    google_api_key=api_key,
)

# Bind tools to the model
model = llm.bind_tools([get_weather_forecast])

# Test the model with tools
res=model.invoke(f"What is the weather in Berlin on {datetime.today()}?")

print(res)
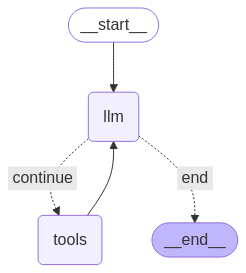
Temsilcinizi çalıştırmadan önceki son adım, düğümlerinizi ve kenarlarınızı tanımlamaktır. Bu örnekte iki düğüm ve bir kenar vardır.
call_toolaracınızın yöntemini yürüten düğüm. LangGraph'ta bu amaçla kullanılan, önceden oluşturulmuş bir düğüm vardır: ToolNode.- Modeli çağırmak için
model_with_toolskullanancall_modeldüğümü. should_continueAracı mı yoksa modeli mi çağıracağını belirleyen bir sınır.
Düğüm ve kenar sayısı sabit değildir. Grafiğinize istediğiniz kadar düğüm ve kenar ekleyebilirsiniz. Örneğin, yapılandırılmış çıkış eklemek için bir düğüm veya aracı ya da modeli çağırmadan önce model çıkışını kontrol etmek için bir kendi kendine doğrulama/yansıtma düğümü ekleyebilirsiniz.
from langchain_core.messages import ToolMessage
from langchain_core.runnables import RunnableConfig

tools_by_name = {tool.name: tool for tool in tools}

# Define our tool node
def call_tool(state: AgentState):
    outputs = []
    # Iterate over the tool calls in the last message
    for tool_call in state["messages"][-1].tool_calls:
        # Get the tool by name
        tool_result = tools_by_name[tool_call["name"]].invoke(tool_call["args"])
        outputs.append(
            ToolMessage(
                content=tool_result,
                name=tool_call["name"],
                tool_call_id=tool_call["id"],
            )
        )
    return {"messages": outputs}

def call_model(
    state: AgentState,
    config: RunnableConfig,
):
    # Invoke the model with the system prompt and the messages
    response = model.invoke(state["messages"], config)
    # This returns a list, which combines with the existing messages state
    # using the add_messages reducer.
    return {"messages": [response]}

# Define the conditional edge that determines whether to continue or not
def should_continue(state: AgentState):
    messages = state["messages"]
    # If the last message is not a tool call, then finish
    if not messages[-1].tool_calls:
        return "end"
    # default to continue
    return "continue"
Tüm aracı bileşenleri hazır olduğunda bunları bir araya getirebilirsiniz.
from langgraph.graph import StateGraph, END

# Define a new graph with our state
workflow = StateGraph(AgentState)

# 1. Add the nodes
workflow.add_node("llm", call_model)
workflow.add_node("tools",  call_tool)
# 2. Set the entrypoint as `agent`, this is the first node called
workflow.set_entry_point("llm")
# 3. Add a conditional edge after the `llm` node is called.
workflow.add_conditional_edges(
    # Edge is used after the `llm` node is called.
    "llm",
    # The function that will determine which node is called next.
    should_continue,
    # Mapping for where to go next, keys are strings from the function return,
    # and the values are other nodes.
    # END is a special node marking that the graph is finish.
    {
        # If `tools`, then we call the tool node.
        "continue": "tools",
        # Otherwise we finish.
        "end": END,
    },
)
# 4. Add a normal edge after `tools` is called, `llm` node is called next.
workflow.add_edge("tools", "llm")

# Now we can compile and visualize our graph
graph = workflow.compile()
Grafiğinizi draw_mermaid_png yöntemini kullanarak görselleştirebilirsiniz.
from IPython.display import Image, display

display(Image(graph.get_graph().draw_mermaid_png()))
Şimdi aracı çalıştırın.
from datetime import datetime
# Create our initial message dictionary
inputs = {"messages": [("user", f"What is the weather in Berlin on {datetime.today()}?")]}

# call our graph with streaming to see the steps
for state in graph.stream(inputs, stream_mode="values"):
    last_message = state["messages"][-1]
    last_message.pretty_print()
Artık sohbetinize devam edebilir, başka bir şehirdeki hava durumunu sorabilir veya karşılaştırma isteğinde bulunabilirsiniz.
state["messages"].append(("user", "Would it be warmer in Munich?"))

for state in graph.stream(state, stream_mode="values"):
    last_message = state["messages"][-1]
    last_message.pretty_print()