LangGraph는 상태 저장 LLM 애플리케이션을 빌드하기 위한 프레임워크이므로 ReAct (추론 및 행동) 에이전트를 구성하는 데 적합합니다.
ReAct 에이전트는 LLM 추론과 작업 실행을 결합합니다. 사용자 목표를 달성하기 위해 반복적으로 생각하고 도구를 사용하며 관찰에 따라 행동하여 접근 방식을 동적으로 조정합니다. '"ReAct: Synergizing Reasoning and Acting in Language Models"'(2023)에서 소개된 이 패턴은 엄격한 워크플로를 통해 인간과 유사한 유연한 문제 해결을 반영하려고 합니다.
LangGraph는 ReAct 구현에 더 많은 제어 및 맞춤설정이 필요한 경우에 유용한 사전 빌드된 ReAct 에이전트 (
create_react_agent)를 제공합니다. 이 가이드에서는 간소화된 버전을 보여줍니다.
LangGraph는 세 가지 주요 구성요소를 사용하여 에이전트를 그래프로 모델링합니다.
State: 애플리케이션의 현재 스냅샷을 나타내는 공유 데이터 구조 (일반적으로TypedDict또는Pydantic BaseModel).Nodes: 에이전트의 로직을 인코딩합니다. 현재 상태를 입력으로 받고 일부 계산 또는 부작용을 실행하며 LLM 호출 또는 도구 호출과 같은 업데이트된 상태를 반환합니다.Edges: 현재State를 기반으로 실행할 다음Node를 정의하여 조건부 로직 및 고정 전환을 허용합니다.
아직 API 키가 없는 경우 Google AI Studio에서 API 키를 가져올 수 있습니다.
pip install langgraph langchain-google-genai geopy requests
환경 변수 GEMINI_API_KEY에서 API 키를 설정합니다.
import os

# Read your API key from the environment variable or set it manually
api_key = os.getenv("GEMINI_API_KEY")
LangGraph를 사용하여 ReAct 에이전트를 구현하는 방법을 더 잘 이해할 수 있도록 이 가이드에서는 실제 예시를 안내합니다. 목표가 도구를 사용하여 지정된 위치의 현재 날씨를 찾는 에이전트를 만듭니다.
이 날씨 에이전트의 경우 State는 진행 중인 대화 기록(메시지 목록)과 수행된 단계 수의 카운터(정수)를 유지합니다(설명을 위해).
LangGraph는 상태 메시지 목록을 업데이트하기 위한 도우미 함수 add_messages를 제공합니다. 현재 목록과 새 메시지를 가져와 결합된 목록을 반환하는 리듀서 역할을 합니다. 메시지 ID별로 업데이트를 처리하고 기본적으로 새 메시지에는 '추가 전용' 동작을 사용합니다.
from typing import Annotated,Sequence, TypedDict

from langchain_core.messages import BaseMessage
from langgraph.graph.message import add_messages  # helper function to add messages to the state

class AgentState(TypedDict):
    """The state of the agent."""
    messages: Annotated[Sequence[BaseMessage], add_messages]
    number_of_steps: int
다음으로 날씨 도구를 정의합니다.
from langchain_core.tools import tool
from geopy.geocoders import Nominatim
from pydantic import BaseModel, Field
import requests

geolocator = Nominatim(user_agent="weather-app")

class SearchInput(BaseModel):
    location:str = Field(description="The city and state, e.g., San Francisco")
    date:str = Field(description="the forecasting date for when to get the weather format (yyyy-mm-dd)")

@tool("get_weather_forecast", args_schema=SearchInput, return_direct=True)
def get_weather_forecast(location: str, date: str):
    """Retrieves the weather using Open-Meteo API.

    Takes a given location (city) and a date (yyyy-mm-dd).

    Returns:
        A dict with the time and temperature for each hour.
    """
    # Note that Colab may experience rate limiting on this service. If this
    # happens, use a machine to which you have exclusive access.
    location = geolocator.geocode(location)
    if location:
        try:
            response = requests.get(f"https://api.open-meteo.com/v1/forecast?latitude={location.latitude}&longitude={location.longitude}&hourly=temperature_2m&start_date={date}&end_date={date}")
            data = response.json()
            return dict(zip(data["hourly"]["time"], data["hourly"]["temperature_2m"]))
        except Exception as e:
            return {"error": str(e)}
    else:
        return {"error": "Location not found"}

tools = [get_weather_forecast]
이제 모델을 초기화하고 도구를 모델에 바인딩합니다.
from datetime import datetime
from langchain_google_genai import ChatGoogleGenerativeAI

# Create LLM class
llm = ChatGoogleGenerativeAI(
    model= "gemini-3.5-flash",
    temperature=1.0,
    max_retries=2,
    google_api_key=api_key,
)

# Bind tools to the model
model = llm.bind_tools([get_weather_forecast])

# Test the model with tools
res=model.invoke(f"What is the weather in Berlin on {datetime.today()}?")

print(res)
에이전트를 실행하기 전에 마지막 단계는 노드와 가장자리를 정의하는 것입니다. 이 예시에는 노드 2개와 가장자리 1개가 있습니다.
- 도구 메서드를 실행하는
call_tool노드. ToolNode model_with_tools를 사용하여 모델을 호출하는call_model노드.- 도구를 호출할지 모델을 호출할지 결정하는
should_continue가장자리.
노드와 가장자리의 수는 고정되어 있지 않습니다. 그래프에 원하는 만큼 노드와 가장자리를 추가할 수 있습니다. 예를 들어 도구 또는 모델을 호출하기 전에 모델 출력을 확인하기 위해 구조화된 출력을 추가하는 노드 또는 자체 검증/반영 노드를 추가할 수 있습니다.
from langchain_core.messages import ToolMessage
from langchain_core.runnables import RunnableConfig

tools_by_name = {tool.name: tool for tool in tools}

# Define our tool node
def call_tool(state: AgentState):
    outputs = []
    # Iterate over the tool calls in the last message
    for tool_call in state["messages"][-1].tool_calls:
        # Get the tool by name
        tool_result = tools_by_name[tool_call["name"]].invoke(tool_call["args"])
        outputs.append(
            ToolMessage(
                content=tool_result,
                name=tool_call["name"],
                tool_call_id=tool_call["id"],
            )
        )
    return {"messages": outputs}

def call_model(
    state: AgentState,
    config: RunnableConfig,
):
    # Invoke the model with the system prompt and the messages
    response = model.invoke(state["messages"], config)
    # This returns a list, which combines with the existing messages state
    # using the add_messages reducer.
    return {"messages": [response]}

# Define the conditional edge that determines whether to continue or not
def should_continue(state: AgentState):
    messages = state["messages"]
    # If the last message is not a tool call, then finish
    if not messages[-1].tool_calls:
        return "end"
    # default to continue
    return "continue"
모든 에이전트 구성요소가 준비되면 이제 이를 조합할 수 있습니다.
from langgraph.graph import StateGraph, END

# Define a new graph with our state
workflow = StateGraph(AgentState)

# 1. Add the nodes
workflow.add_node("llm", call_model)
workflow.add_node("tools",  call_tool)
# 2. Set the entrypoint as `agent`, this is the first node called
workflow.set_entry_point("llm")
# 3. Add a conditional edge after the `llm` node is called.
workflow.add_conditional_edges(
    # Edge is used after the `llm` node is called.
    "llm",
    # The function that will determine which node is called next.
    should_continue,
    # Mapping for where to go next, keys are strings from the function return,
    # and the values are other nodes.
    # END is a special node marking that the graph is finish.
    {
        # If `tools`, then we call the tool node.
        "continue": "tools",
        # Otherwise we finish.
        "end": END,
    },
)
# 4. Add a normal edge after `tools` is called, `llm` node is called next.
workflow.add_edge("tools", "llm")

# Now we can compile and visualize our graph
graph = workflow.compile()
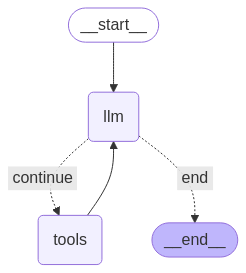
draw_mermaid_png 메서드를 사용하여 그래프를 시각화할 수 있습니다.
from IPython.display import Image, display

display(Image(graph.get_graph().draw_mermaid_png()))
이제 에이전트를 실행합니다.
from datetime import datetime
# Create our initial message dictionary
inputs = {"messages": [("user", f"What is the weather in Berlin on {datetime.today()}?")]}

# call our graph with streaming to see the steps
for state in graph.stream(inputs, stream_mode="values"):
    last_message = state["messages"][-1]
    last_message.pretty_print()
이제 대화를 계속하거나 다른 도시의 날씨를 묻거나 비교를 요청할 수 있습니다.
state["messages"].append(("user", "Would it be warmer in Munich?"))

for state in graph.stream(state, stream_mode="values"):
    last_message = state["messages"][-1]
    last_message.pretty_print()