LangGraph הוא framework לבניית אפליקציות LLM עם שמירת מצב, ולכן הוא בחירה טובה לבניית סוכני ReAct (Reasoning and Acting).
סוכני ReAct משלבים בין נימוק של LLM לבין ביצוע פעולות. הם חושבים באופן איטרטיבי, משתמשים בכלים ופועלים על סמך תצפיות כדי להשיג את יעדי המשתמשים, ומתאימים את הגישה שלהם באופן דינמי. התבנית הזו, שהוצגה במאמר "ReAct: Synergizing Reasoning and Acting in Language Models" (2023), מנסה לשקף פתרון בעיות גמיש כמו אצל בני אדם, ולא תהליכי עבודה נוקשים.
LangGraph מציע סוכן ReAct מוכן מראש (
create_react_agent),
שמתאים במיוחד כשצריך יותר שליטה והתאמה אישית בהטמעות של ReAct. במדריך הזה מוצגת גרסה פשוטה יותר.
מודלים של סוכני LangGraph הם גרפים שכוללים שלושה רכיבים מרכזיים:
-
State: מבנה נתונים משותף (בדרך כללTypedDictאוPydantic BaseModel) שמייצג את תמונת המצב העדכנית של האפליקציה. -
Nodes: קידוד הלוגיקה של הסוכנים. הם מקבלים את המצב הנוכחי כקלט, מבצעים חישוב או תופעת לוואי ומחזירים מצב מעודכן, כמו קריאות ל-LLM או קריאות לכלים. -
Edges: מגדירים אתNodeהבא להפעלה על סמךStateהנוכחי, כדי לאפשר לוגיקה מותנית ומעברים קבועים.
אם עדיין אין לכם מפתח API, תוכלו לקבל אותו מ-Google AI Studio.
pip install langgraph langchain-google-genai geopy requests
מגדירים את מפתח ה-API במשתנה הסביבה GEMINI_API_KEY.
import os

# Read your API key from the environment variable or set it manually
api_key = os.getenv("GEMINI_API_KEY")
כדי להבין טוב יותר איך להטמיע סוכן ReAct באמצעות LangGraph, במדריך הזה נציג דוגמה מעשית. תצרו סוכן שהמטרה שלו היא להשתמש בכלי כדי למצוא את מזג האוויר הנוכחי במיקום ספציפי.
לצורך המחשה, סוכן מזג האוויר הזה, State, ישמור את היסטוריית השיחה המתמשכת (כמו רשימה של הודעות) ומונה (כמספר שלם) של מספר השלבים שבוצעו.
LangGraph מספקת פונקציית עזר, add_messages, לעדכון רשימות של הודעות מצב. היא פועלת כפונקציית צמצום, מקבלת את הרשימה הנוכחית בתוספת ההודעות החדשות ומחזירה רשימה משולבת. הוא מטפל בעדכונים לפי מזהה ההודעה, ובאופן ברירת מחדל הוא פועל בשיטת 'הוספה בלבד' להודעות חדשות שלא נראו.
from typing import Annotated,Sequence, TypedDict

from langchain_core.messages import BaseMessage
from langgraph.graph.message import add_messages  # helper function to add messages to the state

class AgentState(TypedDict):
    """The state of the agent."""
    messages: Annotated[Sequence[BaseMessage], add_messages]
    number_of_steps: int
בשלב הבא, מגדירים את כלי מזג האוויר.
from langchain_core.tools import tool
from geopy.geocoders import Nominatim
from pydantic import BaseModel, Field
import requests

geolocator = Nominatim(user_agent="weather-app")

class SearchInput(BaseModel):
    location:str = Field(description="The city and state, e.g., San Francisco")
    date:str = Field(description="the forecasting date for when to get the weather format (yyyy-mm-dd)")

@tool("get_weather_forecast", args_schema=SearchInput, return_direct=True)
def get_weather_forecast(location: str, date: str):
    """Retrieves the weather using Open-Meteo API.

    Takes a given location (city) and a date (yyyy-mm-dd).

    Returns:
        A dict with the time and temperature for each hour.
    """
    # Note that Colab may experience rate limiting on this service. If this
    # happens, use a machine to which you have exclusive access.
    location = geolocator.geocode(location)
    if location:
        try:
            response = requests.get(f"https://api.open-meteo.com/v1/forecast?latitude={location.latitude}&longitude={location.longitude}&hourly=temperature_2m&start_date={date}&end_date={date}")
            data = response.json()
            return dict(zip(data["hourly"]["time"], data["hourly"]["temperature_2m"]))
        except Exception as e:
            return {"error": str(e)}
    else:
        return {"error": "Location not found"}

tools = [get_weather_forecast]
עכשיו מאתחלים את המודל ומקשרים את הכלים למודל.
from datetime import datetime
from langchain_google_genai import ChatGoogleGenerativeAI

# Create LLM class
llm = ChatGoogleGenerativeAI(
    model= "gemini-3.5-flash",
    temperature=1.0,
    max_retries=2,
    google_api_key=api_key,
)

# Bind tools to the model
model = llm.bind_tools([get_weather_forecast])

# Test the model with tools
res=model.invoke(f"What is the weather in Berlin on {datetime.today()}?")

print(res)
השלב האחרון לפני הפעלת הסוכן הוא הגדרת הצמתים והקצוות. בדוגמה הזו יש שני צמתים וקצה אחד.
-
call_toolnode שמבצע את שיטת הכלי. ל-LangGraph יש צומת מובנה מראש בשביל זה שנקרא ToolNode. -
call_modelשמשתמש בצומתmodel_with_toolsכדי להפעיל את המודל. should_continueedge שמחליט אם להתקשר לכלי או למודל.
מספר הצמתים והקצוות לא קבוע. אתם יכולים להוסיף לגרף כמה צמתים וקשתות שתרצו. לדוגמה, אפשר להוסיף צומת להוספת פלט מובנה או צומת לאימות עצמי או לרפלקציה כדי לבדוק את פלט המודל לפני שמפעילים את הכלי או המודל.
from langchain_core.messages import ToolMessage
from langchain_core.runnables import RunnableConfig

tools_by_name = {tool.name: tool for tool in tools}

# Define our tool node
def call_tool(state: AgentState):
    outputs = []
    # Iterate over the tool calls in the last message
    for tool_call in state["messages"][-1].tool_calls:
        # Get the tool by name
        tool_result = tools_by_name[tool_call["name"]].invoke(tool_call["args"])
        outputs.append(
            ToolMessage(
                content=tool_result,
                name=tool_call["name"],
                tool_call_id=tool_call["id"],
            )
        )
    return {"messages": outputs}

def call_model(
    state: AgentState,
    config: RunnableConfig,
):
    # Invoke the model with the system prompt and the messages
    response = model.invoke(state["messages"], config)
    # This returns a list, which combines with the existing messages state
    # using the add_messages reducer.
    return {"messages": [response]}

# Define the conditional edge that determines whether to continue or not
def should_continue(state: AgentState):
    messages = state["messages"]
    # If the last message is not a tool call, then finish
    if not messages[-1].tool_calls:
        return "end"
    # default to continue
    return "continue"
אחרי שכל רכיבי הסוכן מוכנים, אפשר להרכיב אותם.
from langgraph.graph import StateGraph, END

# Define a new graph with our state
workflow = StateGraph(AgentState)

# 1. Add the nodes
workflow.add_node("llm", call_model)
workflow.add_node("tools",  call_tool)
# 2. Set the entrypoint as `agent`, this is the first node called
workflow.set_entry_point("llm")
# 3. Add a conditional edge after the `llm` node is called.
workflow.add_conditional_edges(
    # Edge is used after the `llm` node is called.
    "llm",
    # The function that will determine which node is called next.
    should_continue,
    # Mapping for where to go next, keys are strings from the function return,
    # and the values are other nodes.
    # END is a special node marking that the graph is finish.
    {
        # If `tools`, then we call the tool node.
        "continue": "tools",
        # Otherwise we finish.
        "end": END,
    },
)
# 4. Add a normal edge after `tools` is called, `llm` node is called next.
workflow.add_edge("tools", "llm")

# Now we can compile and visualize our graph
graph = workflow.compile()
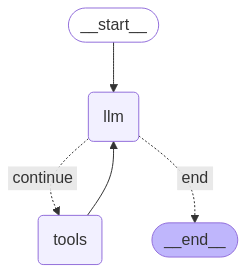
אפשר להמחיש את הגרף באמצעות ה-method draw_mermaid_png.
from IPython.display import Image, display

display(Image(graph.get_graph().draw_mermaid_png()))
עכשיו מפעילים את הסוכן.
from datetime import datetime
# Create our initial message dictionary
inputs = {"messages": [("user", f"What is the weather in Berlin on {datetime.today()}?")]}

# call our graph with streaming to see the steps
for state in graph.stream(inputs, stream_mode="values"):
    last_message = state["messages"][-1]
    last_message.pretty_print()
עכשיו אפשר להמשיך את השיחה, לשאול מה מזג האוויר בעיר אחרת או לבקש השוואה.
state["messages"].append(("user", "Would it be warmer in Munich?"))

for state in graph.stream(state, stream_mode="values"):
    last_message = state["messages"][-1]
    last_message.pretty_print()