LangGraph はステートフルな LLM アプリケーションを構築するためのフレームワークであり、ReAct(推論と行動)エージェントの構築に適しています。
ReAct エージェントは、LLM の推論とアクションの実行を組み合わせます。ユーザーの目標を達成するために、反復的に思考し、ツールを使用し、観察に基づいて行動し、アプローチを動的に適応させます。「"ReAct: Synergizing Reasoning and Acting in Language Models"」(2023 年)で紹介されたこのパターンは、厳格なワークフローではなく、人間のような柔軟な問題解決を反映しようとしています。
LangGraph には、ReAct エージェント(
create_react_agent)が組み込まれています。これは、ReAct 実装の制御とカスタマイズを強化する必要がある場合に役立ちます。このガイドでは、簡略化されたバージョンを示します。
LangGraph は、次の 3 つの主要なコンポーネントを使用してエージェントをグラフとしてモデル化します。
State: アプリケーションの現在のスナップショットを表す共有データ構造(通常はTypedDictまたはPydantic BaseModel)。Nodes: エージェントのロジックをエンコードします。現在の State を入力として受け取り、計算または副作用を実行して、更新された State(LLM 呼び出しやツール呼び出しなど)を返します。Edges: 現在のStateに基づいて実行する次のNodeを定義し、条件付きロジックと固定遷移を可能にします。
API キーをまだ取得していない場合は、Google AI Studio から取得できます。
pip install langgraph langchain-google-genai geopy requests
環境変数 GEMINI_API_KEY に API キーを設定します。
import os

# Read your API key from the environment variable or set it manually
api_key = os.getenv("GEMINI_API_KEY")
LangGraph を使用して ReAct エージェントを実装する方法をよりよく理解するために、このガイドでは実践的な例を紹介します。ツールを使用して、指定された場所の現在の天気を調べるエージェントを作成します。
この天気エージェントでは、State は継続的な会話履歴(メッセージのリストとして)と、実行されたステップ数のカウンタ(整数として)を保持します。これは説明のためのものです。
LangGraph には、状態メッセージ リストを更新するためのヘルパー関数 add_messages が用意されています。これはリデューサーとして機能し、
現在のリストと新しいメッセージを受け取り、結合されたリストを返します。メッセージ ID で更新を処理し、新しい未確認のメッセージに対してはデフォルトで「追加のみ」の動作になります。
from typing import Annotated,Sequence, TypedDict

from langchain_core.messages import BaseMessage
from langgraph.graph.message import add_messages  # helper function to add messages to the state

class AgentState(TypedDict):
    """The state of the agent."""
    messages: Annotated[Sequence[BaseMessage], add_messages]
    number_of_steps: int
次に、天気ツールを定義します。
from langchain_core.tools import tool
from geopy.geocoders import Nominatim
from pydantic import BaseModel, Field
import requests

geolocator = Nominatim(user_agent="weather-app")

class SearchInput(BaseModel):
    location:str = Field(description="The city and state, e.g., San Francisco")
    date:str = Field(description="the forecasting date for when to get the weather format (yyyy-mm-dd)")

@tool("get_weather_forecast", args_schema=SearchInput, return_direct=True)
def get_weather_forecast(location: str, date: str):
    """Retrieves the weather using Open-Meteo API.

    Takes a given location (city) and a date (yyyy-mm-dd).

    Returns:
        A dict with the time and temperature for each hour.
    """
    # Note that Colab may experience rate limiting on this service. If this
    # happens, use a machine to which you have exclusive access.
    location = geolocator.geocode(location)
    if location:
        try:
            response = requests.get(f"https://api.open-meteo.com/v1/forecast?latitude={location.latitude}&longitude={location.longitude}&hourly=temperature_2m&start_date={date}&end_date={date}")
            data = response.json()
            return dict(zip(data["hourly"]["time"], data["hourly"]["temperature_2m"]))
        except Exception as e:
            return {"error": str(e)}
    else:
        return {"error": "Location not found"}

tools = [get_weather_forecast]
次に、モデルを初期化し、ツールをモデルにバインドします。
from datetime import datetime
from langchain_google_genai import ChatGoogleGenerativeAI

# Create LLM class
llm = ChatGoogleGenerativeAI(
    model= "gemini-3.5-flash",
    temperature=1.0,
    max_retries=2,
    google_api_key=api_key,
)

# Bind tools to the model
model = llm.bind_tools([get_weather_forecast])

# Test the model with tools
res=model.invoke(f"What is the weather in Berlin on {datetime.today()}?")

print(res)
エージェントを実行する前の最後のステップは、ノードとエッジを定義することです。 この例では、2 つのノードと 1 つのエッジがあります。
- ツールメソッドを実行する
call_toolノード。ToolNode model_with_toolsを使用してモデルを呼び出すcall_modelノード。- ツールを呼び出すかモデルを呼び出すかを決定する
should_continueエッジ。
ノードとエッジの数は固定されていません。グラフには必要な数のノードとエッジを追加できます。たとえば、構造化された出力を追加するノードや、ツールまたはモデルを呼び出す前にモデルの出力を確認する自己検証/反射ノードを追加できます。
from langchain_core.messages import ToolMessage
from langchain_core.runnables import RunnableConfig

tools_by_name = {tool.name: tool for tool in tools}

# Define our tool node
def call_tool(state: AgentState):
    outputs = []
    # Iterate over the tool calls in the last message
    for tool_call in state["messages"][-1].tool_calls:
        # Get the tool by name
        tool_result = tools_by_name[tool_call["name"]].invoke(tool_call["args"])
        outputs.append(
            ToolMessage(
                content=tool_result,
                name=tool_call["name"],
                tool_call_id=tool_call["id"],
            )
        )
    return {"messages": outputs}

def call_model(
    state: AgentState,
    config: RunnableConfig,
):
    # Invoke the model with the system prompt and the messages
    response = model.invoke(state["messages"], config)
    # This returns a list, which combines with the existing messages state
    # using the add_messages reducer.
    return {"messages": [response]}

# Define the conditional edge that determines whether to continue or not
def should_continue(state: AgentState):
    messages = state["messages"]
    # If the last message is not a tool call, then finish
    if not messages[-1].tool_calls:
        return "end"
    # default to continue
    return "continue"
エージェントのすべてのコンポーネントが準備できたので、組み立てることができます。
from langgraph.graph import StateGraph, END

# Define a new graph with our state
workflow = StateGraph(AgentState)

# 1. Add the nodes
workflow.add_node("llm", call_model)
workflow.add_node("tools",  call_tool)
# 2. Set the entrypoint as `agent`, this is the first node called
workflow.set_entry_point("llm")
# 3. Add a conditional edge after the `llm` node is called.
workflow.add_conditional_edges(
    # Edge is used after the `llm` node is called.
    "llm",
    # The function that will determine which node is called next.
    should_continue,
    # Mapping for where to go next, keys are strings from the function return,
    # and the values are other nodes.
    # END is a special node marking that the graph is finish.
    {
        # If `tools`, then we call the tool node.
        "continue": "tools",
        # Otherwise we finish.
        "end": END,
    },
)
# 4. Add a normal edge after `tools` is called, `llm` node is called next.
workflow.add_edge("tools", "llm")

# Now we can compile and visualize our graph
graph = workflow.compile()
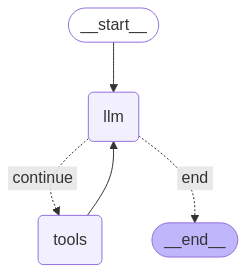
draw_mermaid_png メソッドを使用してグラフを可視化できます。
from IPython.display import Image, display

display(Image(graph.get_graph().draw_mermaid_png()))
エージェントを実行します。
from datetime import datetime
# Create our initial message dictionary
inputs = {"messages": [("user", f"What is the weather in Berlin on {datetime.today()}?")]}

# call our graph with streaming to see the steps
for state in graph.stream(inputs, stream_mode="values"):
    last_message = state["messages"][-1]
    last_message.pretty_print()
会話を続けたり、別の都市の天気を尋ねたり、比較をリクエストしたりできます。
state["messages"].append(("user", "Would it be warmer in Munich?"))

for state in graph.stream(state, stream_mode="values"):
    last_message = state["messages"][-1]
    last_message.pretty_print()