LangGraph เป็นเฟรมเวิร์กสำหรับการสร้างแอปพลิเคชัน LLM ที่มีสถานะ จึงเหมาะสําหรับการสร้างตัวแทน ReAct (การหาเหตุผลและการดําเนินการ)
ตัวแทน ReAct จะรวมการหาเหตุผลของ LLM เข้ากับการดำเนินการ โดยจะคิด ใช้เครื่องมือ และดําเนินการตามสิ่งที่สังเกตเห็นซ้ำๆ เพื่อให้บรรลุเป้าหมายของผู้ใช้ โดยปรับแนวทางแบบไดนามิก รูปแบบนี้เปิดตัวใน "ReAct: Synergizing Reasoning and Acting in Language Models" (2023) โดยพยายามเลียนแบบการแก้ปัญหาที่ยืดหยุ่นและเหมือนมนุษย์แทนเวิร์กโฟลว์ที่เข้มงวด
แม้ว่า LangGraph จะมีตัวแทน ReAct ที่สร้างขึ้นล่วงหน้า (create_react_agent) แต่เครื่องมือนี้โดดเด่นเมื่อคุณต้องการการควบคุมและการปรับแต่งเพิ่มเติมสําหรับการติดตั้งใช้งาน ReAct
LangGraph จำลองเอเจนซีเป็นกราฟโดยใช้คอมโพเนนต์หลัก 3 อย่าง ได้แก่
State: โครงสร้างข้อมูลที่แชร์ (โดยทั่วไปคือTypedDictหรือPydantic BaseModel) ที่แสดงภาพรวมปัจจุบันของแอปพลิเคชันNodes: เข้ารหัสตรรกะของตัวแทน โดยรับสถานะปัจจุบันเป็นอินพุต ดำเนินการคํานวณหรือผลข้างเคียงบางอย่าง และแสดงสถานะที่อัปเดต เช่น การเรียก LLM หรือการเรียกใช้เครื่องมือEdges: กําหนดNodeถัดไปที่จะเรียกใช้โดยอิงตามStateปัจจุบัน ซึ่งช่วยให้ใช้ตรรกะแบบมีเงื่อนไขและการเปลี่ยนแบบคงที่ได้
หากยังไม่มีคีย์ API คุณขอรับคีย์ได้ฟรีที่ Google AI Studio
pip install langgraph langchain-google-genai geopy requests
ตั้งค่าคีย์ API ในตัวแปรสภาพแวดล้อม GEMINI_API_KEY
import os

# Read your API key from the environment variable or set it manually
api_key = os.getenv("GEMINI_API_KEY")
ลองมาดูตัวอย่างการใช้งานจริงเพื่อให้เข้าใจวิธีติดตั้งใช้งานตัวแทน ReAct โดยใช้ LangGraph มากขึ้น คุณจะได้สร้างเอเจนต์ง่ายๆ ที่มีเป้าหมายเพื่อใช้เครื่องมือค้นหาสภาพอากาศปัจจุบันของสถานที่ที่ระบุ
สําหรับตัวแทนสภาพอากาศนี้ State จะต้องเก็บรักษาประวัติการสนทนาต่อเนื่อง (เป็นรายการข้อความ) และตัวนับจํานวนขั้นตอนที่ดําเนินการเพื่อแสดงการจัดการสถานะเพิ่มเติม
LangGraph มีตัวช่วยที่สะดวก add_messages สำหรับอัปเดตรายการข้อความในสถานะ ซึ่งทํางานเป็น reducer ซึ่งหมายความว่าจะนํารายการปัจจุบันและข้อความใหม่มารวมกัน แล้วแสดงผลรายการที่รวม โดยจะจัดการการอัปเดตตามรหัสข้อความอย่างชาญฉลาดและตั้งค่าเริ่มต้นเป็นลักษณะการทํางานแบบ "ต่อท้ายเท่านั้น" สําหรับข้อความใหม่ที่ไม่ซ้ำกัน
from typing import Annotated,Sequence, TypedDict

from langchain_core.messages import BaseMessage
from langgraph.graph.message import add_messages # helper function to add messages to the state


class AgentState(TypedDict):
    """The state of the agent."""
    messages: Annotated[Sequence[BaseMessage], add_messages]
    number_of_steps: int
ต่อไป ให้กำหนดเครื่องมือสภาพอากาศ
from langchain_core.tools import tool
from geopy.geocoders import Nominatim
from pydantic import BaseModel, Field
import requests

geolocator = Nominatim(user_agent="weather-app")

class SearchInput(BaseModel):
    location:str = Field(description="The city and state, e.g., San Francisco")
    date:str = Field(description="the forecasting date for when to get the weather format (yyyy-mm-dd)")

@tool("get_weather_forecast", args_schema=SearchInput, return_direct=True)
def get_weather_forecast(location: str, date: str):
    """Retrieves the weather using Open-Meteo API for a given location (city) and a date (yyyy-mm-dd). Returns a list dictionary with the time and temperature for each hour."""
    location = geolocator.geocode(location)
    if location:
        try:
            response = requests.get(f"https://api.open-meteo.com/v1/forecast?latitude={location.latitude}&longitude={location.longitude}&hourly=temperature_2m&start_date={date}&end_date={date}")
            data = response.json()
            return {time: temp for time, temp in zip(data["hourly"]["time"], data["hourly"]["temperature_2m"])}
        except Exception as e:
            return {"error": str(e)}
    else:
        return {"error": "Location not found"}

tools = [get_weather_forecast]
ถัดไป ให้เริ่มต้นโมเดลและเชื่อมโยงเครื่องมือกับโมเดล
from datetime import datetime
from langchain_google_genai import ChatGoogleGenerativeAI

# Create LLM class
llm = ChatGoogleGenerativeAI(
    model= "gemini-2.5-pro",
    temperature=1.0,
    max_retries=2,
    google_api_key=api_key,
)

# Bind tools to the model
model = llm.bind_tools([get_weather_forecast])

# Test the model with tools
res=model.invoke(f"What is the weather in Berlin on {datetime.today()}?")

print(res)
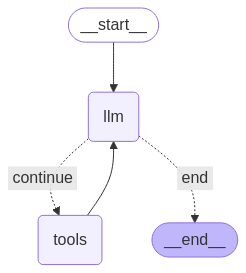
ขั้นตอนสุดท้ายก่อนเรียกใช้ตัวแทนคือการกําหนดโหนดและขอบ ในตัวอย่างนี้ คุณมีโหนด 2 รายการและขอบ 1 รายการ
- โหนด call_tool ที่เรียกใช้เมธอดเครื่องมือ LangGraph มีโหนดที่สร้างไว้ล่วงหน้าสําหรับกรณีนี้ที่เรียกว่า ToolNode
- โหนด call_model ที่ใช้ model_with_tools เพื่อเรียกใช้โมเดล
- should_continue edge ที่ตัดสินใจว่าจะเรียกใช้เครื่องมือหรือโมเดล
จํานวนโหนดและขอบจะไม่จํากัด คุณเพิ่มโหนดและขอบลงในกราฟได้เท่าที่ต้องการ เช่น คุณอาจเพิ่มโหนดสําหรับเพิ่มเอาต์พุตที่มีโครงสร้างหรือโหนดการยืนยันด้วยตนเอง/การสะท้อนกลับเพื่อตรวจสอบเอาต์พุตของโมเดลก่อนเรียกใช้เครื่องมือหรือโมเดล
from langchain_core.messages import ToolMessage
from langchain_core.runnables import RunnableConfig

tools_by_name = {tool.name: tool for tool in tools}

# Define our tool node
def call_tool(state: AgentState):
    outputs = []
    # Iterate over the tool calls in the last message
    for tool_call in state["messages"][-1].tool_calls:
        # Get the tool by name
        tool_result = tools_by_name[tool_call["name"]].invoke(tool_call["args"])
        outputs.append(
            ToolMessage(
                content=tool_result,
                name=tool_call["name"],
                tool_call_id=tool_call["id"],
            )
        )
    return {"messages": outputs}

def call_model(
    state: AgentState,
    config: RunnableConfig,
):
    # Invoke the model with the system prompt and the messages
    response = model.invoke(state["messages"], config)
    # We return a list, because this will get added to the existing messages state using the add_messages reducer
    return {"messages": [response]}


# Define the conditional edge that determines whether to continue or not
def should_continue(state: AgentState):
    messages = state["messages"]
    # If the last message is not a tool call, then we finish
    if not messages[-1].tool_calls:
        return "end"
    # default to continue
    return "continue"
ตอนนี้คุณก็มีคอมโพเนนต์ทั้งหมดในการสร้างตัวแทนแล้ว มารวมข้อมูลกัน
from langgraph.graph import StateGraph, END

# Define a new graph with our state
workflow = StateGraph(AgentState)

# 1. Add our nodes
workflow.add_node("llm", call_model)
workflow.add_node("tools",  call_tool)
# 2. Set the entrypoint as `agent`, this is the first node called
workflow.set_entry_point("llm")
# 3. Add a conditional edge after the `llm` node is called.
workflow.add_conditional_edges(
    # Edge is used after the `llm` node is called.
    "llm",
    # The function that will determine which node is called next.
    should_continue,
    # Mapping for where to go next, keys are strings from the function return, and the values are other nodes.
    # END is a special node marking that the graph is finish.
    {
        # If `tools`, then we call the tool node.
        "continue": "tools",
        # Otherwise we finish.
        "end": END,
    },
)
# 4. Add a normal edge after `tools` is called, `llm` node is called next.
workflow.add_edge("tools", "llm")

# Now we can compile and visualize our graph
graph = workflow.compile()
คุณสามารถแสดงภาพกราฟได้โดยใช้เมธอด draw_mermaid_png
from IPython.display import Image, display

display(Image(graph.get_graph().draw_mermaid_png()))

มาเรียกใช้ Agent กัน
from datetime import datetime
# Create our initial message dictionary
inputs = {"messages": [("user", f"What is the weather in Berlin on {datetime.today()}?")]}

# call our graph with streaming to see the steps
for state in graph.stream(inputs, stream_mode="values"):
    last_message = state["messages"][-1]
    last_message.pretty_print()
ตอนนี้คุณสนทนาต่อได้ เช่น ถามสภาพอากาศในเมืองอื่นหรือให้เปรียบเทียบสภาพอากาศ
state["messages"].append(("user", "Would it be in Munich warmer?"))

for state in graph.stream(state, stream_mode="values"):
    last_message = state["messages"][-1]
    last_message.pretty_print()
